

Find sessions in the sidebar
The sidebar organizes sessions by project, and each session appears in only one place:- Pinned: Sessions you pinned.
- Cloud projects and Local projects: Each project lists its sessions below it.
- Recents: Sessions not in any project, sorted by most recent activity.
⇧Esc (Windows: Shift+Esc) to mark all unread sessions as read.
To search by title or project name, click the magnifying glass at the top of the sidebar, or press ⌘K (Windows: Ctrl+K).
The session menu has most of the actions described below. Hover over a session and click … to open it. In the desktop app you can also right-click, and on mobile web you can long-press a session. The … in the session page’s top bar is the same menu.
Pin and sort
- Pin a session: Choose Pin in the session menu, or press
⌥⌘P(Windows:Ctrl+Alt+P). - Reorder projects: Drag a project to a new position. You can only reorder within the same section, and pinned projects always come first. You can also pin projects from the project menu.
- Change the layout: Hover over the Cloud projects heading and click … › Organize sidebar on the right to switch between By project and In one list. In one list puts all sessions in a single list, with each row showing its project.
Rename
A new session’s title is generated automatically after the agent’s first reply and doesn’t change automatically after that. To change the title, click the title in the session page’s top bar to edit it directly, or choose Rename in the session menu (⌥⌘R, Windows: Ctrl+Alt+R). Titles can be up to 80 characters.
Move to a project
Drag a session onto a project in the sidebar, or choose Move to project… in the session menu and select a project.- Move a session that isn’t in a project into a project: Later messages run in that project. Files in the previous temporary working directory don’t come along. This step requires confirmation, can’t be undone, and isn’t available while the session is running.
- Move between projects, or back to Recents: Only changes where it’s listed in the sidebar. The session keeps running in the original project’s directory and branch. You can undo this.
- You can’t move sessions between cloud projects and local projects. Child sessions move together with their parent session.
Archive and restore
Archiving removes sessions you’re not using from the sidebar while keeping their full records.1
Archive
Choose Archive in the session menu, or press
⇧⌘A (Windows: Ctrl+Shift+A). Click Undo before the notice disappears to reverse it immediately. To archive all sessions in a project, choose Archive chats in the project menu.2
Find archived sessions
Open Settings › Workspace › Archived chats. The most recently archived appear first. Click a title to view the full record.
3
Restore
Click Restore on that row, and the session returns to the sidebar.
Delete a session
Choose Delete permanently in the session menu or in Archived chats, then confirm. You can’t delete a session while it’s running, queued, or waiting for your approval. Stop it or wait for it to finish first, or archive it instead.Export and import
- Export: Choose Export as .cshare in the session menu. The session package downloads to your computer, and you can import it on another account or device.
- Import a .cshare file: Open Settings › Integrations › Import sessions, click Import from .cshare file, preview and select sessions, then click Import. Session packages exported from Claude Code, Codex, and AIHubMix are supported, up to 50 MB per file. Imported sessions appear under Recents in the sidebar, and the import continues in the background if you leave the page.
- Import sessions from this computer: The same page lists Claude Code and Codex sessions on this computer. Select them and click Import. Sessions whose working directory matches a local project go directly into that project, and the rest go to Recents. Sensitive information is removed on your computer before import. Each session can be up to 50 MB, and there’s a daily limit on the number of imports.
Importing sessions from this computer is available only in the desktop app. The web app can import .cshare files.
View several sessions at once in split view
Split view shows several sessions in the session area at the same time. You can send messages and handle approvals in each pane separately.1
Turn on split view
Open a session, click Split view in the top bar, and choose 2, 4, or 6 panes. You can also drag another session from the sidebar into the session area, or hold
⌥ (Windows: Alt) and click a session in the sidebar.2
Fill in sessions
In an empty pane, click Drag a chat here or click to choose, or drag a session into it from the sidebar. You can keep dragging in more sessions after that.
3
Adjust and close
Drag a pane’s title onto another pane to swap their positions. Click the close button at the top right of a pane to close it. When only one session remains, split view exits automatically.
⇧⌘\ (Windows: Ctrl+Shift+\) to switch between single, 2, 4, and 6 panes. For other split view shortcuts, see Keyboard shortcuts.
Mobile web doesn’t support split view. When you reopen the app, the split view layout is restored on this device.
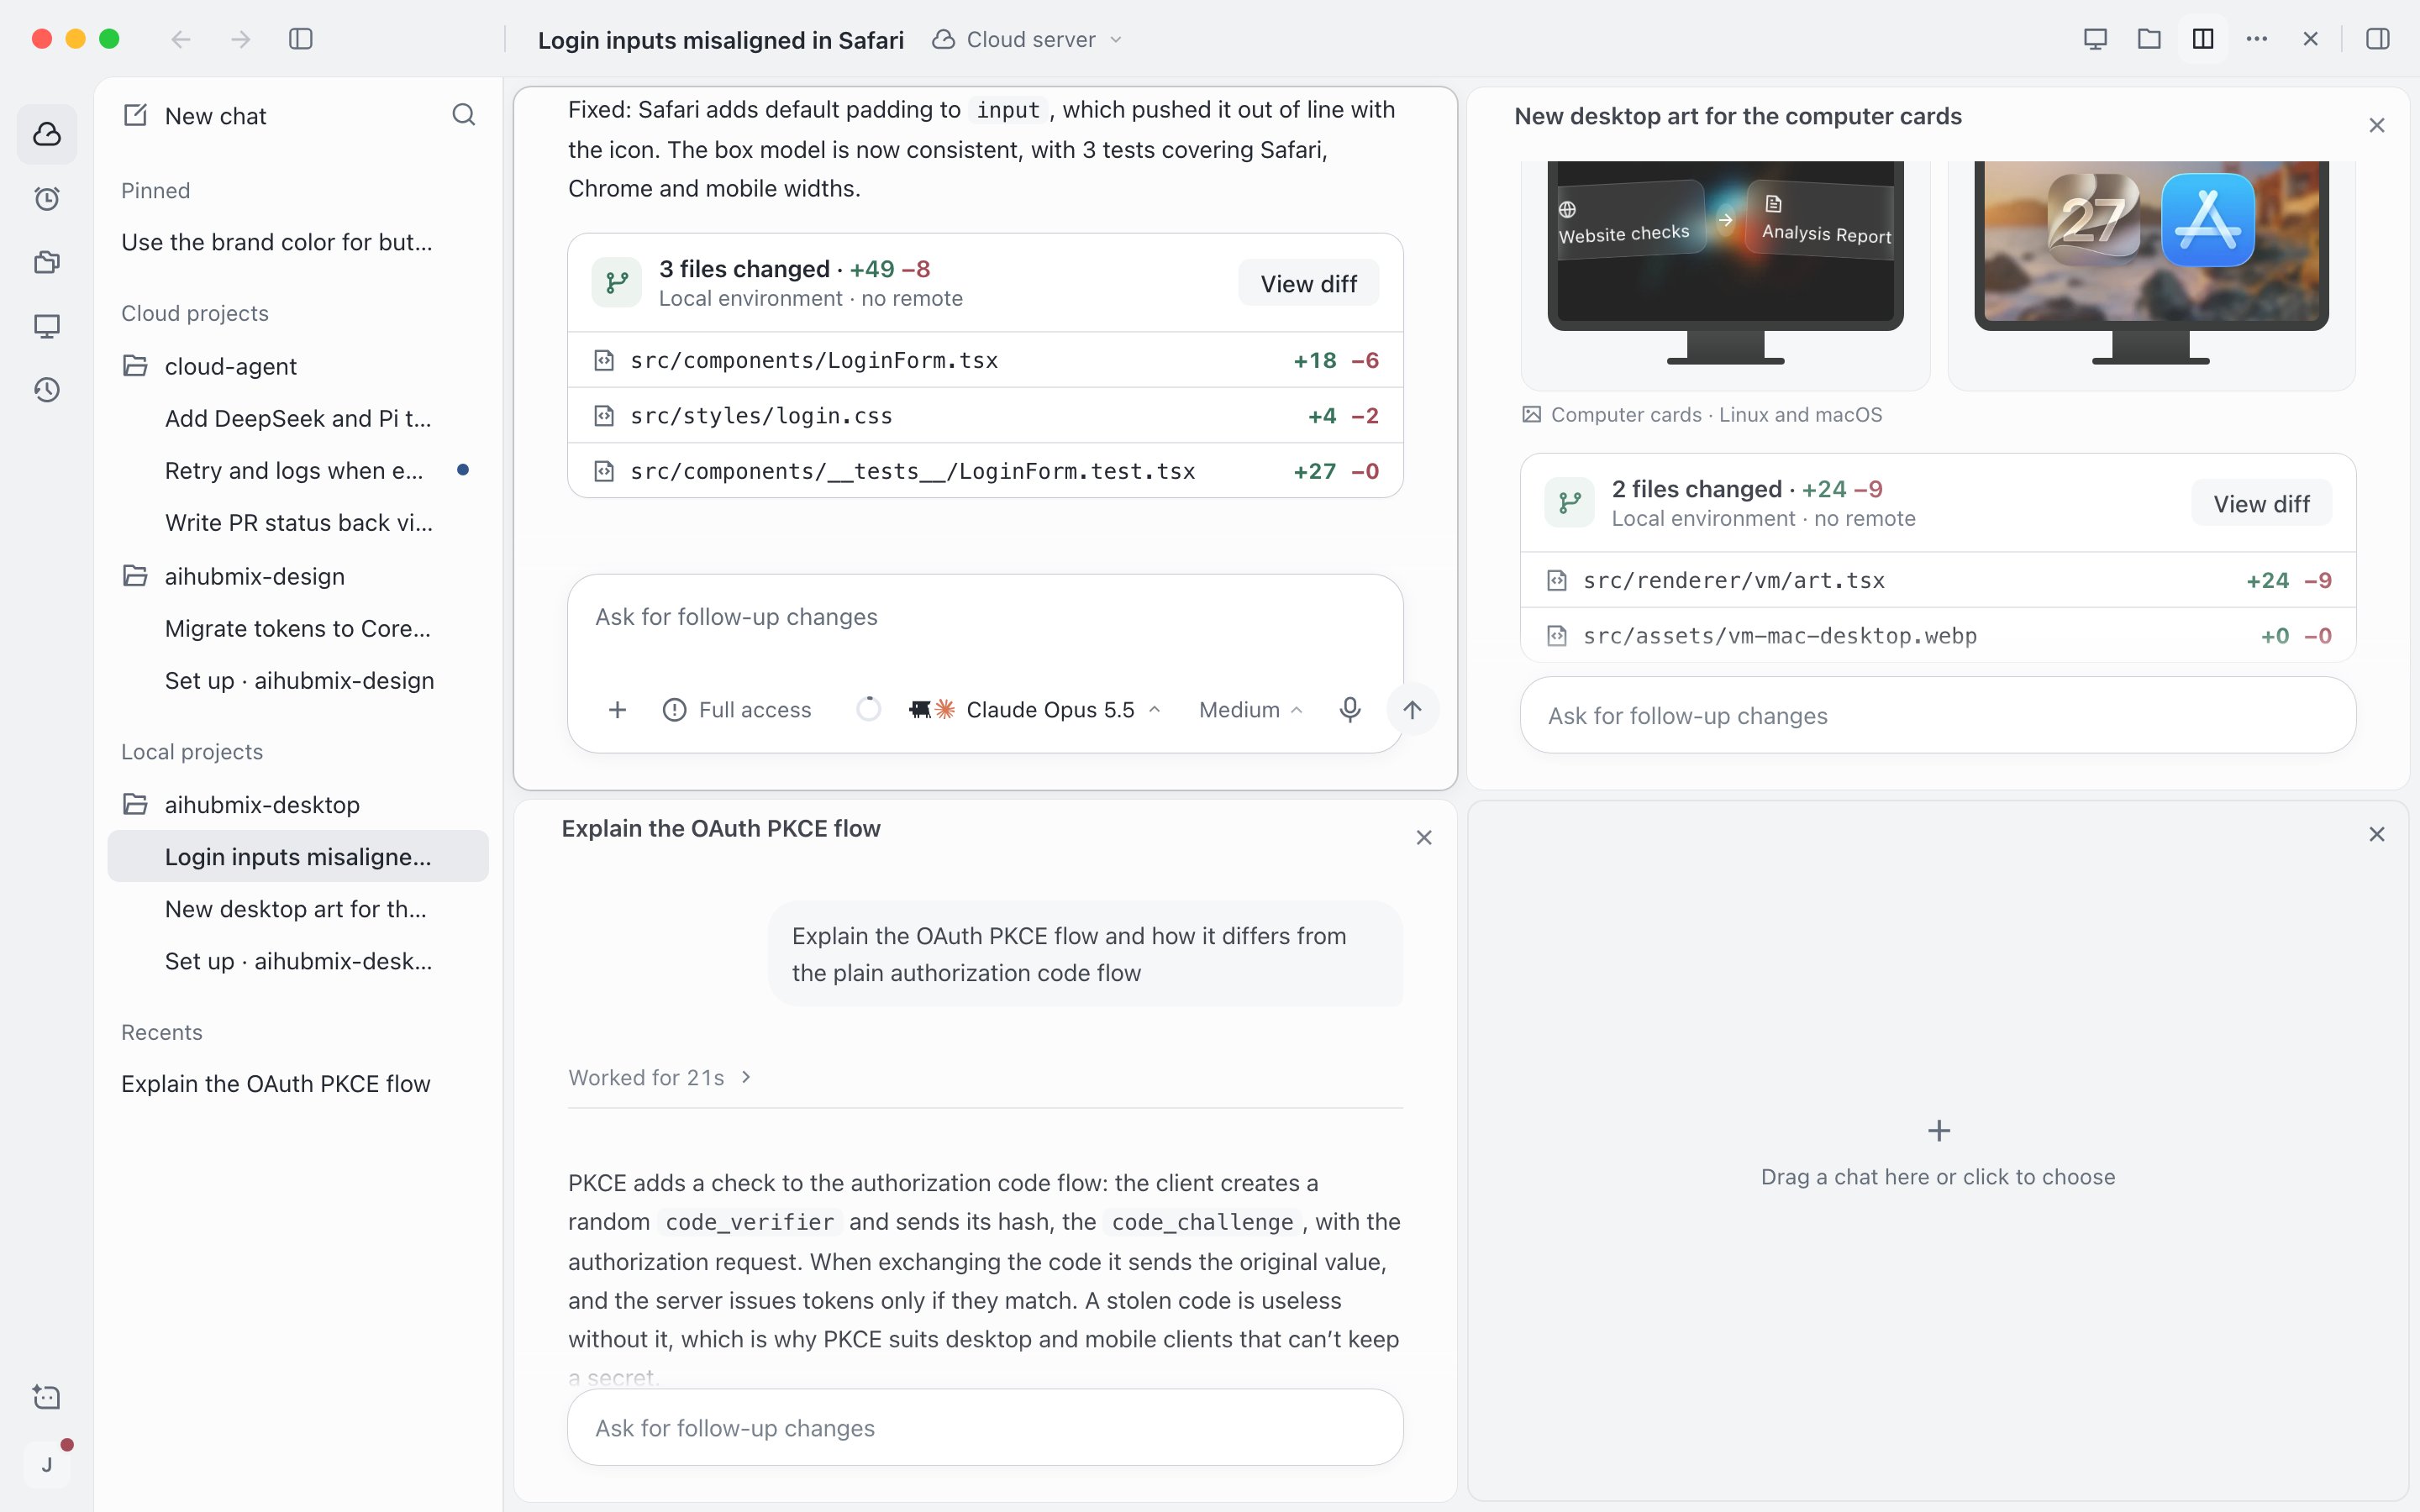
Four sessions in split view