> ## Documentation Index
> Fetch the complete documentation index at: https://docs.aihubmix.com/llms.txt
> Use this file to discover all available pages before exploring further.
# NoteGen
> NoteGen에 내장된 AIHubMix 모델 플랫폼으로 모델을 설정해 AI 채팅, 노트 정리, 글쓰기 보조, 지식 베이스 검색에 사용할 수 있습니다.
NoteGen은 로컬 우선 방식의 크로스 플랫폼 Markdown 앱으로, 흩어진 정보를 수집하고 AI를 활용해 명확한 노트로 정리할 수 있습니다. NoteGen에는 AIHubMix가 모델 플랫폼으로 내장되어 있습니다. API Key를 입력하고 모델을 추가하면 AIHubMix가 지원하는 모델을 사용할 수 있습니다.
다운로드: [NoteGen 공식 사이트](https://notegen.top/en/download)
준비 사항
* NoteGen을 설치하고 실행합니다. 이 가이드는 NoteGen `0.38.2` 데스크톱 앱을 기준으로 설명합니다.
* [AIHubMix 콘솔](https://aihubmix.com/token)에서 API Key를 만듭니다.
* 사용할 모델의 ID를 준비합니다(예: `gpt-5.6-terra`). 입력 오류를 방지하려면 [모델 목록](https://aihubmix.com/models)에서 모델 ID를 복사합니다.
1\. Model Services 열기
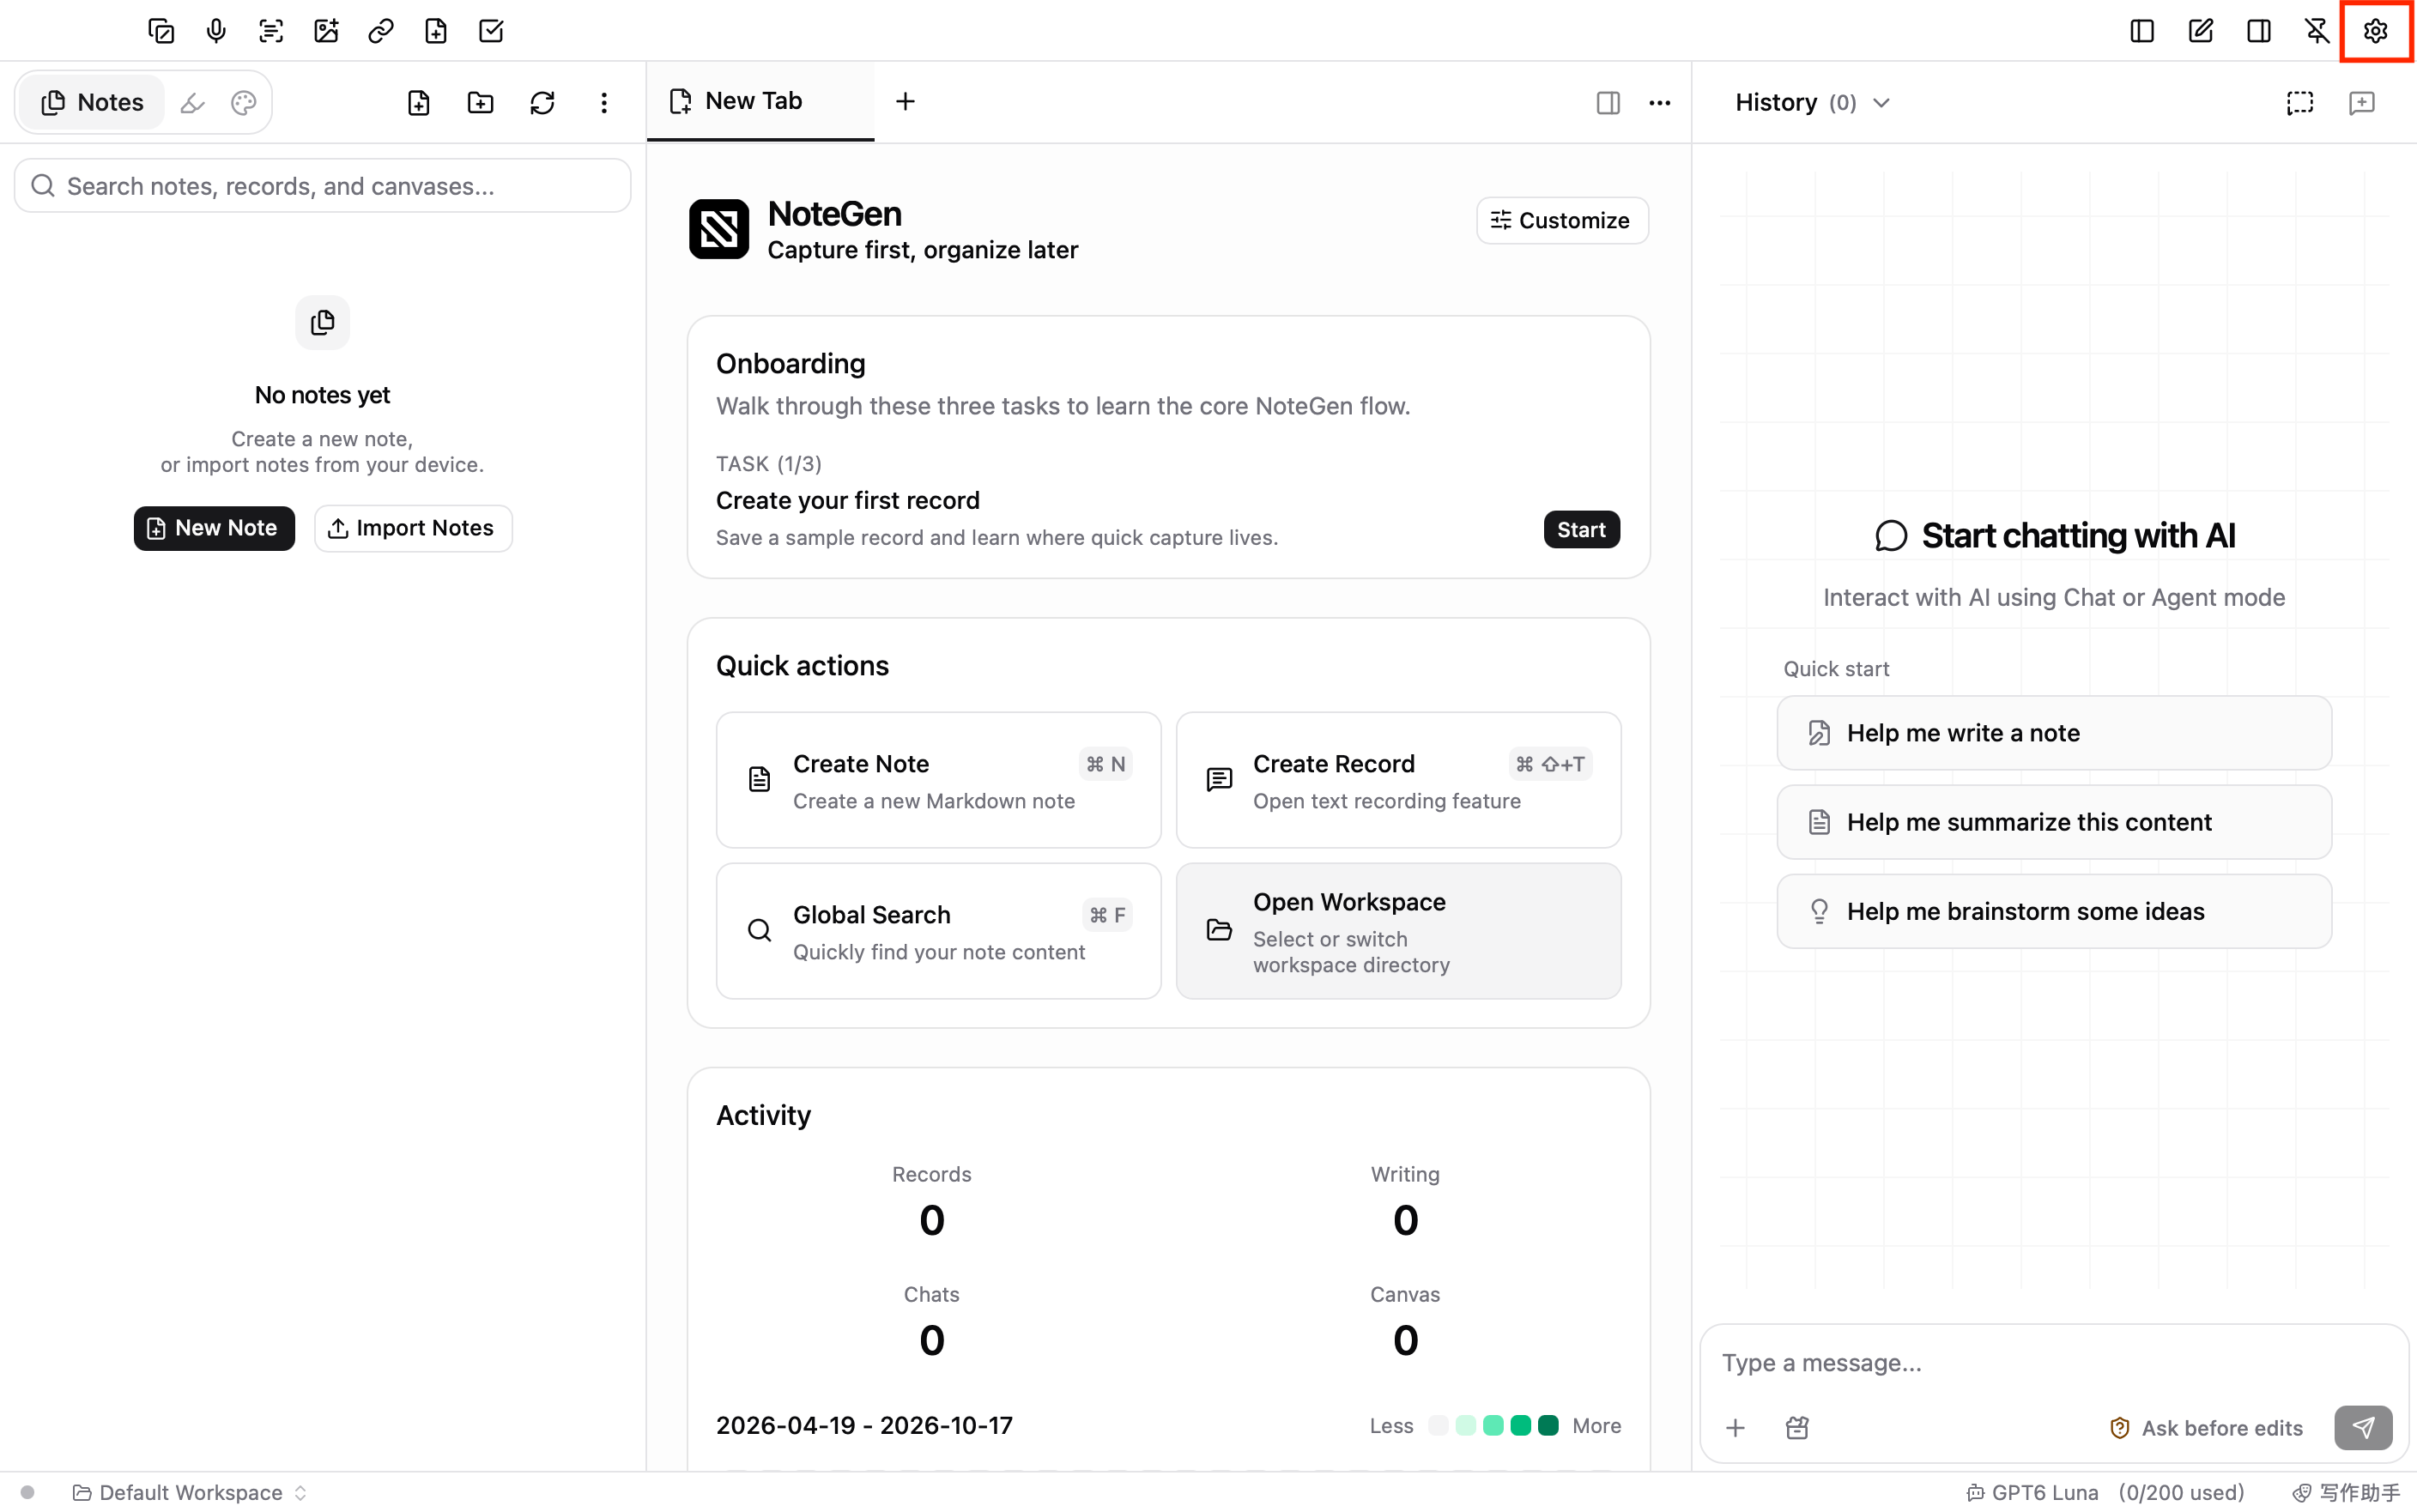
NoteGen 창 오른쪽 위의 설정 버튼을 클릭합니다. 설정 사이드바의 **AI** 그룹에서 **Model Services** 를 선택합니다.
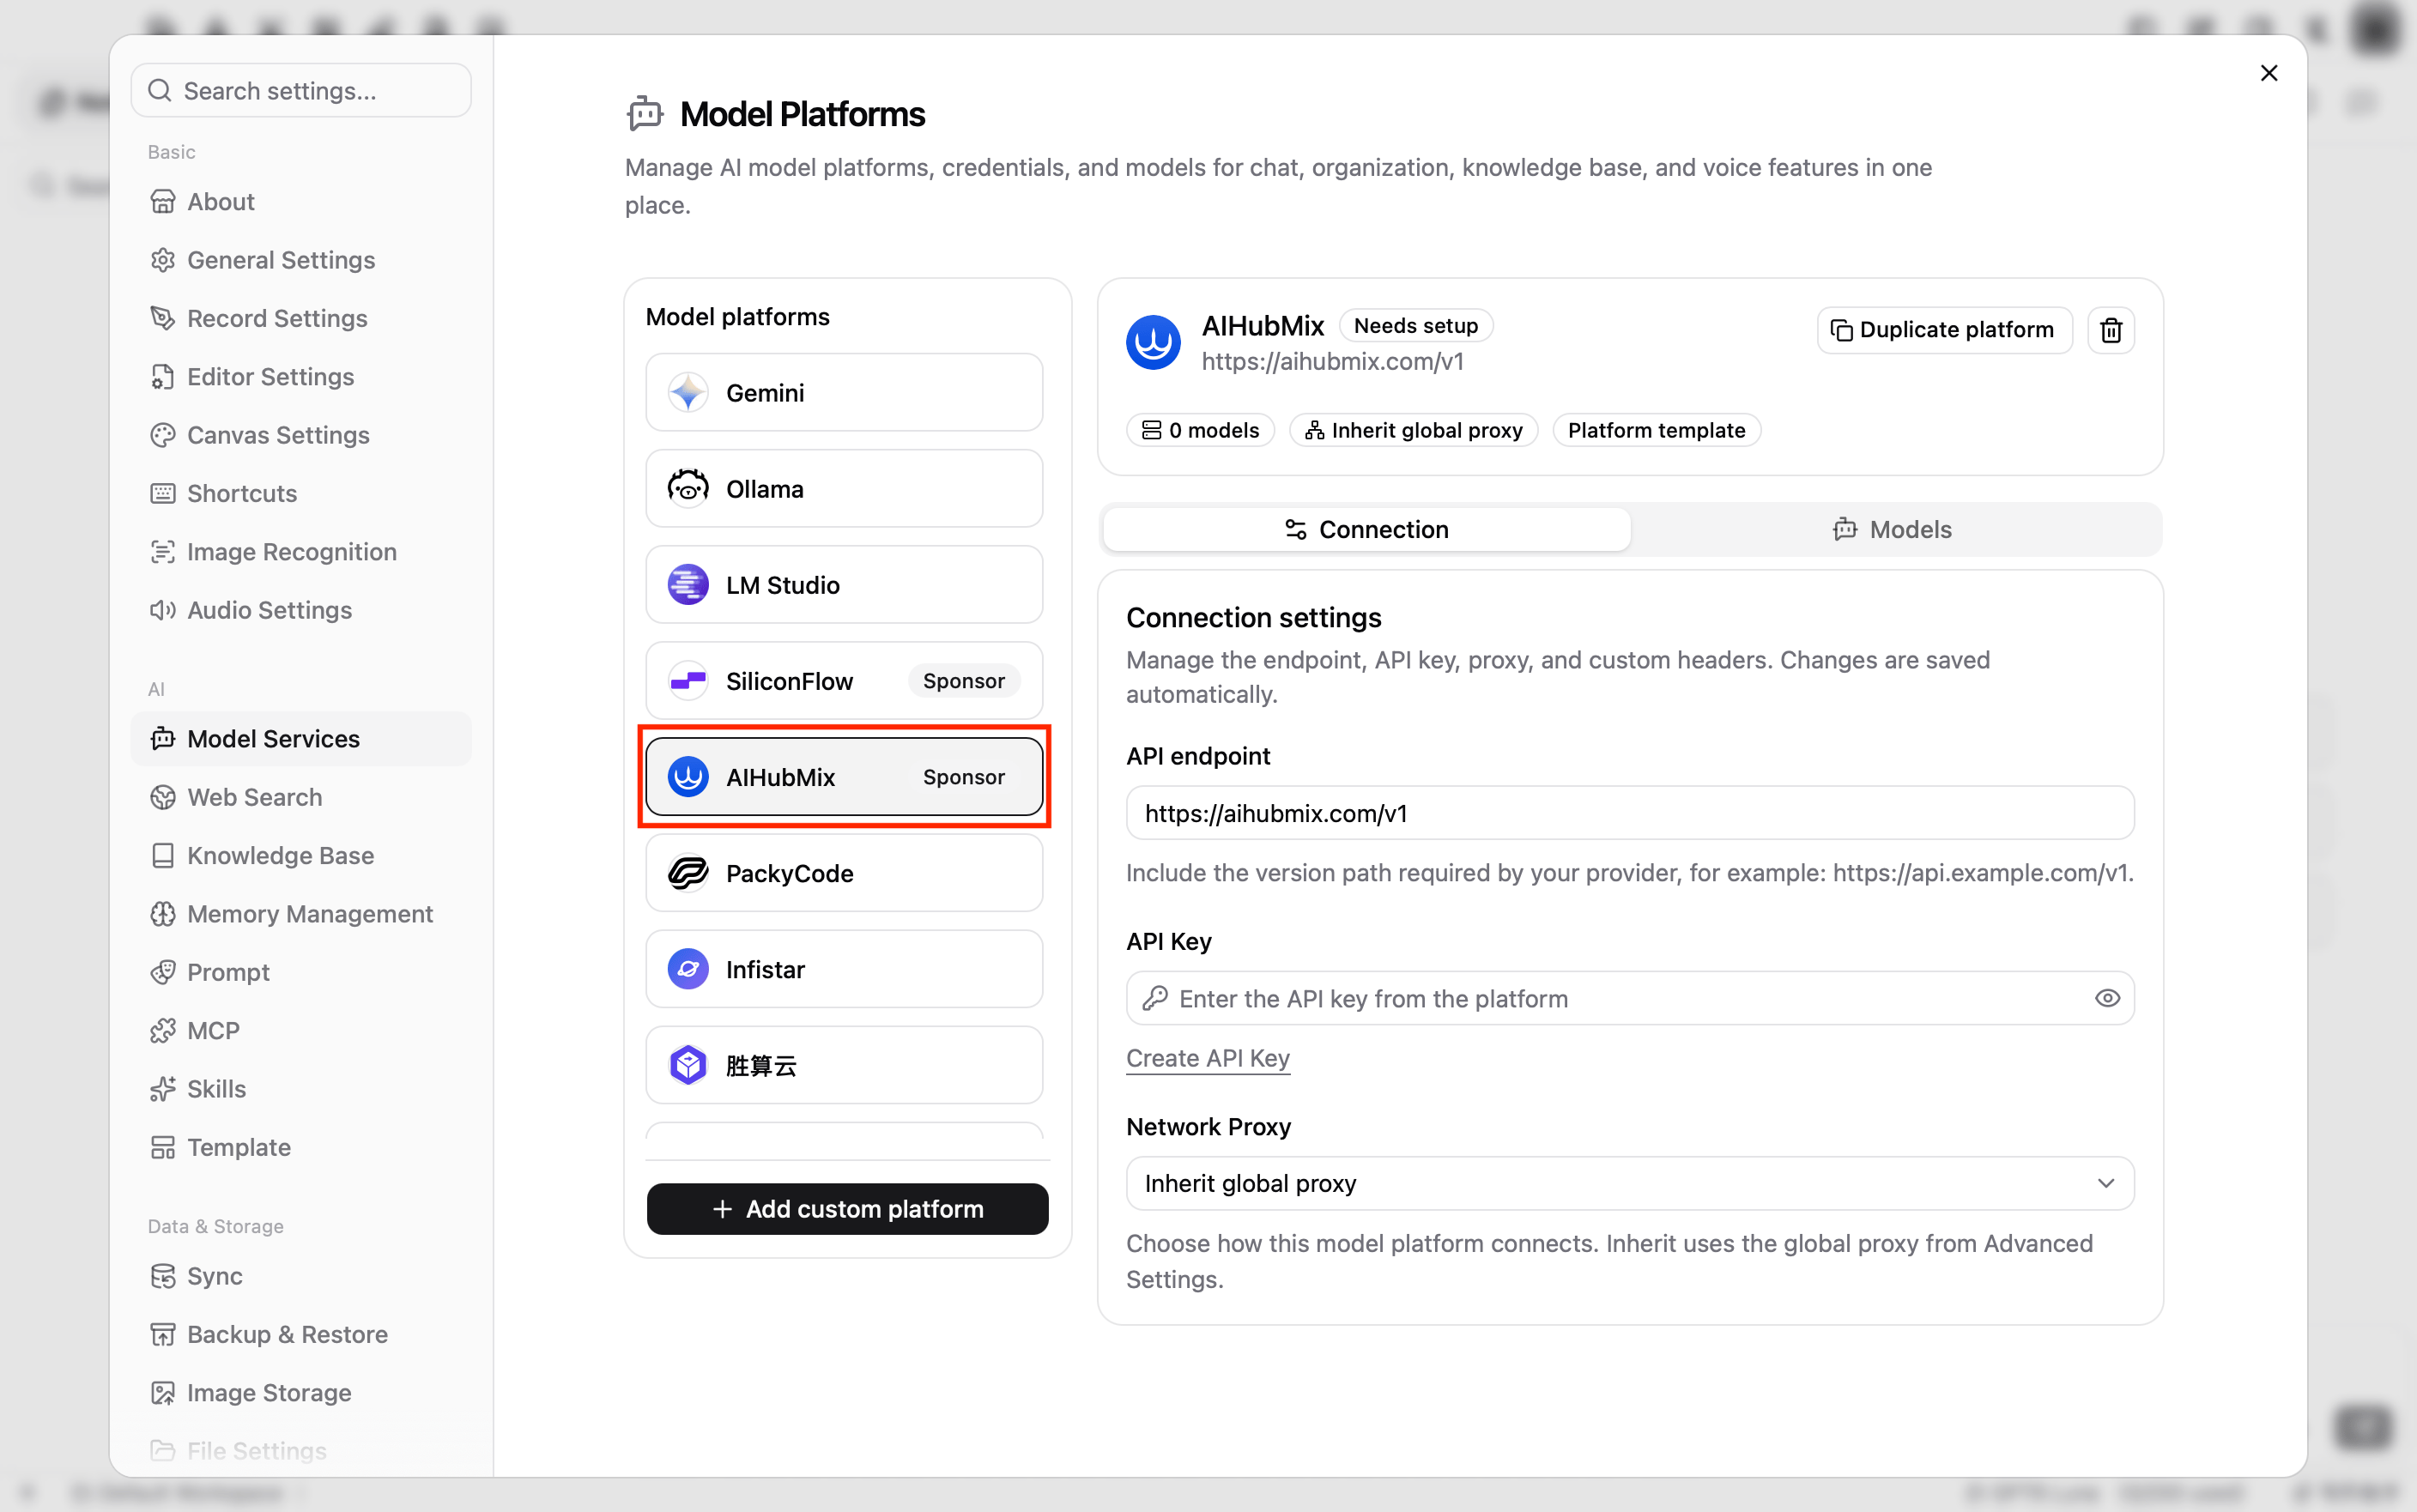
 **Model platforms** 목록에서 **AIHubMix** 를 클릭합니다. 이 플랫폼은 NoteGen에 내장되어 있으며, 이름 옆에 **Sponsor** 배지가 표시됩니다.
3\. 연결 설정 입력
**Connection** 탭에서 다음 내용을 입력합니다.
* **API endpoint**: `https://aihubmix.com/v1` 로 미리 설정되어 있습니다. 변경하지 않고 그대로 둡니다. 기본 엔드포인트를 일시적으로 사용할 수 없으면 백업 엔드포인트 `https://api.inferera.com/v1` 로 변경합니다.
* **API Key**: AIHubMix 콘솔에서 만든 API Key를 입력합니다.
* **Network Proxy**: 기본값인 **Inherit global proxy** 를 유지합니다.
변경 사항은 자동으로 저장됩니다.
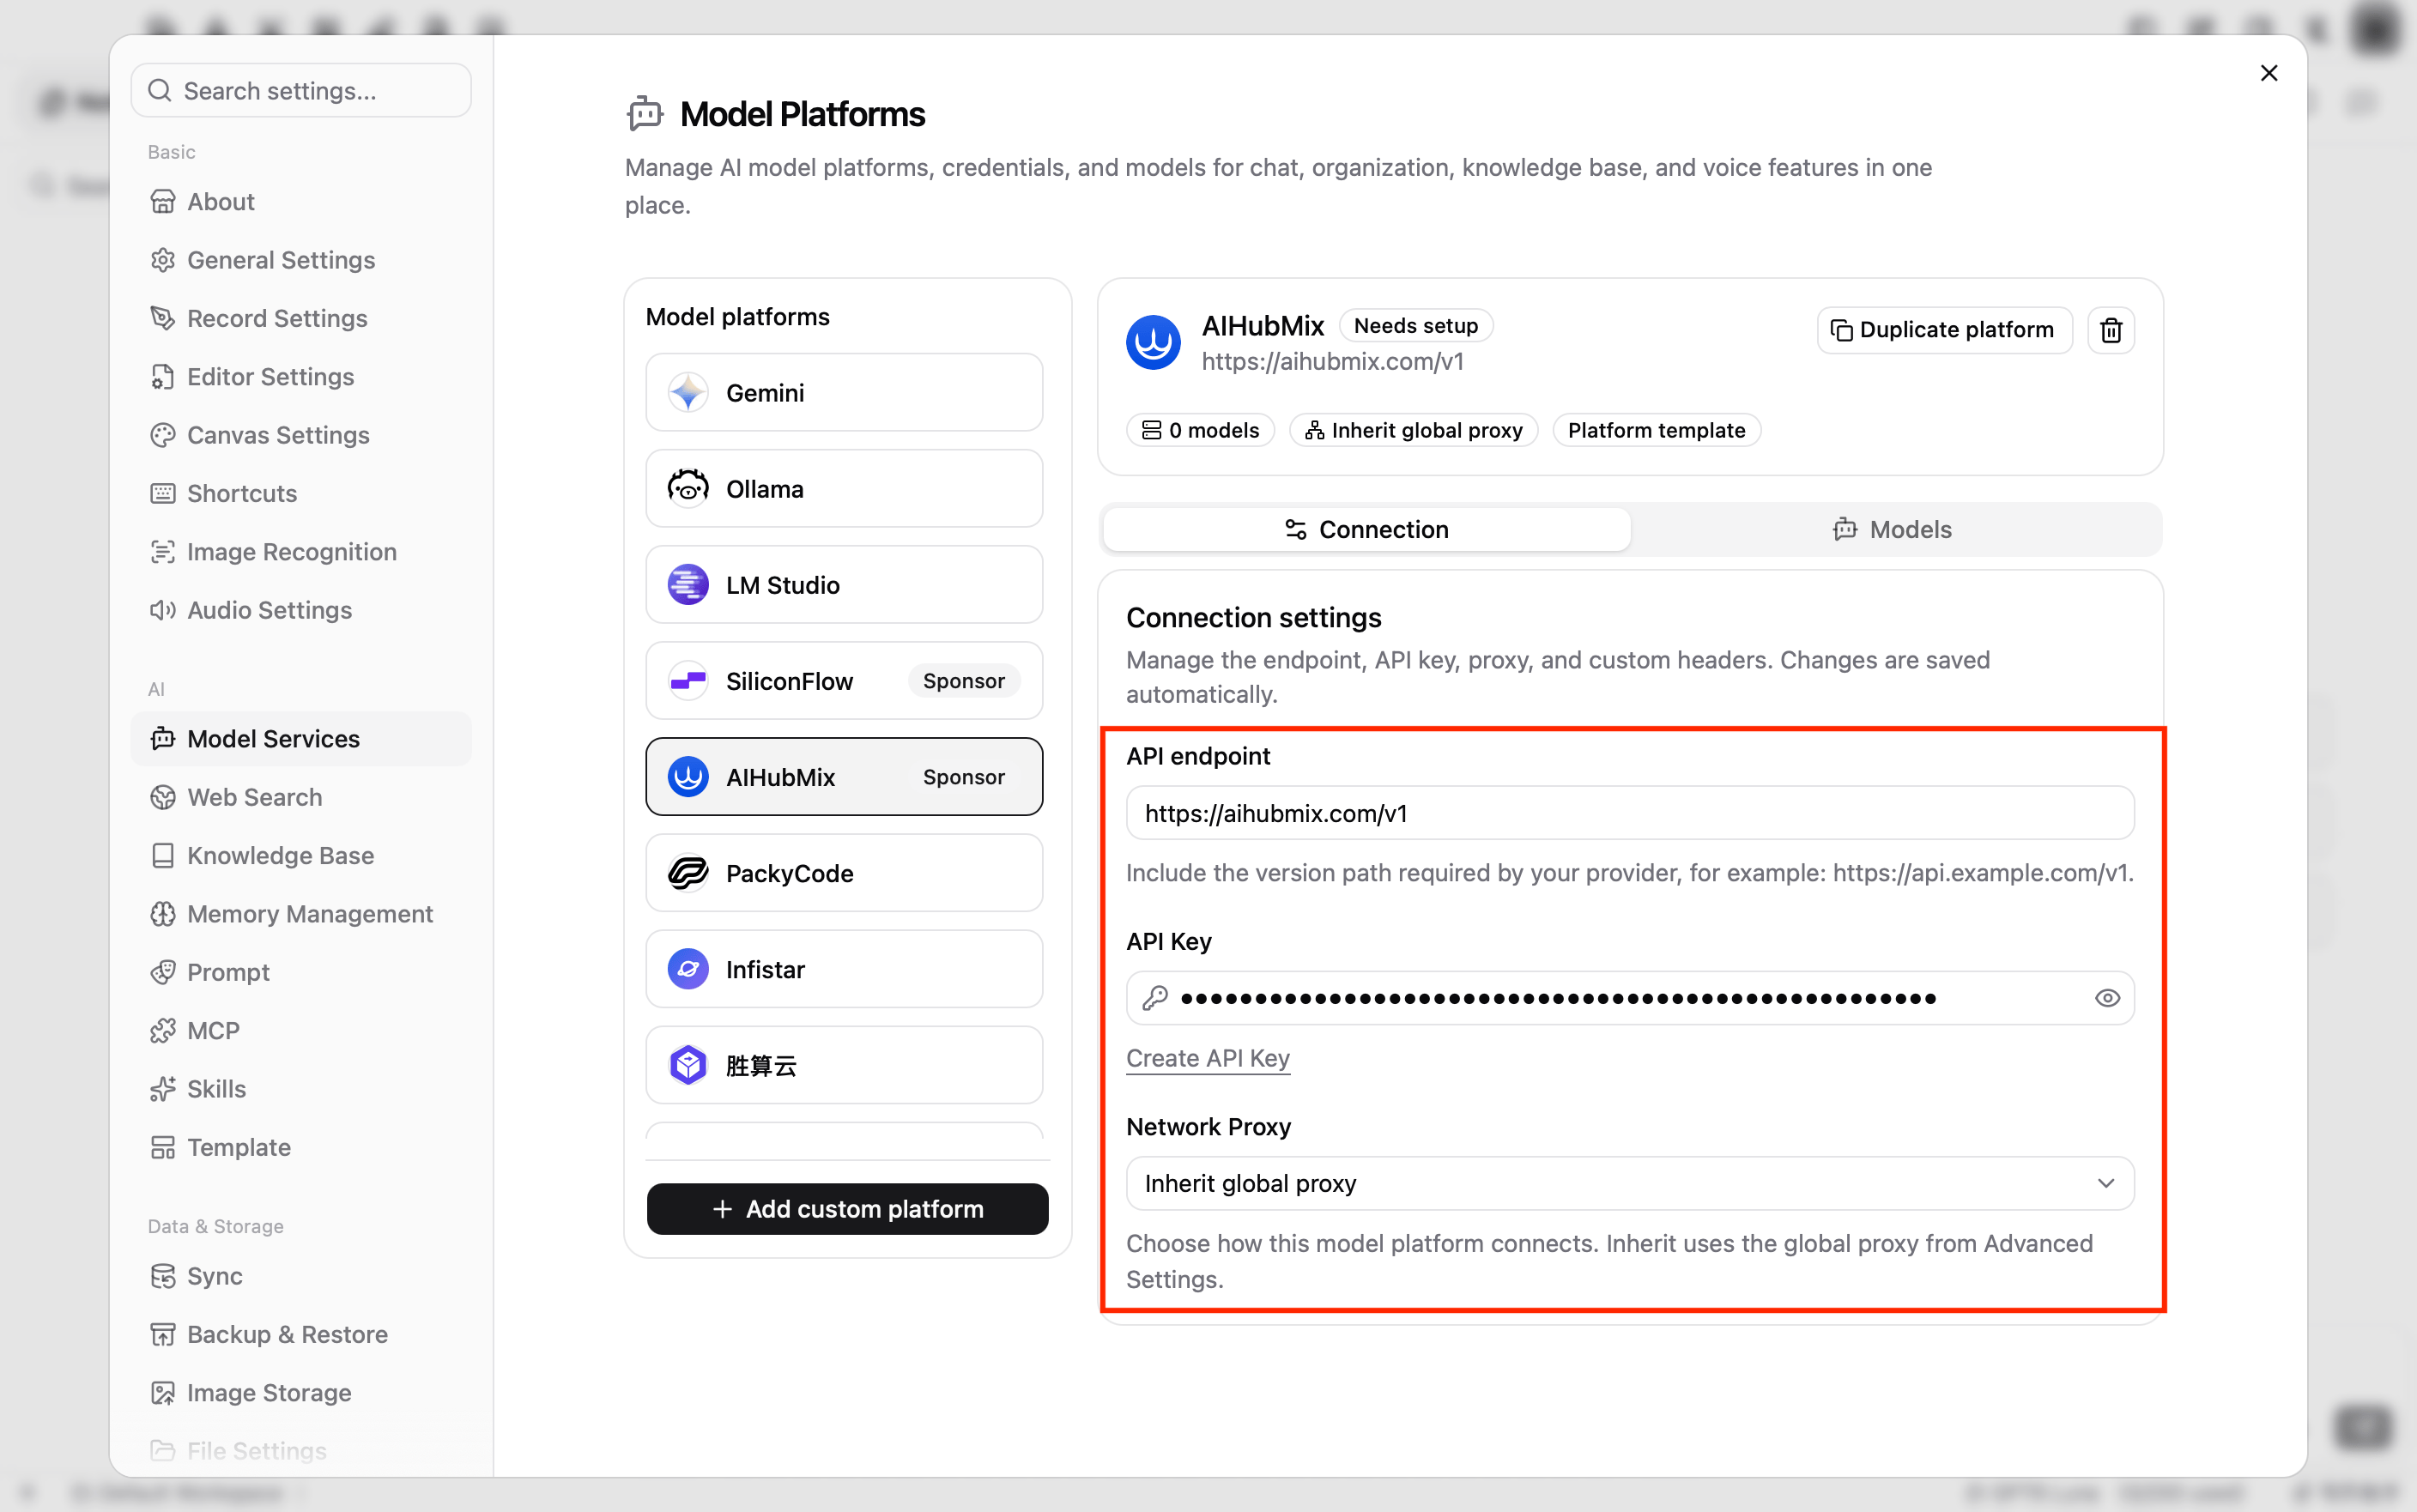 **API endpoint** 는 `/v1` 까지 입력합니다(예: `https://aihubmix.com/v1`). NoteGen은 모델 유형에 따라 `/chat/completions`, `/embeddings` 등의 API 경로를 추가합니다.
4\. 채팅 모델 추가
**Models** 탭으로 전환한 뒤 **Add Model** 을 클릭합니다.
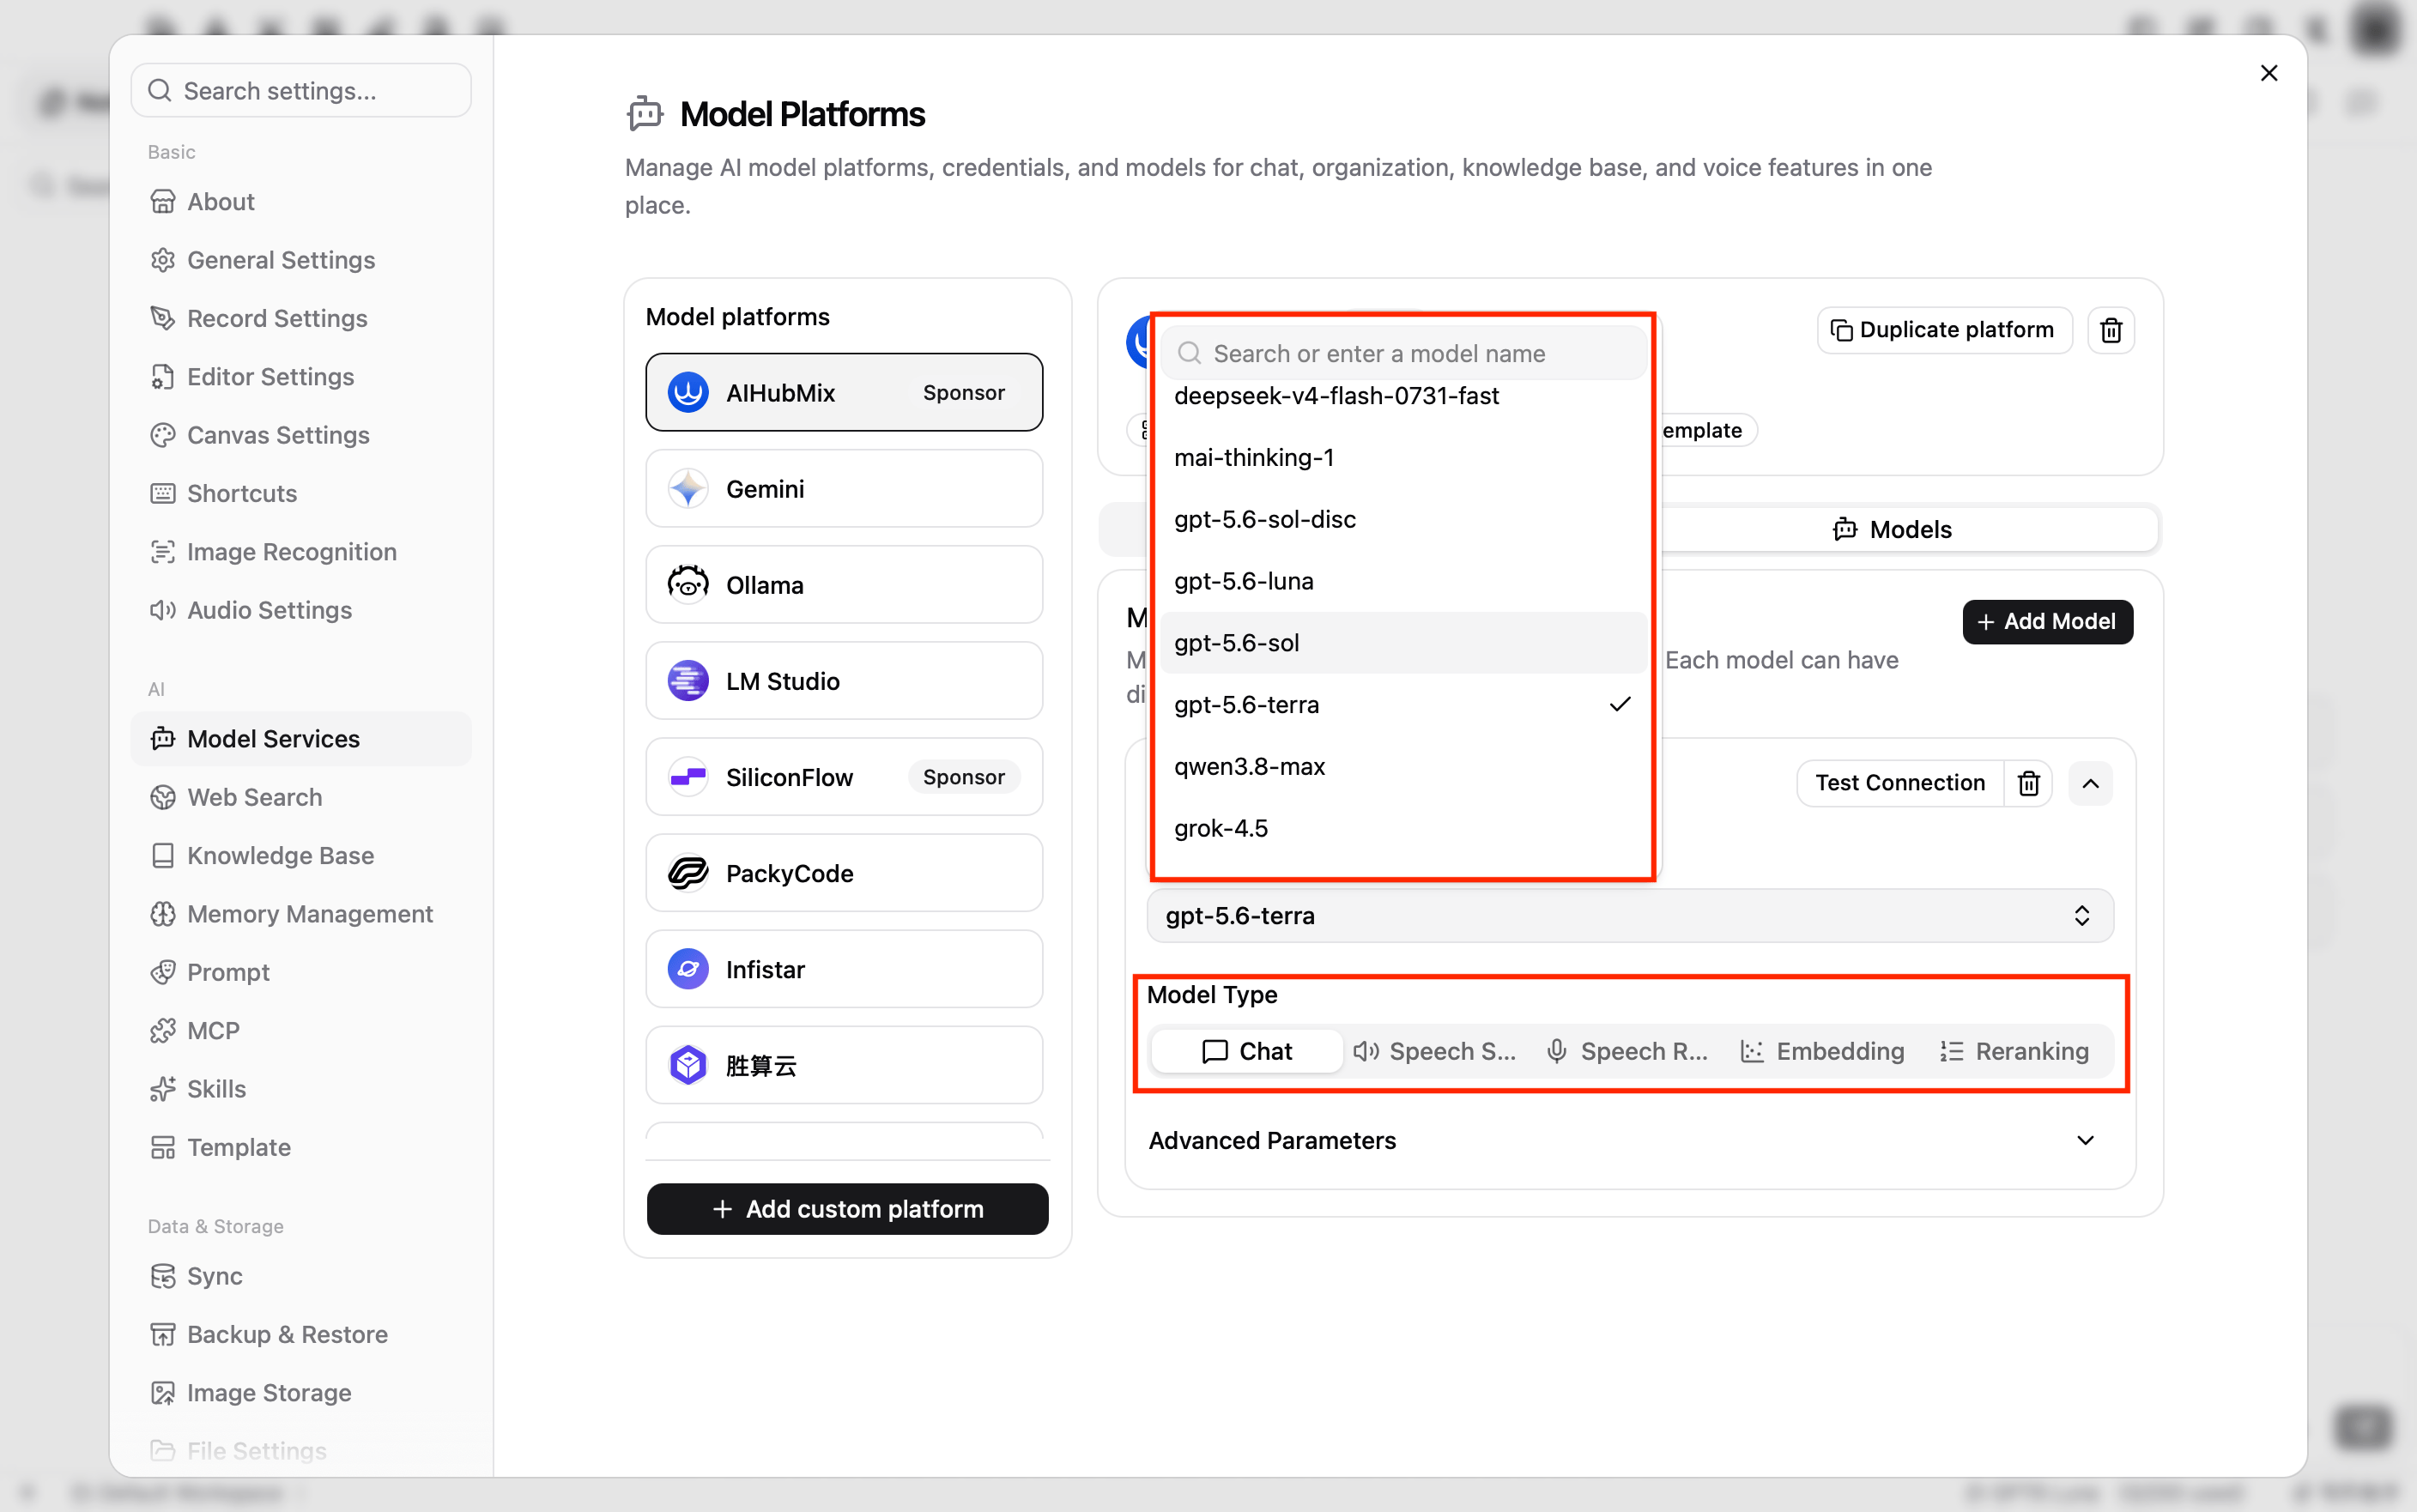
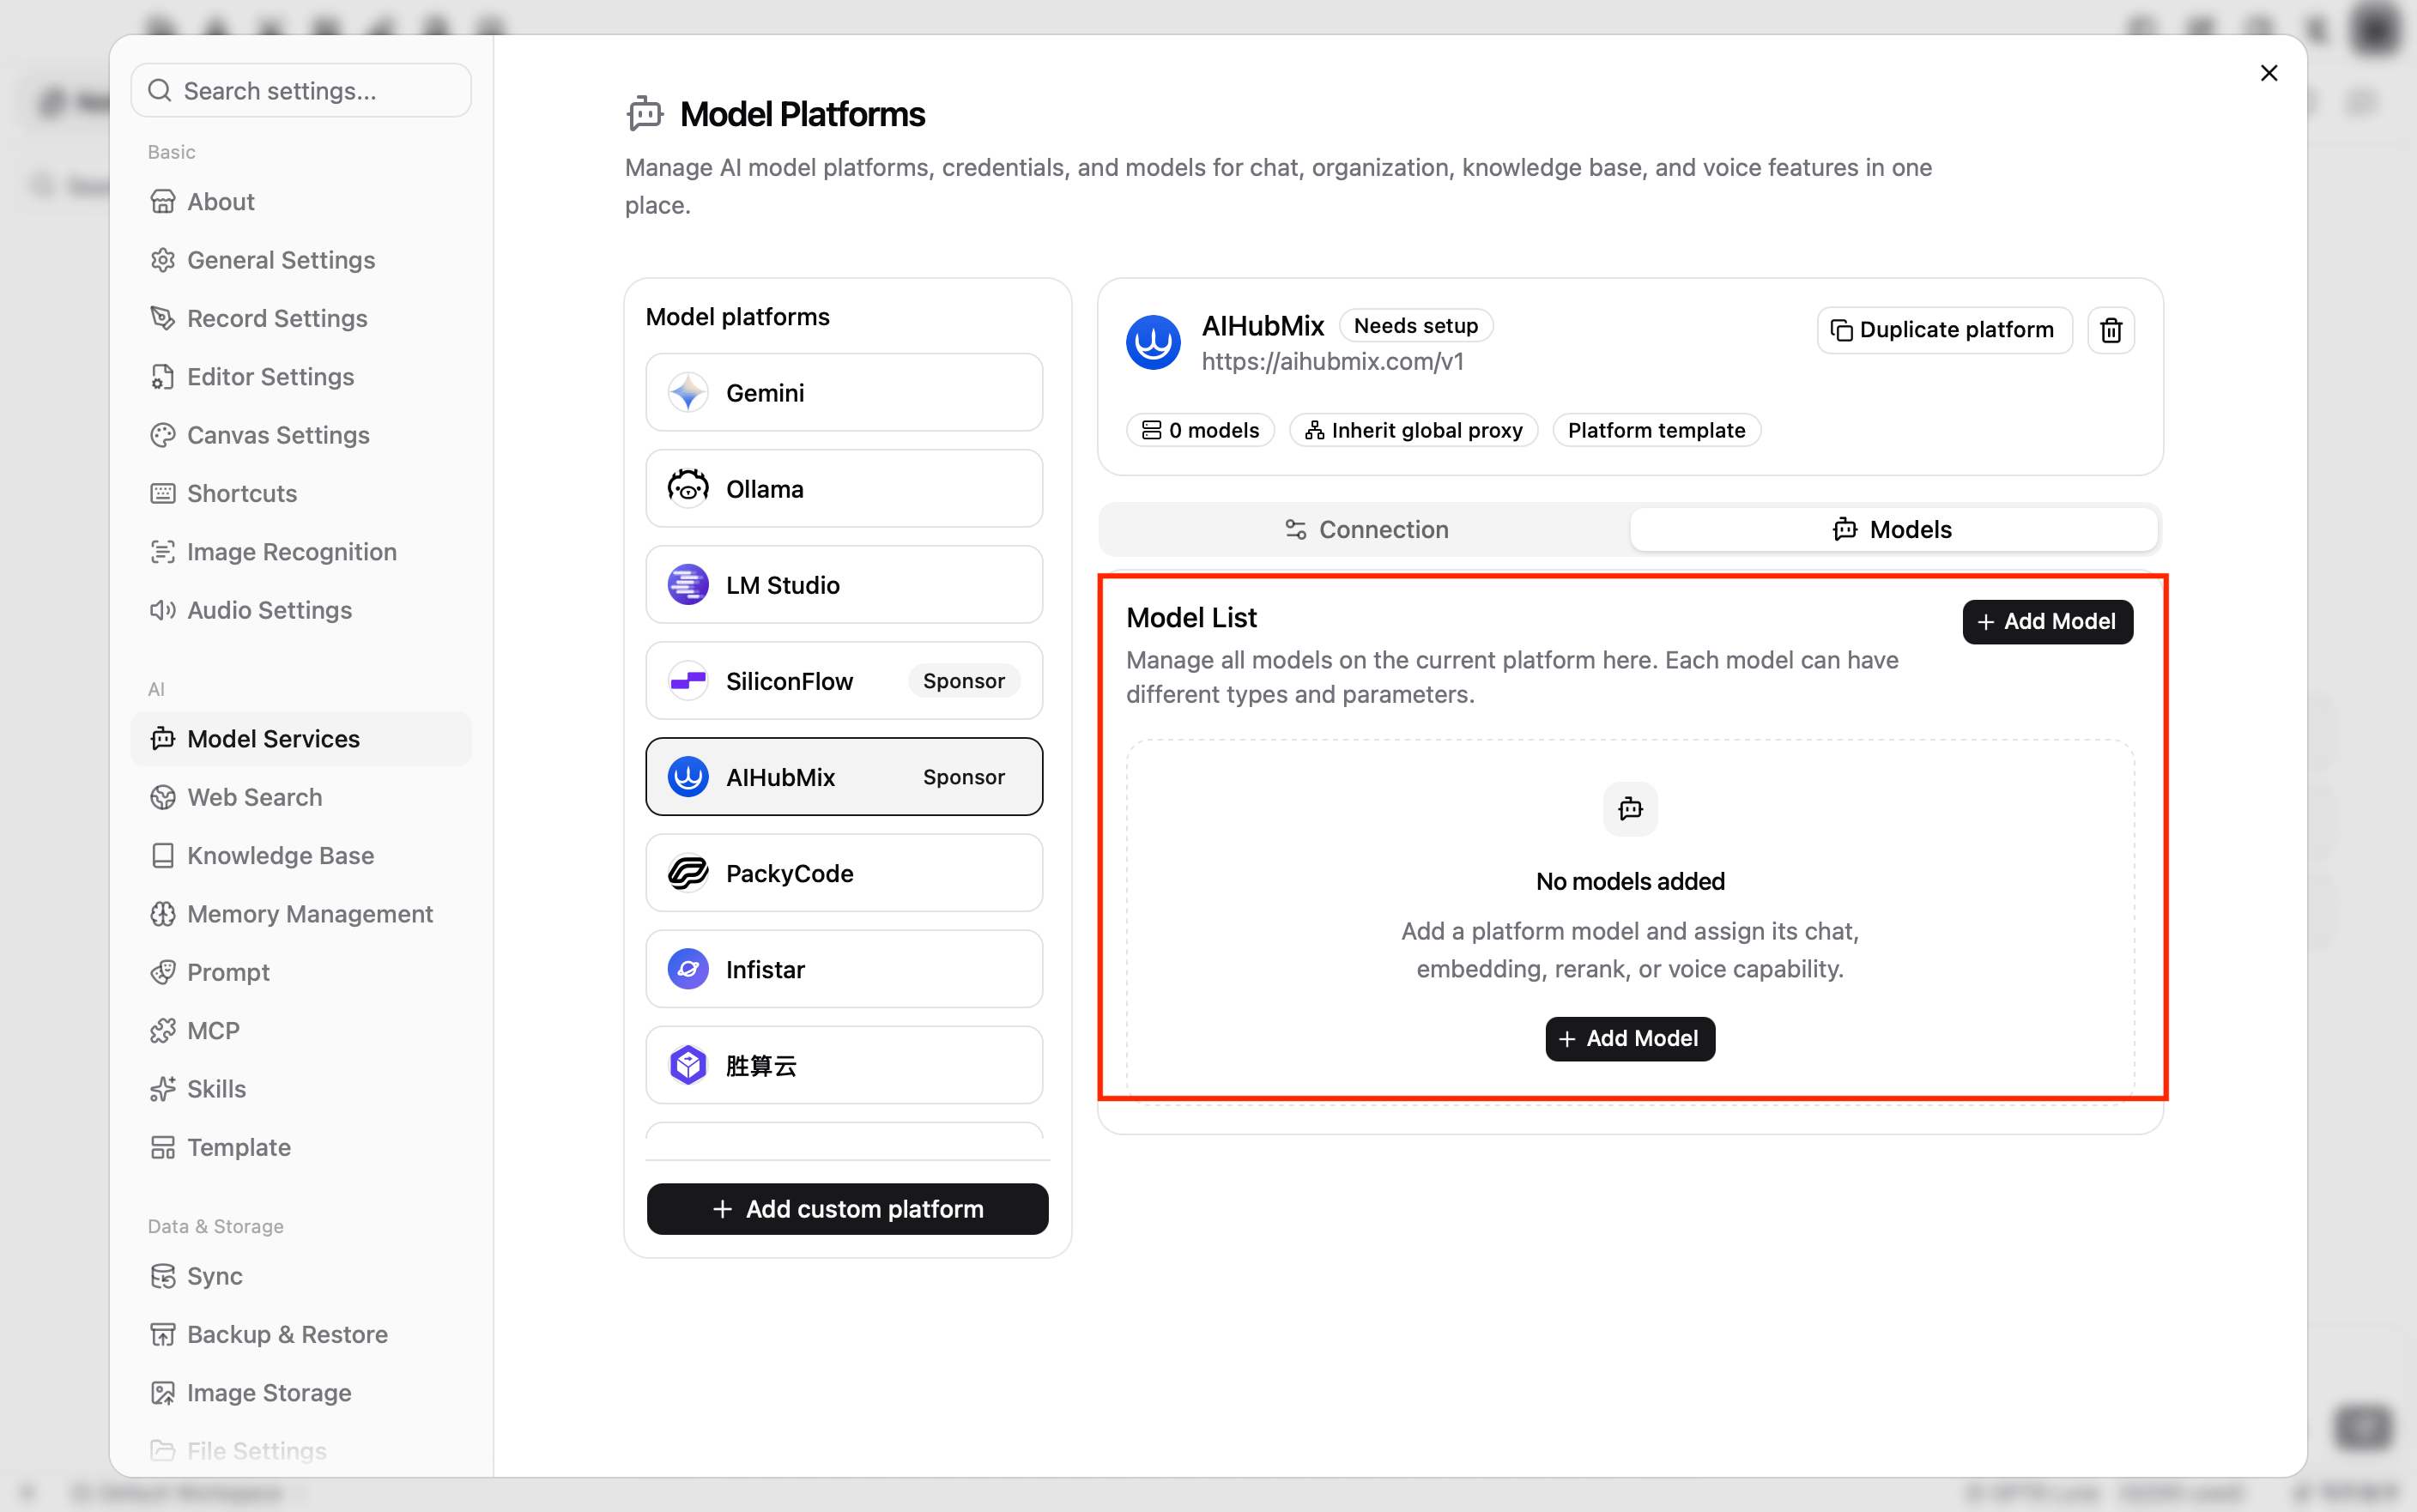 자동으로 펼쳐진 모델 카드에서 모델 정보를 입력합니다.
* **Model**: **Please select a model** 을 클릭하고 검색창에 모델 ID(예: `gpt-5.6-terra`)를 입력한 뒤 선택합니다. 모델이 목록에 없으면 전체 모델 ID를 입력하고 **Use "모델 ID"** 를 클릭합니다. 이 위치에 텍스트 상자가 대신 표시되면 모델 ID를 직접 입력하거나, 텍스트 상자 오른쪽의 새로고침 버튼을 클릭해 모델 목록을 다시 가져옵니다.
* **Model Type**: **Chat** 을 선택합니다. 새로 추가한 모델은 기본적으로 **Chat** 으로 설정됩니다.
사용자 지정 설정이 필요하지 않으면 **Advanced Parameters** 의 Maximum Output Tokens, Context Window, Temperature 등의 옵션은 기본값으로 둡니다. 모델을 입력하면 플랫폼 이름 옆의 상태가 **Needs setup** 에서 **Ready** 로 바뀝니다.
자동으로 펼쳐진 모델 카드에서 모델 정보를 입력합니다.
* **Model**: **Please select a model** 을 클릭하고 검색창에 모델 ID(예: `gpt-5.6-terra`)를 입력한 뒤 선택합니다. 모델이 목록에 없으면 전체 모델 ID를 입력하고 **Use "모델 ID"** 를 클릭합니다. 이 위치에 텍스트 상자가 대신 표시되면 모델 ID를 직접 입력하거나, 텍스트 상자 오른쪽의 새로고침 버튼을 클릭해 모델 목록을 다시 가져옵니다.
* **Model Type**: **Chat** 을 선택합니다. 새로 추가한 모델은 기본적으로 **Chat** 으로 설정됩니다.
사용자 지정 설정이 필요하지 않으면 **Advanced Parameters** 의 Maximum Output Tokens, Context Window, Temperature 등의 옵션은 기본값으로 둡니다. 모델을 입력하면 플랫폼 이름 옆의 상태가 **Needs setup** 에서 **Ready** 로 바뀝니다.
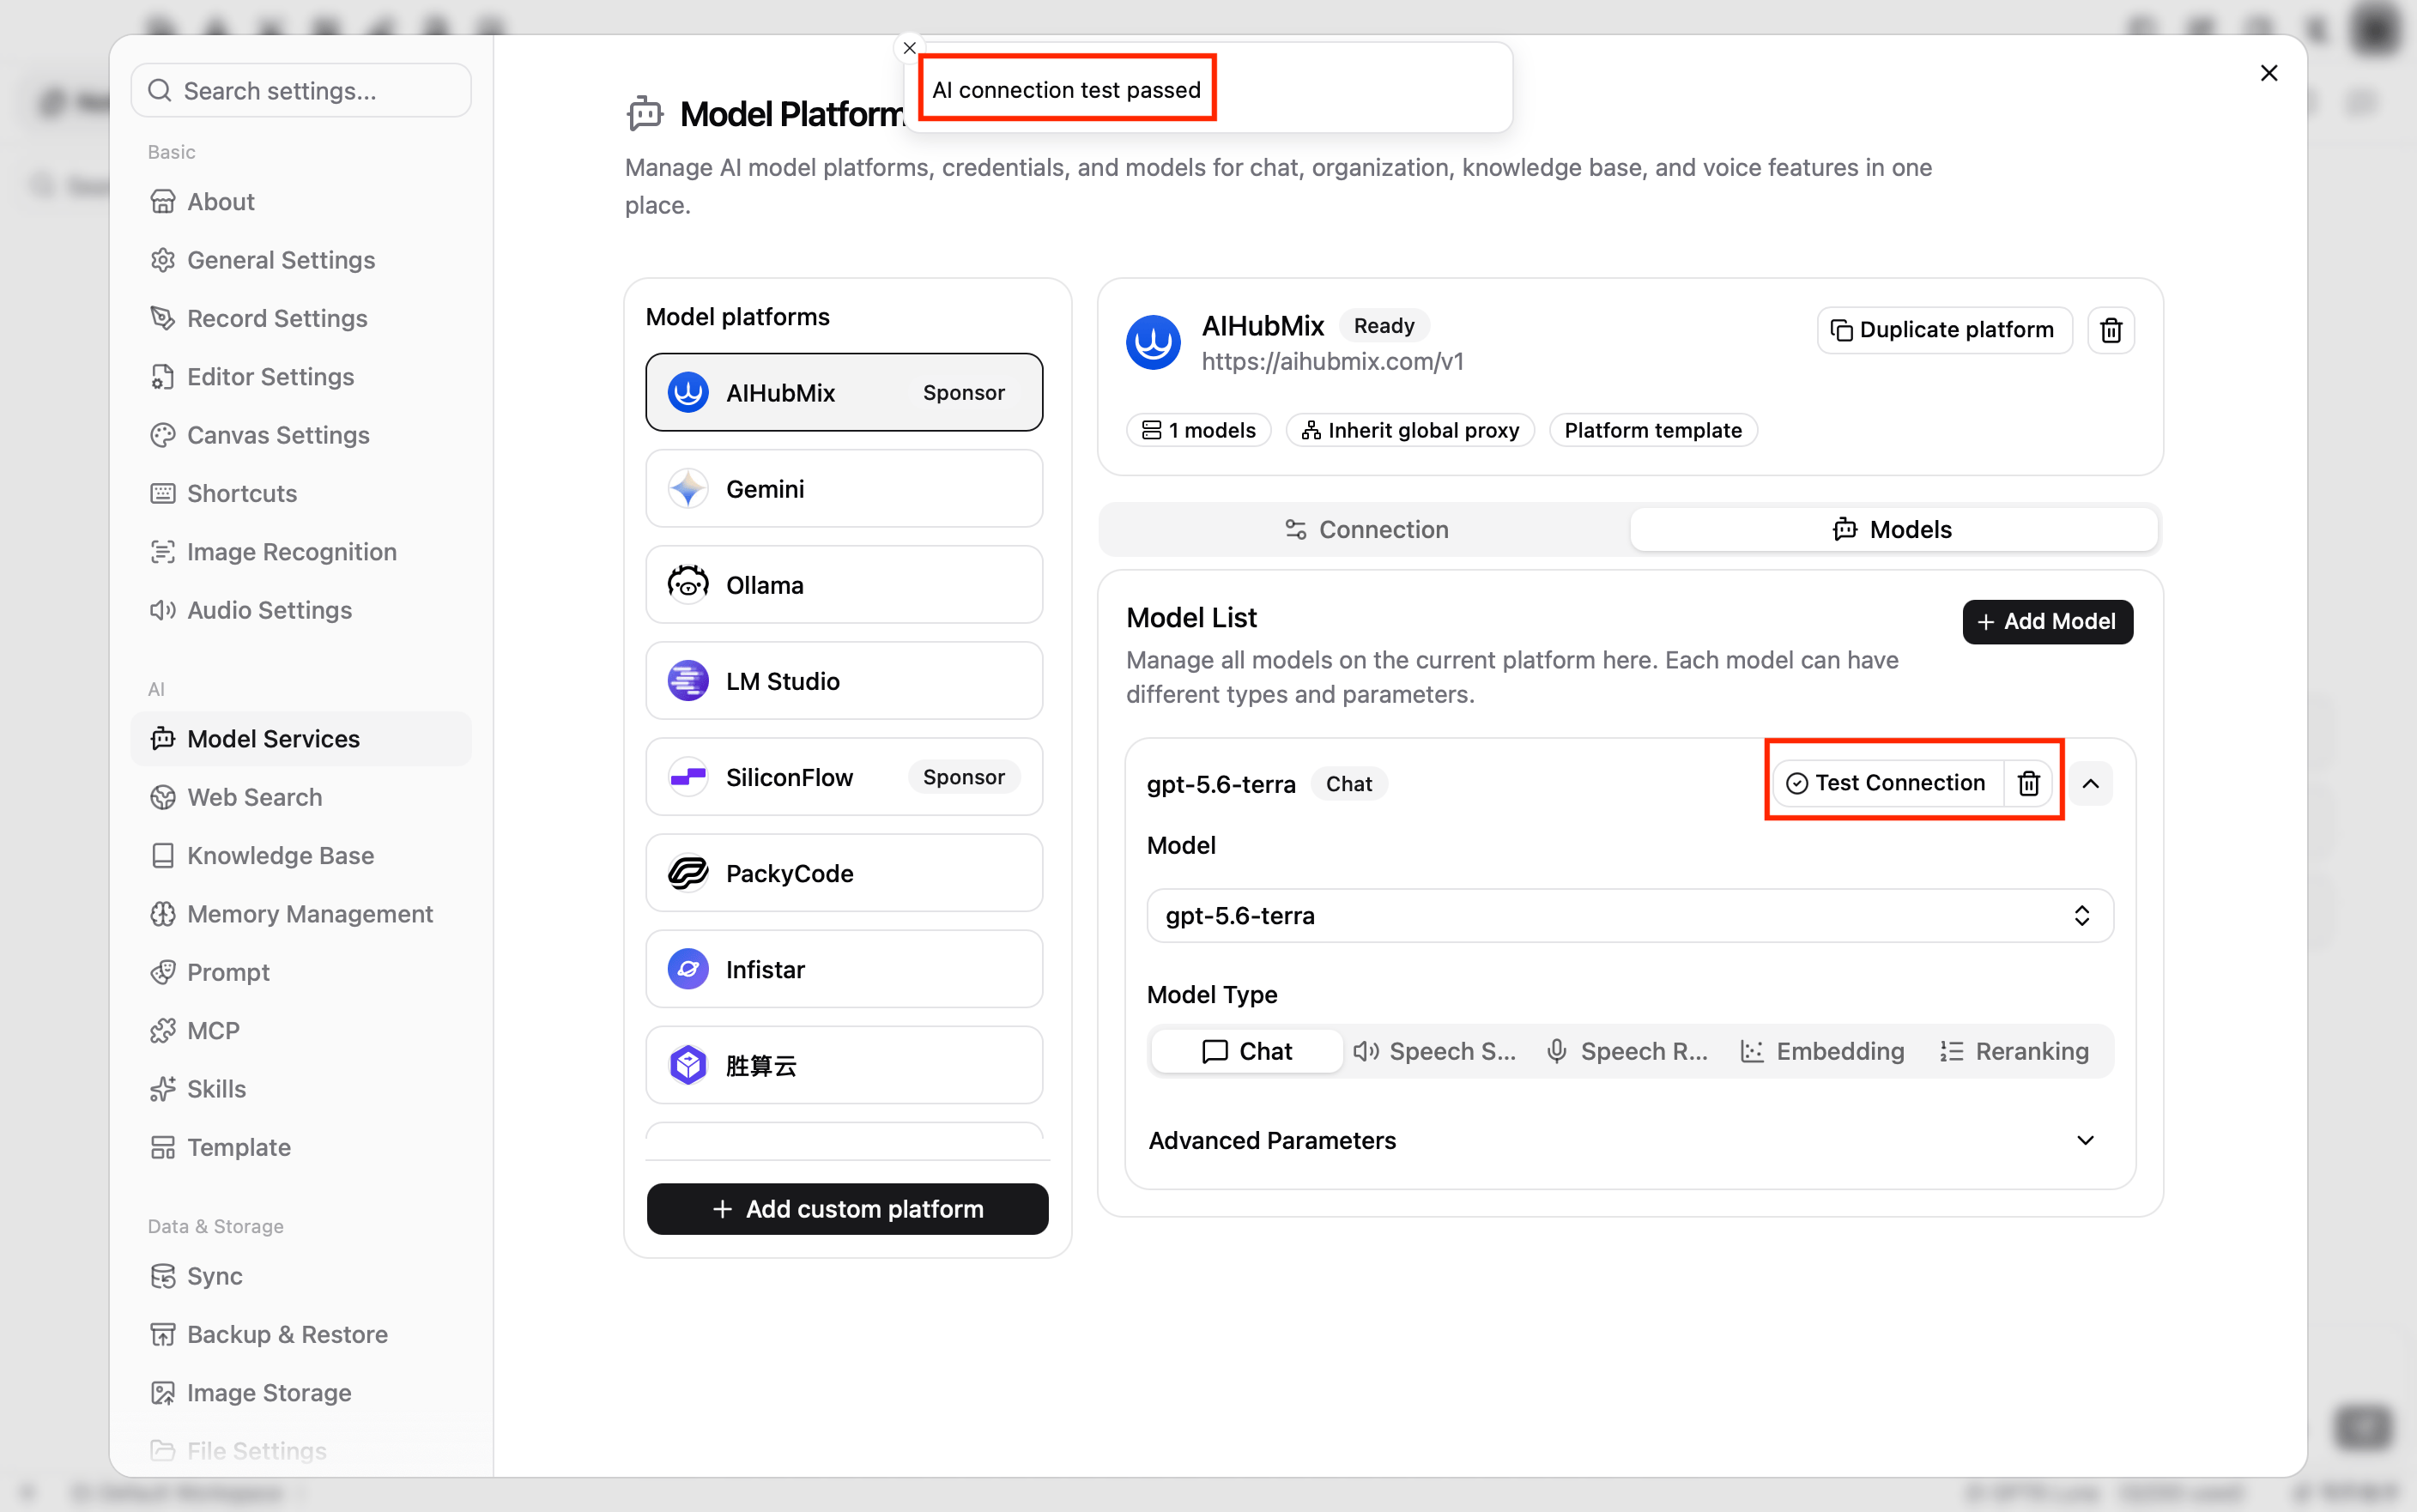
5\. 연결 테스트
모델 카드 오른쪽 위의 **Test Connection** 을 클릭합니다. **AI connection test passed** 가 표시되면 API Key, API endpoint, 모델 ID가 정상적으로 작동하는 것입니다.
모델을 더 추가하려면 [4단계](#add-chat-model)와 [5단계](#test-connection)를 반복합니다.
AIHubMix 모델 사용
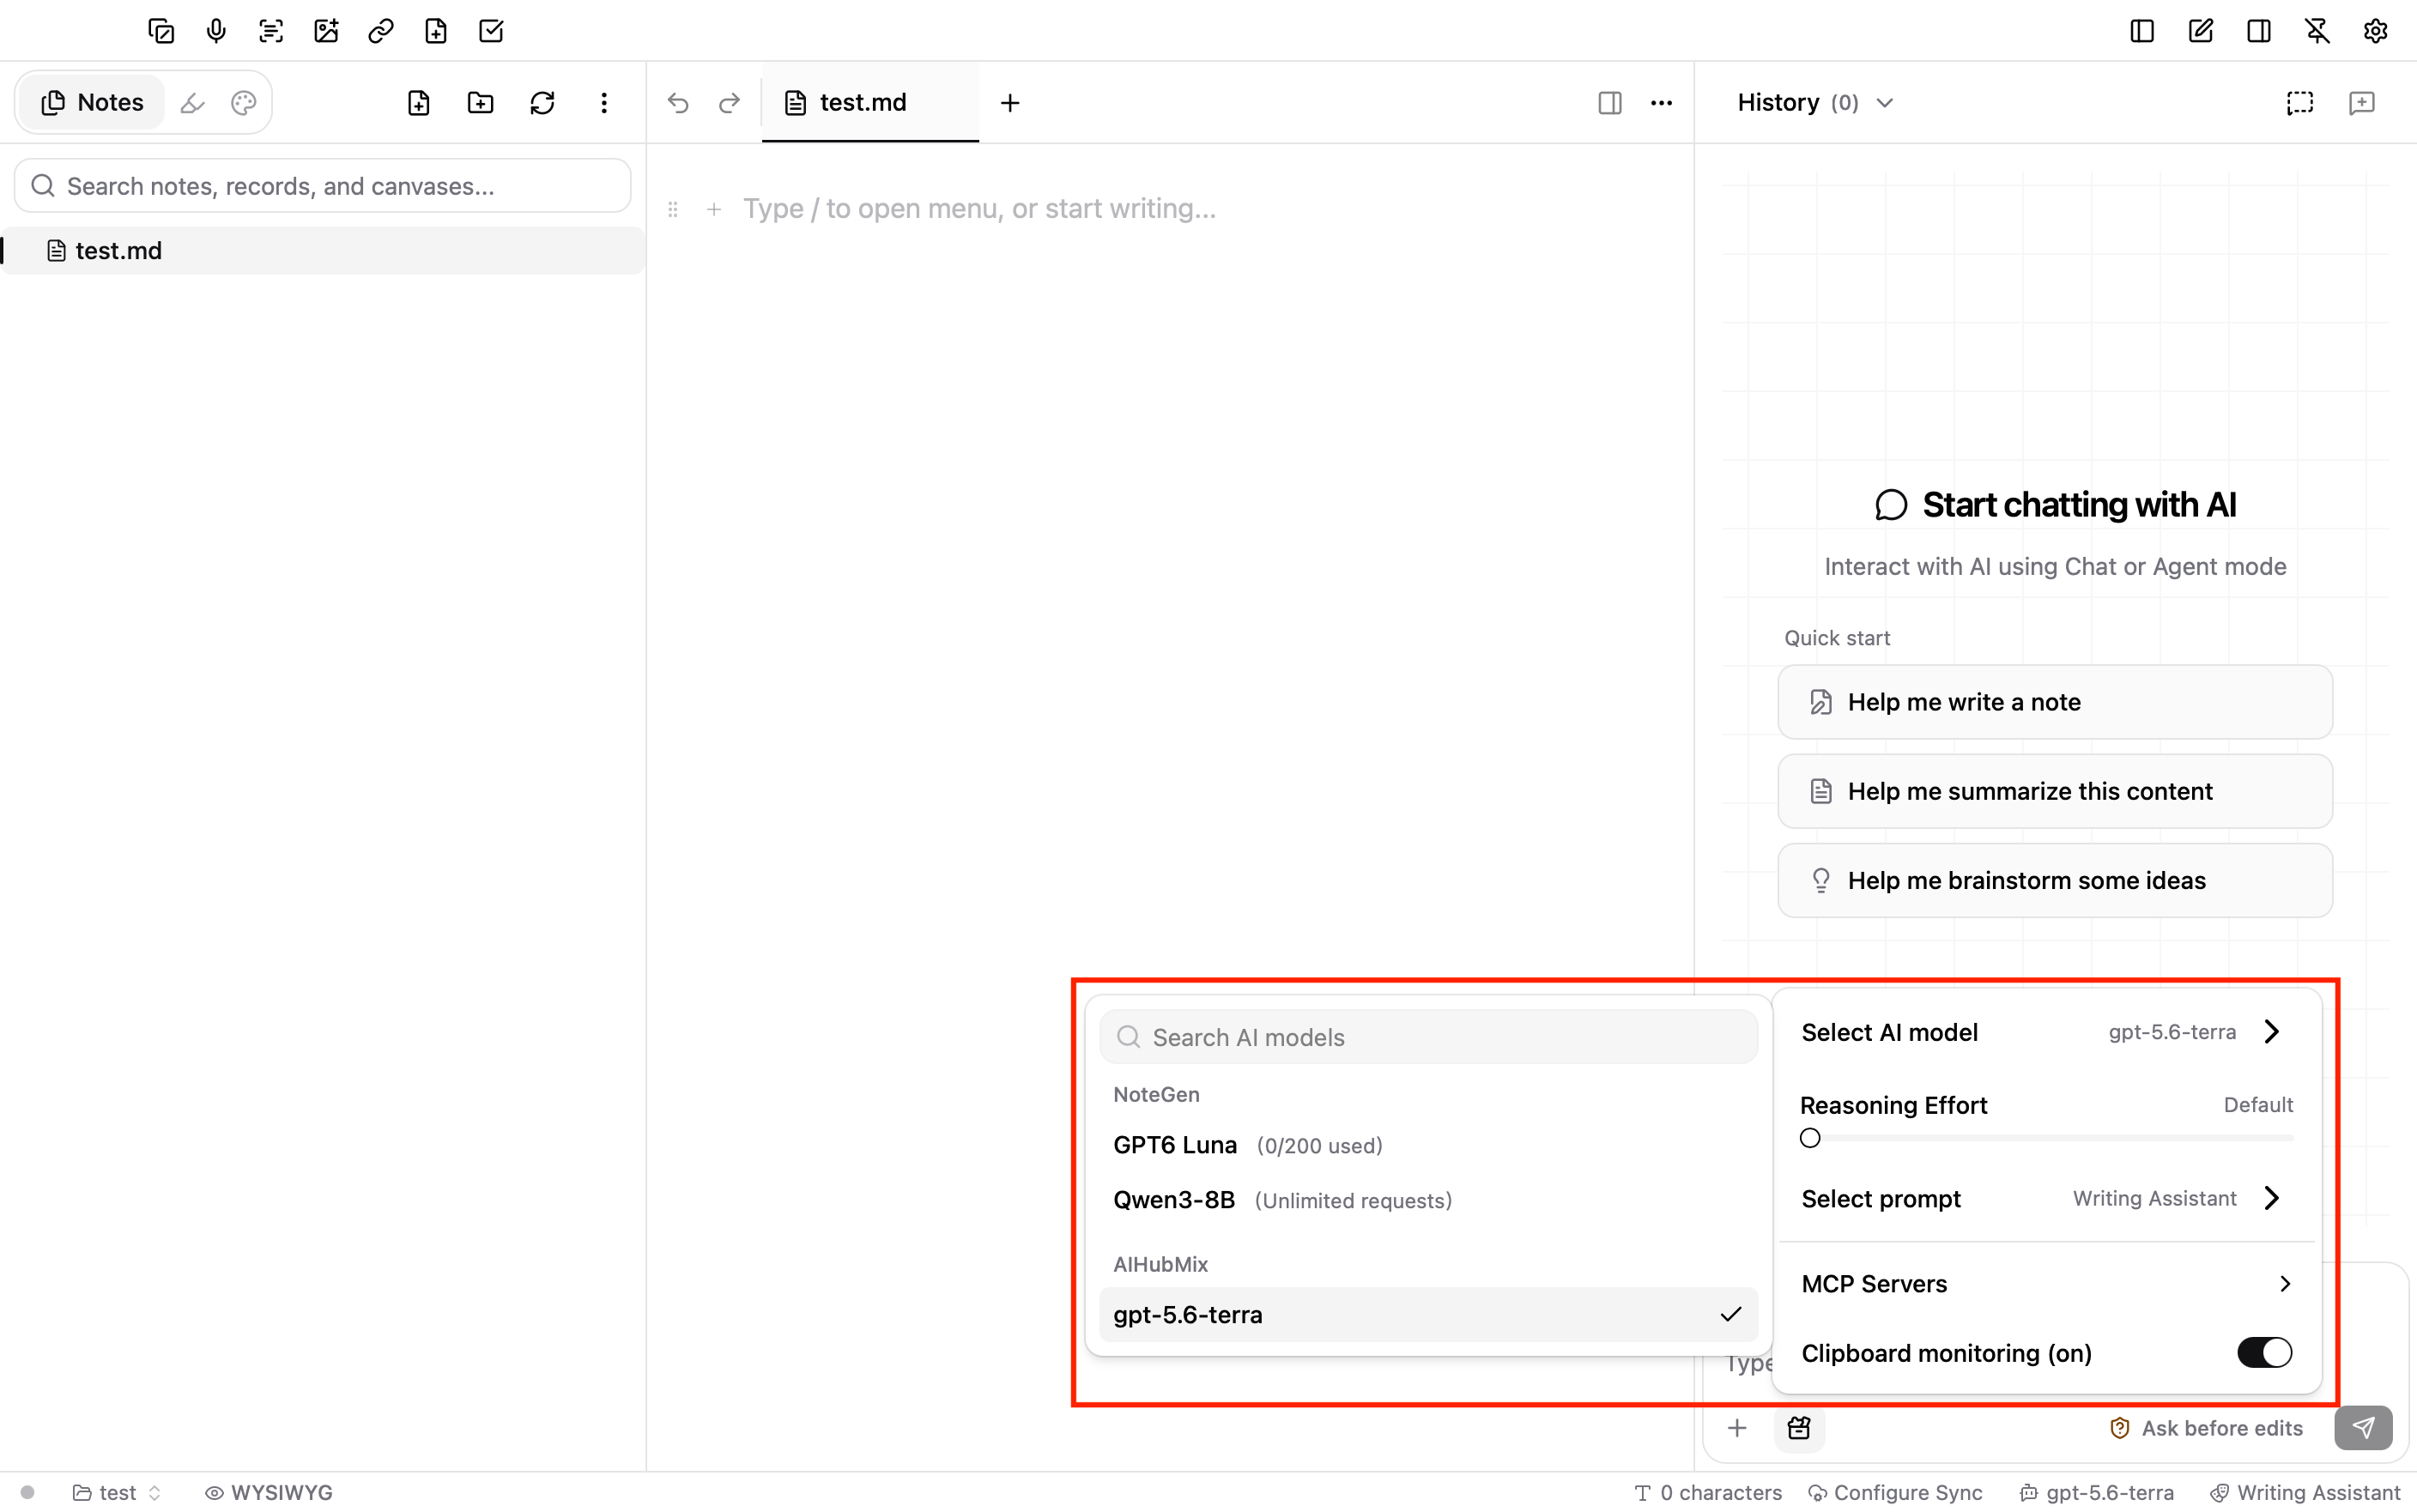
AI 채팅에서 모델 선택
오른쪽 위의 닫기 버튼을 클릭해 메인 창으로 돌아갑니다. 창 하단 상태 표시줄 오른쪽의 현재 모델 이름을 클릭한 뒤, **AIHubMix** 그룹에서 추가한 모델을 선택합니다.
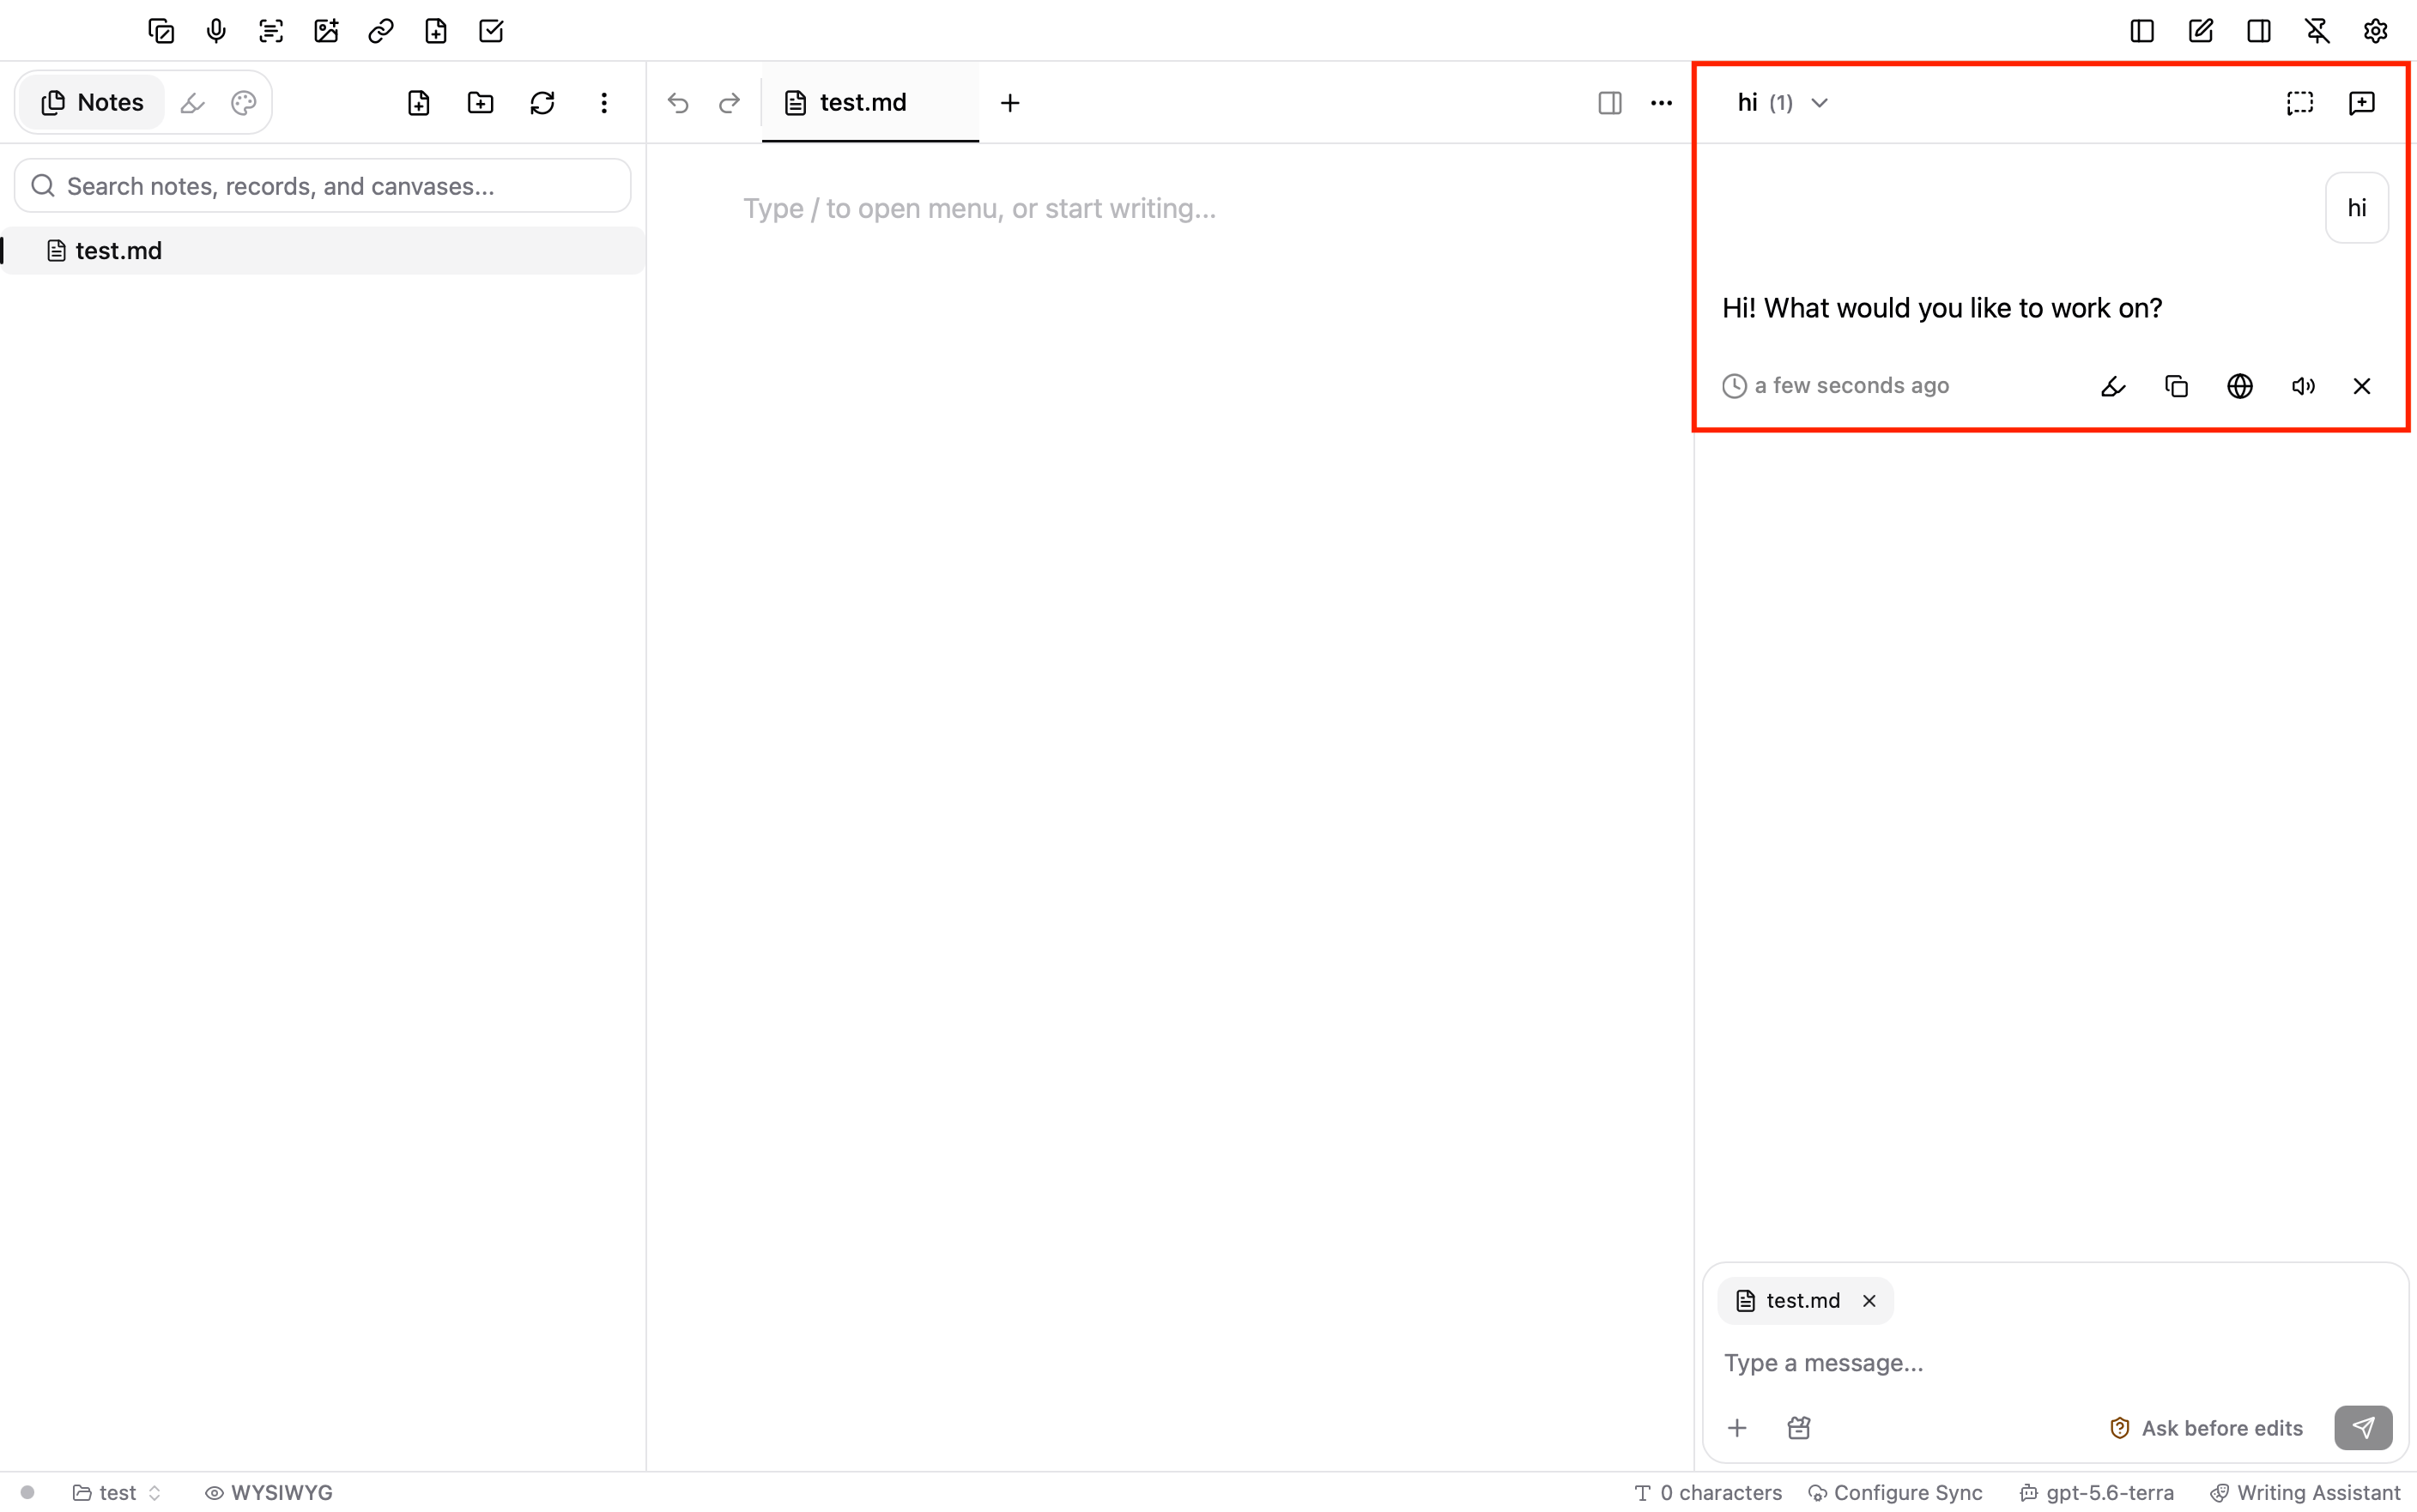
 오른쪽 채팅 패널에 메시지를 입력하고 전송합니다. 정상적으로 응답을 받으면 설정이 완료된 것입니다. 채팅 패널이 보이지 않으면 창 오른쪽 위의 **Show Right Sidebar** 버튼을 클릭합니다.
편집기에서 AI 사용
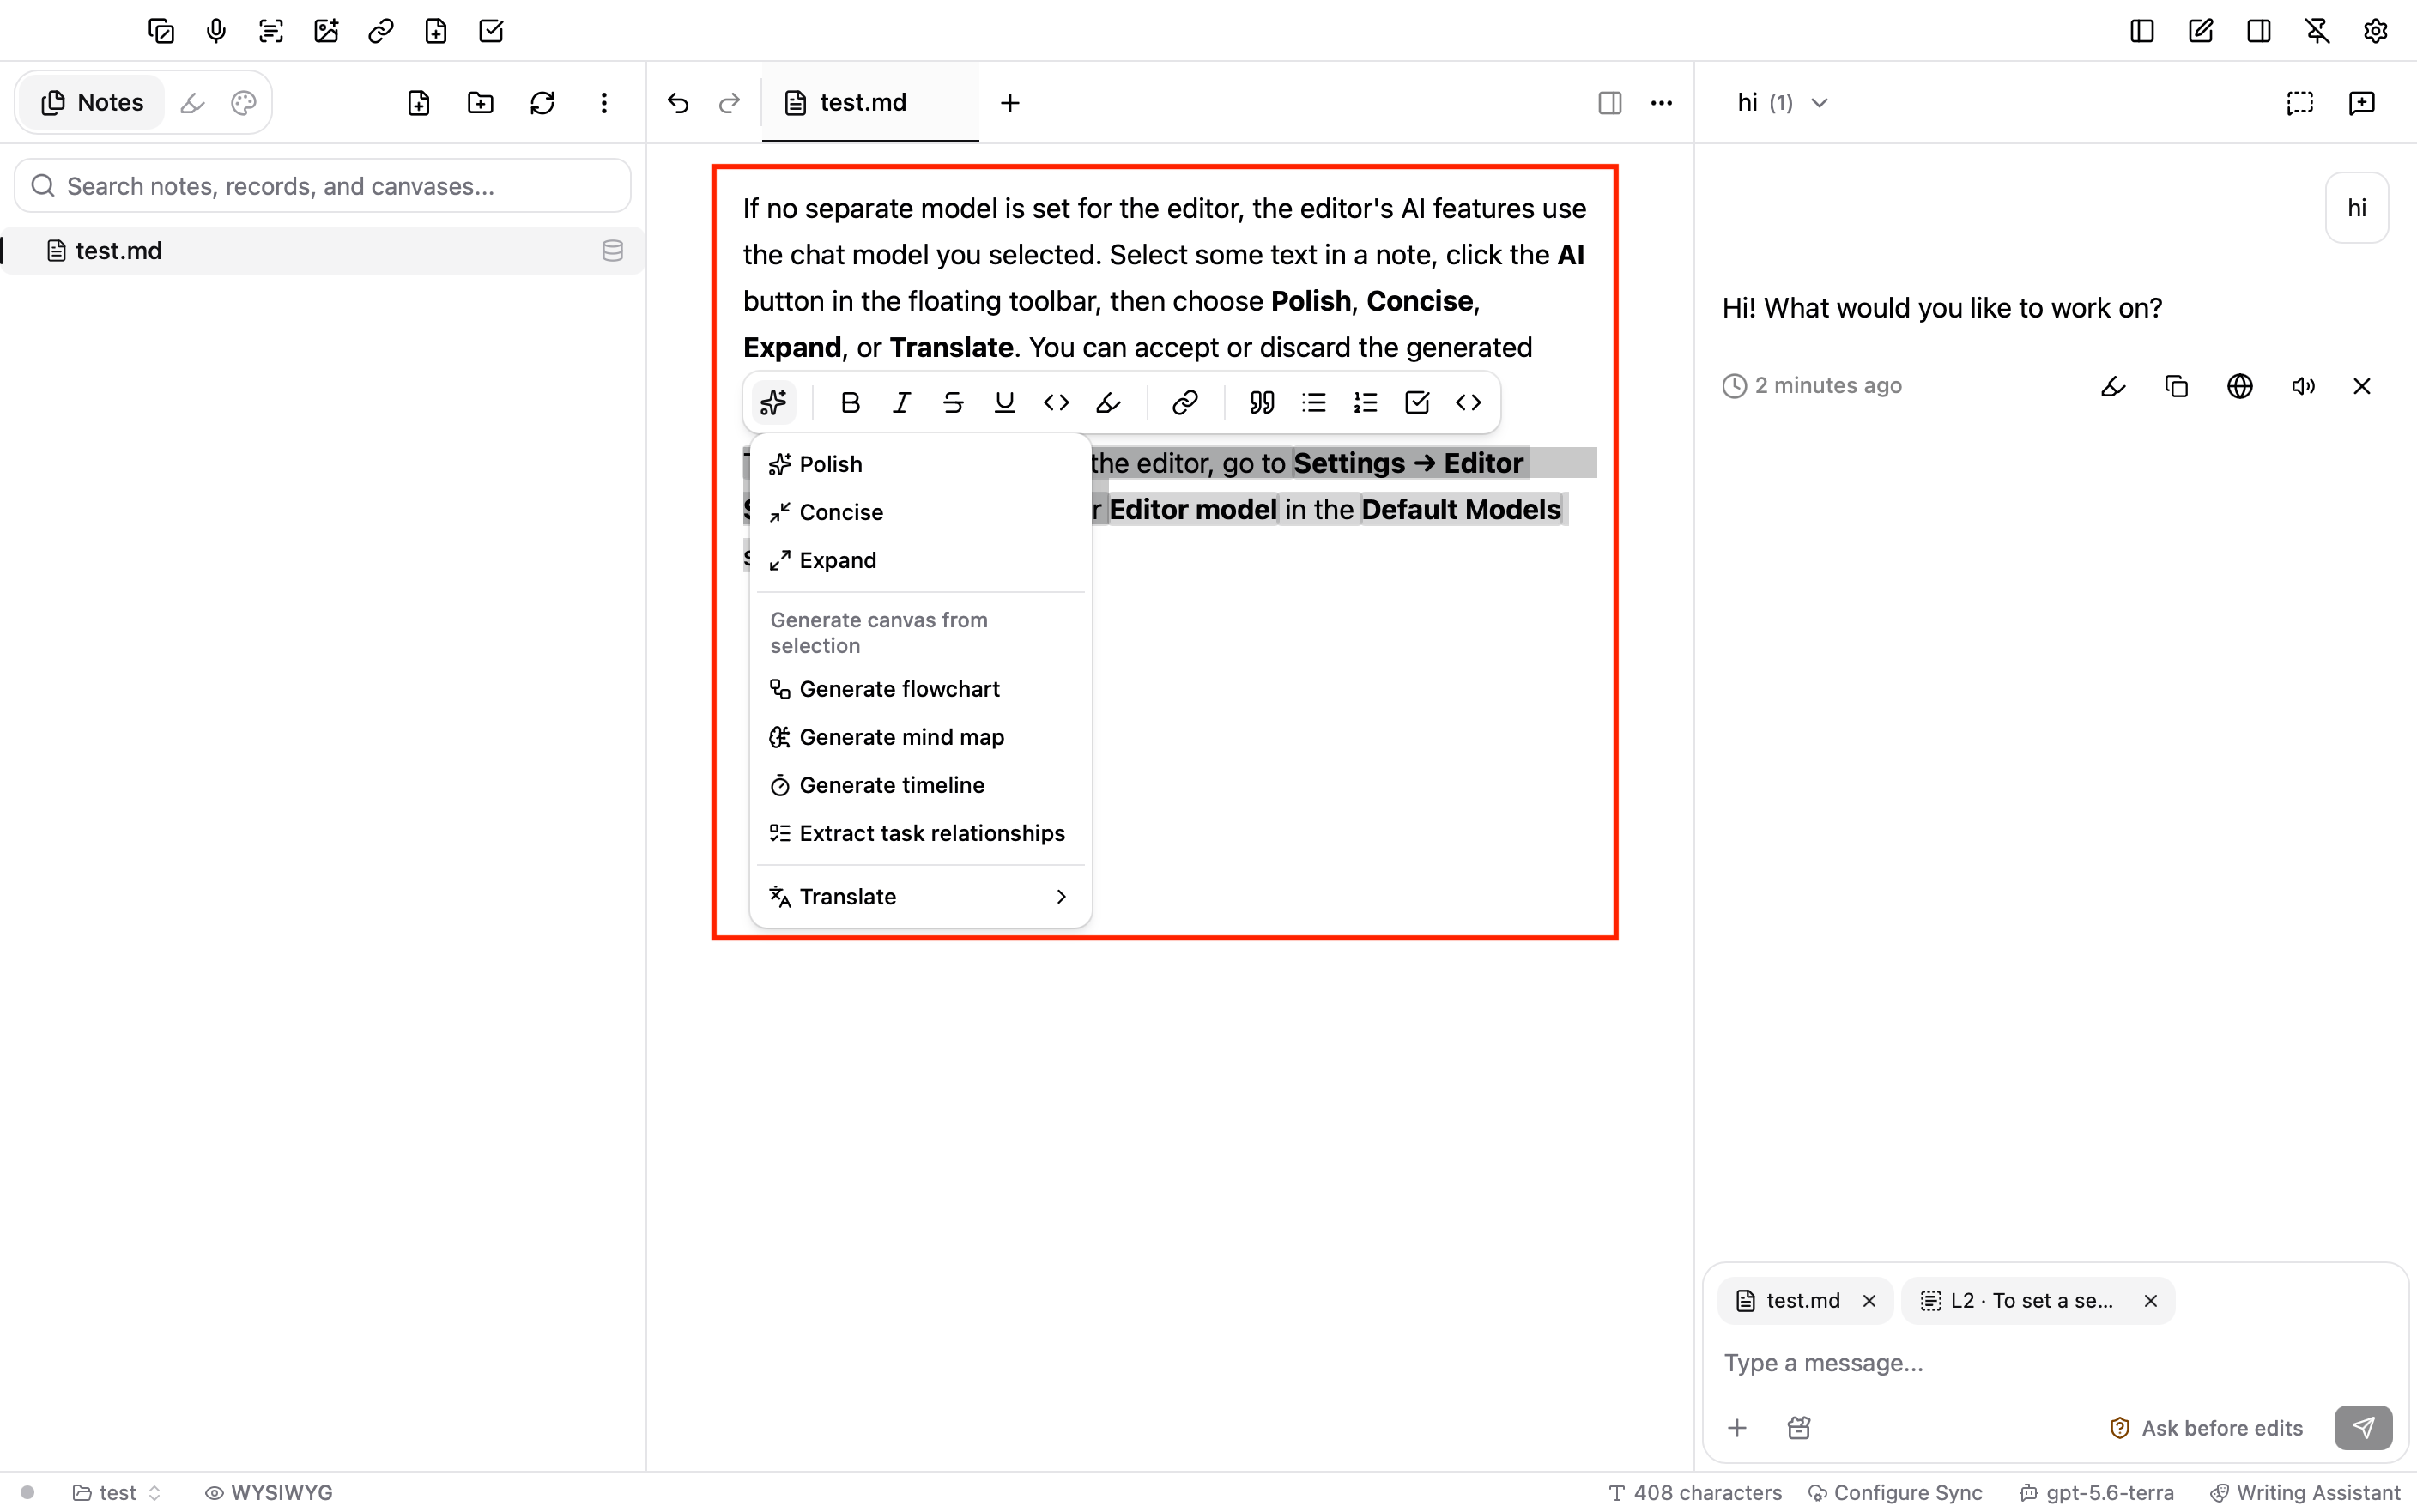
편집기에 별도의 모델을 지정하지 않으면 편집기의 AI 기능은 선택한 채팅 모델을 사용합니다. 노트에서 텍스트를 선택하고 플로팅 도구 모음의 **AI** 버튼을 클릭한 다음 **Polish**, **Concise**, **Expand**, **Translate** 중 하나를 선택합니다. 생성된 결과는 수락하거나 폐기할 수 있습니다.
편집기에 별도의 모델을 지정하려면 **Settings → Editor Settings** 로 이동해 **Default Models** 섹션의 **Editor model** 에서 모델을 선택합니다.
지식 베이스 모델 설정(선택 사항)
NoteGen의 지식 베이스는 시맨틱 검색에 임베딩 모델을 사용합니다. 리랭킹 모델은 선택 사항이며, 검색 결과의 순서를 개선합니다.
1. AIHubMix 플랫폼의 **Models** 탭에서 **Add Model** 을 클릭합니다. 임베딩 모델 ID(예: `text-embedding-3-small`)를 입력하고 **Model Type** 을 **Embedding** 으로 설정한 다음 **Test Connection** 을 클릭합니다.
2. 리랭킹을 사용하려면 리랭킹 모델(예: `qwen3-reranker-0.6b`)을 추가하고 **Model Type** 을 **Reranking** 으로 설정한 다음 **Test Connection** 을 클릭합니다.
3. **Settings → Knowledge Base** 를 엽니다. **Retrieval models** 에서 **Embedding Model** 을 추가한 임베딩 모델로 설정합니다. 리랭킹 모델을 추가했다면 **Reranking Model** 도 해당 모델로 설정합니다.
임베딩 모델이나 리랭킹 모델이 모델 목록에 없으면 검색창에 전체 모델 ID를 입력한 다음 **Use "모델 ID"** 를 클릭합니다.
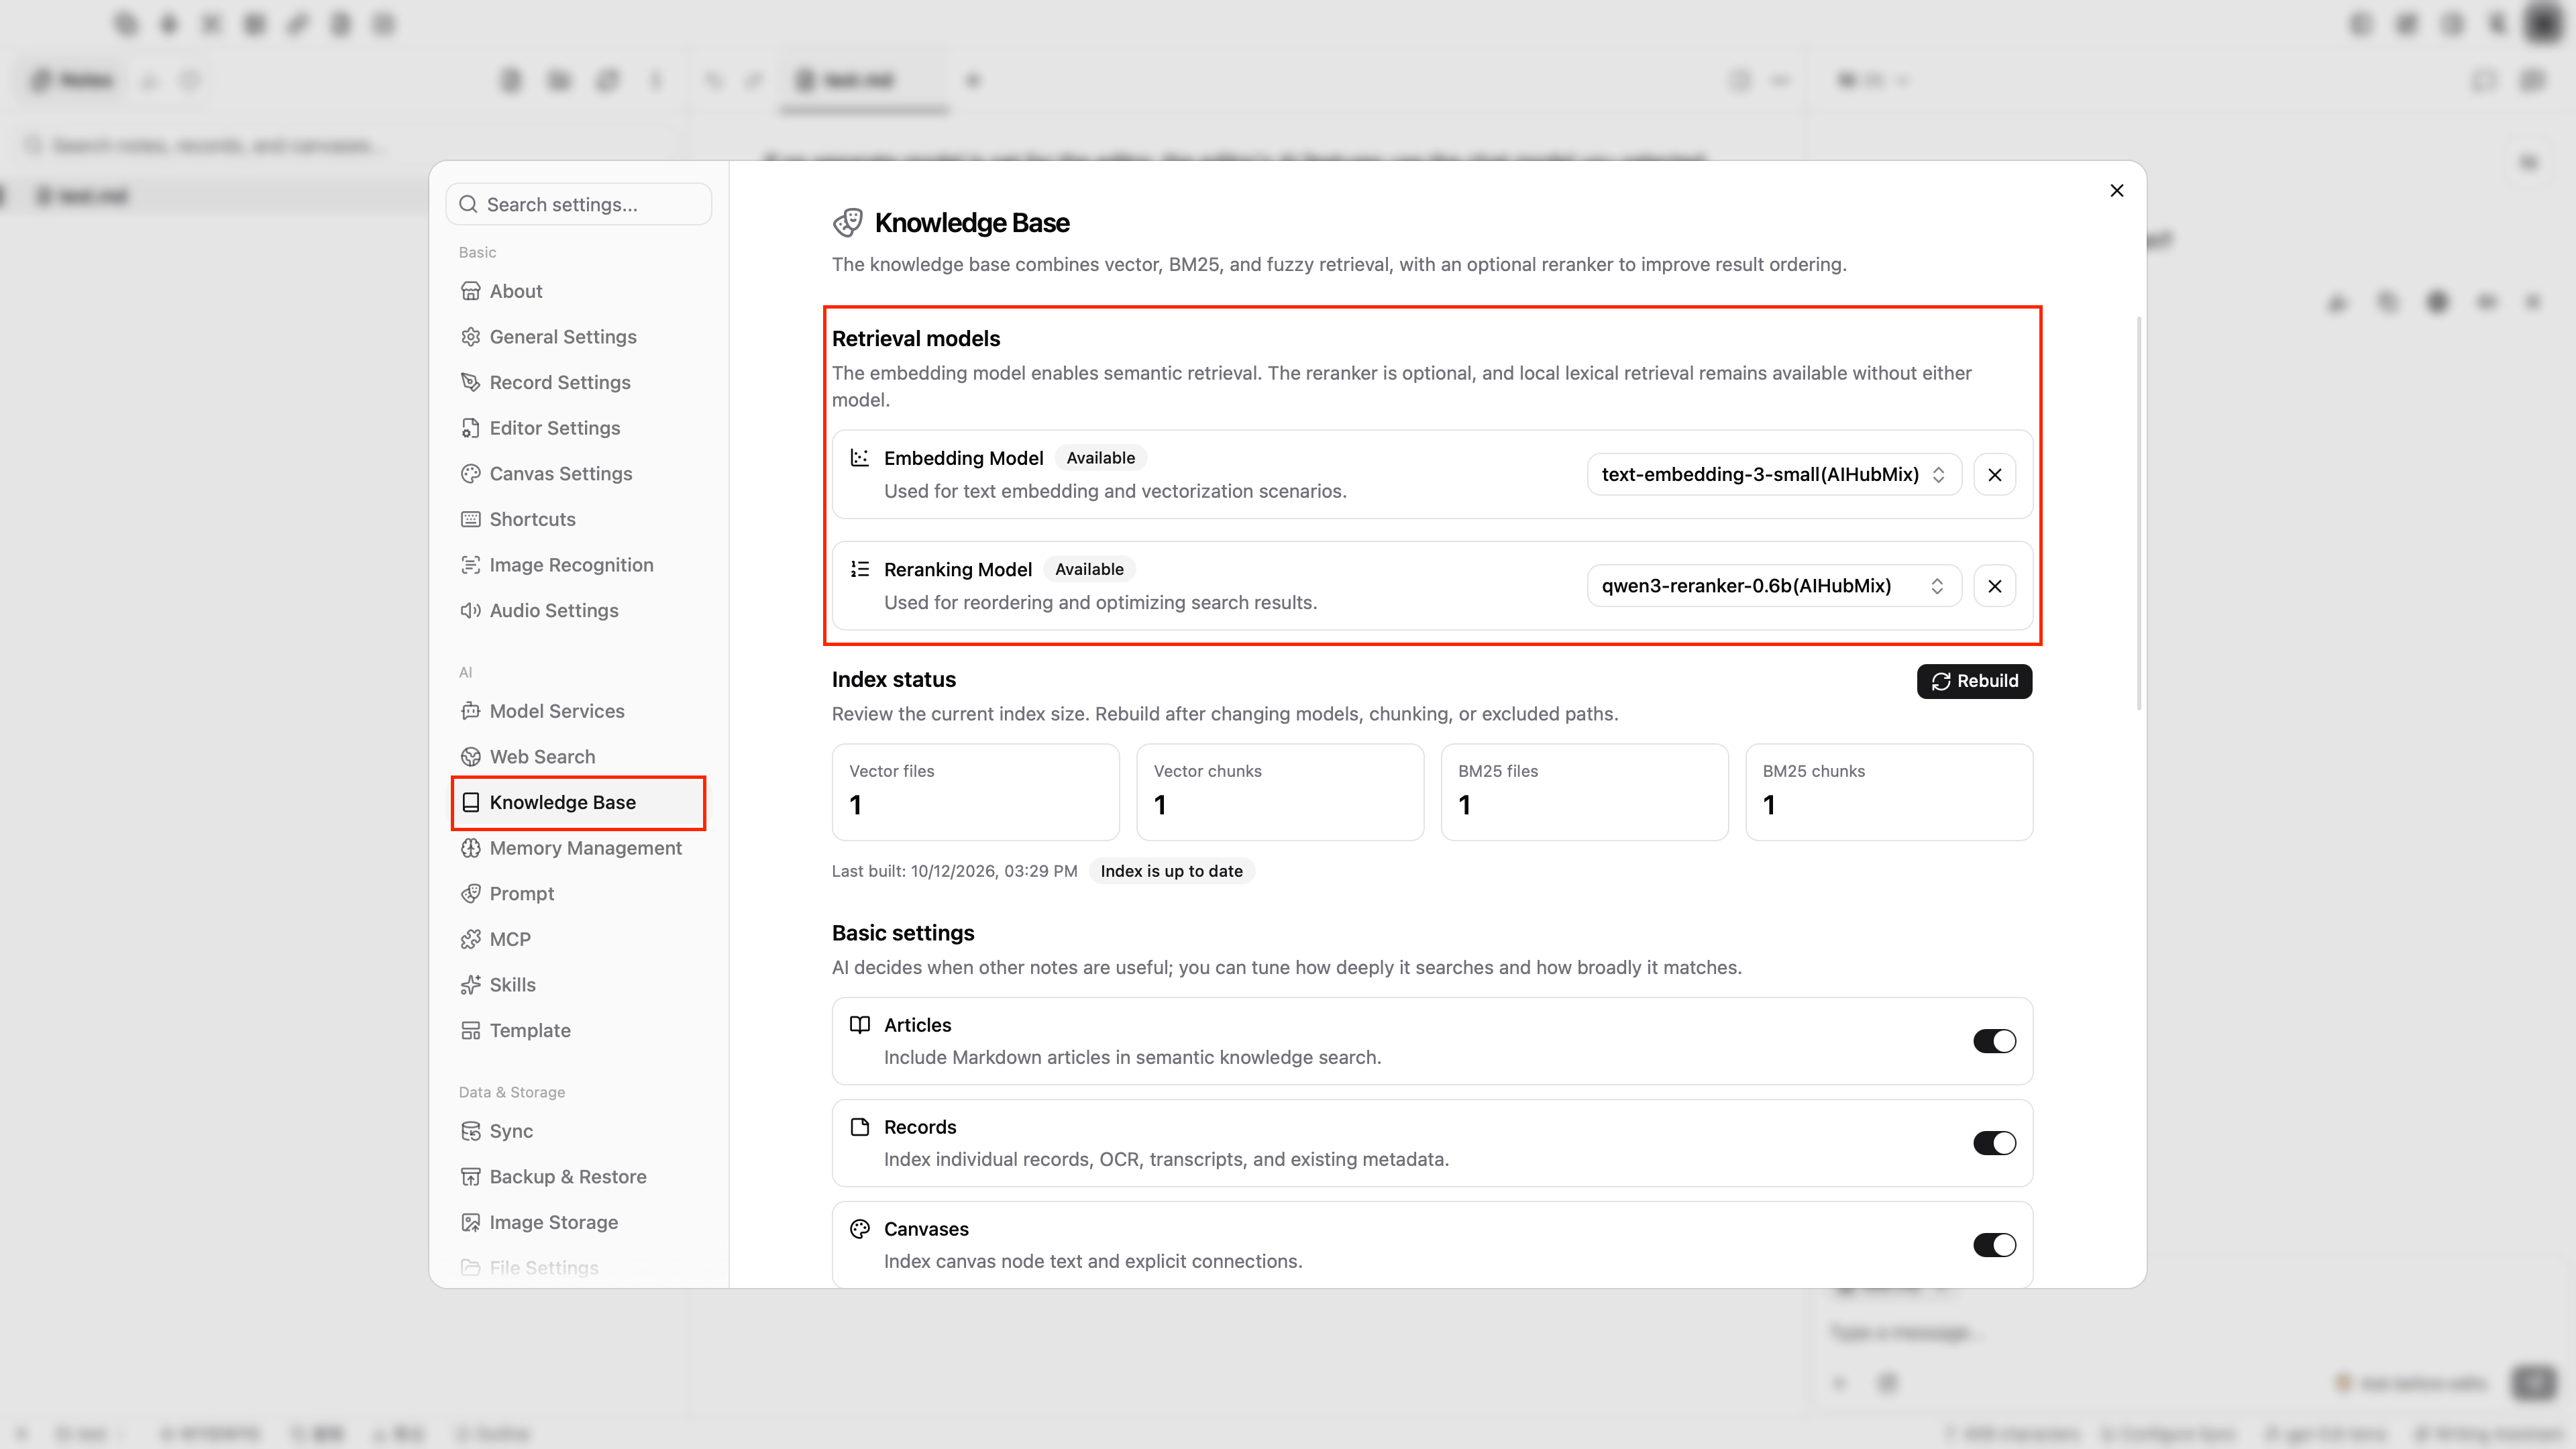 임베딩 모델을 변경한 후에는 지식 베이스의 모든 벡터가 같은 모델로 생성되도록 지식 베이스 벡터를 다시 계산합니다.
자주 묻는 질문
**Model platforms 목록에 AIHubMix가 없으면 어떻게 하나요?**
네트워크 연결을 확인한 다음 설정 창을 닫고 **Model Services** 를 다시 엽니다. NoteGen이 플랫폼 목록을 다시 가져옵니다. 또는 **Model platforms** 목록 하단의 **Add custom platform** 을 클릭하고, 플랫폼 이름을 `AIHubMix` 로 변경하고, **API endpoint** 를 `https://aihubmix.com/v1` 로 설정한 다음 API Key를 입력하고 모델을 추가할 수도 있습니다.
**연결 테스트에 실패하면 어떻게 하나요?**
API Key가 빠짐없이 입력되었는지, **API endpoint** 가 `https://aihubmix.com/v1` 인지, 모델 ID가 AIHubMix 모델 목록과 일치하는지, **Model Type** 이 모델의 기능과 맞는지 확인합니다. `401` 또는 `403` 오류가 발생하면 API Key와 계정 권한을 확인합니다. `404` 오류가 발생하면 API endpoint와 모델 ID를 확인합니다. 기본 엔드포인트를 일시적으로 사용할 수 없으면 **API endpoint** 를 `https://api.inferera.com/v1` 로 변경합니다.
**추가한 모델이 하단의 모델 선택기에 표시되지 않으면 어떻게 하나요?**
모델 선택기에는 **Model Type** 이 **Chat** 인 모델만 표시됩니다. **Settings → Model Services** 로 돌아가 해당 모델에 모델 ID가 입력되어 있고 **Model Type** 이 **Chat** 인지 확인합니다.
**채팅 입력창에 “No primary model configured, can't use AI chat...”라는 메시지가 표시되면 어떻게 하나요?**
창 하단 상태 표시줄 오른쪽의 모델 이름을 클릭한 뒤 **AIHubMix** 그룹에서 채팅 모델을 선택합니다.
***
마지막 업데이트: 2026-10-12
This documentation is built and hosted on [Mintlify](https://mintlify.com), a developer documentation platform.