> ## Documentation Index
> Fetch the complete documentation index at: https://docs.aihubmix.com/llms.txt
> Use this file to discover all available pages before exploring further.
# OpenClaw
## 설치
설치 전에 Node >= 22를 확인하세요.
설치 명령을 실행합니다
```shellscript theme={null}
npm install -g openclaw@latest
```
설치가 끝난 뒤에는 아래 명령을 어느 디렉터리에서나 실행할 수 있습니다. 먼저 OpenClaw 설치 디렉터리로 이동할 필요가 없습니다. 터미널에서 `openclaw`를 인식한다면 이 가이드의 명령을 그대로 복사해 실행하면 됩니다.
```powershell theme={null}
openclaw models status
```
Windows에서 `openclaw`를 찾을 수 없다고 표시되면 명령 앞부분의 `openclaw`를 로컬 실행 파일 경로로 바꾸세요.
```powershell theme={null}
& "설치경로\OpenClaw\openclaw.cmd" models status
```
`설치경로`는 자리표시자입니다. 실제로 OpenClaw를 설치한 상위 디렉터리로 바꾸세요. 예를 들어 OpenClaw가 `D:\Apps\OpenClaw`에 있다면 `& "D:\Apps\OpenClaw\openclaw.cmd" models status`로 실행합니다.
### 터미널 구성
터미널을 열고 다음 명령을 실행하여 구성을 시작합니다
```shellscript theme={null}
openclaw onboard
```
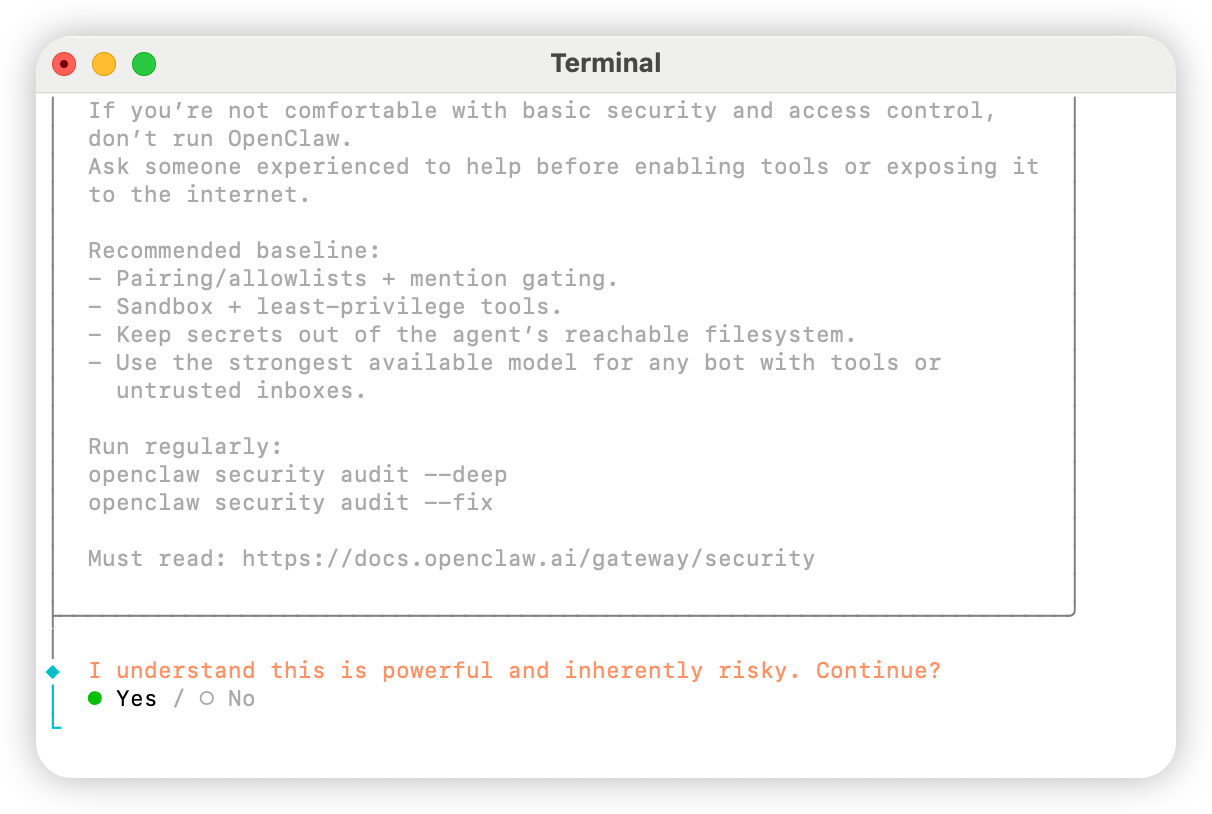
`Yes`를 선택합니다
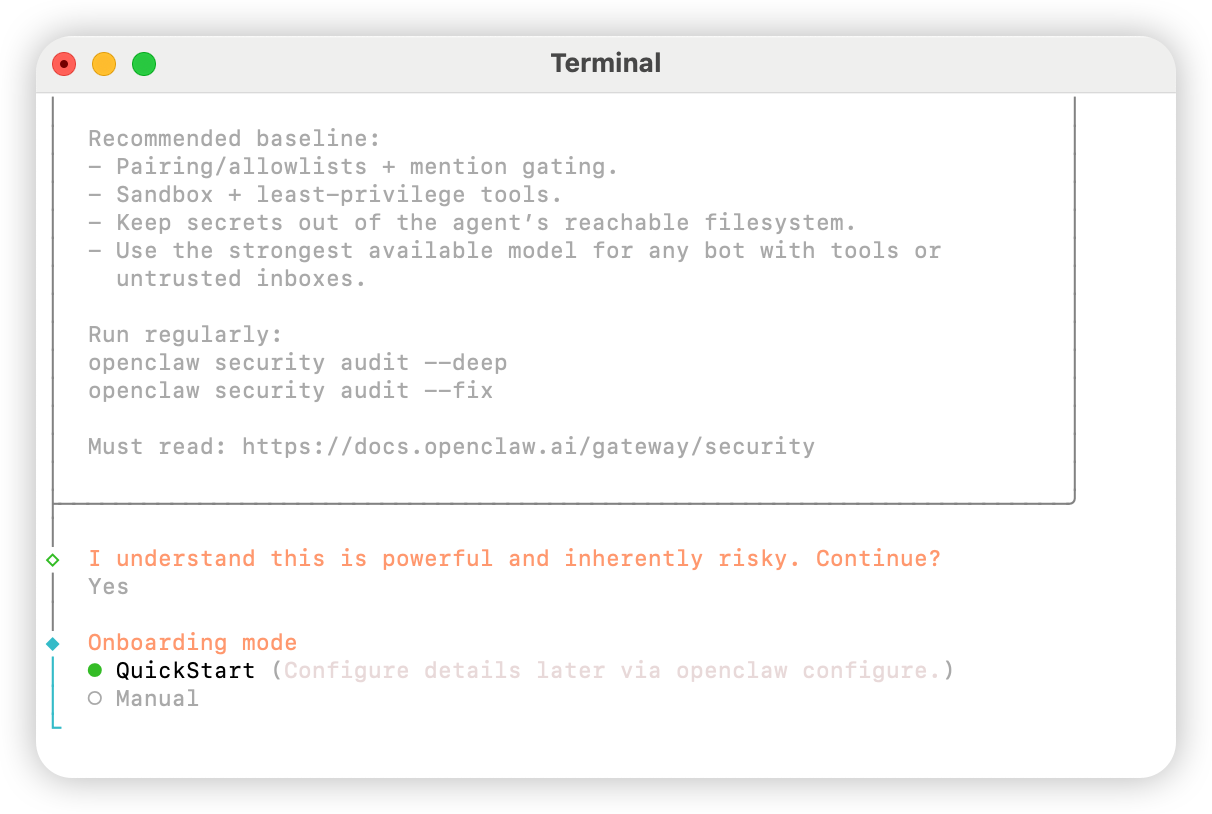
 `QuickStart`를 선택합니다
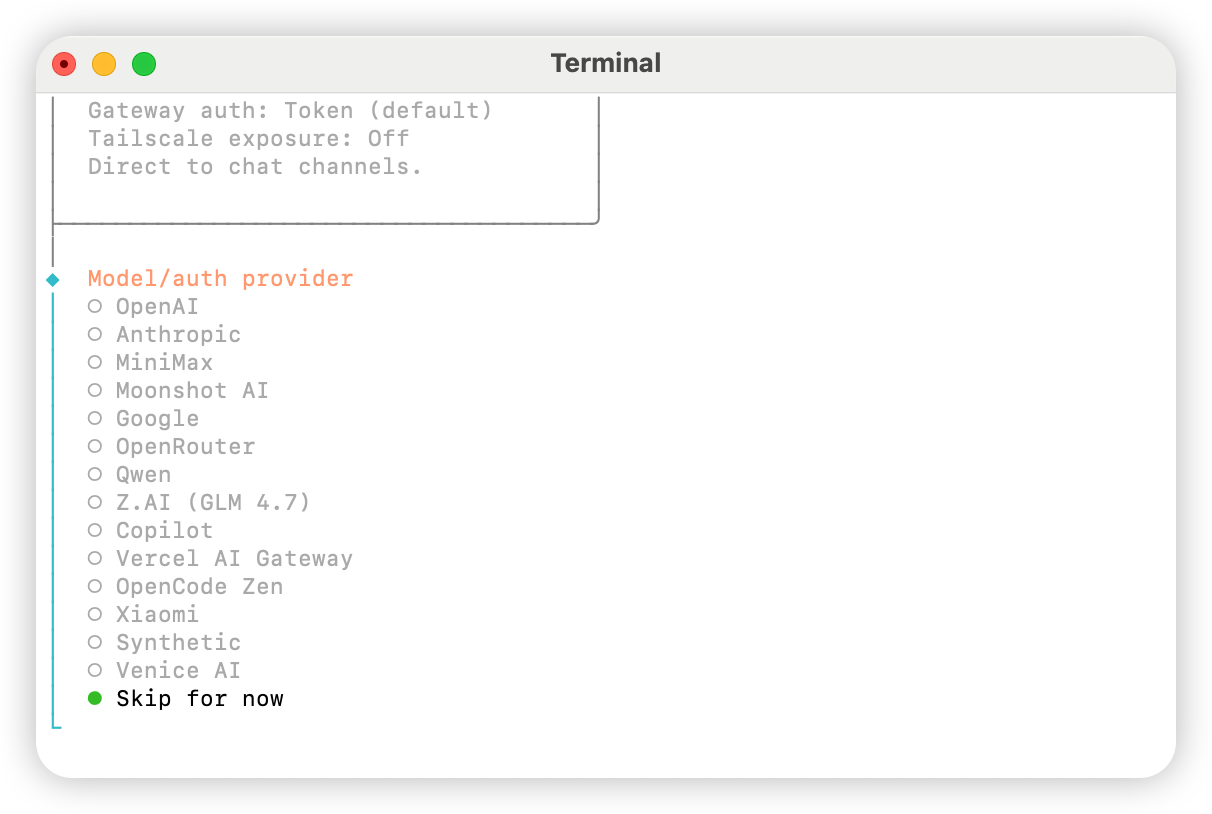
 `Skip for now`를 선택합니다
 `All providers`를 선택합니다
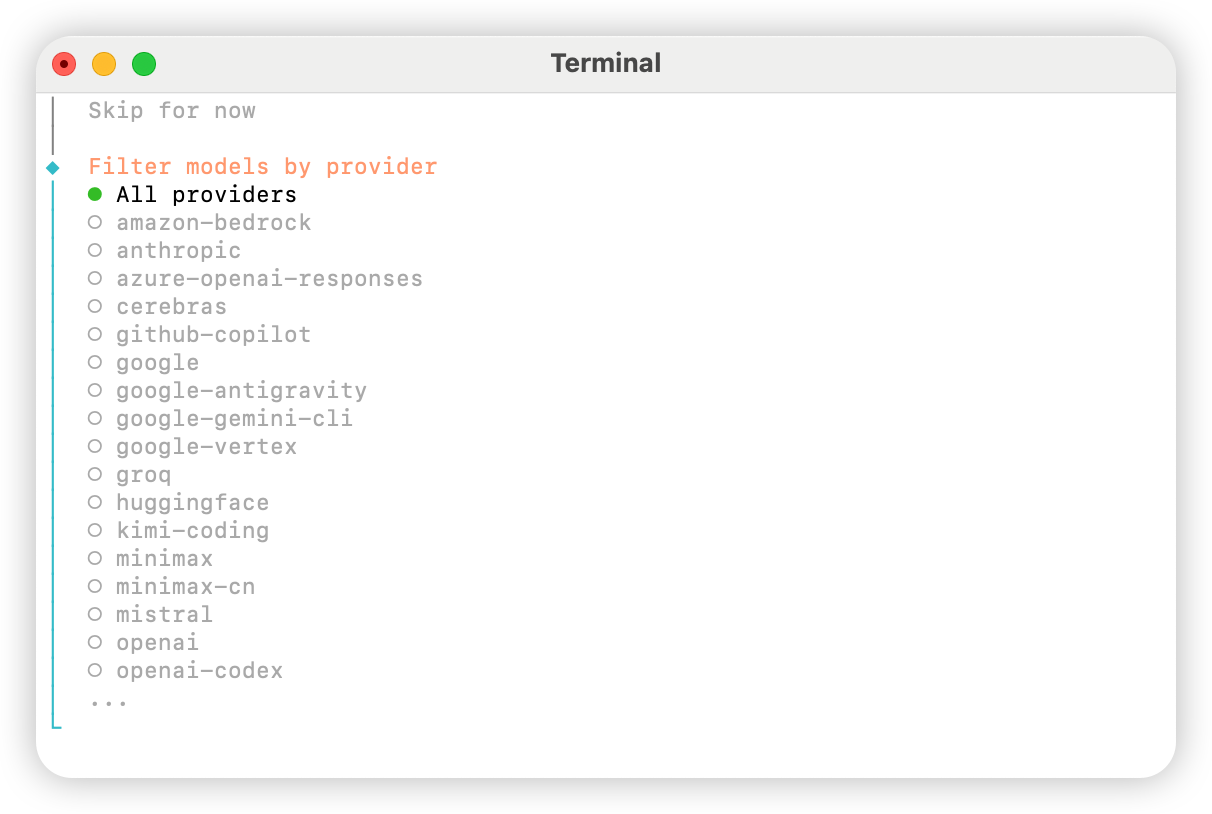 필요에 따라 기본 모델을 선택합니다. 처음에는 `Keep current`를 선택해도 됩니다(「방법 2: 수동 구성」을 사용하는 경우, 다음 단계에서 구성 파일에서 수정할 수 있습니다).
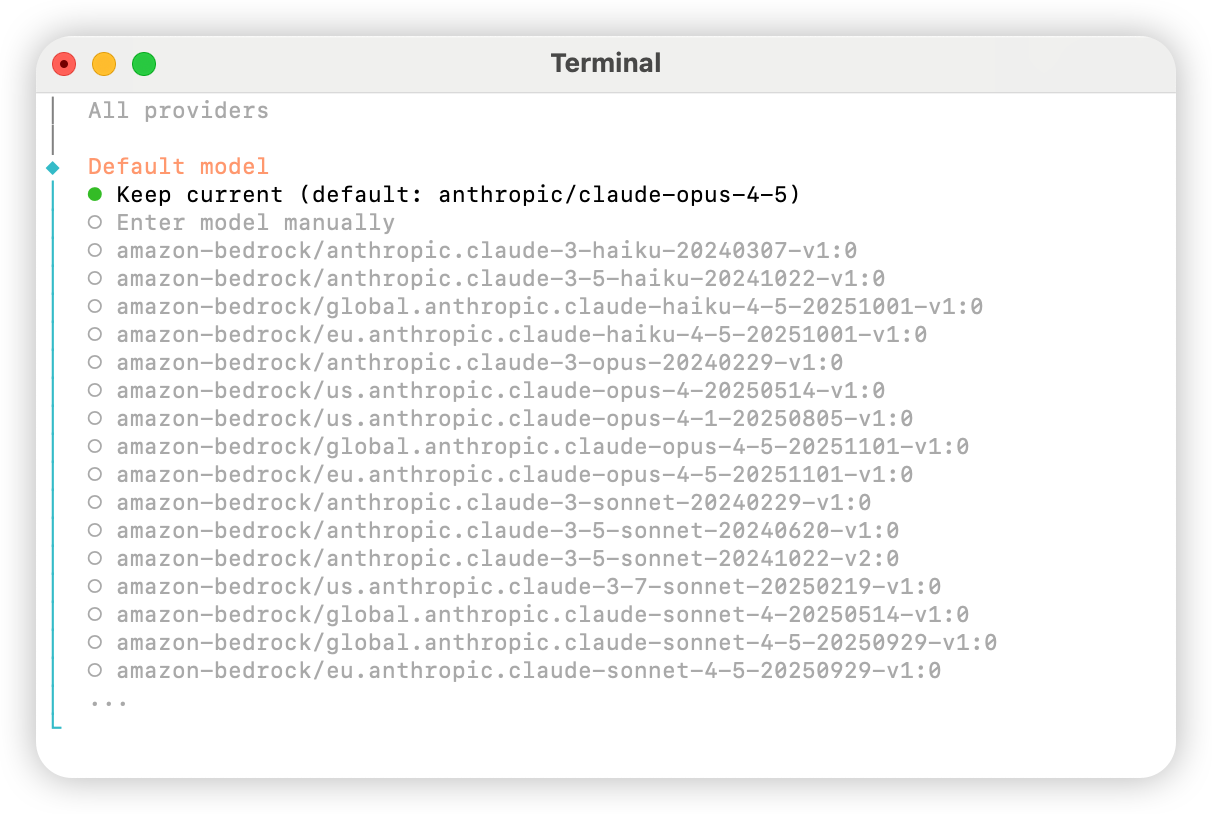 필요에 따라 개인 계정을 연결하세요. 필요하지 않으면 `Skip for now`를 선택하세요.
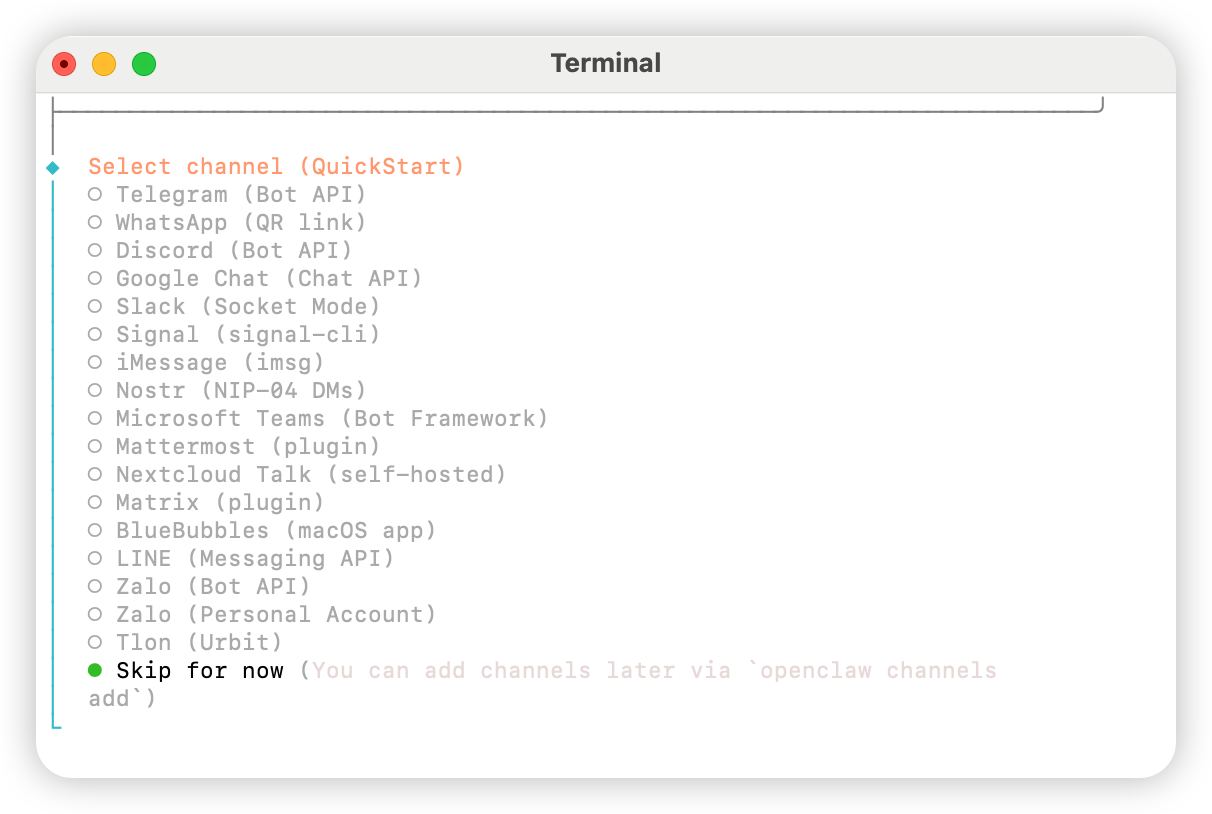 `Yes`를 선택하여 스킬을 구성합니다.
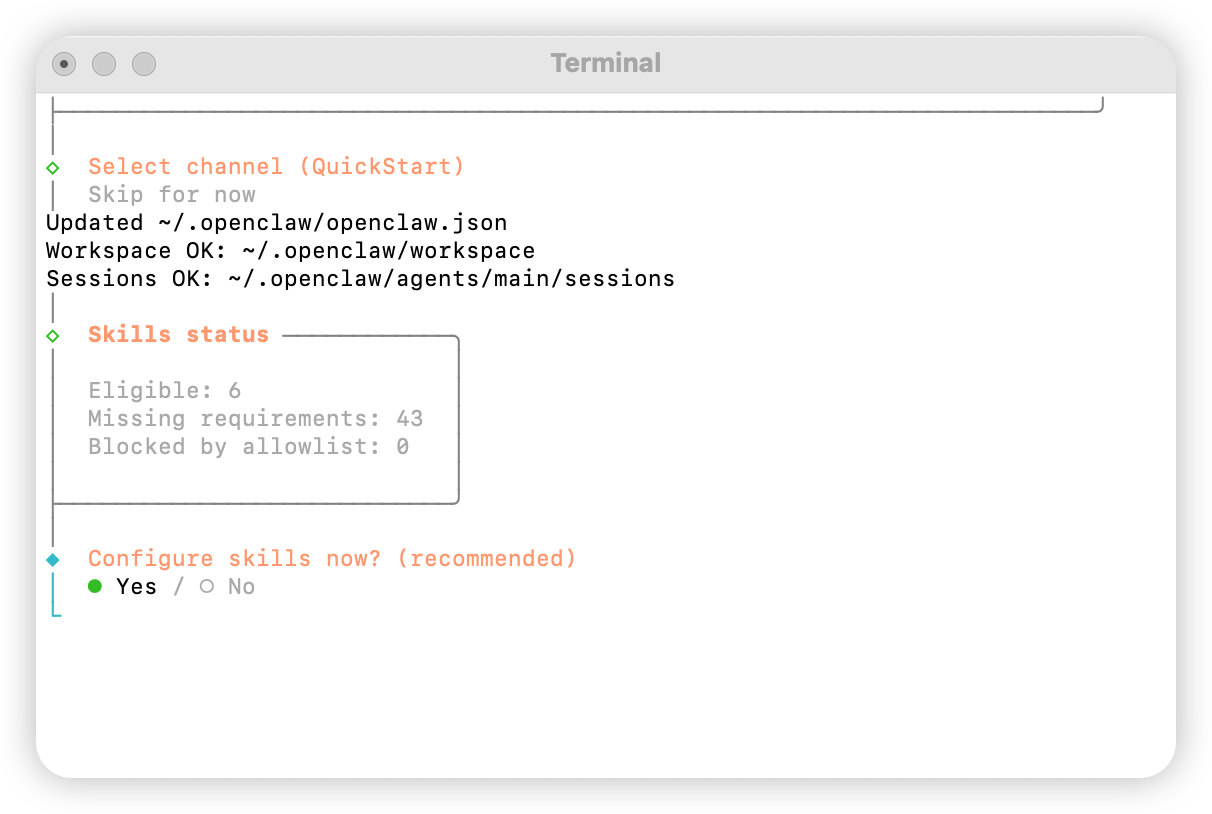 `npm`을 선택합니다
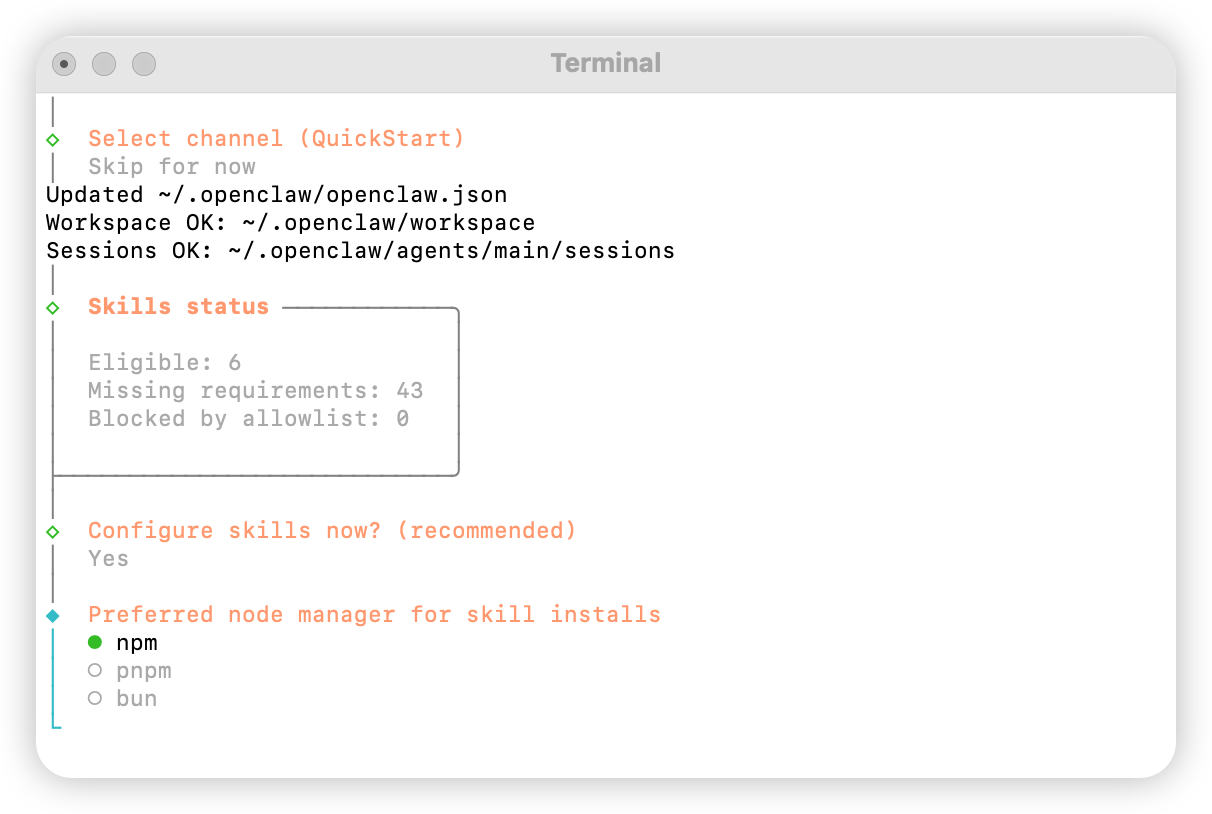 필요에 따라 스킬 선택을 구성합니다.
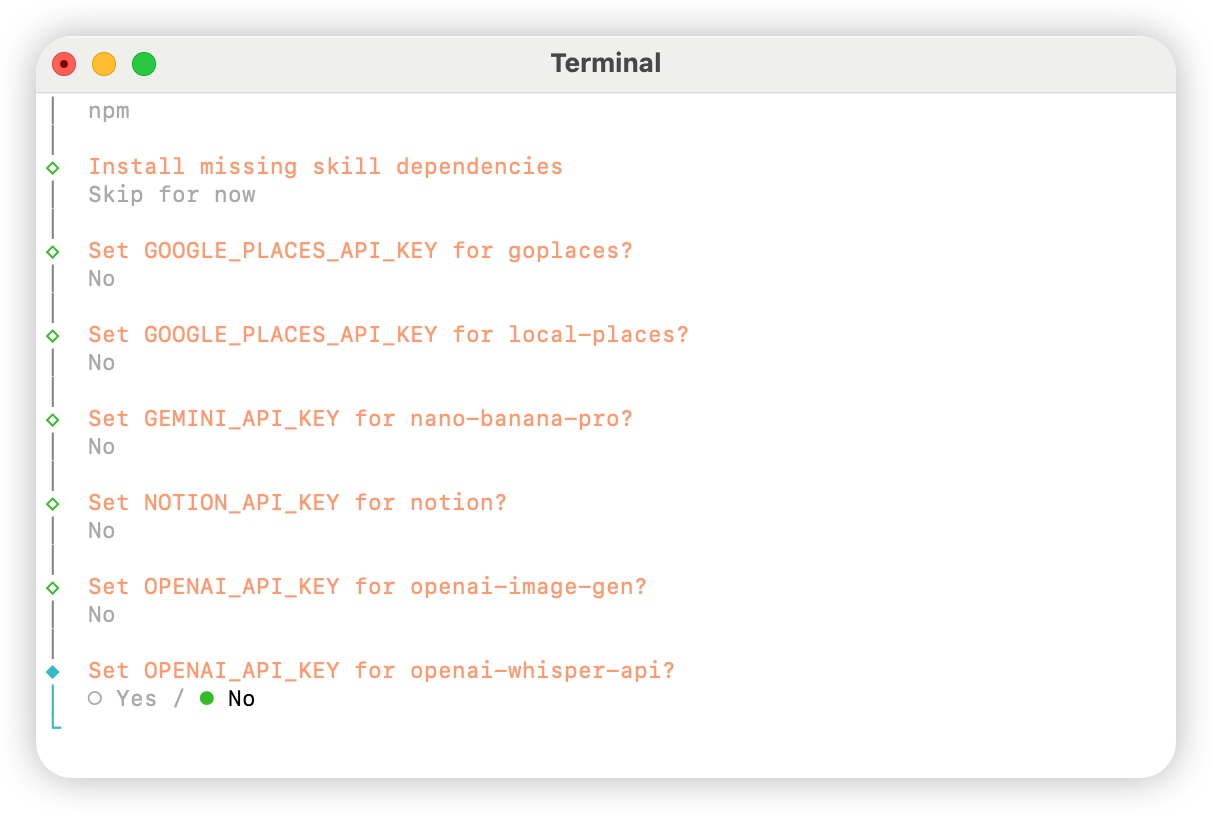
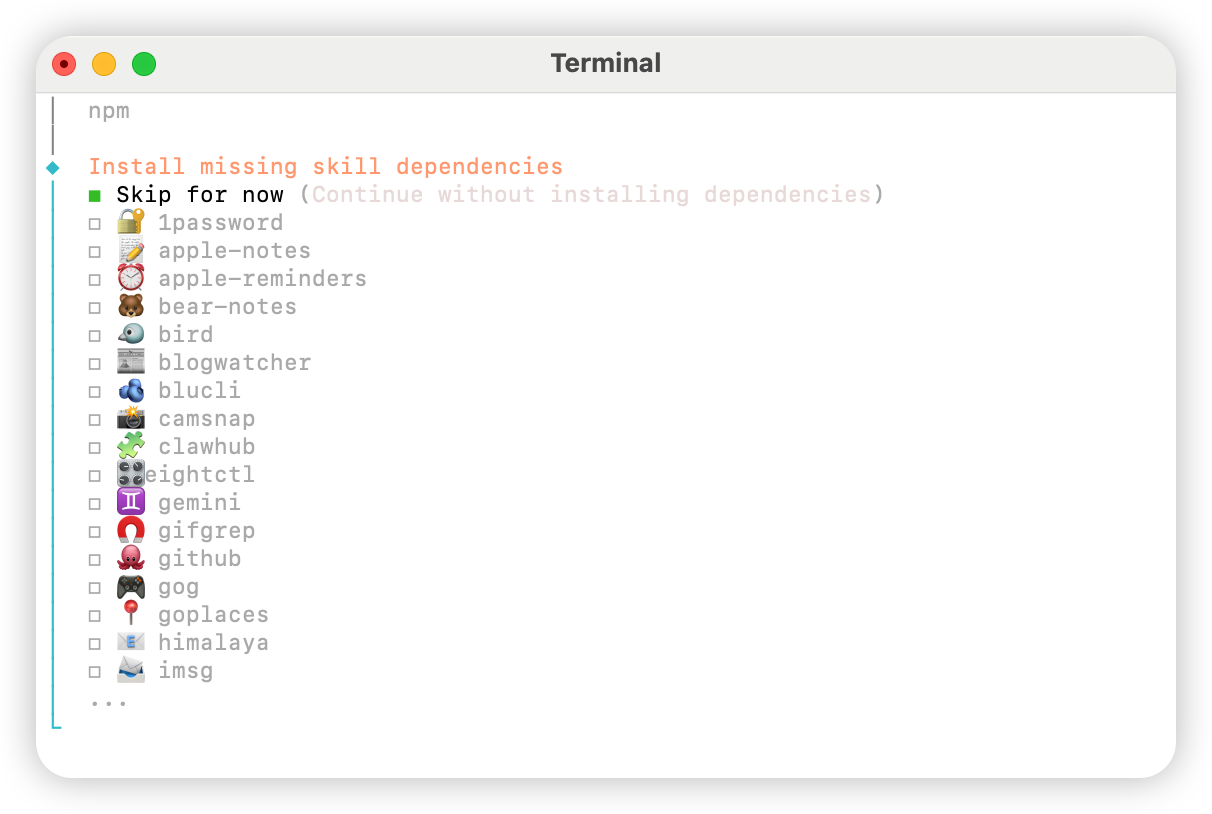 모든 옵션에 대해 `No`를 선택합니다.
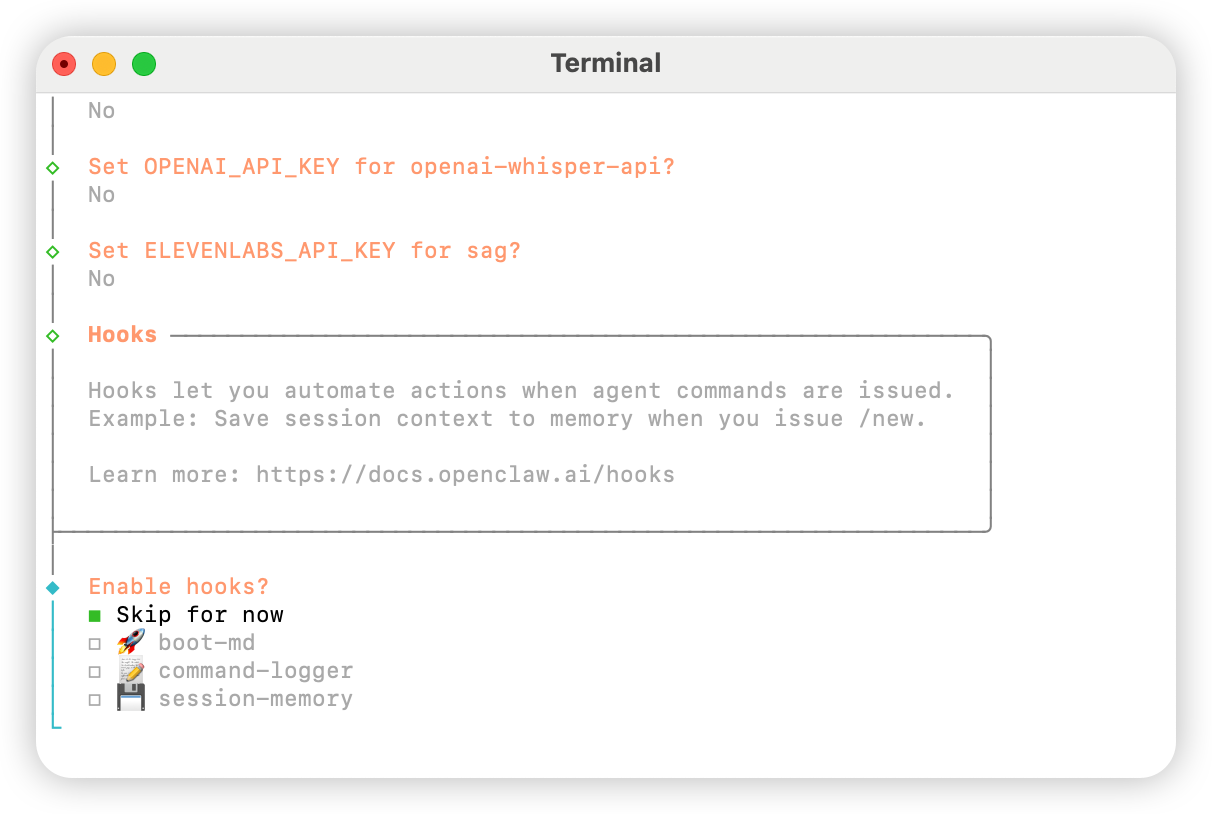
 `Skip for now`를 선택합니다.
 `Hatch in UI`를 선택합니다.
## AIHubMix 구성
### 방법 1: 플러그인을 통한 빠른 설정 (권장)
플러그인 소스 코드: [aihubmix-auth](https://github.com/akakenle/aihubmix-auth)
AIHubMix auth 플러그인을 설치하고 Gateway를 재시작합니다:
```shellscript theme={null}
openclaw plugins install @akakenle/aihubmix-auth
openclaw gateway restart
```
auth 명령을 실행합니다. 프롬프트가 나타나면 AIHubMix API Key를 입력합니다. 아래 명령은 네 개의 provider 중 하나에 대해 한 번만 실행하면 됩니다 — 플러그인이 `providerAuthAliases`를 사용하여 동일한 키를 모든 transport에서 유효하게 만듭니다:
```shellscript theme={null}
openclaw models auth login --provider aihubmix-openai --method api-key --set-default
```
플러그인은 모델을 다음 그룹으로 구성합니다:
* **aihubmix-openai** — `gpt-*` / `o1-*` / `o3-*` / `o4-*`, `https://aihubmix.com/v1` (`openai-completions`)
* **aihubmix-anthropic** — `claude-*`, `https://aihubmix.com` (`anthropic-messages`)
* **aihubmix-google** — `gemini-*`, `https://aihubmix.com/gemini/v1beta` (`google-generative-ai`)
* **aihubmix-other** — 기타 모델, `https://aihubmix.com/v1` (`openai-completions`)
단축 모델 ID(예: `claude-sonnet-4-5`)는 플러그인의 `resolveDynamicModel` 훅이 올바른 transport로 자동 라우팅합니다 — 전체 `provider/model`을 작성할 필요가 없습니다.
> 대화형 로그인을 건너뛰고 싶으신가요? 설치 전에 `export AIHUBMIX_API_KEY=sk-...`을 설정하세요 — 플러그인이 키를 provider 구성에 인라인 `apiKey`로 작성합니다 (대화형 로그는 대신 auth-profile에 저장).
구성이 완료되면 [시작](#시작) 섹션으로 이동하여 사용을 시작합니다.
### 방법 2: 수동 구성
`~/.openclaw/openclaw.json` 파일을 열고 다음 구성을 추가합니다:
```json theme={null}
{
"models": {
"mode": "merge",
"providers": {
"aihubmix-openai": {
"baseUrl": "https://aihubmix.com/v1",
"api": "openai-completions",
"models": [
{
"id": "gpt-4o",
"name": "gpt-4o",
"reasoning": false,
"input": ["text"],
"cost": {
"input": 0,
"output": 0,
"cacheRead": 0,
"cacheWrite": 0
},
"contextWindow": 128000,
"maxTokens": 16384
}
]
},
"aihubmix-anthropic": {
"baseUrl": "https://aihubmix.com",
"api": "anthropic-messages",
"models": [
{
"id": "claude-sonnet-4-5",
"name": "claude-sonnet-4-5",
"reasoning": false,
"input": ["text"],
"cost": {
"input": 0,
"output": 0,
"cacheRead": 0,
"cacheWrite": 0
},
"contextWindow": 200000,
"maxTokens": 64000
}
]
},
"aihubmix-google": {
"baseUrl": "https://aihubmix.com/gemini/v1beta",
"api": "google-generative-ai",
"models": []
},
"aihubmix-other": {
"baseUrl": "https://aihubmix.com/v1",
"api": "openai-completions",
"models": []
}
}
},
"agents": {
"defaults": {
"model": {
"primary": "aihubmix-anthropic/claude-sonnet-4-5"
},
"workspace": "your_workspace_path",
"compaction": {
"mode": "safeguard"
},
"maxConcurrent": 4,
"subagents": {
"maxConcurrent": 8
}
}
}
}
```
### 방법 3: 동적 모델 명령으로 기본 모델 전환
AIHubMix OpenClaw 플러그인은 동적 모델 라우팅을 지원합니다. AIHubMix 계정에서 사용할 수 있는 모델이라면 `provider/model-id` 형식으로 호출할 수 있습니다. 실제 사용 가능 여부는 AIHubMix 콘솔과 API 응답을 기준으로 확인하세요.
일반적인 provider 선택 규칙은 다음과 같습니다.
* `aihubmix-openai`: OpenAI 호환 모델, 예: `gpt-*`, `o1-*`, `o3-*`, `o4-*`
* `aihubmix-anthropic`: Claude 모델, 예: `claude-*`
* `aihubmix-google`: Gemini 모델, 예: `gemini-*`
* `aihubmix-other`: OpenAI 호환 엔드포인트로 호출하는 기타 모델, 예: `glm-5.2`
예를 들어 `gpt-5.4`를 OpenClaw 기본 모델로 설정합니다.
```powershell theme={null}
openclaw models set aihubmix-openai/gpt-5.4
```
Windows에서 `openclaw`를 찾을 수 없다면 로컬 경로 형식으로 실행합니다.
```powershell theme={null}
& "설치경로\OpenClaw\openclaw.cmd" models set aihubmix-openai/gpt-5.4
```
현재 기본 모델과 인증 상태를 확인합니다.
```powershell theme={null}
openclaw models status
```
실제 호출로 검증합니다.
```powershell theme={null}
openclaw infer model run --local --json --model aihubmix-openai/gpt-5.4 --prompt "Reply only OK"
```
OpenAI / Claude / Gemini 그룹 밖의 모델을 호출하려면 `aihubmix-other`를 사용합니다. 예:
```powershell theme={null}
openclaw infer model run --local --json --model aihubmix-other/glm-5.2 --prompt "Reply only OK"
```
현재 OpenClaw가 불러온 모델 카탈로그를 확인합니다.
```powershell theme={null}
openclaw infer model list --json
```
## 시작
```shellscript theme={null}
openclaw gateway
```
## 테스트
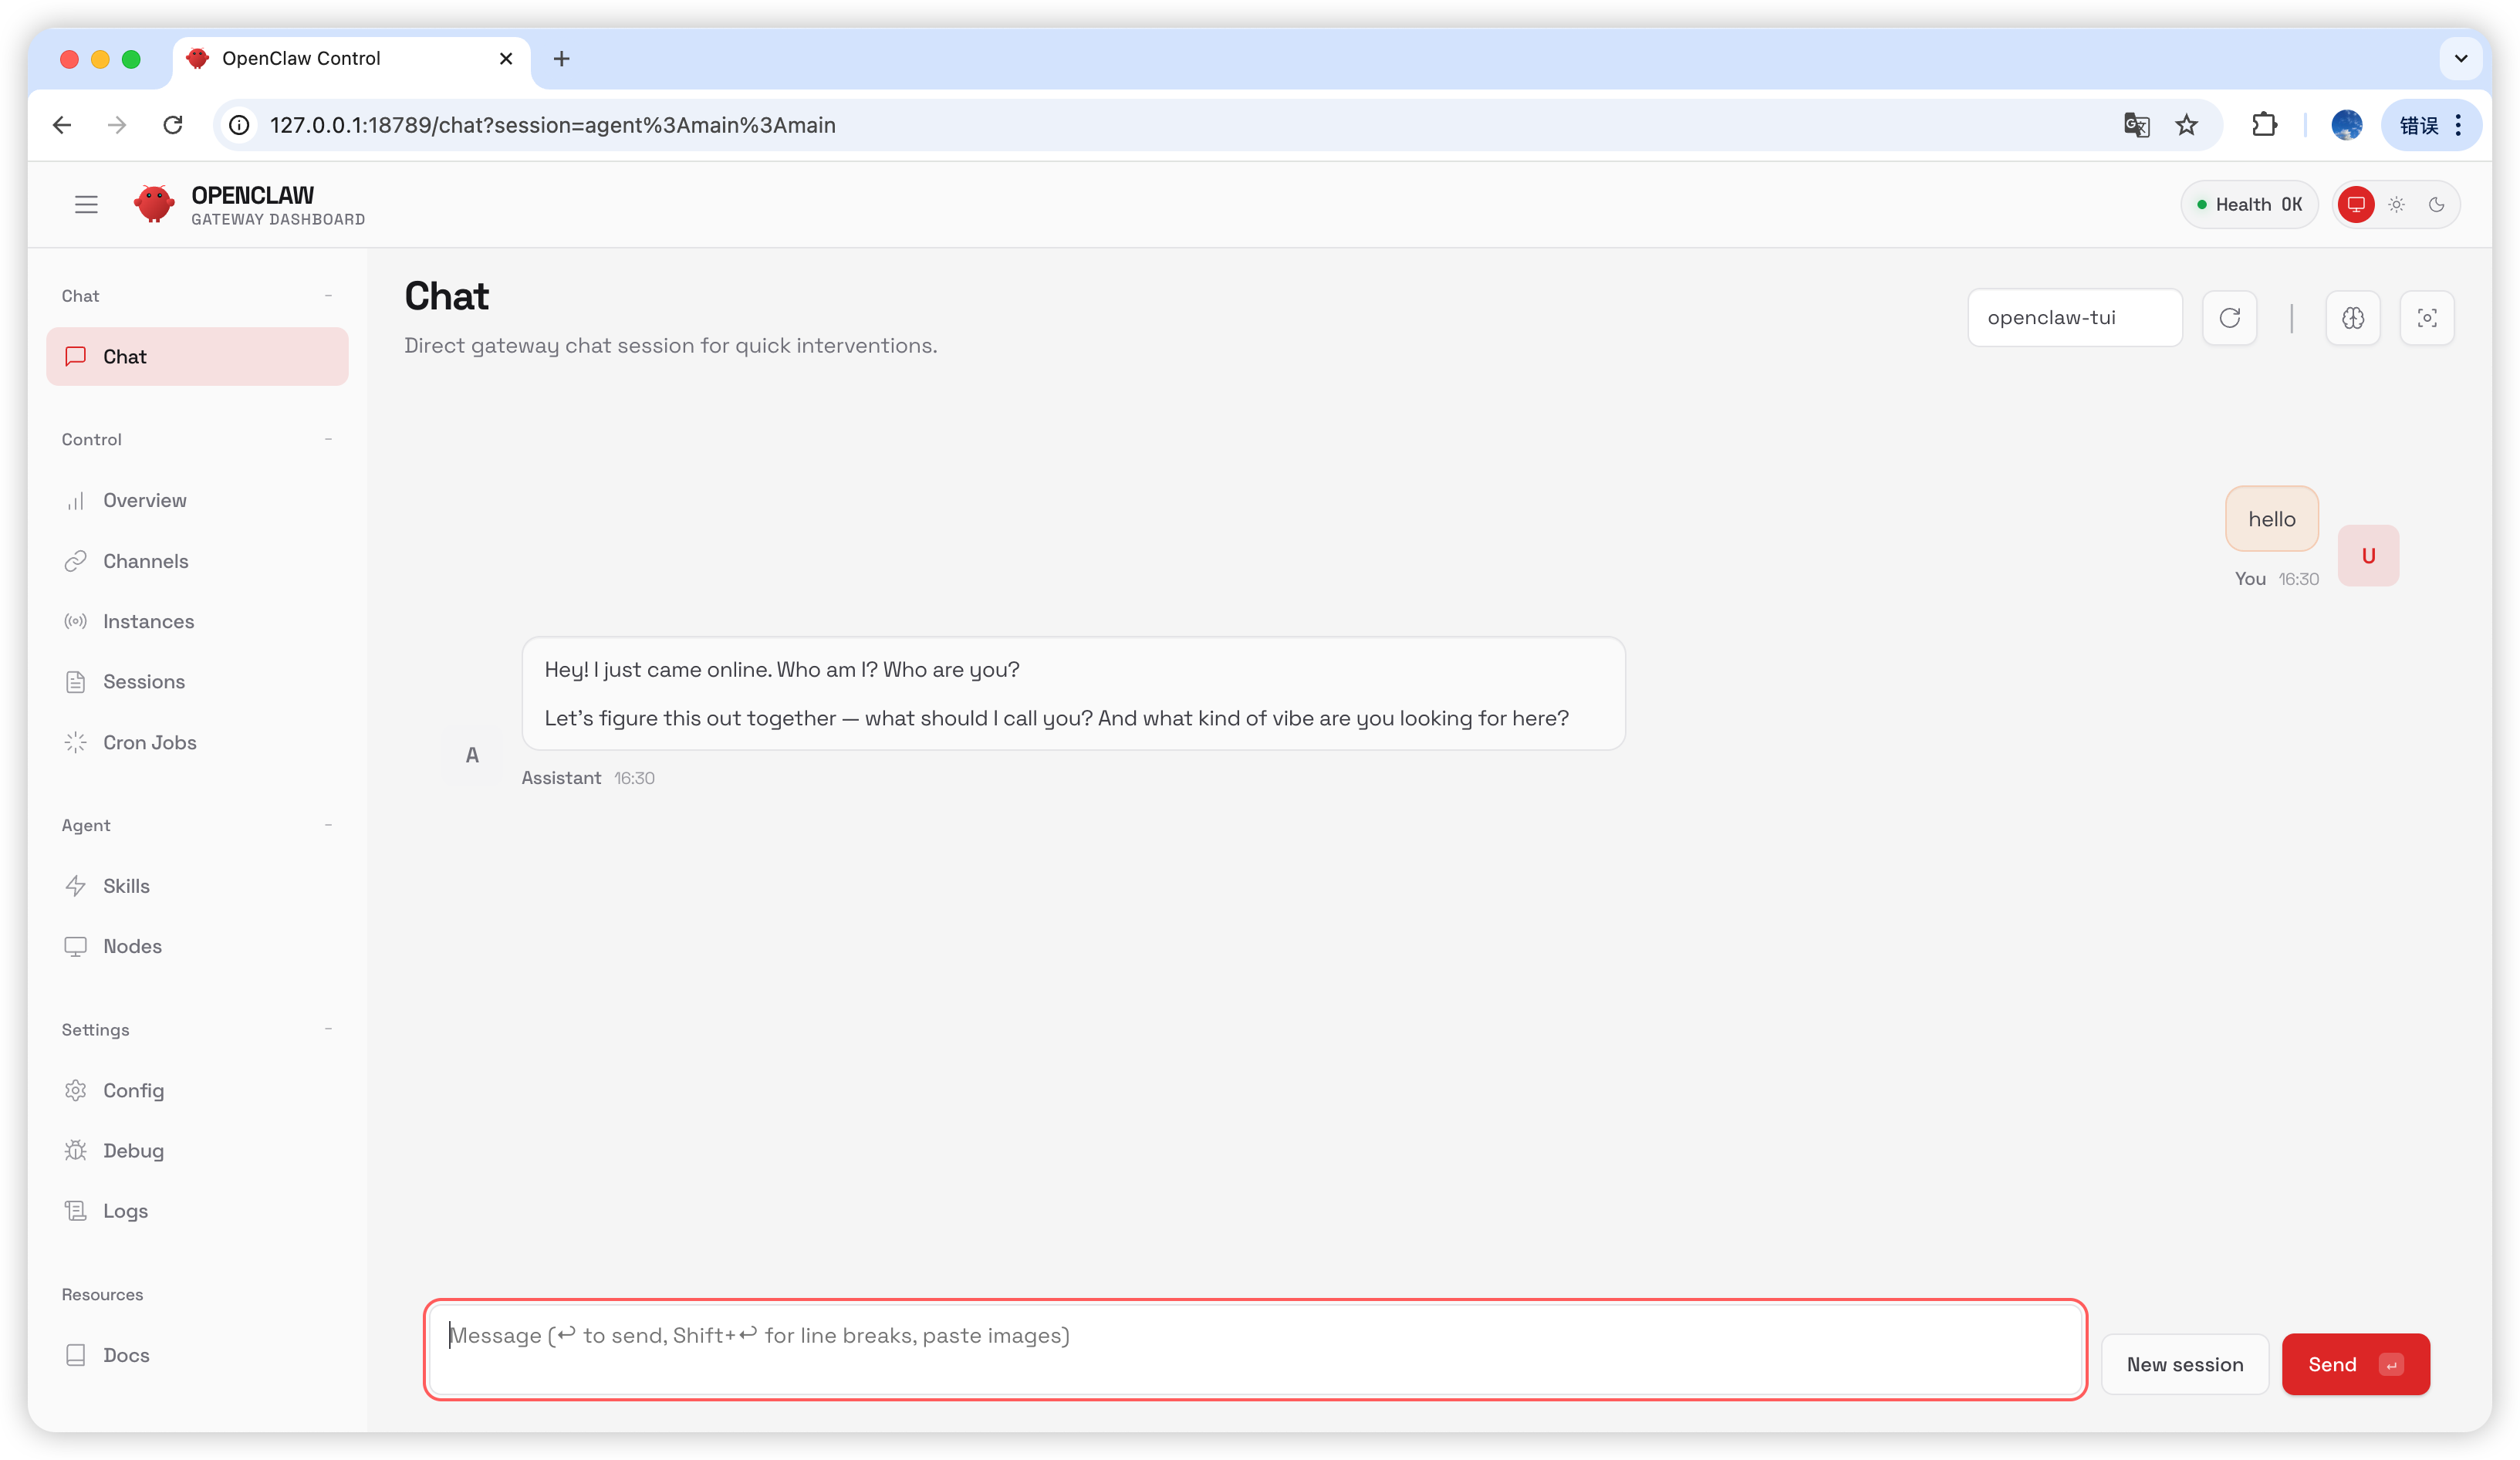
채팅 페이지에서 `hello`를 입력하세요. 답변을 받으면 구성에 성공한 것입니다.
`Hatch in UI`를 선택합니다.
## AIHubMix 구성
### 방법 1: 플러그인을 통한 빠른 설정 (권장)
플러그인 소스 코드: [aihubmix-auth](https://github.com/akakenle/aihubmix-auth)
AIHubMix auth 플러그인을 설치하고 Gateway를 재시작합니다:
```shellscript theme={null}
openclaw plugins install @akakenle/aihubmix-auth
openclaw gateway restart
```
auth 명령을 실행합니다. 프롬프트가 나타나면 AIHubMix API Key를 입력합니다. 아래 명령은 네 개의 provider 중 하나에 대해 한 번만 실행하면 됩니다 — 플러그인이 `providerAuthAliases`를 사용하여 동일한 키를 모든 transport에서 유효하게 만듭니다:
```shellscript theme={null}
openclaw models auth login --provider aihubmix-openai --method api-key --set-default
```
플러그인은 모델을 다음 그룹으로 구성합니다:
* **aihubmix-openai** — `gpt-*` / `o1-*` / `o3-*` / `o4-*`, `https://aihubmix.com/v1` (`openai-completions`)
* **aihubmix-anthropic** — `claude-*`, `https://aihubmix.com` (`anthropic-messages`)
* **aihubmix-google** — `gemini-*`, `https://aihubmix.com/gemini/v1beta` (`google-generative-ai`)
* **aihubmix-other** — 기타 모델, `https://aihubmix.com/v1` (`openai-completions`)
단축 모델 ID(예: `claude-sonnet-4-5`)는 플러그인의 `resolveDynamicModel` 훅이 올바른 transport로 자동 라우팅합니다 — 전체 `provider/model`을 작성할 필요가 없습니다.
> 대화형 로그인을 건너뛰고 싶으신가요? 설치 전에 `export AIHUBMIX_API_KEY=sk-...`을 설정하세요 — 플러그인이 키를 provider 구성에 인라인 `apiKey`로 작성합니다 (대화형 로그는 대신 auth-profile에 저장).
구성이 완료되면 [시작](#시작) 섹션으로 이동하여 사용을 시작합니다.
### 방법 2: 수동 구성
`~/.openclaw/openclaw.json` 파일을 열고 다음 구성을 추가합니다:
```json theme={null}
{
"models": {
"mode": "merge",
"providers": {
"aihubmix-openai": {
"baseUrl": "https://aihubmix.com/v1",
"api": "openai-completions",
"models": [
{
"id": "gpt-4o",
"name": "gpt-4o",
"reasoning": false,
"input": ["text"],
"cost": {
"input": 0,
"output": 0,
"cacheRead": 0,
"cacheWrite": 0
},
"contextWindow": 128000,
"maxTokens": 16384
}
]
},
"aihubmix-anthropic": {
"baseUrl": "https://aihubmix.com",
"api": "anthropic-messages",
"models": [
{
"id": "claude-sonnet-4-5",
"name": "claude-sonnet-4-5",
"reasoning": false,
"input": ["text"],
"cost": {
"input": 0,
"output": 0,
"cacheRead": 0,
"cacheWrite": 0
},
"contextWindow": 200000,
"maxTokens": 64000
}
]
},
"aihubmix-google": {
"baseUrl": "https://aihubmix.com/gemini/v1beta",
"api": "google-generative-ai",
"models": []
},
"aihubmix-other": {
"baseUrl": "https://aihubmix.com/v1",
"api": "openai-completions",
"models": []
}
}
},
"agents": {
"defaults": {
"model": {
"primary": "aihubmix-anthropic/claude-sonnet-4-5"
},
"workspace": "your_workspace_path",
"compaction": {
"mode": "safeguard"
},
"maxConcurrent": 4,
"subagents": {
"maxConcurrent": 8
}
}
}
}
```
### 방법 3: 동적 모델 명령으로 기본 모델 전환
AIHubMix OpenClaw 플러그인은 동적 모델 라우팅을 지원합니다. AIHubMix 계정에서 사용할 수 있는 모델이라면 `provider/model-id` 형식으로 호출할 수 있습니다. 실제 사용 가능 여부는 AIHubMix 콘솔과 API 응답을 기준으로 확인하세요.
일반적인 provider 선택 규칙은 다음과 같습니다.
* `aihubmix-openai`: OpenAI 호환 모델, 예: `gpt-*`, `o1-*`, `o3-*`, `o4-*`
* `aihubmix-anthropic`: Claude 모델, 예: `claude-*`
* `aihubmix-google`: Gemini 모델, 예: `gemini-*`
* `aihubmix-other`: OpenAI 호환 엔드포인트로 호출하는 기타 모델, 예: `glm-5.2`
예를 들어 `gpt-5.4`를 OpenClaw 기본 모델로 설정합니다.
```powershell theme={null}
openclaw models set aihubmix-openai/gpt-5.4
```
Windows에서 `openclaw`를 찾을 수 없다면 로컬 경로 형식으로 실행합니다.
```powershell theme={null}
& "설치경로\OpenClaw\openclaw.cmd" models set aihubmix-openai/gpt-5.4
```
현재 기본 모델과 인증 상태를 확인합니다.
```powershell theme={null}
openclaw models status
```
실제 호출로 검증합니다.
```powershell theme={null}
openclaw infer model run --local --json --model aihubmix-openai/gpt-5.4 --prompt "Reply only OK"
```
OpenAI / Claude / Gemini 그룹 밖의 모델을 호출하려면 `aihubmix-other`를 사용합니다. 예:
```powershell theme={null}
openclaw infer model run --local --json --model aihubmix-other/glm-5.2 --prompt "Reply only OK"
```
현재 OpenClaw가 불러온 모델 카탈로그를 확인합니다.
```powershell theme={null}
openclaw infer model list --json
```
## 시작
```shellscript theme={null}
openclaw gateway
```
## 테스트
채팅 페이지에서 `hello`를 입력하세요. 답변을 받으면 구성에 성공한 것입니다.
 ## 자주 묻는 질문
### 버전 업그레이드
```shellscript theme={null}
openclaw plugins update @akakenle/aihubmix-auth
openclaw gateway restart
```
### Gateway 프로세스 점유
```shellscript theme={null}
openclaw gateway stop
openclaw gateway
```
***
마지막 업데이트: 2026-07-03
## 자주 묻는 질문
### 버전 업그레이드
```shellscript theme={null}
openclaw plugins update @akakenle/aihubmix-auth
openclaw gateway restart
```
### Gateway 프로세스 점유
```shellscript theme={null}
openclaw gateway stop
openclaw gateway
```
***
마지막 업데이트: 2026-07-03