> ## Documentation Index
> Fetch the complete documentation index at: https://docs.aihubmix.com/llms.txt
> Use this file to discover all available pages before exploring further.
# Gemini를 활용한 멀티모달 인터랙션
> Gemini 이미지/비디오 생성
## Imagen 가이드
Imagen은 Google에서 개발한 고급 이미지 생성 AI 모델 시리즈로, 텍스트 프롬프트를 바탕으로 고품질의 사실적인 이미지를 생성할 수 있습니다. 이 가이드는 Imagen API를 사용하여 이미지를 생성하는 방법, 매개변수 설정, 모델 선택, 코드 예시를 이해하는 데 도움이 됩니다.
사용 가능한 모델:
* imagen-4.0-ultra-generate-001
* imagen-4.0-generate-001
* imagen-4.0-fast-generate-001
* imagen-4.0-fast-generate-preview-06-06
* imagen-3.0-generate-002
1. 현재 Imagen은 영어 프롬프트만 지원합니다. 통합 시 자동 번역을 추가하여 사용자가 언어 장벽 없이 사용할 수 있도록 하는 것을 권장합니다.
2. 대량의 텍스트 렌더링 시 성능이 불안정합니다. 핵심 키워드만 포함하는 것을 권장합니다.
### 모델 매개변수
Imagen은 현재 영어 프롬프트만 지원하며 다음과 같은 매개변수를 제공합니다:
* **numberOfImages**: 생성할 이미지 수, 1에서 4까지(포함). 기본값은 4입니다.
* `imagen-4.0-ultra-generate-001`은 한 번에 1개의 이미지만 생성할 수 있습니다.
* **aspectRatio**: 생성된 이미지의 종횡비를 변경합니다. 지원되는 값은 "1:1", "3:4", "4:3", "9:16", "16:9"입니다. 기본값은 "1:1"입니다.
* **personGeneration**: 모델이 사람이 포함된 이미지를 생성할 수 있도록 허용합니다. 다음 값을 지원합니다:
* "DONT\_ALLOW": 사람이 포함된 이미지 생성을 방지합니다.
* "ALLOW\_ADULT": 성인 이미지는 생성하지만 어린이는 생성하지 않습니다. 이것이 기본값입니다.
### 사용 요금
Imagen API로 이미지를 생성하는 비용은 다음과 같습니다:
* imagen-4-ultra: \$0.06/장
* imagen-4: \$0.04/장
* imagen-4-fast: \$0.02/장
* imagen-3: \$0.03/장
매번 호출 시 1\~4장의 이미지를 생성할 수 있으며, 실제 생성된 이미지 수에 따라 비용이 청구됩니다.
### API 호출 예시
다음은 Imagen 3.0을 사용하여 이미지를 생성하는 Python 예시입니다:
```py Imagen theme={null}
import os
import time
from google import genai
from google.genai import types
from PIL import Image
from io import BytesIO
client = genai.Client(
api_key="sk-***", # 🔑 AiHubMix에서 생성한 키로 교체하세요
http_options={"base_url": "https://aihubmix.com/gemini"},
)
# 현재 영어 프롬프트만 지원하며, 대량의 텍스트에서 성능이 떨어집니다
response = client.models.generate_images(
model='imagen-3.0-generate-002',
prompt='A minimalist logo for a LLM router market company on a solid white background. trident in a circle as the main symbol, with ONLY text \'InferEra\' below.',
config=types.GenerateImagesConfig(
number_of_images=1,
aspect_ratio="1:1", # "1:1", "9:16", "16:9", "3:4", "4:3" 지원
)
)
script_dir = os.path.dirname(os.path.abspath(__file__))
output_dir = os.path.join(script_dir, "output")
os.makedirs(output_dir, exist_ok=True)
# 파일명 충돌을 피하기 위해 타임스탬프를 파일명 접두사로 생성
timestamp = int(time.time())
# 생성된 이미지 저장 및 표시
for i, generated_image in enumerate(response.generated_images):
image = Image.open(BytesIO(generated_image.image.image_bytes))
image.show()
file_name = f"imagen3_{timestamp}_{i+1}.png"
file_path = os.path.join(output_dir, file_name)
image.save(file_path)
print(f"이미지가 저장되었습니다: {file_path}")
```
### 프롬프트 팁
원하는 이미지를 얻기 위해서는 효과적인 프롬프트 작성이 중요합니다:
* 주제, 스타일, 조명, 앵글 등을 포함한 상세한 설명을 사용하세요.
* 예술적 스타일을 명시하세요(영화적, 사실적, 애니메이션 스타일 등).
* 기술적 세부사항을 포함하세요(DSLR, 고화질, 세부사항이 풍부한 등).
* 부정적이거나 금지된 콘텐츠는 피하세요.
* **프롬프트에 대량의 텍스트를 포함하지 마세요**, 더 안정적인 결과를 위해 핵심 키워드만 사용하세요.
## Gemini 이미지 생성
Gemini는 대안으로 이미지 생성 기능도 제공합니다. Imagen과 비교하여 Gemini의 이미지 생성은 궁극적인 예술적 표현과 시각적 품질을 추구하기보다는 맥락적 이해와 추론이 필요한 시나리오에 더 적합합니다.
**지침:**
* 모델 id: `gemini-2.0-flash-preview-image-generation`
* 입력/출력 요금: $0.1→$0.4/M 토큰
* 새로운 기능을 경험하려면 매개변수를 추가해야 합니다: `"modalities":["text","image"]`
* 이미지는 Base64 인코딩으로 전달되고 출력됩니다
* 실험적 모델로서 "출력 이미지"를 명시적으로 지정하는 것을 권장하며, 그렇지 않으면 텍스트만 출력될 수 있습니다
* 출력 이미지의 기본 높이는 1024px입니다
* Python 호출에는 최신 OpenAI SDK가 필요하며, 먼저 `pip install -U openai`를 실행하세요
* 자세한 정보는 [Gemini 공식 문서](https://ai.google.dev/gemini-api/docs/image-generation)를 참조하세요
**입력 참조 구조:**
```json theme={null}
"modalities": ["text","image"]
{
"model": "gemini-2.0-flash-preview-image-generation",
"messages": [
{
"role": "user",
"content": "Generate a landscape painting and provide a poem to describe it"
}
],
"modalities":["text","image"], //이미지 추가 필요
"temperature": 0.7
}'
```
**출력 참조 구조:**
```json theme={null}
"choices":
[
{
"index": 0,
"message":
{
"role": "assistant",
"content": "Hello! How can I assist you today?",
"refusal": null,
"multi_mod_content": //📍 새로 추가
[
{
"text": "",
"inlineData":
{
"data":"base64 str",
"mimeType":"png"
}
},
{
"text": "hello",
"inlineData":
{
}
}
],
"annotations":
[]
},
"logprobs": null,
"finish_reason": "stop"
}
],
```
### 텍스트-이미지 생성
입력: 텍스트
출력: 텍스트 + 이미지
```shell Curl theme={null}
IMG_PATH="/your_path/image.jpg"
if [[ "$(base64 --version 2>&1)" = *"FreeBSD"* ]]; then
B64FLAGS="--input"
else
B64FLAGS="-w0"
fi
IMG_BASE64=$(base64 "$B64FLAGS" "$IMG_PATH" 2>&1)
curl https://aihubmix.com/v1/chat/completions \
-H "Content-Type: application/json" \
-H "Authorization: Bearer sk-***" \
-d '{
"model": "gemini-2.0-flash-preview-image-generation",
"messages": [
{
"role": "user",
"content": [
{
"type":"text",
"text":"describe the image with a concise and engaging paragraph, then fill color as children's crayon style"
},
{
"type": "image_url",
"image_url": {
"url": "data:image/jpeg;base64,'$IMG_BASE64'"
}
}
]
}
],
"modalities": ["text","image"],
"temperature": 0.7
}' \
| grep -o '"data":"[^"]*"' \
| cut -d'"' -f4 \
| base64 --decode > /your_path/imageGen.jpg
```
```py Python theme={null}
import os
from openai import OpenAI
from PIL import Image
from io import BytesIO
import base64
client = OpenAI(
api_key="sk-***", # 🔑 AiHubMix에서 생성한 키로 교체하세요
base_url="https://aihubmix.com/v1",
)
# 텍스트 전용 입력 사용
response = client.chat.completions.create(
model="gemini-2.0-flash-preview-image-generation",
messages=[
{
"role": "user",
"content": [
{
"type": "text",
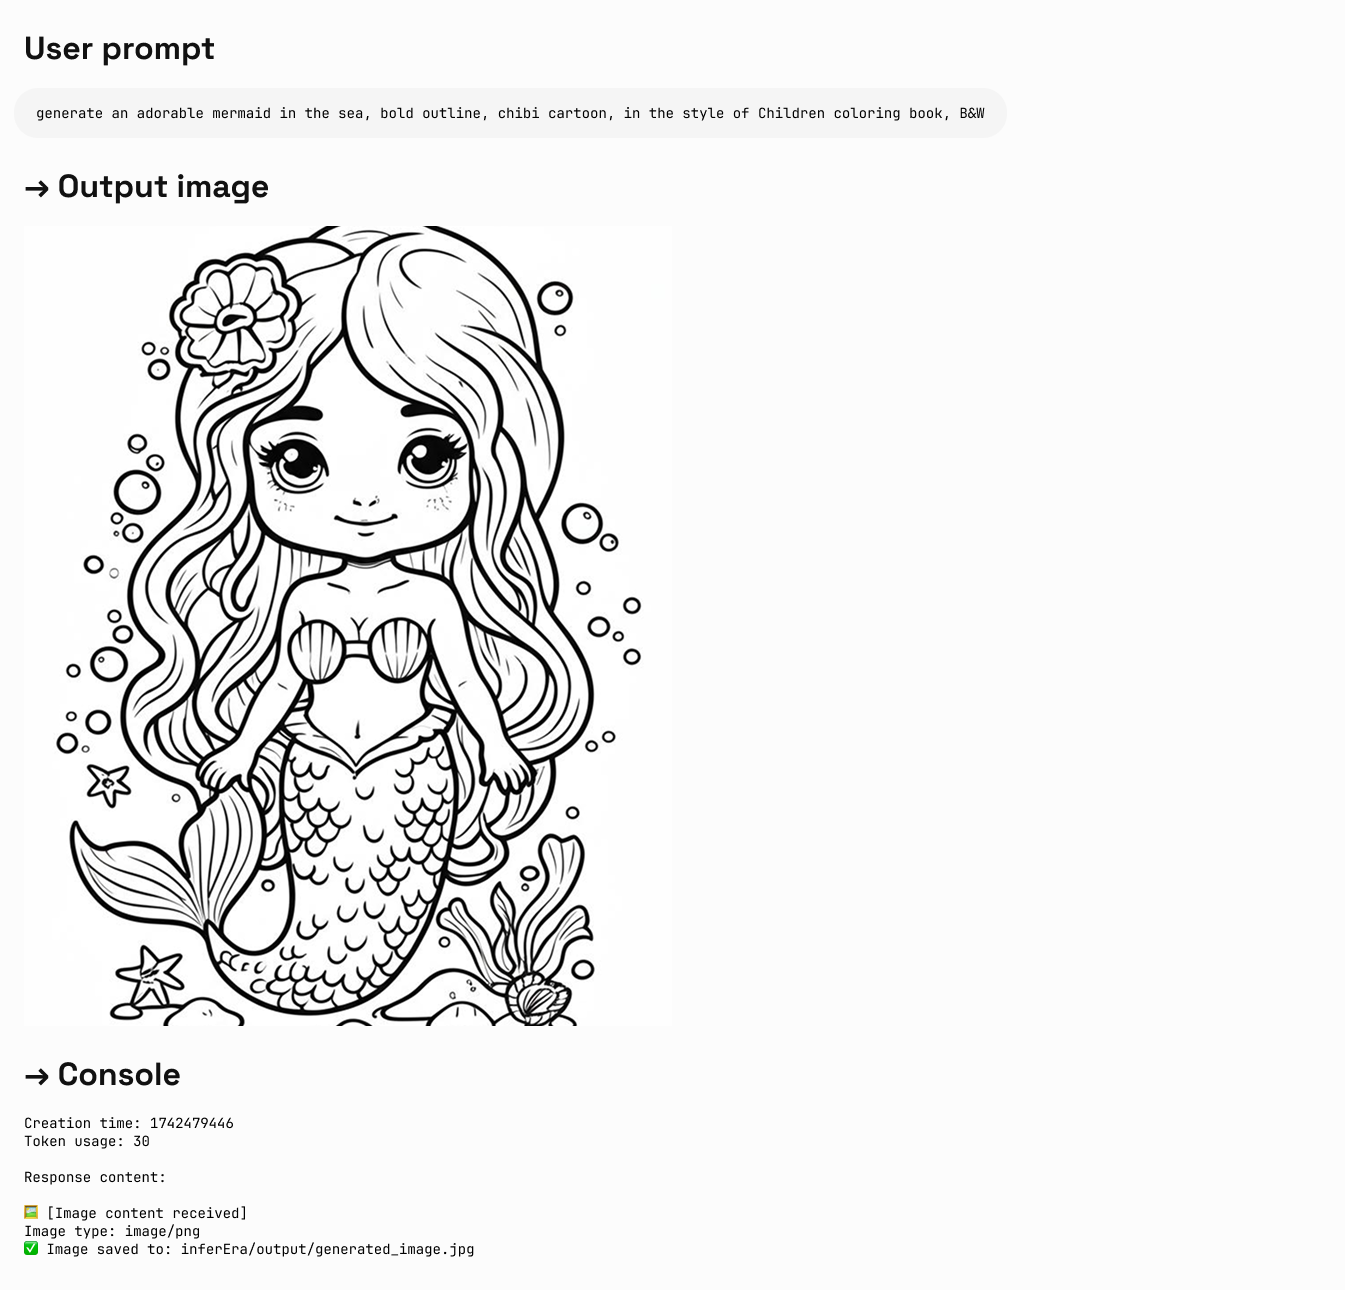
"text": "generate an adorable mermaid in the sea, bold outline, chibi cartoon, in the style of Children coloring book, B&W",
}
],
},
],
modalities=["text", "image"],
temperature=0.7,
)
try:
# 기본 응답 정보 출력
print(f"생성 시간: {response.created}")
print(f"토큰 사용량: {response.usage.total_tokens}")
# multi_mod_content 필드가 존재하는지 확인
if (
hasattr(response.choices[0].message, "multi_mod_content")
and response.choices[0].message.multi_mod_content is not None
):
print("\n응답 내용:")
for part in response.choices[0].message.multi_mod_content:
if "text" in part and part["text"] is not None:
print(part["text"])
# 이미지 내용 처리
elif "inline_data" in part and part["inline_data"] is not None:
print("\n🖼️ [이미지 내용 수신됨]")
image_data = base64.b64decode(part["inline_data"]["data"])
mime_type = part["inline_data"].get("mime_type", "image/png")
print(f"이미지 유형: {mime_type}")
image = Image.open(BytesIO(image_data))
image.show()
# 이미지 저장
output_dir = os.path.join(os.path.dirname(os.path.abspath(__file__)), "output")
os.makedirs(output_dir, exist_ok=True)
output_path = os.path.join(output_dir, "generated_image.jpg")
image.save(output_path)
print(f"✅ 이미지가 저장되었습니다: {output_path}")
else:
print("유효한 멀티모달 응답을 받지 못했습니다. 응답 구조를 확인하세요")
except Exception as e:
print(f"응답 처리 중 오류 발생: {str(e)}")
```
**출력 예시:**
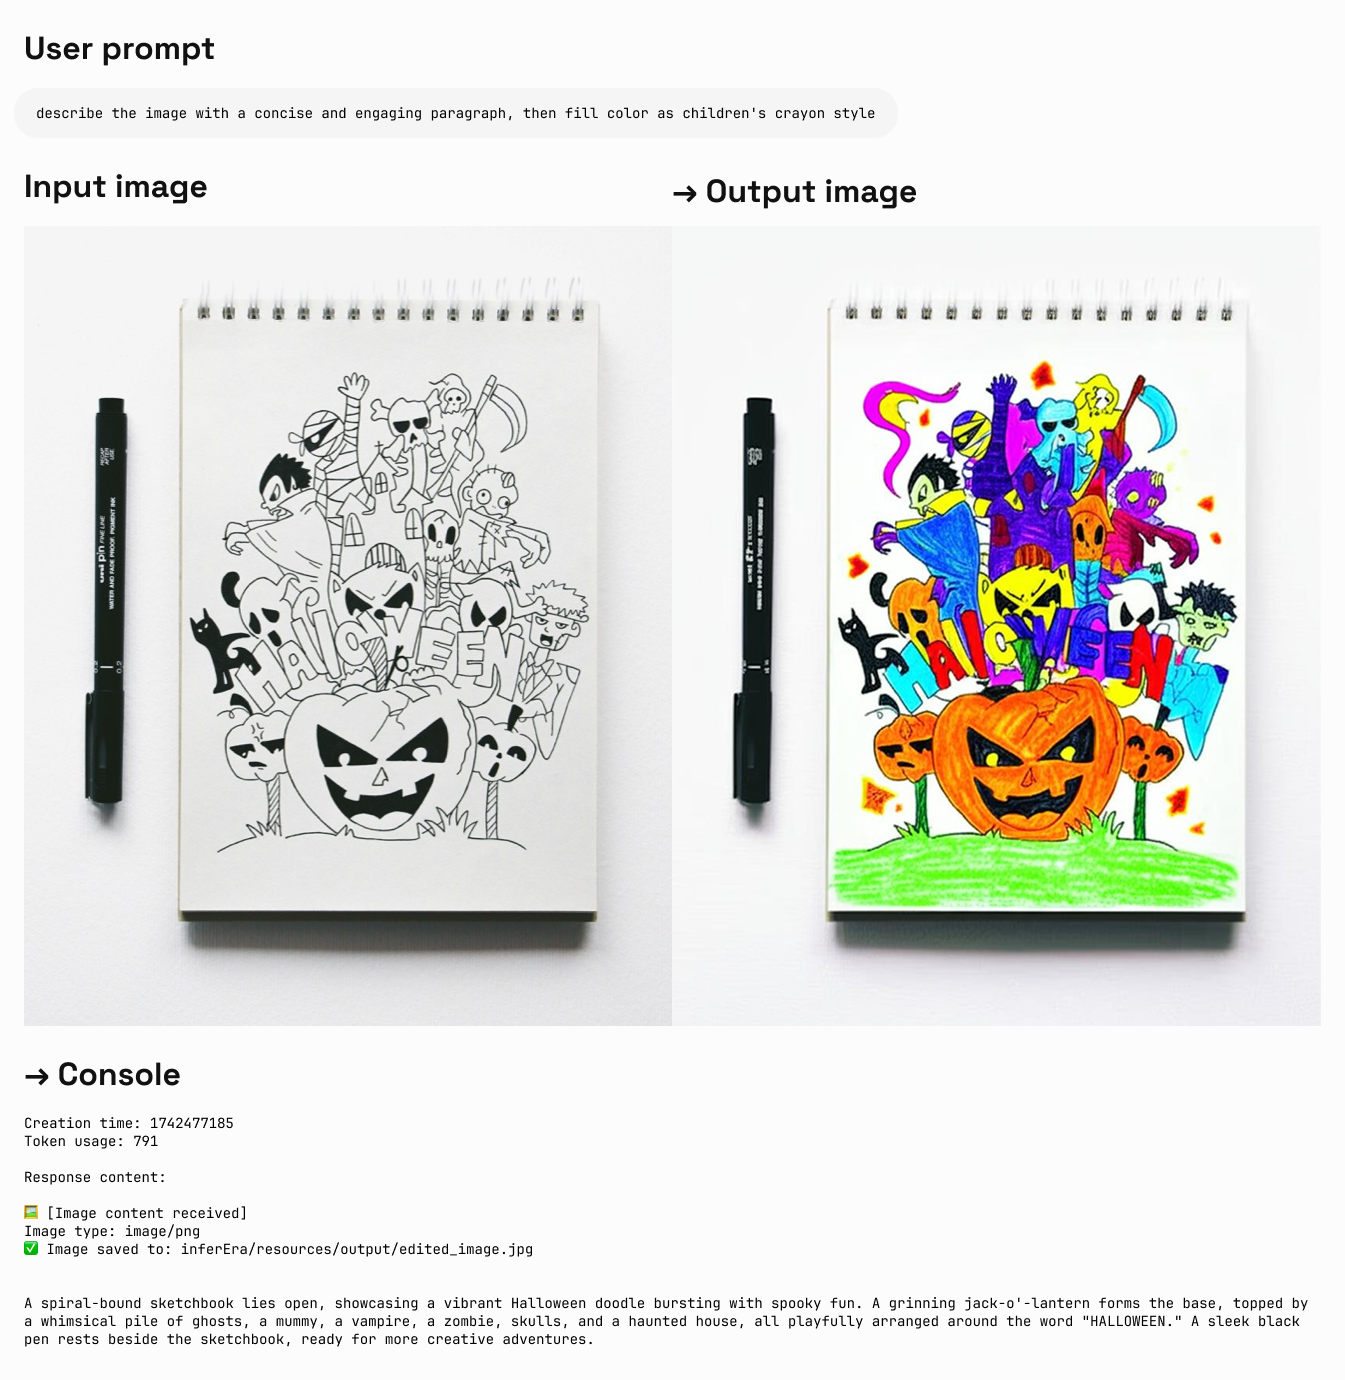 ### 이미지 편집
입력: 텍스트 + 이미지\
출력: 텍스트 + 이미지
```py Python theme={null}
import os
from openai import OpenAI
from PIL import Image
from io import BytesIO
import base64
client = OpenAI(
api_key="sk-***", # 🔑 AiHubMix에서 생성한 키로 교체하세요
base_url="https://aihubmix.com/v1",
)
project_root = os.path.dirname(os.path.dirname(os.path.abspath(__file__)))
image_path = os.path.join(os.path.dirname(os.path.abspath(__file__)), "resources", "filled.jpg")
if not os.path.exists(image_path):
raise FileNotFoundError(f"이미지 {image_path}가 존재하지 않습니다")
def encode_image(image_path):
with open(image_path, "rb") as image_file:
return base64.b64encode(image_file.read()).decode("utf-8")
base64_image = encode_image(image_path)
response = client.chat.completions.create(
model="gemini-2.0-flash-preview-image-generation",
messages=[
{
"role": "user",
"content": [
{
"type": "text",
"text": "describe the image with a concise and engaging paragraph, then fill color as children's crayon style",
},
{
"type": "image_url",
"image_url": {"url": f"data:image/jpeg;base64,{base64_image}"},
},
],
},
],
modalities=["text", "image"],
temperature=0.7,
)
try:
# base64 데이터 없이 기본 응답 정보 출력
print(f"생성 시간: {response.created}")
print(f"토큰 사용량: {response.usage.total_tokens}")
# multi_mod_content 필드가 존재하는지 확인
if (
hasattr(response.choices[0].message, "multi_mod_content")
and response.choices[0].message.multi_mod_content is not None
):
print("\n응답 내용:")
for part in response.choices[0].message.multi_mod_content:
if "text" in part and part["text"] is not None:
print(part["text"])
# 이미지 내용 처리
elif "inline_data" in part and part["inline_data"] is not None:
print("\n🖼️ [이미지 내용 수신됨]")
image_data = base64.b64decode(part["inline_data"]["data"])
mime_type = part["inline_data"].get("mime_type", "image/png")
print(f"이미지 유형: {mime_type}")
image = Image.open(BytesIO(image_data))
image.show()
# 이미지 저장
output_dir = os.path.join(os.path.dirname(image_path), "output")
os.makedirs(output_dir, exist_ok=True)
output_path = os.path.join(output_dir, "edited_image.jpg")
image.save(output_path)
print(f"✅ 이미지가 저장되었습니다: {output_path}")
else:
print("유효한 멀티모달 응답을 받지 못했습니다. 응답 구조를 확인하세요")
except Exception as e:
print(f"응답 처리 중 오류 발생: {str(e)}")
```
**출력 예시:**
### 이미지 편집
입력: 텍스트 + 이미지\
출력: 텍스트 + 이미지
```py Python theme={null}
import os
from openai import OpenAI
from PIL import Image
from io import BytesIO
import base64
client = OpenAI(
api_key="sk-***", # 🔑 AiHubMix에서 생성한 키로 교체하세요
base_url="https://aihubmix.com/v1",
)
project_root = os.path.dirname(os.path.dirname(os.path.abspath(__file__)))
image_path = os.path.join(os.path.dirname(os.path.abspath(__file__)), "resources", "filled.jpg")
if not os.path.exists(image_path):
raise FileNotFoundError(f"이미지 {image_path}가 존재하지 않습니다")
def encode_image(image_path):
with open(image_path, "rb") as image_file:
return base64.b64encode(image_file.read()).decode("utf-8")
base64_image = encode_image(image_path)
response = client.chat.completions.create(
model="gemini-2.0-flash-preview-image-generation",
messages=[
{
"role": "user",
"content": [
{
"type": "text",
"text": "describe the image with a concise and engaging paragraph, then fill color as children's crayon style",
},
{
"type": "image_url",
"image_url": {"url": f"data:image/jpeg;base64,{base64_image}"},
},
],
},
],
modalities=["text", "image"],
temperature=0.7,
)
try:
# base64 데이터 없이 기본 응답 정보 출력
print(f"생성 시간: {response.created}")
print(f"토큰 사용량: {response.usage.total_tokens}")
# multi_mod_content 필드가 존재하는지 확인
if (
hasattr(response.choices[0].message, "multi_mod_content")
and response.choices[0].message.multi_mod_content is not None
):
print("\n응답 내용:")
for part in response.choices[0].message.multi_mod_content:
if "text" in part and part["text"] is not None:
print(part["text"])
# 이미지 내용 처리
elif "inline_data" in part and part["inline_data"] is not None:
print("\n🖼️ [이미지 내용 수신됨]")
image_data = base64.b64decode(part["inline_data"]["data"])
mime_type = part["inline_data"].get("mime_type", "image/png")
print(f"이미지 유형: {mime_type}")
image = Image.open(BytesIO(image_data))
image.show()
# 이미지 저장
output_dir = os.path.join(os.path.dirname(image_path), "output")
os.makedirs(output_dir, exist_ok=True)
output_path = os.path.join(output_dir, "edited_image.jpg")
image.save(output_path)
print(f"✅ 이미지가 저장되었습니다: {output_path}")
else:
print("유효한 멀티모달 응답을 받지 못했습니다. 응답 구조를 확인하세요")
except Exception as e:
print(f"응답 처리 중 오류 발생: {str(e)}")
```
**출력 예시:**
 ## 적절한 모델 선택
### Gemini를 선택해야 하는 경우:
* 세계 지식과 추론 능력을 활용하여 맥락적으로 관련된 이미지를 생성해야 할 때.
* 텍스트와 이미지의 원활한 통합이 필요할 때.
* 긴 텍스트 시퀀스에 정확한 시각적 콘텐츠를 포함시키고 싶을 때.
* 맥락을 유지하면서 대화형으로 이미지를 편집하고 싶을 때.
### Imagen을 선택해야 하는 경우:
* 이미지 품질, 사실성, 예술적 세부사항 또는 특정 스타일(인상파, 애니메이션 등)이 주요 고려사항일 때.
* 제품 배경 업데이트나 이미지 확대와 같은 전문적인 편집 작업을 수행할 때.
* 브랜딩, 스타일을 주입하거나 로고 및 제품 디자인을 생성할 때.
### 모범 사례
1. **프롬프트 최적화**: 고품질 출력을 얻기 위해서는 프롬프트를 신중하게 작성하는 것이 핵심입니다.
2. **매개변수 실험**: 다양한 종횡비와 설정을 시도하여 필요에 가장 적합한 구성을 찾으세요.
3. **배치 생성**: 이상적인 결과를 얻을 확률을 높이기 위해 여러 이미지를 생성하세요.
4. **메타데이터 저장**: 성공적인 결과를 추적하고 재현하기 위해 프롬프트와 타임스탬프를 이미지와 함께 저장하세요.
5. **사용 정책 준수**: 사용이 Google의 콘텐츠 정책 및 서비스 약관을 준수하는지 확인하세요.
## Veo 3.0 비디오 생성
VEO 3.0은 Google DeepMind에서 개발한 최신 고급 비디오 생성 모델입니다. [VEO 3.0](https://aihubmix.com/models?model=veo-3.0-generate-preview)을 사용하면 다음과 같은 기능을 가진 비디오를 생성할 수 있습니다:
* 텍스트 및 이미지 프롬프트로부터 향상된 품질
* 대화 및 내레이션과 같은 음성
* 음악 및 음향 효과와 같은 오디오
1. 현재 VEO 3.0은 영어 프롬프트만 지원하므로, 통합 시 자동 번역을 권장합니다
2. 비디오는 보통 몇 분 내에 생성되지만, 피크 시간에는 더 오래 걸릴 수 있습니다
3. 현재 이미지 기반 대화에서의 비디오 생성은 지원되지 않습니다
### 알려진 제한사항
현재 VEO 3.0 매개변수는 고정되어 있으며 변경할 수 없습니다:
* **해상도**: 720p (가로형)
* **프레임 레이트**: 24fps
* **비디오 길이**: 8초
### 요금
VEO 3.0 API의 비용은 **\$0.675/초**입니다 (Aihubmix는 10% 한정 할인을 제공합니다)
### 사용 예시
VEO 3.0은 현재 curl 명령어 호출만 지원하며, 2단계 프로세스를 사용합니다:
참고: `sk-***`는 AiHubMix에서 생성한 키입니다.
```shell 1단계: 생성 요청 시작 theme={null}
curl "https://aihubmix.com/gemini/v1beta/models/veo-3.0-generate-preview:predictLongRunning?key=sk-***" \
-H "Content-Type: application/json" \
-X "POST" \
-d '{
"instances":
[
{
"prompt": "A cat playing with a ball"
}
],
"parameters":
{
"numberOfVideos": 1,
"durationSeconds": 8,
"aspectRatio": "16:9",
"personGeneration": "dont_allow"
}
}'
```
```shell 2단계: 생성 결과 가져오기 theme={null}
# 1단계에서 반환된 name 필드의 operation ID 사용
curl "https://aihubmix.com/gemini/v1beta/models/veo-3.0-generate-preview/operations/ff5***?key=sk-***"
```
```py 비디오 추출 스크립트 theme={null}
import json
import base64
# 1. 응답 JSON 파일 읽기
with open('yourpath/response.json', 'r') as f:
data = json.load(f)
# 2. base64로 인코딩된 비디오 문자열 가져오기
b64_str = data['response']['videos'][0]['bytesBase64Encoded']
# 3. 디코딩하고 mp4 파일로 저장
with open('output.mp4', 'wb') as f:
f.write(base64.b64decode(b64_str))
print("비디오가 output.mp4로 저장되었습니다")
```
### 응답 예시
**1단계 응답:**
```json theme={null}
{
"name": "models/veo-3.0-generate-preview/operations/ff5***"
}
```
**2단계 응답 (생성 완료):**
```json theme={null}
{
"name": "projects/ahm-gemini-03/locations/us-central1/publishers/google/models/veo-3.0-generate-preview/operations/ff5***",
"done": true,
"response": {
"@type": "type.googleapis.com/cloud.ai.large_models.vision.GenerateVideoResponse",
"raiMediaFilteredCount": 0,
"videos": [
{
"bytesBase64Encoded": "AAA...2xl",
"mimeType": "video/mp4"
}
]
}
}
```
**2단계 응답 (아직 처리 중):**
```json theme={null}
{
"name": "projects/ahm-gemini-03/locations/us-central1/publishers/google/models/veo-3.0-generate-preview/operations/777***"
}
```
처리 중 응답을 받으면 몇 분 기다린 후 2단계 요청을 다시 보내주세요.
**비디오 효과:**
### 모범 사례
1. **인내심**: 비디오 생성에는 보통 몇 분이 걸리며, 피크 시간에는 더 오래 걸립니다
2. **상태 확인**: 응답에 `done: true`가 포함되지 않으면 아직 처리 중입니다
3. **Operation ID 저장**: 후속 쿼리를 위해 1단계에서 반환된 operation ID를 반드시 저장하세요
4. **사용 정책 준수**: 사용이 Google의 콘텐츠 정책 및 서비스 약관을 준수하는지 확인하세요
자세한 정보는 [Vertex AI 공식 문서](https://cloud.google.com/vertex-ai/generative-ai/docs/video/generate-videos)를 참조하세요
## Veo 2.0 비디오 생성
VEO 2.0은 Google에서 출시한 고급 비디오 생성 AI 모델로, 텍스트 프롬프트를 바탕으로 고품질의 사실적인 단편 비디오를 생성할 수 있습니다. 이 부분은 VEO 2.0 API를 사용하여 비디오를 생성하는 방법, 매개변수 설정, 모델 선택, 코드 예시를 이해하는 데 도움이 됩니다.
1. 현재 VEO 2.0은 영어 프롬프트만 지원합니다
2. 비디오 생성에는 약 2-3분이 소요되므로 인내심을 가지세요
### 모델 매개변수
VEO 2.0은 다음과 같은 매개변수를 제공합니다:
* **numberOfVideos**: 생성할 비디오 수, 1 또는 2 선택 가능. 기본값은 2입니다.
* **aspectRatio**: 생성된 비디오의 종횡비. 지원되는 값은 "16:9"와 "9:16"입니다.
* **durationSeconds**: 비디오 길이, 5초 또는 8초 선택 가능. 기본값은 8초입니다.
* **personGeneration**: 사람이 포함된 비디오 생성을 허용할지 제어합니다. 다음 값을 지원합니다:
* "dont\_allow": 사람이 포함된 비디오 생성을 방지합니다.
* "allow\_adult": 성인이 포함된 비디오 생성을 허용하지만, 어린이는 허용하지 않습니다.
### 요금
VEO 2.0 API의 비용은 \$0.35/초입니다
### 사용 예시
다음은 VEO 2.0을 사용하여 비디오를 생성하는 Python 예시입니다:
```py 텍스트로부터 생성 theme={null}
import os
import time
from google import genai
from google.genai import types
client = genai.Client(
api_key="sk-***", # 🔑 AiHubMix에서 생성한 키로 교체하세요
http_options={"base_url": "https://aihubmix.com/gemini"},
)
operation = client.models.generate_videos(
model="veo-2.0-generate-001",
prompt="Panning wide shot of a calico kitten sleeping in the sunshine",
config=types.GenerateVideosConfig(
person_generation="dont_allow", # "dont_allow" 또는 "allow_adult"
aspect_ratio="16:9", # "16:9" 또는 "9:16"
number_of_videos=1, # 정수, 1 또는 2 선택, 기본값은 2
durationSeconds=5, # 정수, 5 또는 8 선택, 기본값은 8
),
)
# 2-3분 소요, 비디오 길이는 5-8초
while not operation.done:
time.sleep(20)
operation = client.operations.get(operation)
for n, generated_video in enumerate(operation.response.generated_videos):
client.files.download(file=generated_video.video)
generated_video.video.save(f"video{n}.mp4") # 비디오 저장
```
```py 이미지로부터 생성 theme={null}
import os
import time
from google import genai
from google.genai import types
def load_image(path):
with open(path, "rb") as image_file:
return image_file.read()
client = genai.Client(
api_key="sk-***", # 🔑 AiHubMix에서 생성한 키로 교체하세요
http_options={"base_url": "https://aihubmix.com/gemini"},
)
operation = client.models.generate_videos(
model="veo-2.0-generate-001",
prompt="The waves in the background keep flowing",
image=types.Image(
mime_type="image/png",
image_bytes=load_image("img/inferbanner.png") # 이미지 경로
),
config=types.GenerateVideosConfig(
person_generation="dont_allow",
aspect_ratio="16:9",
numberOfVideos=1,
durationSeconds=5,
),
)
while not operation.done:
time.sleep(20)
operation = client.operations.get(operation)
for n, generated_video in enumerate(operation.response.generated_videos):
client.files.download(file=generated_video.video)
generated_video.video.save(f"video{n}.mp4")
```
### 프롬프트 팁
원하는 비디오를 얻기 위해서는 효과적인 프롬프트 작성이 중요합니다:
* 명확한 장면, 동작, 분위기를 묘사하세요
* 촬영 스타일을 명시하세요(파노라마, 클로즈업, 추적 샷 등)
* 조명 조건을 설명하세요(햇빛, 황혼, 실내 조명 등)
* 주요 피사체와 그 동작을 명시하세요(예: "햇빛 속에서 잠자고 있는 새끼 고양이")
* 지나치게 복잡한 내러티브나 빠르게 변하는 장면은 피하세요
* 부정적이거나 금지된 콘텐츠는 피하세요
### 모범 사례
1. **명확하고 간결한 프롬프트**: 비디오 생성을 안내하기 위해 명확하고 구체적인 설명을 사용하세요.
2. **인내심이 핵심**: 비디오 생성에는 2-3분이 걸리므로 완료될 때까지 기다리세요.
3. **다양한 매개변수 테스트**: 다양한 종횡비와 길이를 시도하여 필요에 가장 적합한 설정을 찾으세요.
4. **생성 기록 저장**: 성공적인 결과를 추적하기 위해 생성된 비디오와 함께 프롬프트를 기록하세요.
5. **사용 정책 준수**: 사용이 Google의 콘텐츠 정책 및 서비스 약관을 준수하는지 확인하세요.
***
마지막 업데이트: 2026-06-01
## 적절한 모델 선택
### Gemini를 선택해야 하는 경우:
* 세계 지식과 추론 능력을 활용하여 맥락적으로 관련된 이미지를 생성해야 할 때.
* 텍스트와 이미지의 원활한 통합이 필요할 때.
* 긴 텍스트 시퀀스에 정확한 시각적 콘텐츠를 포함시키고 싶을 때.
* 맥락을 유지하면서 대화형으로 이미지를 편집하고 싶을 때.
### Imagen을 선택해야 하는 경우:
* 이미지 품질, 사실성, 예술적 세부사항 또는 특정 스타일(인상파, 애니메이션 등)이 주요 고려사항일 때.
* 제품 배경 업데이트나 이미지 확대와 같은 전문적인 편집 작업을 수행할 때.
* 브랜딩, 스타일을 주입하거나 로고 및 제품 디자인을 생성할 때.
### 모범 사례
1. **프롬프트 최적화**: 고품질 출력을 얻기 위해서는 프롬프트를 신중하게 작성하는 것이 핵심입니다.
2. **매개변수 실험**: 다양한 종횡비와 설정을 시도하여 필요에 가장 적합한 구성을 찾으세요.
3. **배치 생성**: 이상적인 결과를 얻을 확률을 높이기 위해 여러 이미지를 생성하세요.
4. **메타데이터 저장**: 성공적인 결과를 추적하고 재현하기 위해 프롬프트와 타임스탬프를 이미지와 함께 저장하세요.
5. **사용 정책 준수**: 사용이 Google의 콘텐츠 정책 및 서비스 약관을 준수하는지 확인하세요.
## Veo 3.0 비디오 생성
VEO 3.0은 Google DeepMind에서 개발한 최신 고급 비디오 생성 모델입니다. [VEO 3.0](https://aihubmix.com/models?model=veo-3.0-generate-preview)을 사용하면 다음과 같은 기능을 가진 비디오를 생성할 수 있습니다:
* 텍스트 및 이미지 프롬프트로부터 향상된 품질
* 대화 및 내레이션과 같은 음성
* 음악 및 음향 효과와 같은 오디오
1. 현재 VEO 3.0은 영어 프롬프트만 지원하므로, 통합 시 자동 번역을 권장합니다
2. 비디오는 보통 몇 분 내에 생성되지만, 피크 시간에는 더 오래 걸릴 수 있습니다
3. 현재 이미지 기반 대화에서의 비디오 생성은 지원되지 않습니다
### 알려진 제한사항
현재 VEO 3.0 매개변수는 고정되어 있으며 변경할 수 없습니다:
* **해상도**: 720p (가로형)
* **프레임 레이트**: 24fps
* **비디오 길이**: 8초
### 요금
VEO 3.0 API의 비용은 **\$0.675/초**입니다 (Aihubmix는 10% 한정 할인을 제공합니다)
### 사용 예시
VEO 3.0은 현재 curl 명령어 호출만 지원하며, 2단계 프로세스를 사용합니다:
참고: `sk-***`는 AiHubMix에서 생성한 키입니다.
```shell 1단계: 생성 요청 시작 theme={null}
curl "https://aihubmix.com/gemini/v1beta/models/veo-3.0-generate-preview:predictLongRunning?key=sk-***" \
-H "Content-Type: application/json" \
-X "POST" \
-d '{
"instances":
[
{
"prompt": "A cat playing with a ball"
}
],
"parameters":
{
"numberOfVideos": 1,
"durationSeconds": 8,
"aspectRatio": "16:9",
"personGeneration": "dont_allow"
}
}'
```
```shell 2단계: 생성 결과 가져오기 theme={null}
# 1단계에서 반환된 name 필드의 operation ID 사용
curl "https://aihubmix.com/gemini/v1beta/models/veo-3.0-generate-preview/operations/ff5***?key=sk-***"
```
```py 비디오 추출 스크립트 theme={null}
import json
import base64
# 1. 응답 JSON 파일 읽기
with open('yourpath/response.json', 'r') as f:
data = json.load(f)
# 2. base64로 인코딩된 비디오 문자열 가져오기
b64_str = data['response']['videos'][0]['bytesBase64Encoded']
# 3. 디코딩하고 mp4 파일로 저장
with open('output.mp4', 'wb') as f:
f.write(base64.b64decode(b64_str))
print("비디오가 output.mp4로 저장되었습니다")
```
### 응답 예시
**1단계 응답:**
```json theme={null}
{
"name": "models/veo-3.0-generate-preview/operations/ff5***"
}
```
**2단계 응답 (생성 완료):**
```json theme={null}
{
"name": "projects/ahm-gemini-03/locations/us-central1/publishers/google/models/veo-3.0-generate-preview/operations/ff5***",
"done": true,
"response": {
"@type": "type.googleapis.com/cloud.ai.large_models.vision.GenerateVideoResponse",
"raiMediaFilteredCount": 0,
"videos": [
{
"bytesBase64Encoded": "AAA...2xl",
"mimeType": "video/mp4"
}
]
}
}
```
**2단계 응답 (아직 처리 중):**
```json theme={null}
{
"name": "projects/ahm-gemini-03/locations/us-central1/publishers/google/models/veo-3.0-generate-preview/operations/777***"
}
```
처리 중 응답을 받으면 몇 분 기다린 후 2단계 요청을 다시 보내주세요.
**비디오 효과:**
### 모범 사례
1. **인내심**: 비디오 생성에는 보통 몇 분이 걸리며, 피크 시간에는 더 오래 걸립니다
2. **상태 확인**: 응답에 `done: true`가 포함되지 않으면 아직 처리 중입니다
3. **Operation ID 저장**: 후속 쿼리를 위해 1단계에서 반환된 operation ID를 반드시 저장하세요
4. **사용 정책 준수**: 사용이 Google의 콘텐츠 정책 및 서비스 약관을 준수하는지 확인하세요
자세한 정보는 [Vertex AI 공식 문서](https://cloud.google.com/vertex-ai/generative-ai/docs/video/generate-videos)를 참조하세요
## Veo 2.0 비디오 생성
VEO 2.0은 Google에서 출시한 고급 비디오 생성 AI 모델로, 텍스트 프롬프트를 바탕으로 고품질의 사실적인 단편 비디오를 생성할 수 있습니다. 이 부분은 VEO 2.0 API를 사용하여 비디오를 생성하는 방법, 매개변수 설정, 모델 선택, 코드 예시를 이해하는 데 도움이 됩니다.
1. 현재 VEO 2.0은 영어 프롬프트만 지원합니다
2. 비디오 생성에는 약 2-3분이 소요되므로 인내심을 가지세요
### 모델 매개변수
VEO 2.0은 다음과 같은 매개변수를 제공합니다:
* **numberOfVideos**: 생성할 비디오 수, 1 또는 2 선택 가능. 기본값은 2입니다.
* **aspectRatio**: 생성된 비디오의 종횡비. 지원되는 값은 "16:9"와 "9:16"입니다.
* **durationSeconds**: 비디오 길이, 5초 또는 8초 선택 가능. 기본값은 8초입니다.
* **personGeneration**: 사람이 포함된 비디오 생성을 허용할지 제어합니다. 다음 값을 지원합니다:
* "dont\_allow": 사람이 포함된 비디오 생성을 방지합니다.
* "allow\_adult": 성인이 포함된 비디오 생성을 허용하지만, 어린이는 허용하지 않습니다.
### 요금
VEO 2.0 API의 비용은 \$0.35/초입니다
### 사용 예시
다음은 VEO 2.0을 사용하여 비디오를 생성하는 Python 예시입니다:
```py 텍스트로부터 생성 theme={null}
import os
import time
from google import genai
from google.genai import types
client = genai.Client(
api_key="sk-***", # 🔑 AiHubMix에서 생성한 키로 교체하세요
http_options={"base_url": "https://aihubmix.com/gemini"},
)
operation = client.models.generate_videos(
model="veo-2.0-generate-001",
prompt="Panning wide shot of a calico kitten sleeping in the sunshine",
config=types.GenerateVideosConfig(
person_generation="dont_allow", # "dont_allow" 또는 "allow_adult"
aspect_ratio="16:9", # "16:9" 또는 "9:16"
number_of_videos=1, # 정수, 1 또는 2 선택, 기본값은 2
durationSeconds=5, # 정수, 5 또는 8 선택, 기본값은 8
),
)
# 2-3분 소요, 비디오 길이는 5-8초
while not operation.done:
time.sleep(20)
operation = client.operations.get(operation)
for n, generated_video in enumerate(operation.response.generated_videos):
client.files.download(file=generated_video.video)
generated_video.video.save(f"video{n}.mp4") # 비디오 저장
```
```py 이미지로부터 생성 theme={null}
import os
import time
from google import genai
from google.genai import types
def load_image(path):
with open(path, "rb") as image_file:
return image_file.read()
client = genai.Client(
api_key="sk-***", # 🔑 AiHubMix에서 생성한 키로 교체하세요
http_options={"base_url": "https://aihubmix.com/gemini"},
)
operation = client.models.generate_videos(
model="veo-2.0-generate-001",
prompt="The waves in the background keep flowing",
image=types.Image(
mime_type="image/png",
image_bytes=load_image("img/inferbanner.png") # 이미지 경로
),
config=types.GenerateVideosConfig(
person_generation="dont_allow",
aspect_ratio="16:9",
numberOfVideos=1,
durationSeconds=5,
),
)
while not operation.done:
time.sleep(20)
operation = client.operations.get(operation)
for n, generated_video in enumerate(operation.response.generated_videos):
client.files.download(file=generated_video.video)
generated_video.video.save(f"video{n}.mp4")
```
### 프롬프트 팁
원하는 비디오를 얻기 위해서는 효과적인 프롬프트 작성이 중요합니다:
* 명확한 장면, 동작, 분위기를 묘사하세요
* 촬영 스타일을 명시하세요(파노라마, 클로즈업, 추적 샷 등)
* 조명 조건을 설명하세요(햇빛, 황혼, 실내 조명 등)
* 주요 피사체와 그 동작을 명시하세요(예: "햇빛 속에서 잠자고 있는 새끼 고양이")
* 지나치게 복잡한 내러티브나 빠르게 변하는 장면은 피하세요
* 부정적이거나 금지된 콘텐츠는 피하세요
### 모범 사례
1. **명확하고 간결한 프롬프트**: 비디오 생성을 안내하기 위해 명확하고 구체적인 설명을 사용하세요.
2. **인내심이 핵심**: 비디오 생성에는 2-3분이 걸리므로 완료될 때까지 기다리세요.
3. **다양한 매개변수 테스트**: 다양한 종횡비와 길이를 시도하여 필요에 가장 적합한 설정을 찾으세요.
4. **생성 기록 저장**: 성공적인 결과를 추적하기 위해 생성된 비디오와 함께 프롬프트를 기록하세요.
5. **사용 정책 준수**: 사용이 Google의 콘텐츠 정책 및 서비스 약관을 준수하는지 확인하세요.
***
마지막 업데이트: 2026-06-01