> ## Documentation Index
> Fetch the complete documentation index at: https://docs.aihubmix.com/llms.txt
> Use this file to discover all available pages before exploring further.
# WorkBuddy
> WorkBuddy で AIHubMix を設定し、AIHubMix 対応の任意のモデルを使用します。
WorkBuddy は OpenAI 互換のカスタムモデルに対応しています。AIHubMix を追加すると、GPT、Claude、Gemini、DeepSeek、GLM などの AIHubMix モデルを選択できます。
## 事前準備
* [WorkBuddy](https://www.codebuddy.cn/work/) をインストールして起動します。
* [AIHubMix コンソール](https://aihubmix.com/token) で API Key を作成します。通常は `sk-***` の形式です。
* AIHubMix のモデル一覧から使用するモデル ID をコピーします。
## 画面で AIHubMix モデルを設定する
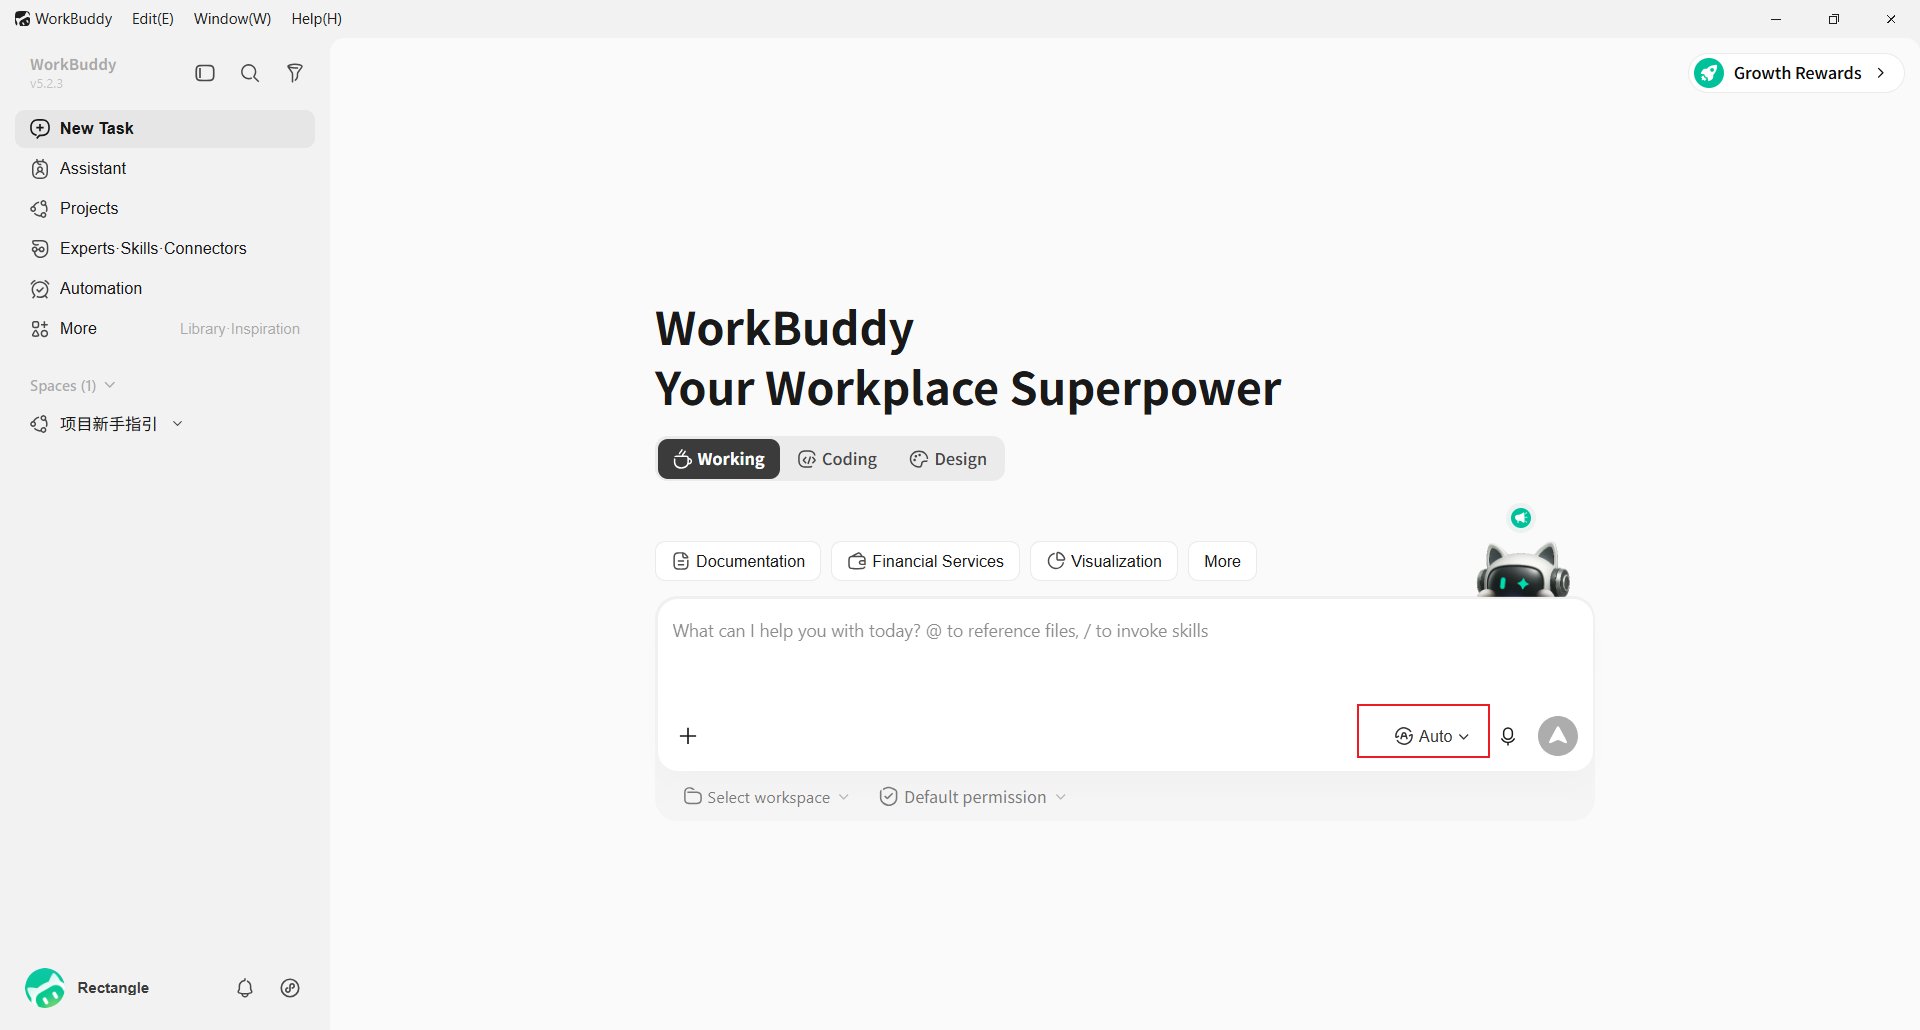
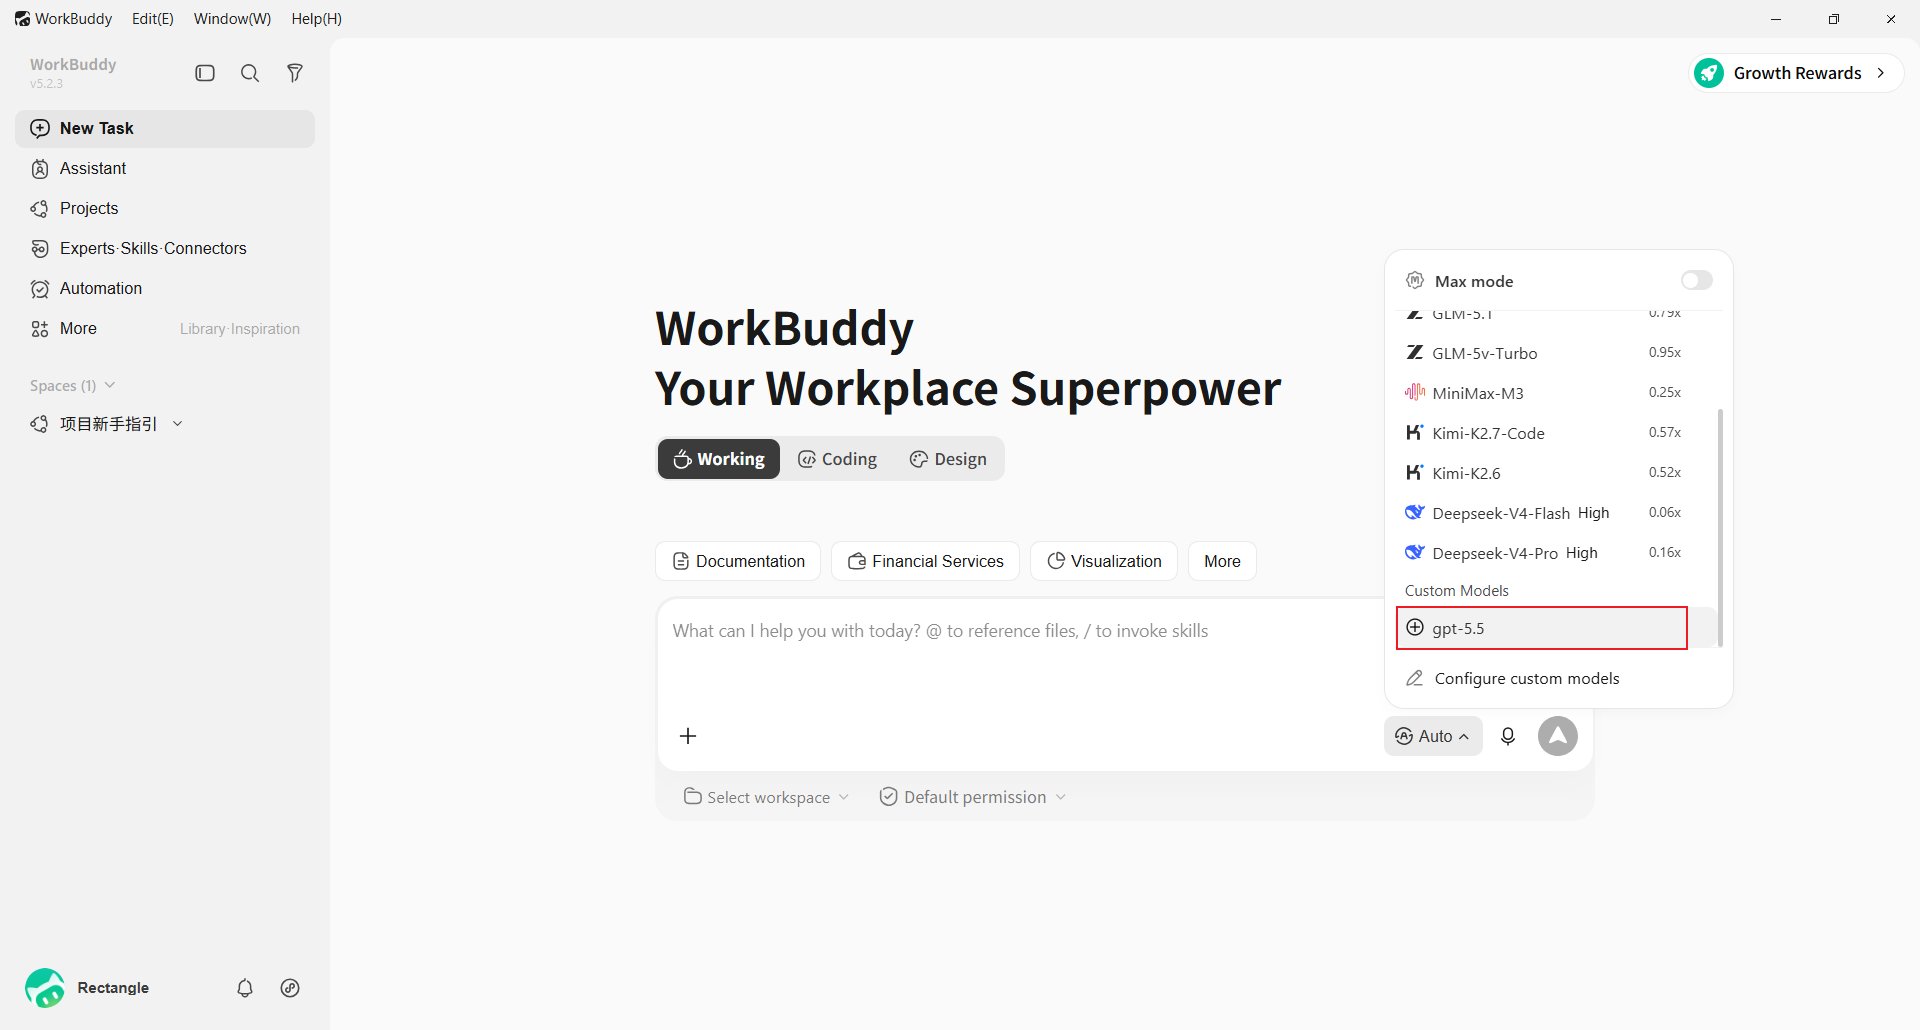
入力欄右下のモデル選択(例:**Auto**)をクリックします。
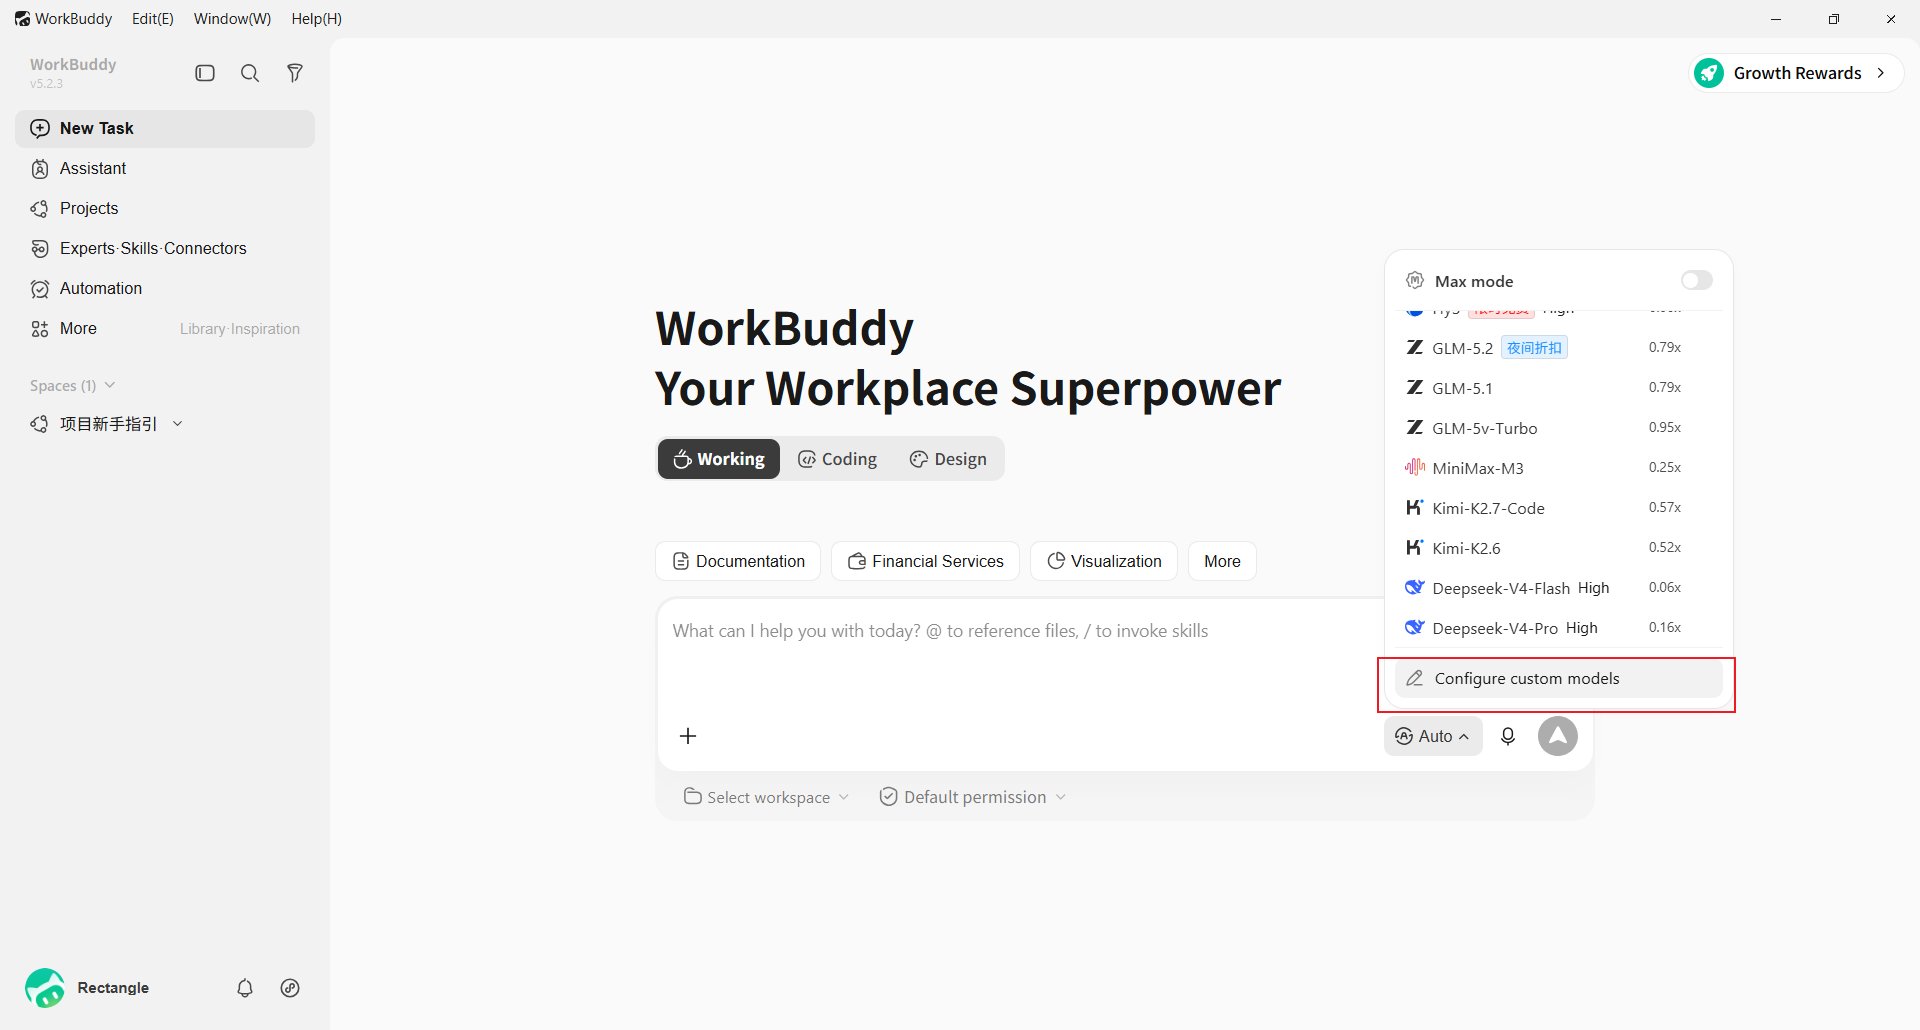
 リストの末尾で **Configure custom models** を選び、**Add Model** をクリックして **Provider** から **Custom** を選択します。
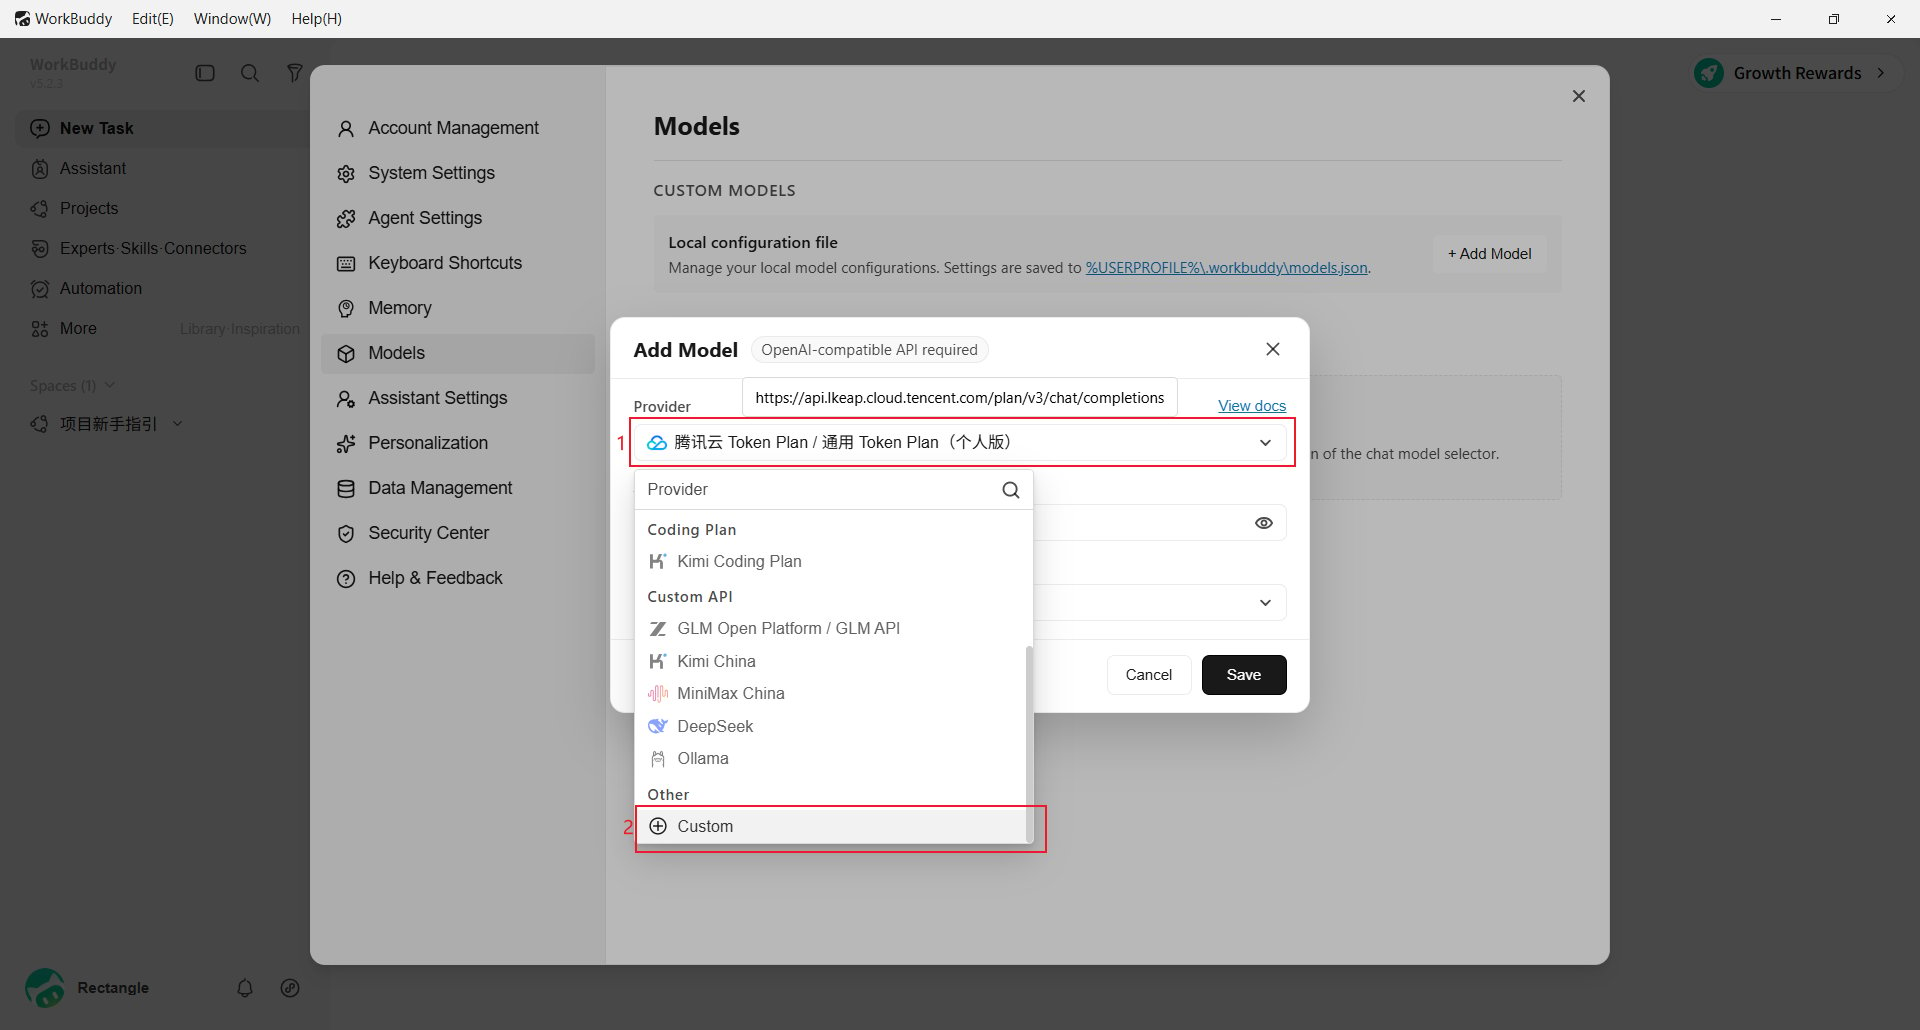 * **Endpoint**:`https://aihubmix.com/v1`。必要な場合は `https://api.inferera.com/v1`。
* **API Key**:[AIHubMix コンソール](https://aihubmix.com/token) で作成した Key。
* **Model Name**:モデル ID。例:`gpt-5.5`。
* **Advanced Settings**:対応する機能だけ **Tool Calling**、**Image Input**、**Reasoning** を有効にします。
**Save** をクリックし、**Custom Models** からモデルを選択します。
* **Endpoint**:`https://aihubmix.com/v1`。必要な場合は `https://api.inferera.com/v1`。
* **API Key**:[AIHubMix コンソール](https://aihubmix.com/token) で作成した Key。
* **Model Name**:モデル ID。例:`gpt-5.5`。
* **Advanced Settings**:対応する機能だけ **Tool Calling**、**Image Input**、**Reasoning** を有効にします。
**Save** をクリックし、**Custom Models** からモデルを選択します。
 ## 設定ファイルからモデルを追加する
`%USERPROFILE%\.workbuddy\models.json` を編集します。
```json theme={null}
[{"id":"gpt-5.5","name":"gpt-5.5","vendor":"Custom","url":"https://aihubmix.com/v1","apiKey":"sk-***","supportsToolCall":true,"supportsImages":true,"supportsReasoning":false,"useCustomProtocol":false}]
```
予備アドレスを使う場合:
```json theme={null}
"url": "https://api.inferera.com/v1"
```
`id` と `name` はモデル ID、`vendor` は `Custom`、`apiKey` は AIHubMix Key です。`supportsImages` と `supportsToolCall` は **Image Input** と **Tool Calling** に対応します。変更後は WorkBuddy を再起動するか、モデル選択を開き直します。
## 動作確認
モデルを選択して短いメッセージを送信します。応答があれば設定完了です。
## 設定ファイルからモデルを追加する
`%USERPROFILE%\.workbuddy\models.json` を編集します。
```json theme={null}
[{"id":"gpt-5.5","name":"gpt-5.5","vendor":"Custom","url":"https://aihubmix.com/v1","apiKey":"sk-***","supportsToolCall":true,"supportsImages":true,"supportsReasoning":false,"useCustomProtocol":false}]
```
予備アドレスを使う場合:
```json theme={null}
"url": "https://api.inferera.com/v1"
```
`id` と `name` はモデル ID、`vendor` は `Custom`、`apiKey` は AIHubMix Key です。`supportsImages` と `supportsToolCall` は **Image Input** と **Tool Calling** に対応します。変更後は WorkBuddy を再起動するか、モデル選択を開き直します。
## 動作確認
モデルを選択して短いメッセージを送信します。応答があれば設定完了です。
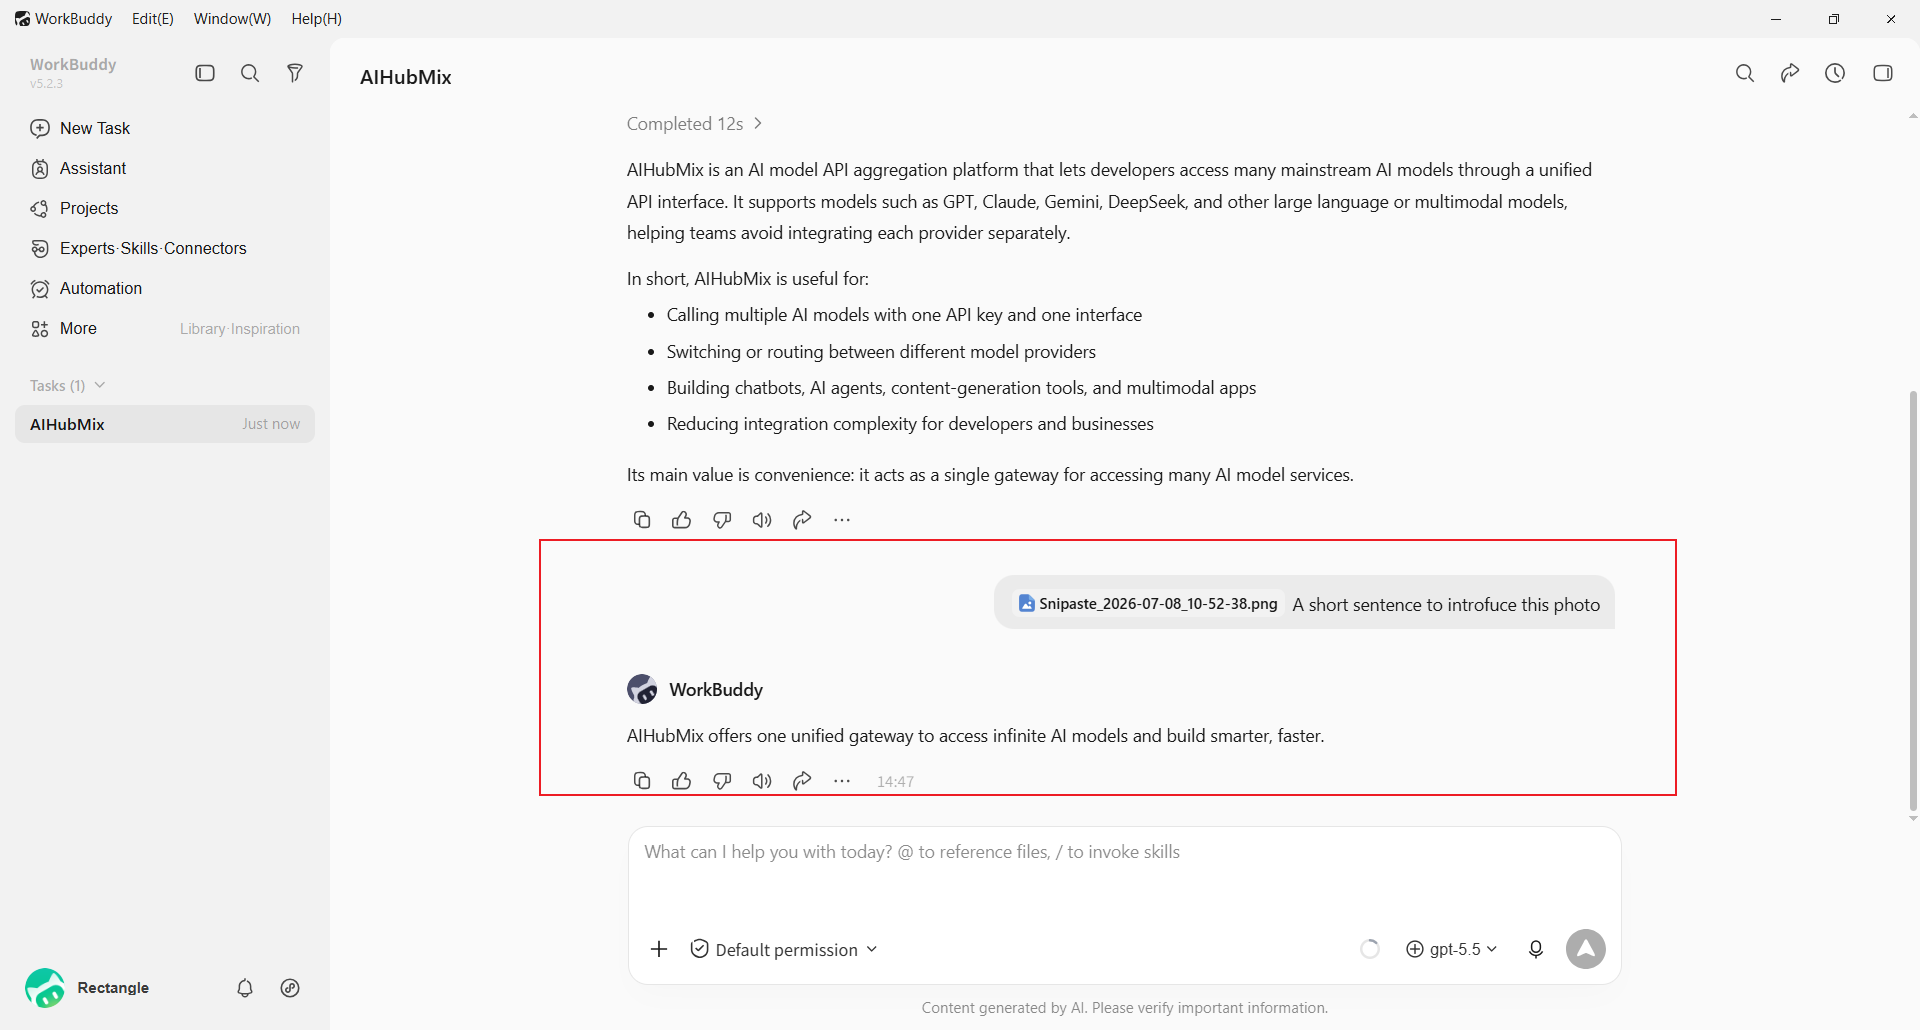
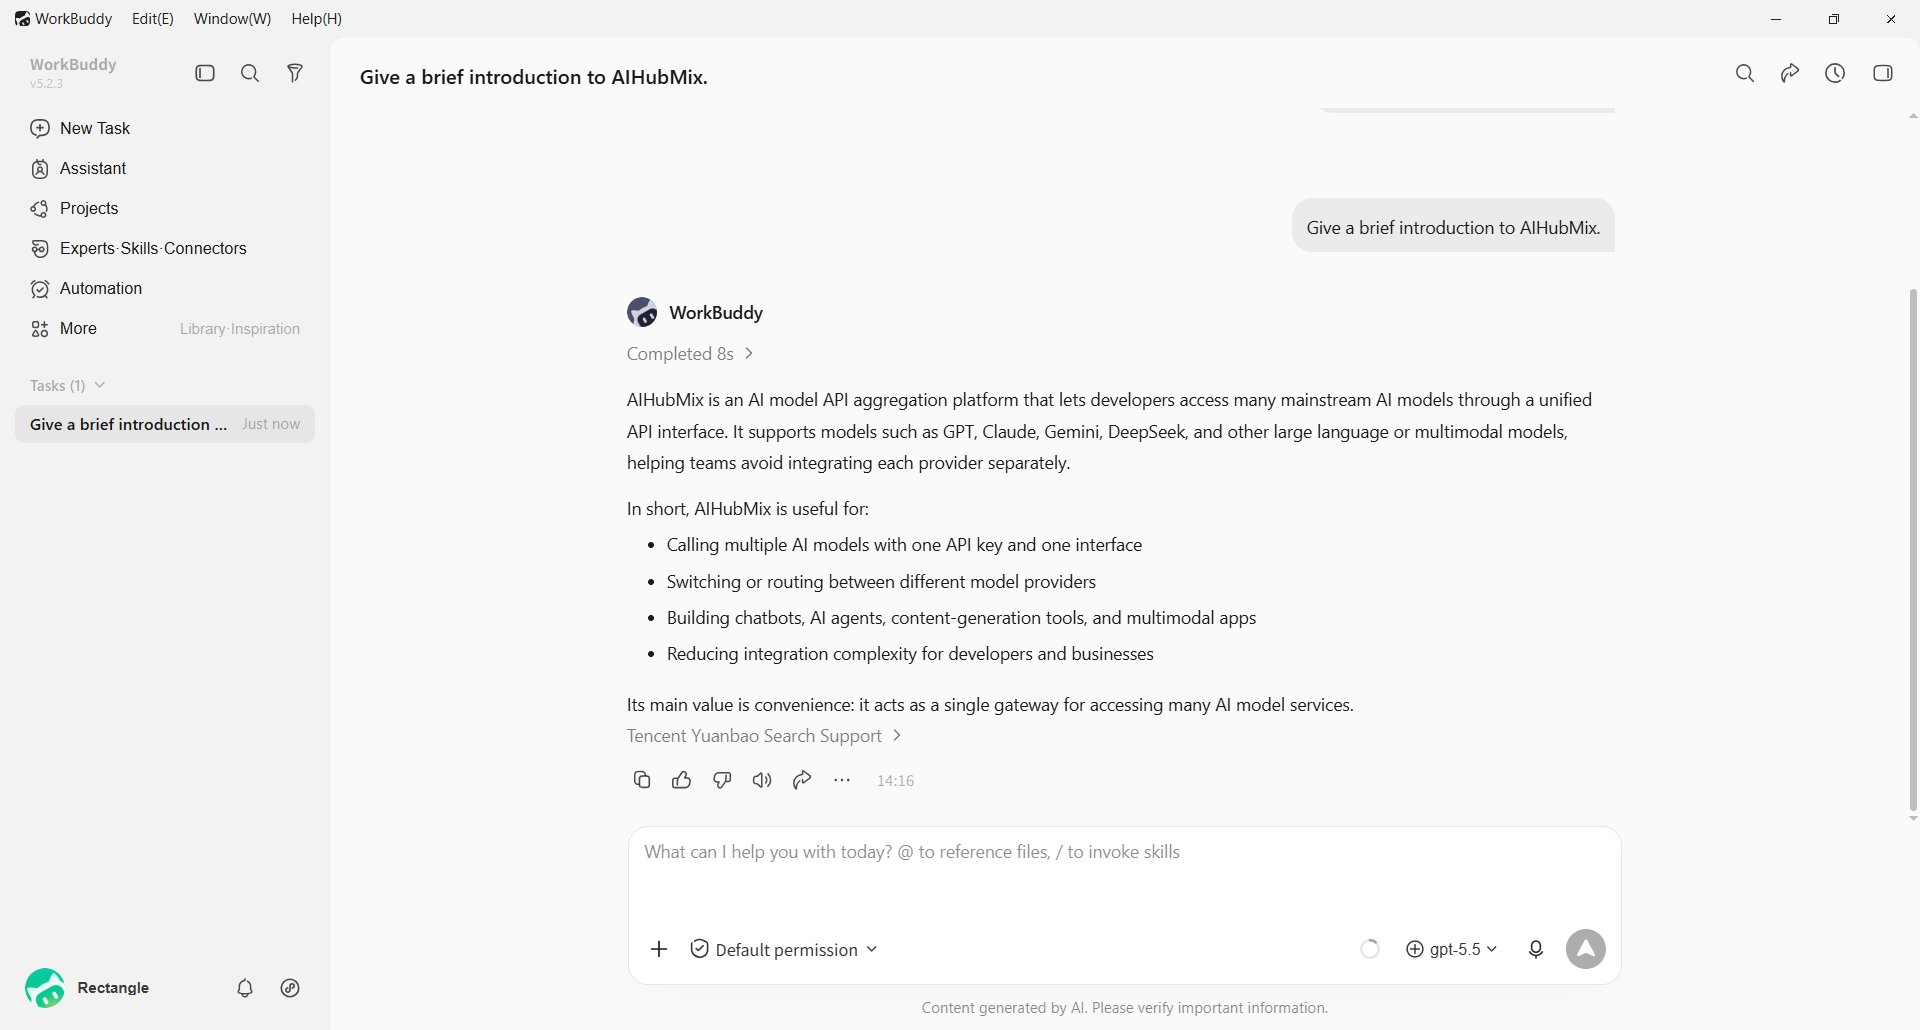 対応モデルで **Image Input** を有効にした場合は、画像を送信して確認します。
 ## よくある質問
**なぜ Custom を選ぶのですか?**
AIHubMix は OpenAI 互換インターフェースを使用するため、Endpoint、API Key、モデル名を入力します。組み込みプロバイダーは独自の API アドレスを自動使用する場合があります。
**保存後にモデルが表示されない場合**
モデル選択を開き直して **Custom Models** を確認します。**Save** を押したこと、モデル名が入力されていること、`%USERPROFILE%\.workbuddy\models.json` が有効な JSON であることを確認してください。
**リクエストが失敗する場合**
`/v1`、API Key、モデル ID を確認してください。主アドレスが利用できない場合は `https://api.inferera.com/v1` を使用します。
更新日:2026-07-10
## よくある質問
**なぜ Custom を選ぶのですか?**
AIHubMix は OpenAI 互換インターフェースを使用するため、Endpoint、API Key、モデル名を入力します。組み込みプロバイダーは独自の API アドレスを自動使用する場合があります。
**保存後にモデルが表示されない場合**
モデル選択を開き直して **Custom Models** を確認します。**Save** を押したこと、モデル名が入力されていること、`%USERPROFILE%\.workbuddy\models.json` が有効な JSON であることを確認してください。
**リクエストが失敗する場合**
`/v1`、API Key、モデル ID を確認してください。主アドレスが利用できない場合は `https://api.inferera.com/v1` を使用します。
更新日:2026-07-10