> ## Documentation Index
> Fetch the complete documentation index at: https://docs.aihubmix.com/llms.txt
> Use this file to discover all available pages before exploring further.
# WorkBuddy
> Configure AIHubMix in WorkBuddy and use any model supported by AIHubMix.
WorkBuddy supports custom OpenAI-compatible models. After adding AIHubMix, you can select GPT, Claude, Gemini, DeepSeek, GLM, and other AIHubMix models in WorkBuddy.
## Before you start
* Install and open [WorkBuddy](https://www.codebuddy.cn/work/).
* Create an API key in the [AIHubMix Console](https://aihubmix.com/token). It usually starts with `sk-***`.
* Copy the model ID you want to use, such as `gpt-5.5`, `gemini-3.5-flash`, or `deepseek-chat`, from the AIHubMix model list.
## Configure AIHubMix in the interface
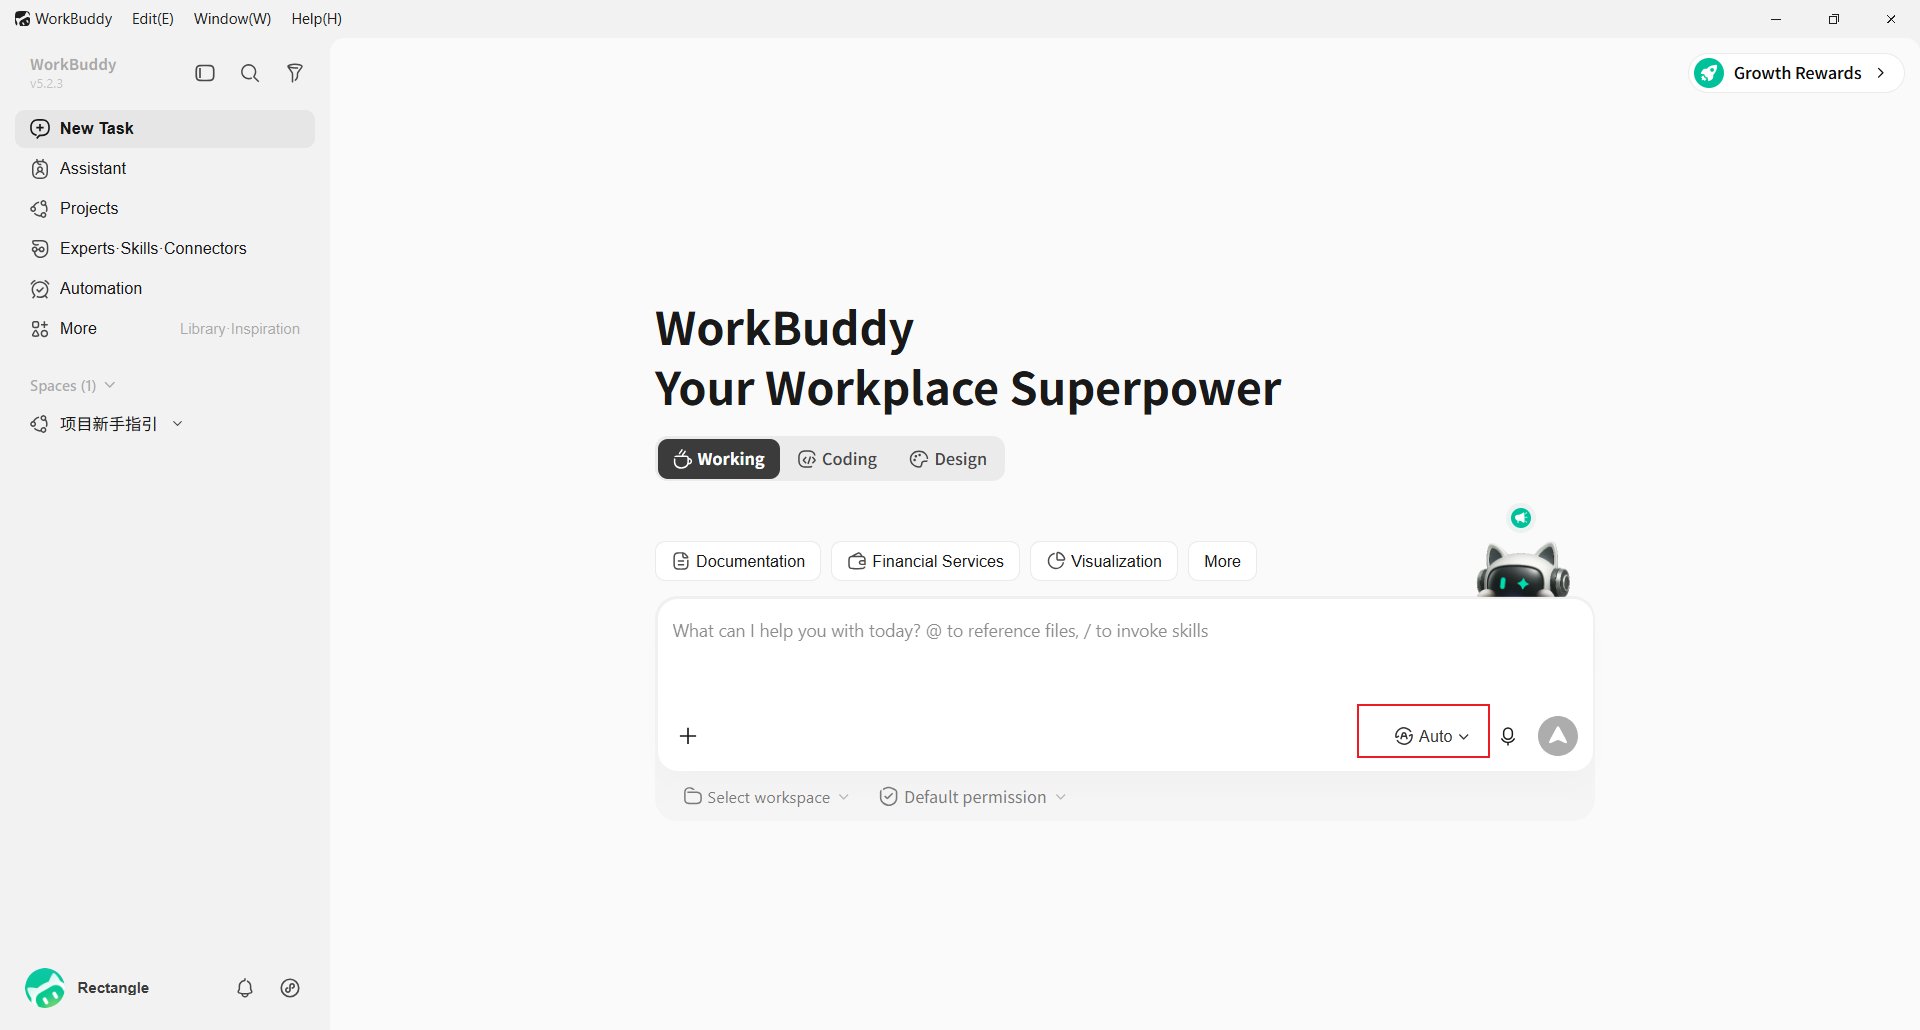
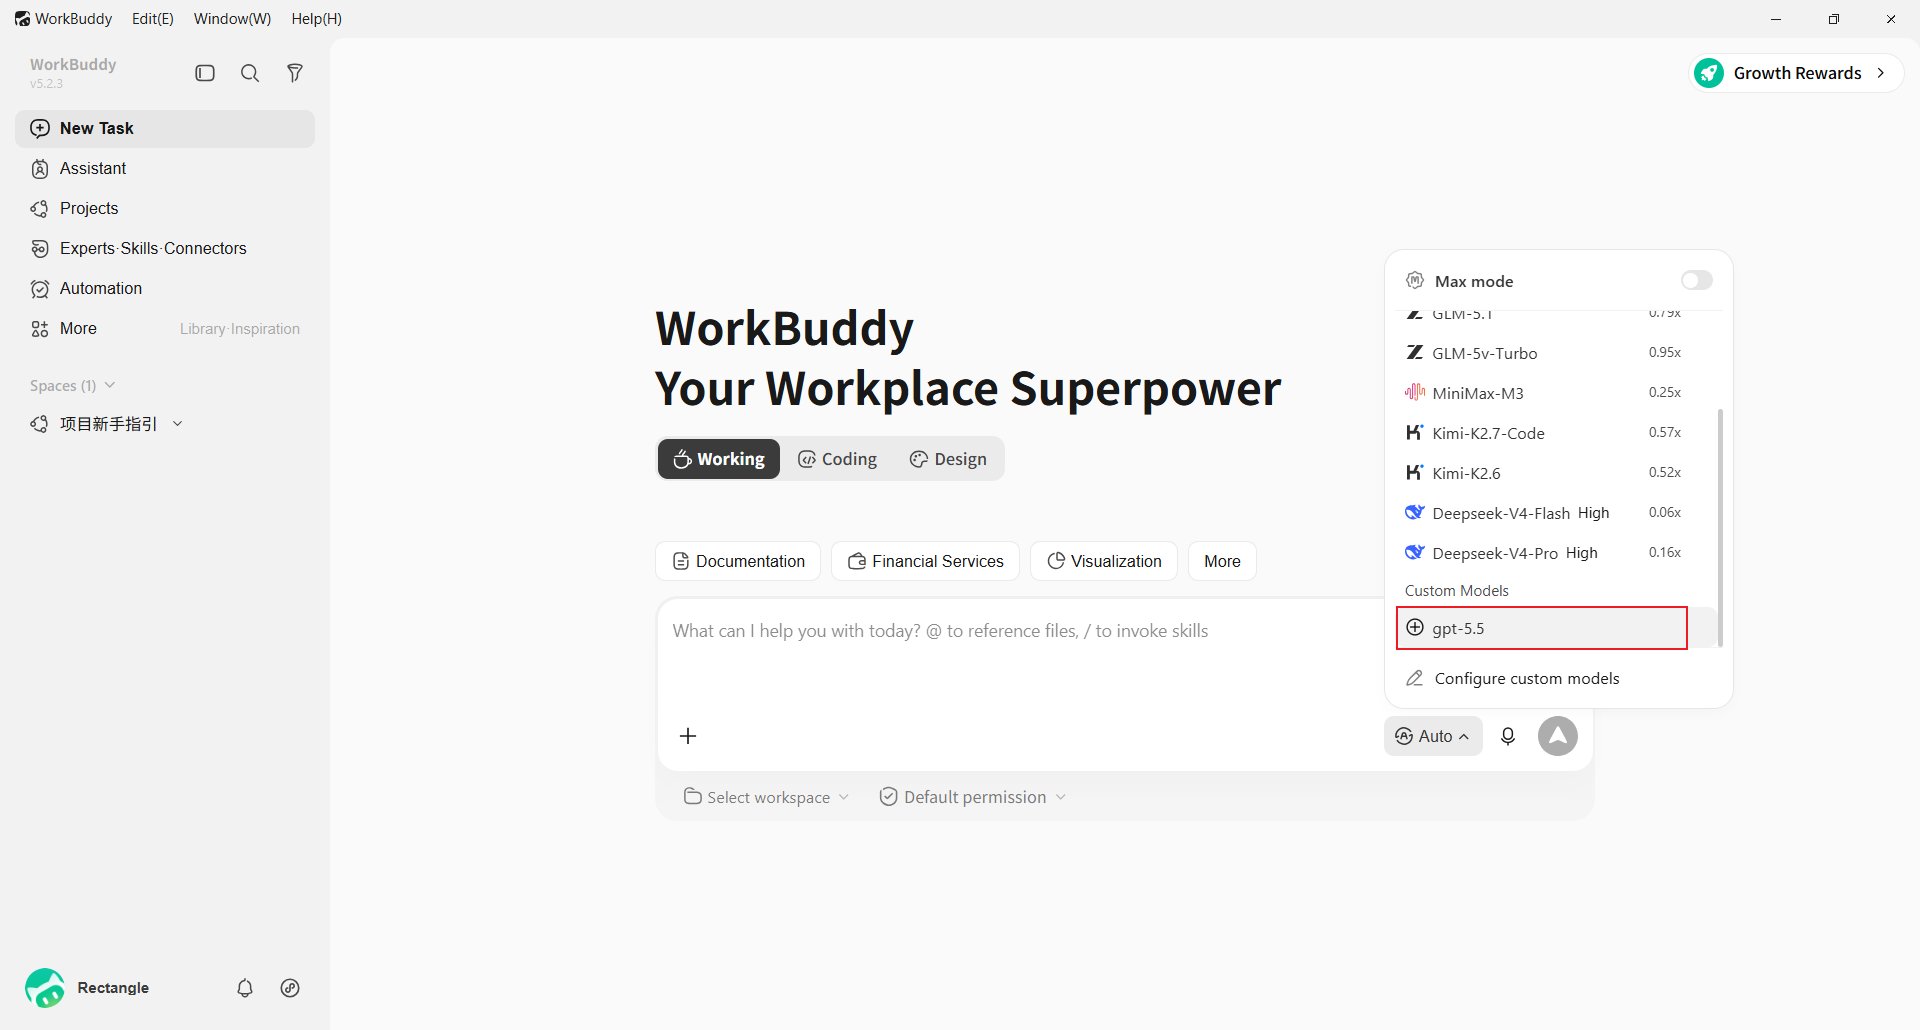
Open WorkBuddy and click the current model picker in the lower-right corner of the input box, for example **Auto**.
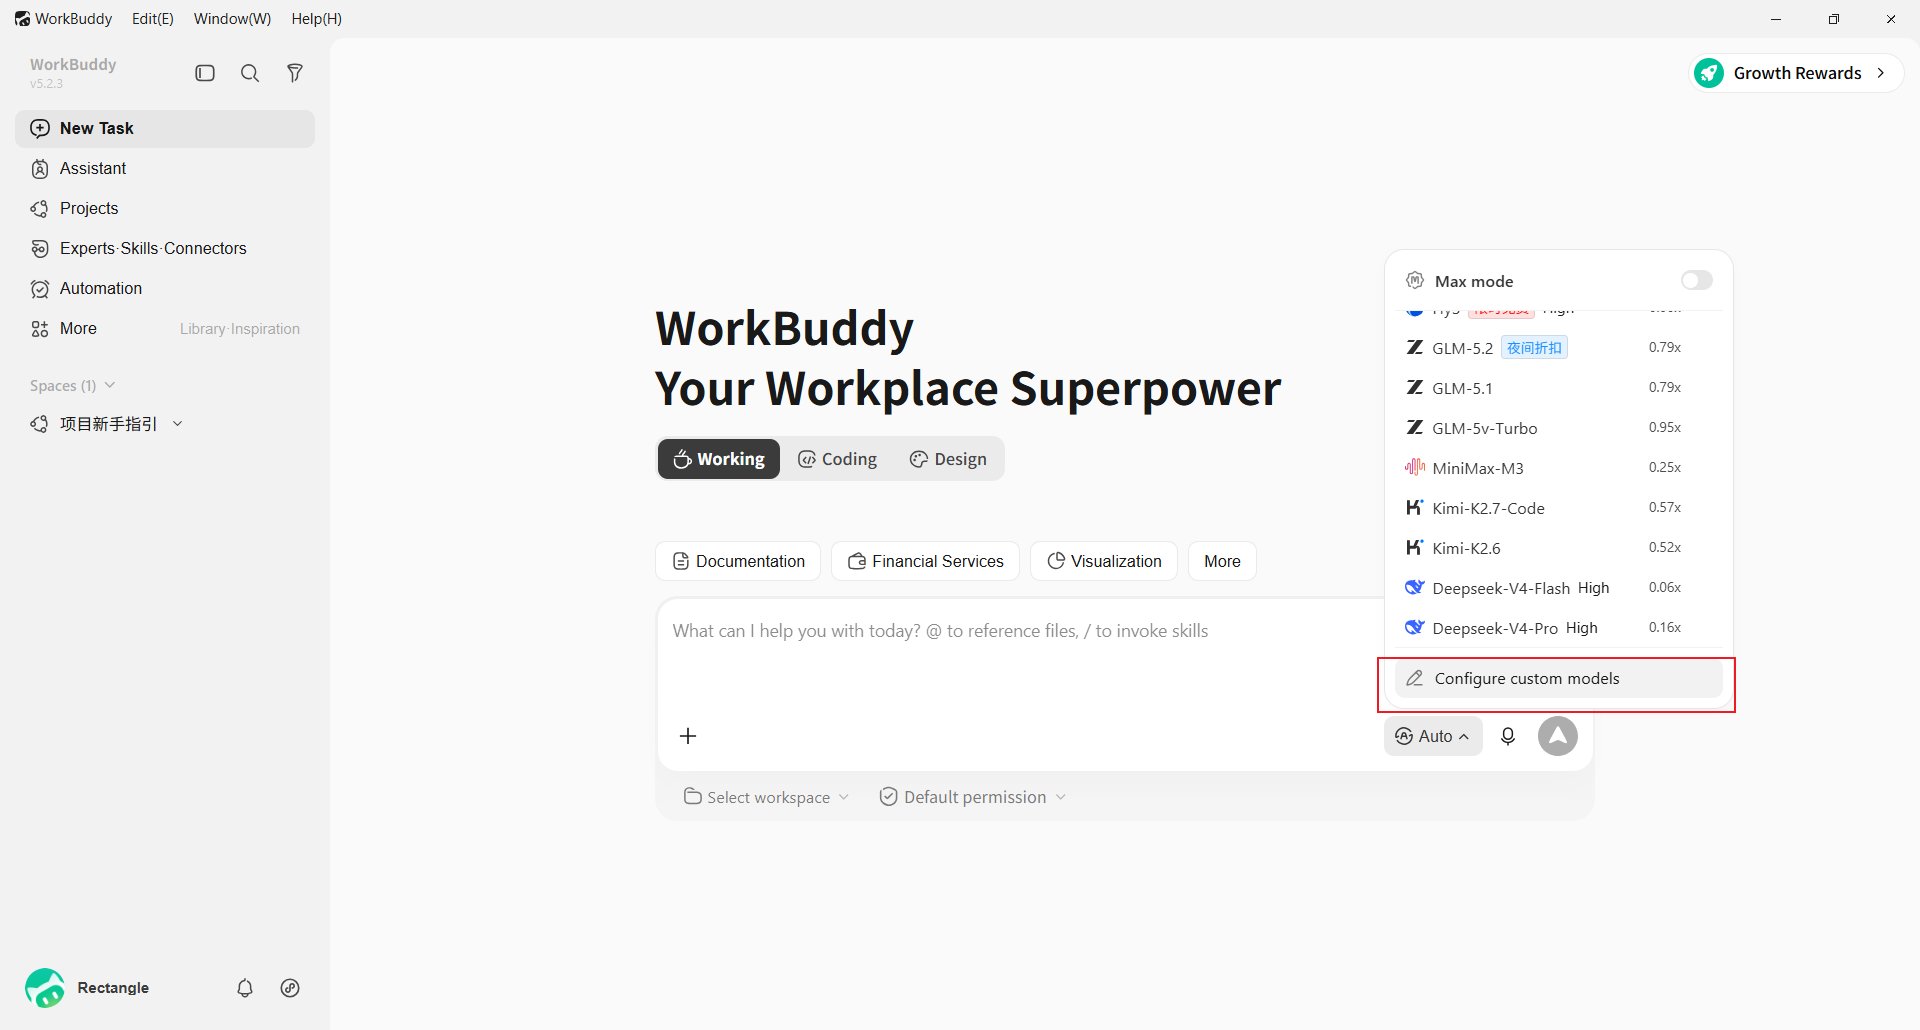
 Scroll to the bottom of the model list and select **Configure custom models**.
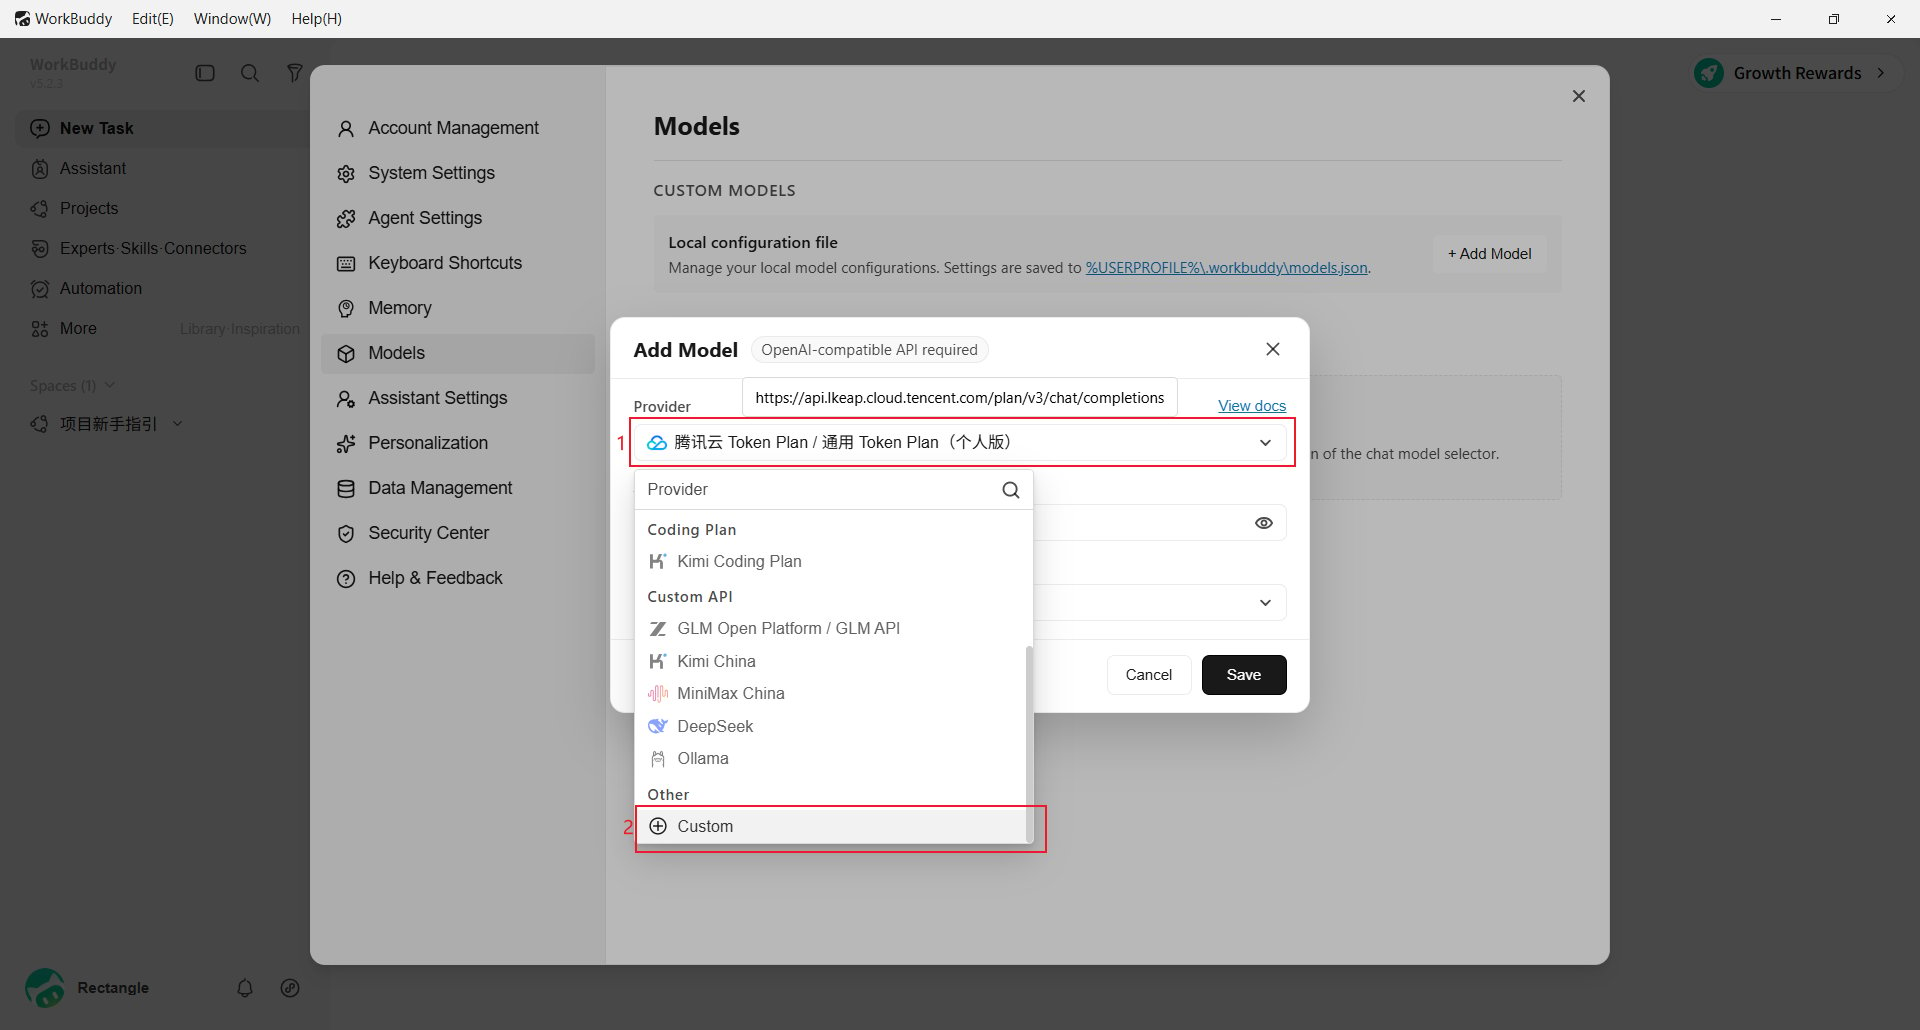
 Click **Add Model**, then choose **Custom** from the **Provider** menu.
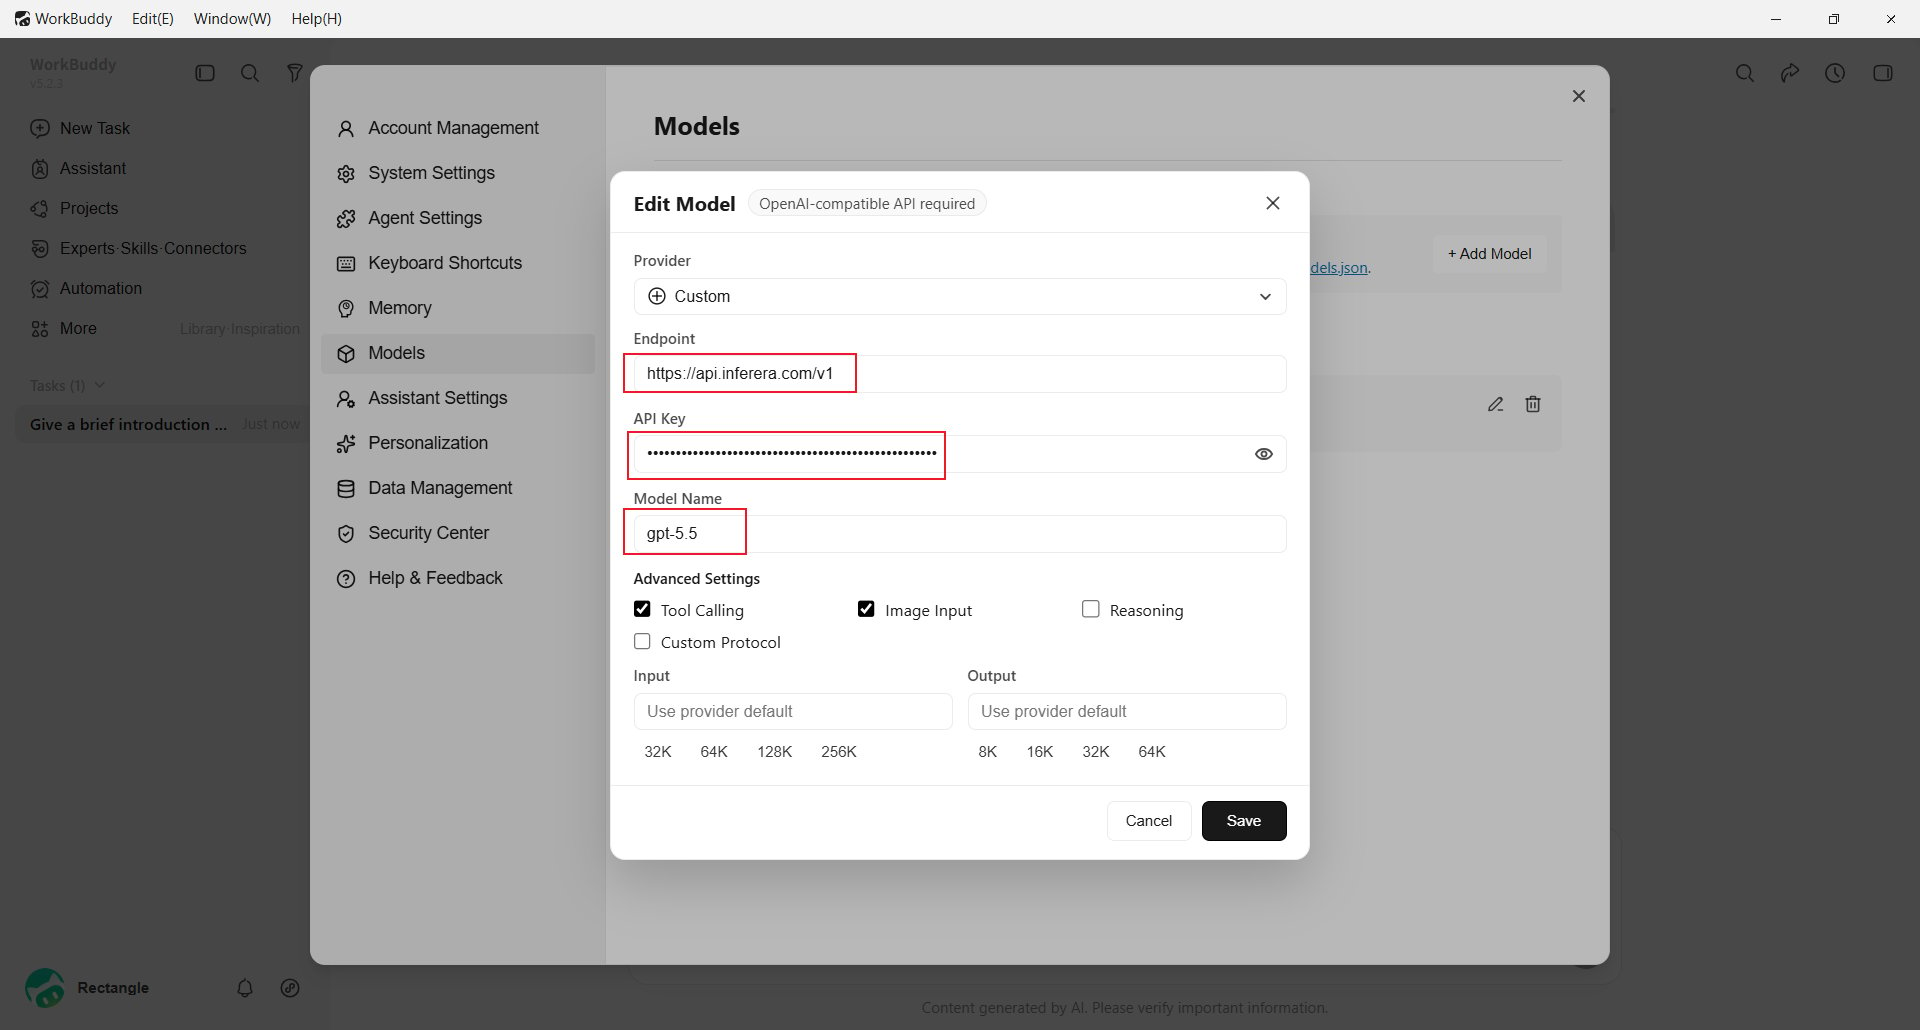
 Complete the following fields:
* **Endpoint**: Use `https://aihubmix.com/v1`. If it is temporarily unavailable, use the backup endpoint `https://api.inferera.com/v1`.
* **API Key**: Enter the key created in the [AIHubMix Console](https://aihubmix.com/token).
* **Model Name**: Enter the model ID, such as `gpt-5.5`.
* **Advanced Settings**: Enable **Tool Calling**, **Image Input**, or **Reasoning** only when the selected model supports that capability.
Click **Save**.
Complete the following fields:
* **Endpoint**: Use `https://aihubmix.com/v1`. If it is temporarily unavailable, use the backup endpoint `https://api.inferera.com/v1`.
* **API Key**: Enter the key created in the [AIHubMix Console](https://aihubmix.com/token).
* **Model Name**: Enter the model ID, such as `gpt-5.5`.
* **Advanced Settings**: Enable **Tool Calling**, **Image Input**, or **Reasoning** only when the selected model supports that capability.
Click **Save**.
 Return to the model picker and select the model from **Custom Models**.
 ## Add a model through a configuration file
WorkBuddy stores custom models in a local `models.json`. Edit this file instead of entering each field in the interface:
```text theme={null}
%USERPROFILE%\.workbuddy\models.json
```
The file contains a model array. Use this AIHubMix configuration as an example:
```json theme={null}
[
{
"id": "gpt-5.5",
"name": "gpt-5.5",
"vendor": "Custom",
"url": "https://aihubmix.com/v1",
"apiKey": "sk-***",
"supportsToolCall": true,
"supportsImages": true,
"supportsReasoning": false,
"useCustomProtocol": false
}
]
```
If the primary endpoint is unavailable, change `url` to:
```json theme={null}
"url": "https://api.inferera.com/v1"
```
`id` and `name` are the model ID, `vendor` is `Custom`, and `apiKey` is your AIHubMix key. `supportsImages` and `supportsToolCall` correspond to **Image Input** and **Tool Calling** in the interface. Restart WorkBuddy or reopen the model picker after saving.
## Verify the setup
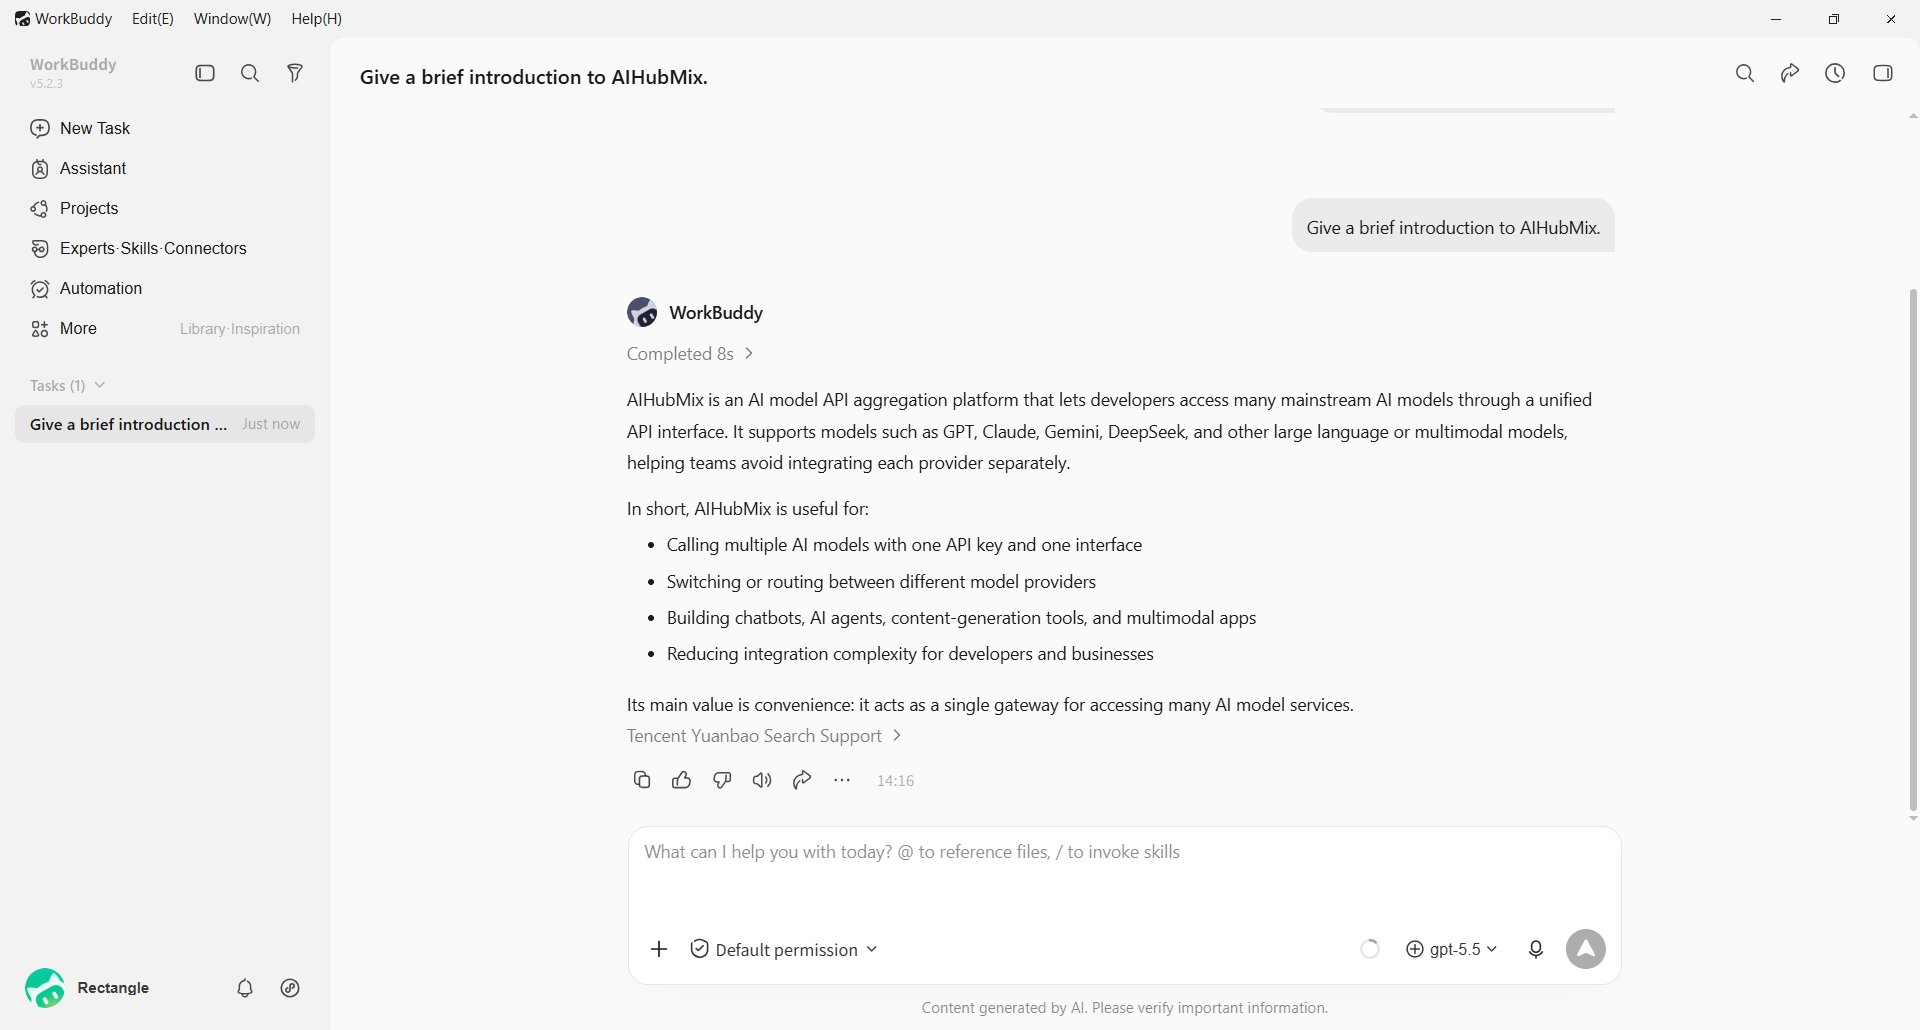
Select the custom model and send a short message, such as asking WorkBuddy to introduce AIHubMix. A successful reply confirms the configuration.
## Add a model through a configuration file
WorkBuddy stores custom models in a local `models.json`. Edit this file instead of entering each field in the interface:
```text theme={null}
%USERPROFILE%\.workbuddy\models.json
```
The file contains a model array. Use this AIHubMix configuration as an example:
```json theme={null}
[
{
"id": "gpt-5.5",
"name": "gpt-5.5",
"vendor": "Custom",
"url": "https://aihubmix.com/v1",
"apiKey": "sk-***",
"supportsToolCall": true,
"supportsImages": true,
"supportsReasoning": false,
"useCustomProtocol": false
}
]
```
If the primary endpoint is unavailable, change `url` to:
```json theme={null}
"url": "https://api.inferera.com/v1"
```
`id` and `name` are the model ID, `vendor` is `Custom`, and `apiKey` is your AIHubMix key. `supportsImages` and `supportsToolCall` correspond to **Image Input** and **Tool Calling** in the interface. Restart WorkBuddy or reopen the model picker after saving.
## Verify the setup
Select the custom model and send a short message, such as asking WorkBuddy to introduce AIHubMix. A successful reply confirms the configuration.
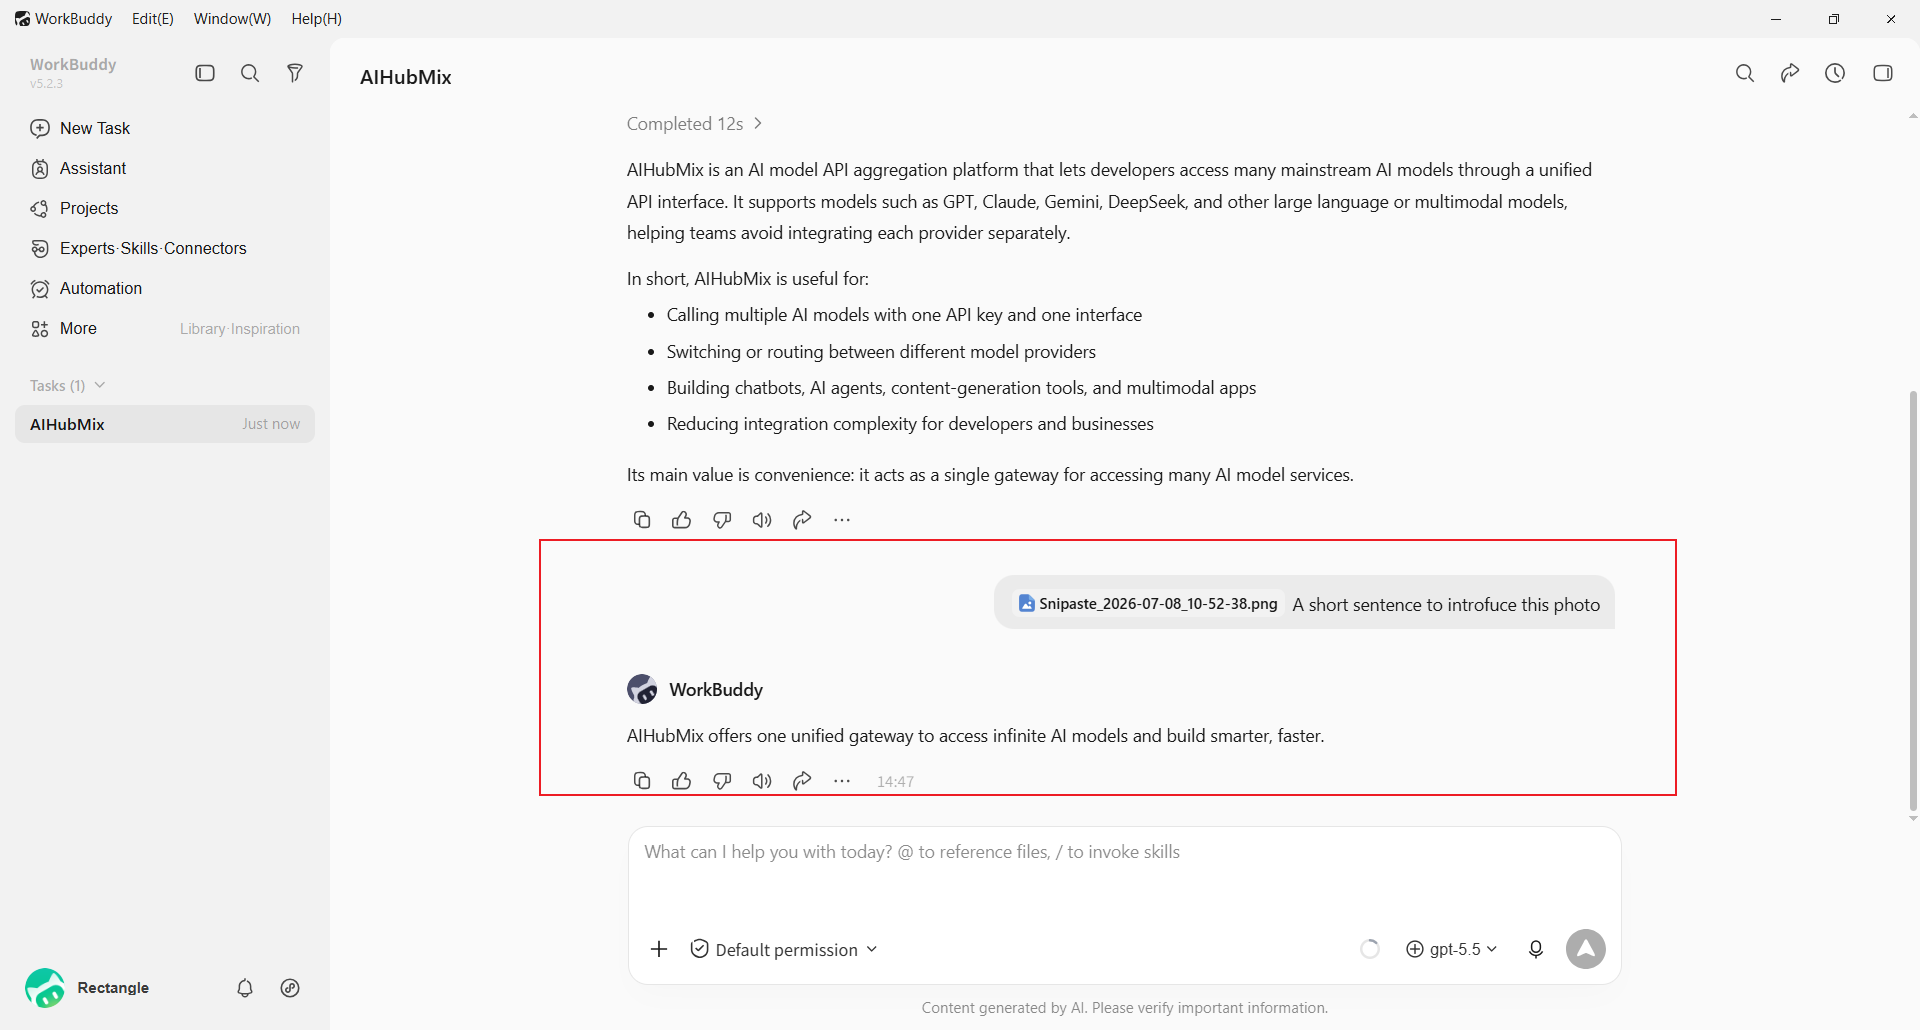
 When **Image Input** is enabled for a supported model, upload an image and ask WorkBuddy about it to verify image input.
 ## FAQ
**Why choose Custom?**
AIHubMix uses an OpenAI-compatible interface, so you need to enter the endpoint, API key, and model name. Built-in providers may automatically use their own API endpoint.
**The model does not appear after saving. What should I do?**
Reopen the model picker and scroll to **Custom Models**. If it is still missing, confirm that you clicked **Save** and entered a model name. For file-based configuration, confirm that `%USERPROFILE%\.workbuddy\models.json` is valid JSON.
**What should I check when a request fails?**
Confirm that the endpoint includes `/v1`, the API key is complete, and the model name matches the AIHubMix model ID. If the primary endpoint is unavailable, use `https://api.inferera.com/v1`.
Last updated: 2026-07-10
## FAQ
**Why choose Custom?**
AIHubMix uses an OpenAI-compatible interface, so you need to enter the endpoint, API key, and model name. Built-in providers may automatically use their own API endpoint.
**The model does not appear after saving. What should I do?**
Reopen the model picker and scroll to **Custom Models**. If it is still missing, confirm that you clicked **Save** and entered a model name. For file-based configuration, confirm that `%USERPROFILE%\.workbuddy\models.json` is valid JSON.
**What should I check when a request fails?**
Confirm that the endpoint includes `/v1`, the API key is complete, and the model name matches the AIHubMix model ID. If the primary endpoint is unavailable, use `https://api.inferera.com/v1`.
Last updated: 2026-07-10