> ## Documentation Index
> Fetch the complete documentation index at: https://docs.aihubmix.com/llms.txt
> Use this file to discover all available pages before exploring further.
# OpenClaw
## Installation
Please ensure Node >= 22 before installation.
Run the installation command
```shellscript theme={null}
npm install -g openclaw@latest
```
After installation, the following commands can be run from any directory. You do not need to switch to the OpenClaw installation directory first. If your terminal recognizes `openclaw`, you can copy the commands in this guide directly.
```powershell theme={null}
openclaw models status
```
If Windows reports that `openclaw` cannot be found, replace the leading `openclaw` command with your local executable path:
```powershell theme={null}
& "your-install-path\OpenClaw\openclaw.cmd" models status
```
`your-install-path` is a placeholder. Replace it with the parent directory where OpenClaw is installed. For example, if OpenClaw is located at `D:\Apps\OpenClaw`, use `& "D:\Apps\OpenClaw\openclaw.cmd" models status`.
### Terminal Configuration
Open the terminal and run the following command to start the configuration
```shellscript theme={null}
openclaw onboard
```
Select `Yes`
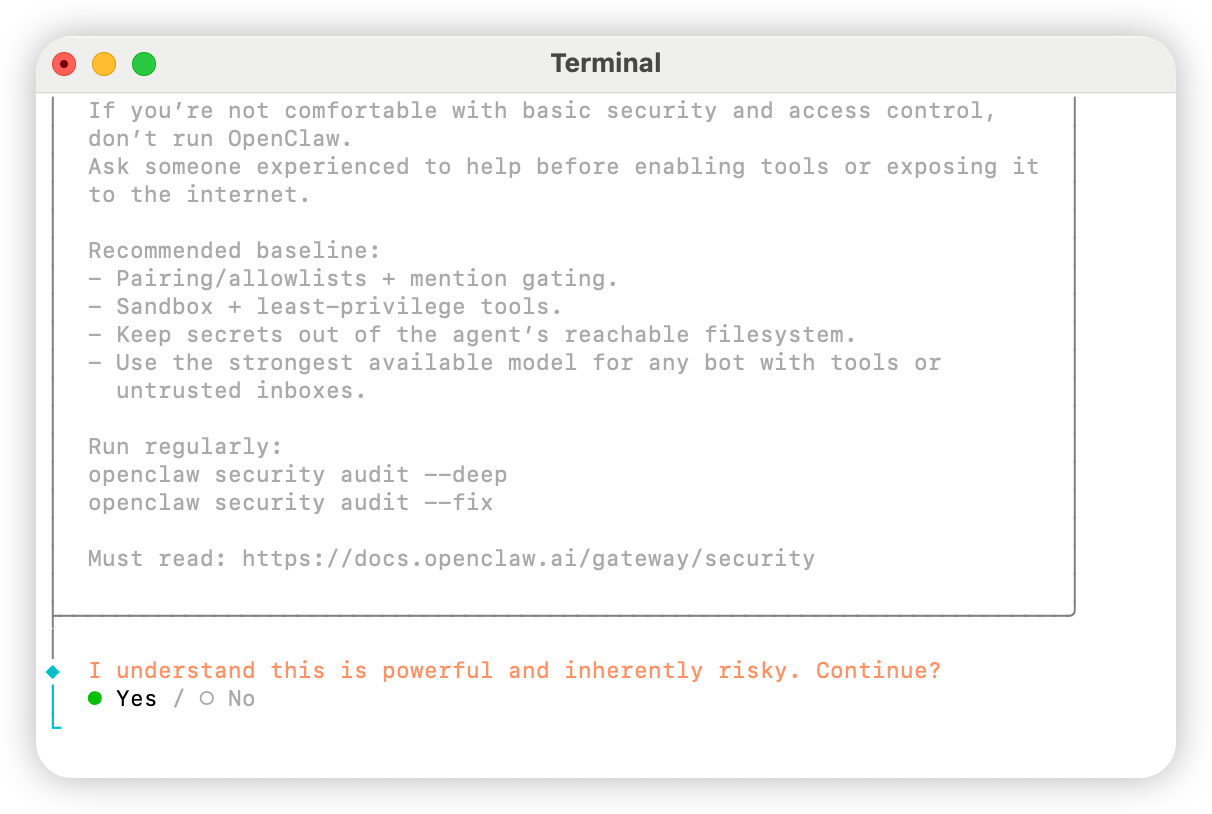 Select `QuickStart`
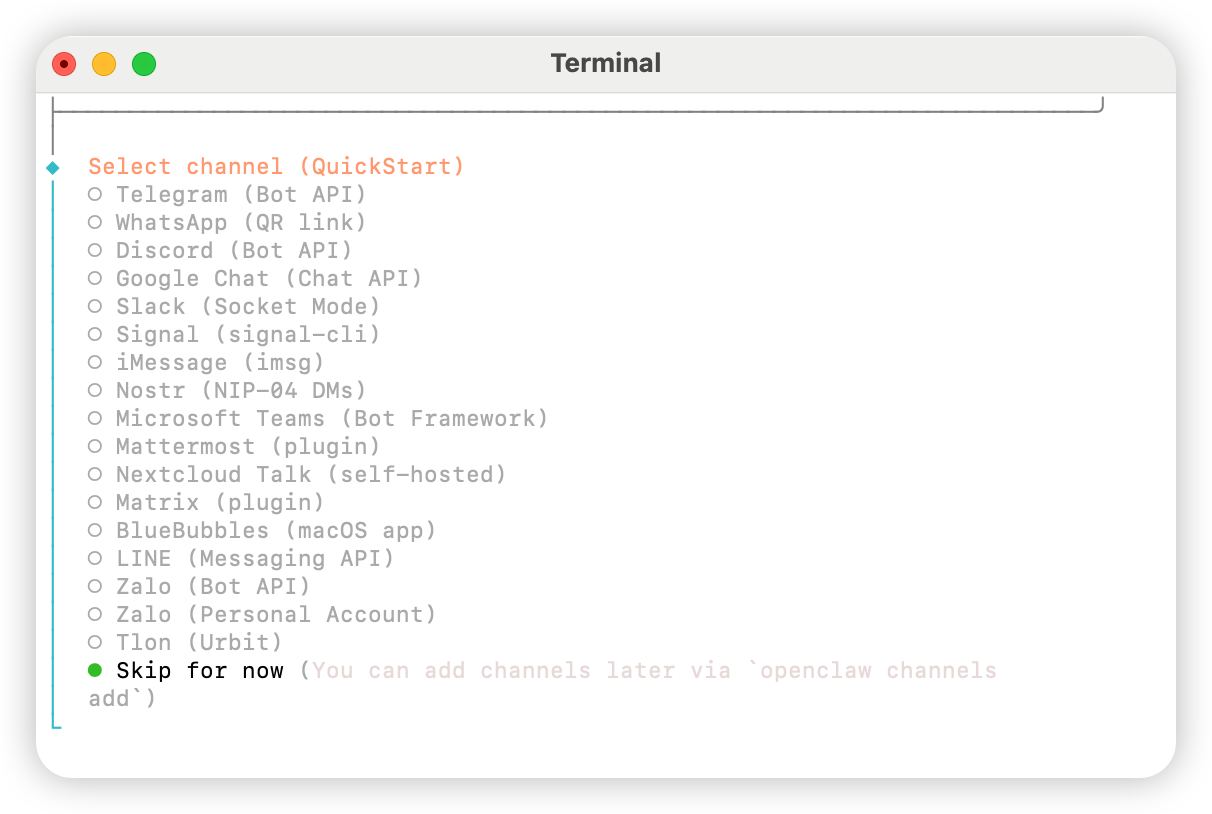
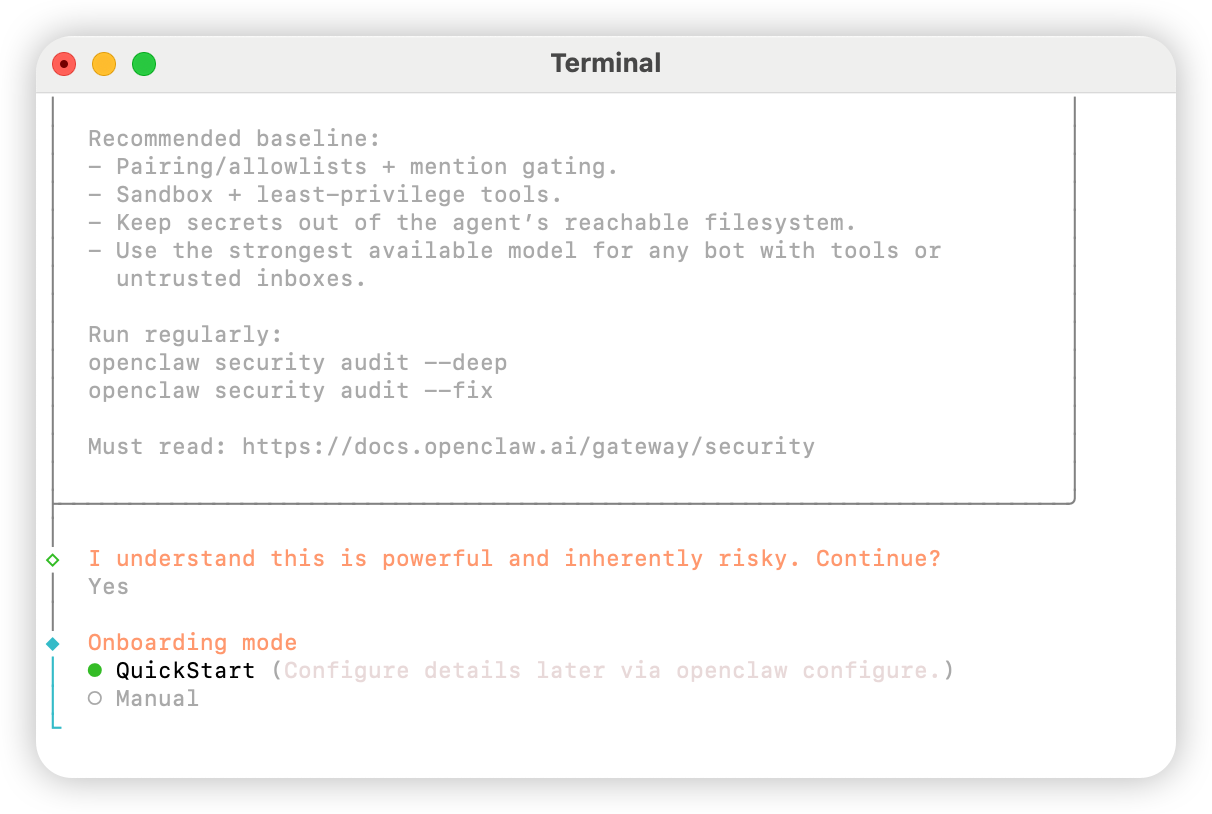 Select `Skip for now`
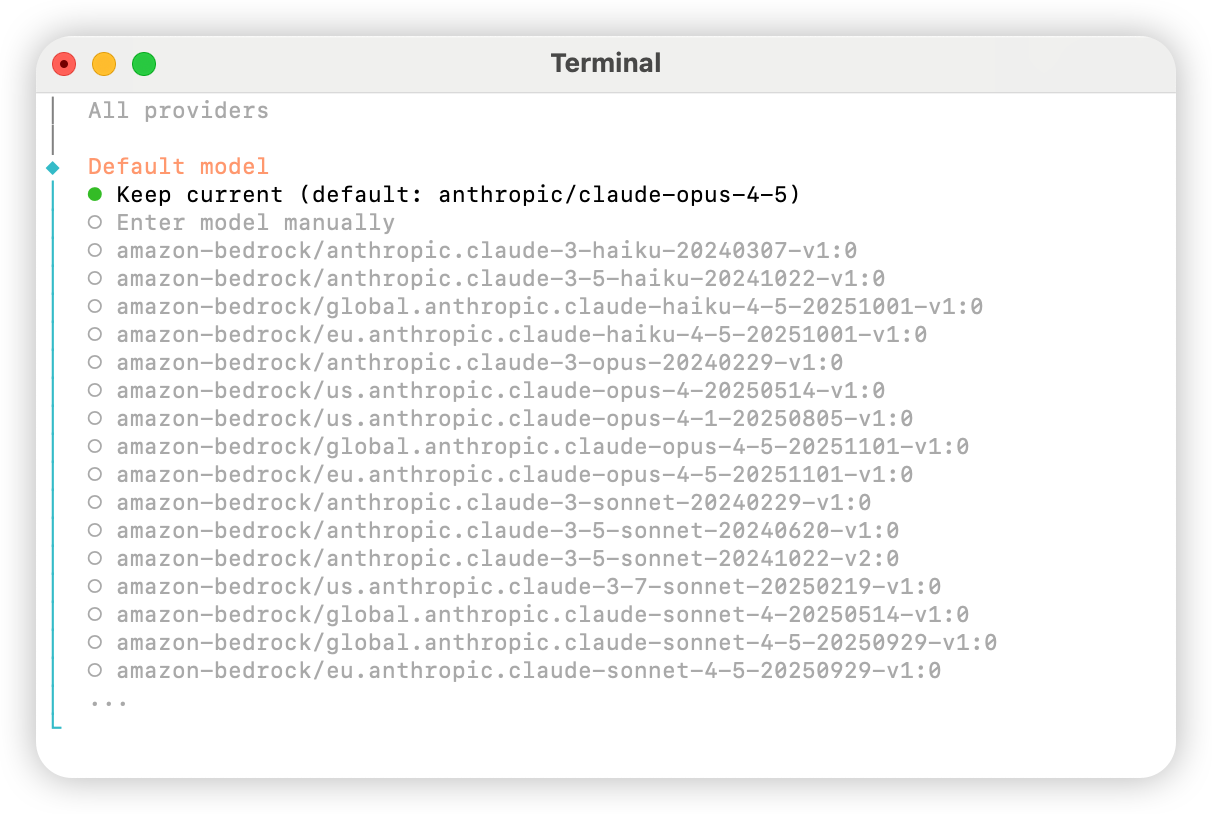
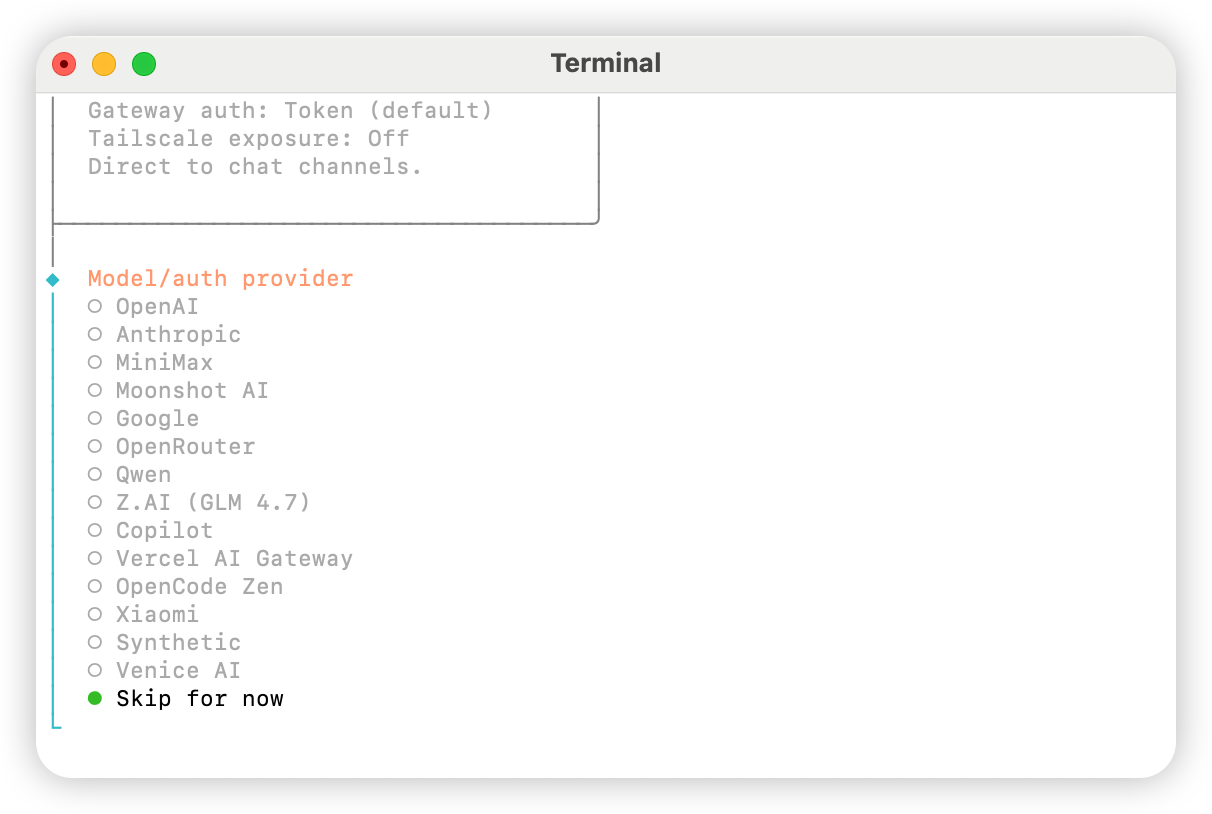 Select `All providers`
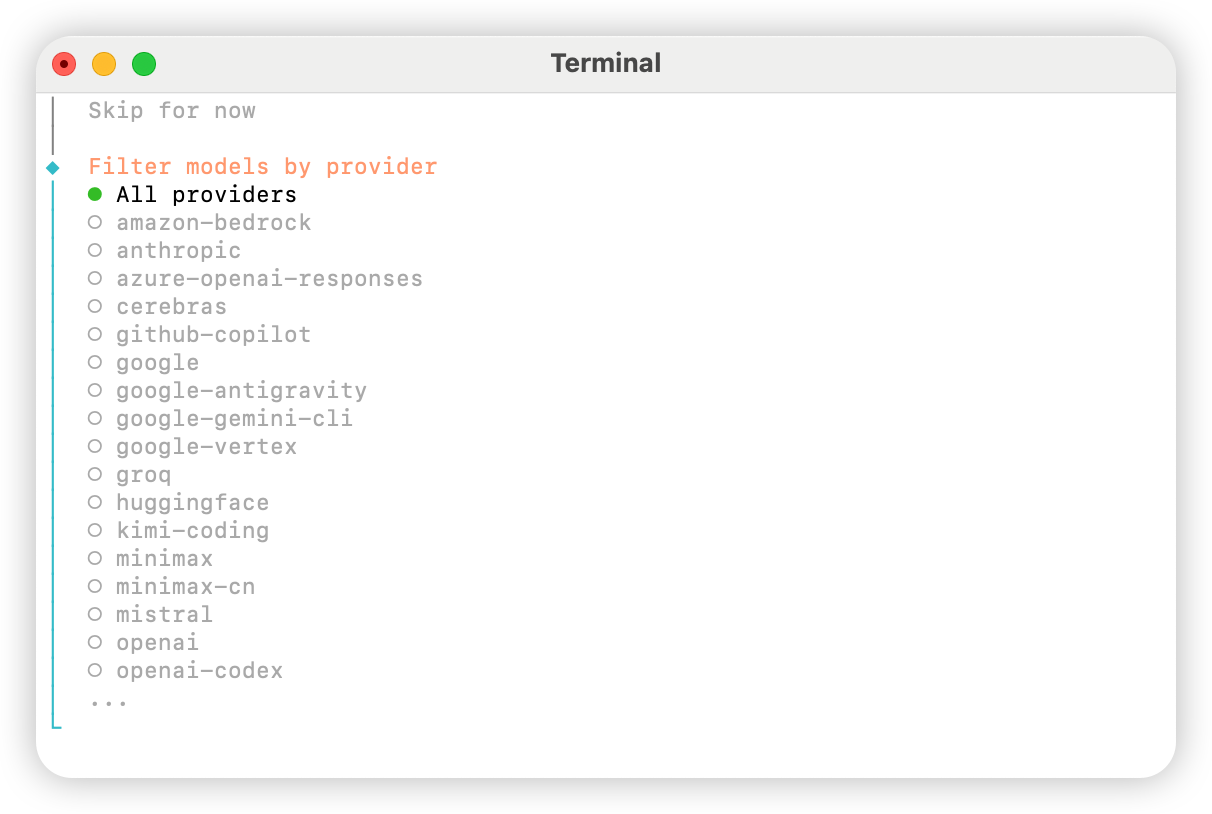 Choose the default model as needed; you can initially select `Keep current` (if using "Method 2: Manual Configuration", it can be modified in the configuration file in the next step).
 Link your personal account as needed; if not required, please select `Skip for now`.
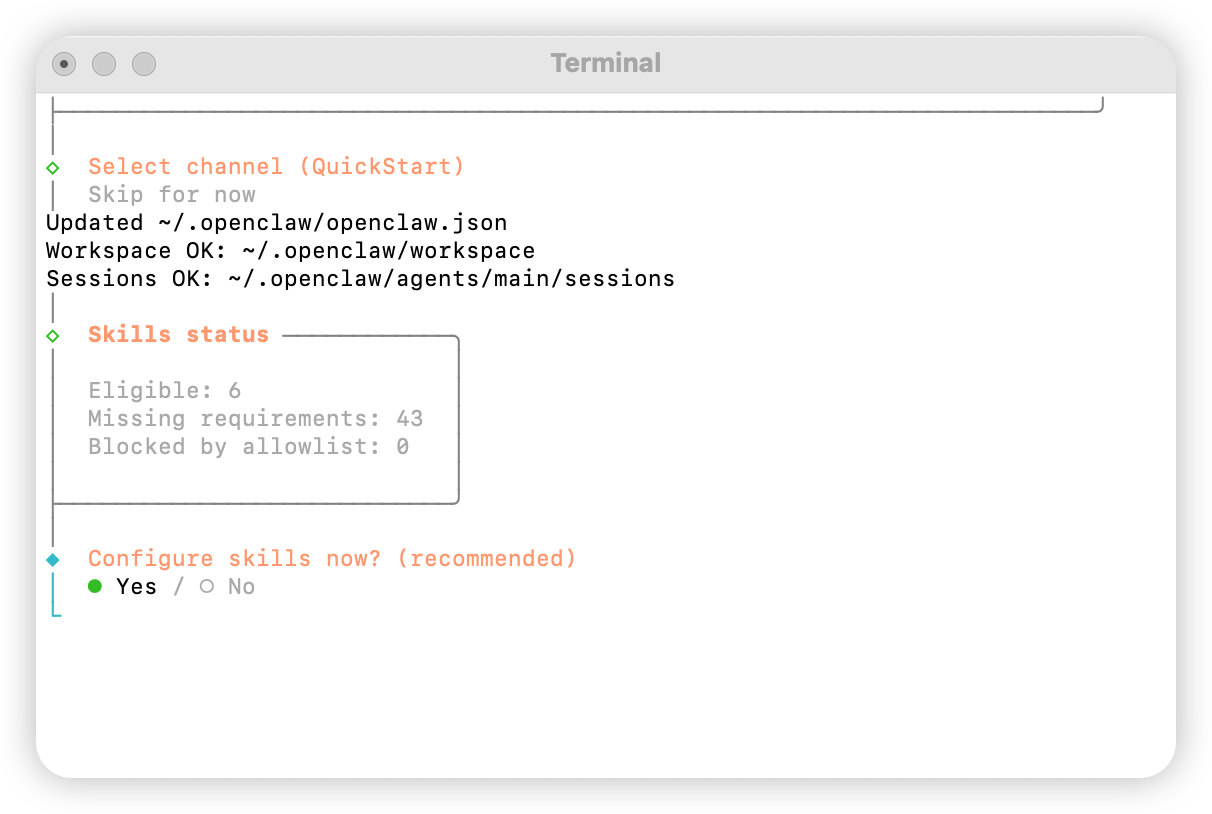
 Configure skills by selecting `Yes`.
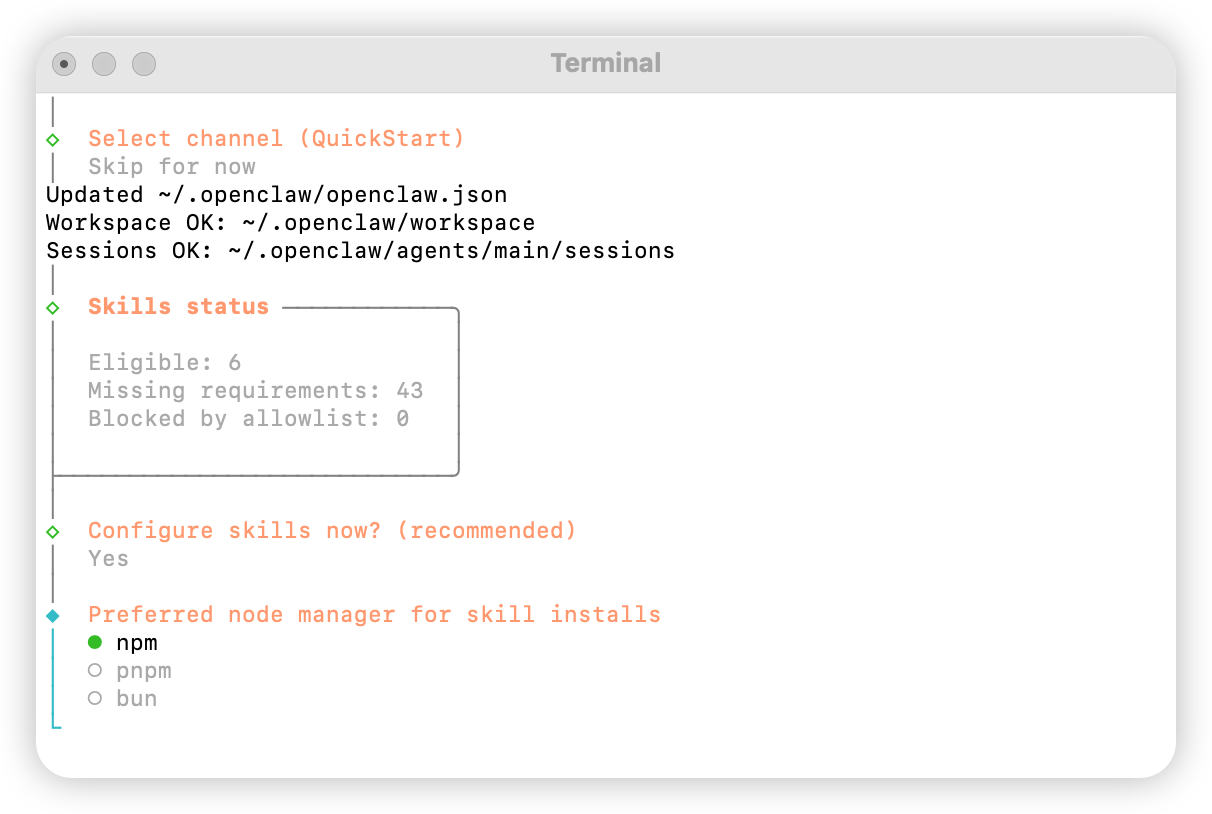
 Select `npm`
 Configure skill selection as needed.
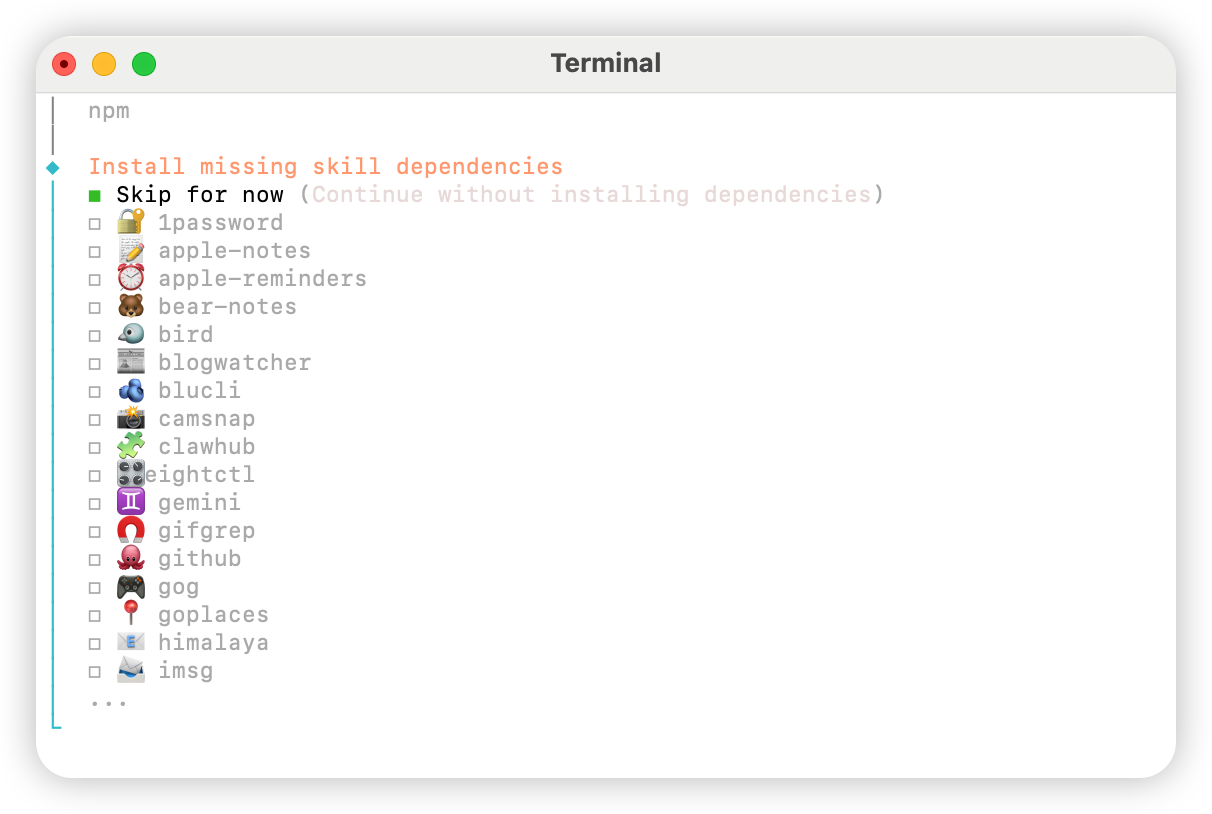 Select `No` for all options.
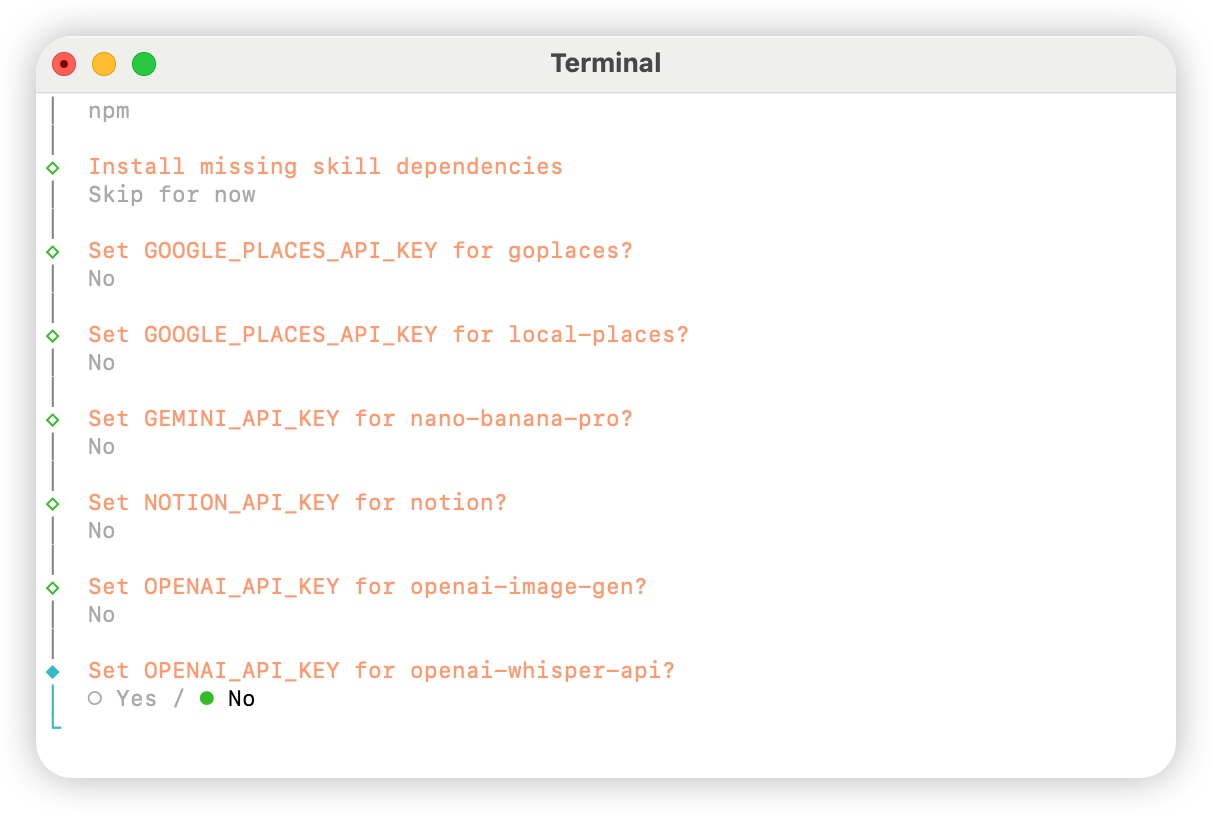 Select `Skip for now`.
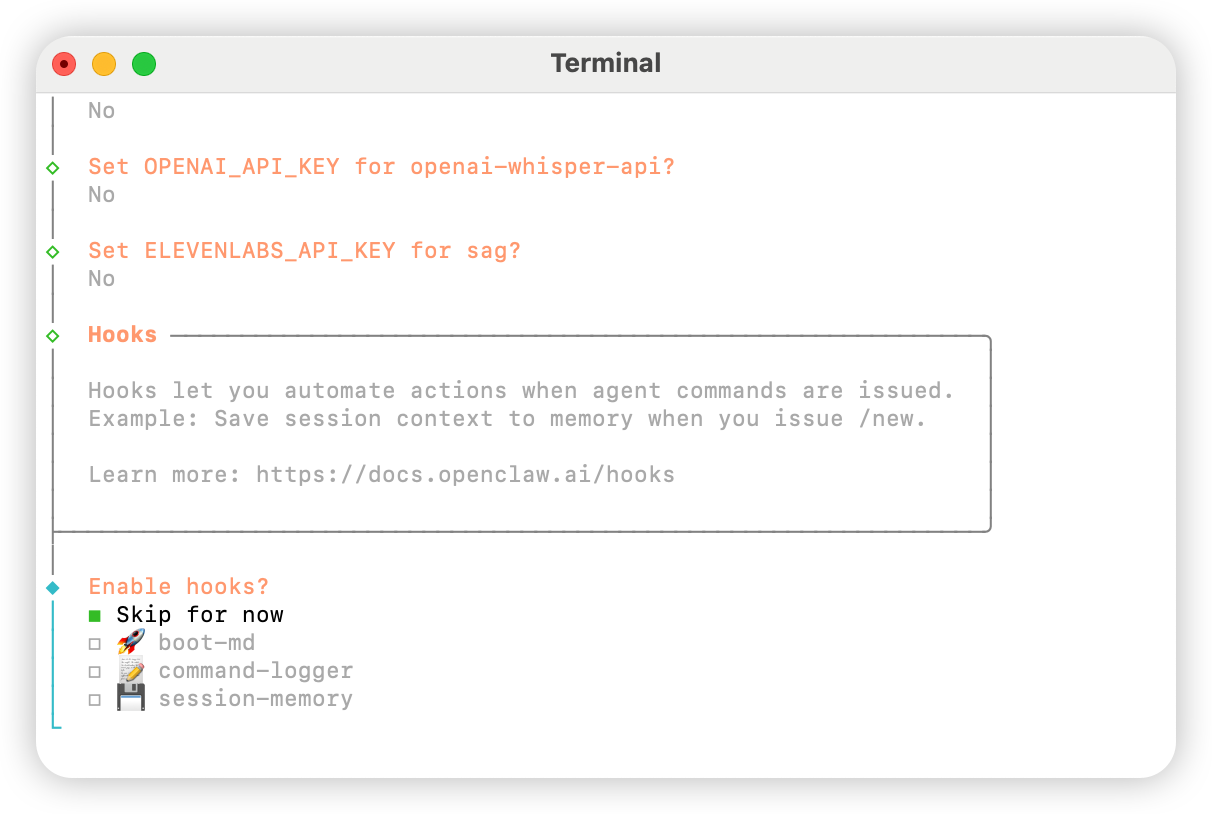 Select `Hatch in UI`.
## Configure AIHubMix
### Method 1: Quick Setup via Plugin (Recommended)
Plugin source code: [aihubmix-auth](https://github.com/akakenle/aihubmix-auth)
Install the AIHubMix auth plugin and restart the Gateway:
```shellscript theme={null}
openclaw plugins install @akakenle/aihubmix-auth
openclaw gateway restart
```
Run the auth command. Enter your AIHubMix API Key when prompted. You only need to run the command below once for any one of the four providers — the plugin uses `providerAuthAliases` to make the same key valid for all transports:
```shellscript theme={null}
openclaw models auth login --provider aihubmix-openai --method api-key --set-default
```
The plugin organizes models into the following groups:
* **aihubmix-openai** — `gpt-*` / `o1-*` / `o3-*` / `o4-*`, `https://aihubmix.com/v1` (`openai-completions`)
* **aihubmix-anthropic** — `claude-*`, `https://aihubmix.com` (`anthropic-messages`)
* **aihubmix-google** — `gemini-*`, `https://aihubmix.com/gemini/v1beta` (`google-generative-ai`)
* **aihubmix-other** — other models, `https://aihubmix.com/v1` (`openai-completions`)
Shorthand model ids (e.g. `claude-sonnet-4-5`) are automatically routed to the correct transport by the plugin's `resolveDynamicModel` hook — no need to write the full `provider/model`.
> Prefer to skip interactive login? Set `export AIHUBMIX_API_KEY=sk-...` before installing — the plugin will write the key as an inline `apiKey` in the provider config (interactive login stores it in the auth-profile instead).
Once configured, jump to the [Start](#start) section to begin using it.
### Method 2: Manual Configuration
Open the `~/.openclaw/openclaw.json` file and add the following configuration:
```json theme={null}
{
"models": {
"mode": "merge",
"providers": {
"aihubmix-openai": {
"baseUrl": "https://aihubmix.com/v1",
"api": "openai-completions",
"models": [
{
"id": "gpt-4o",
"name": "gpt-4o",
"reasoning": false,
"input": ["text"],
"cost": {
"input": 0,
"output": 0,
"cacheRead": 0,
"cacheWrite": 0
},
"contextWindow": 128000,
"maxTokens": 16384
}
]
},
"aihubmix-anthropic": {
"baseUrl": "https://aihubmix.com",
"api": "anthropic-messages",
"models": [
{
"id": "claude-sonnet-4-5",
"name": "claude-sonnet-4-5",
"reasoning": false,
"input": ["text"],
"cost": {
"input": 0,
"output": 0,
"cacheRead": 0,
"cacheWrite": 0
},
"contextWindow": 200000,
"maxTokens": 64000
}
]
},
"aihubmix-google": {
"baseUrl": "https://aihubmix.com/gemini/v1beta",
"api": "google-generative-ai",
"models": []
},
"aihubmix-other": {
"baseUrl": "https://aihubmix.com/v1",
"api": "openai-completions",
"models": []
}
}
},
"agents": {
"defaults": {
"model": {
"primary": "aihubmix-anthropic/claude-sonnet-4-5"
},
"workspace": "your_workspace_path",
"compaction": {
"mode": "safeguard"
},
"maxConcurrent": 4,
"subagents": {
"maxConcurrent": 8
}
}
}
}
```
### Method 3: Switch the Default Model with Dynamic Model Commands
The AIHubMix OpenClaw plugin supports dynamic model routing. As long as a model is available in your AIHubMix account, you can call it in the `provider/model-id` format. The actual model availability depends on the AIHubMix console and API response.
Common provider rules:
* `aihubmix-openai`: OpenAI-compatible models, such as `gpt-*`, `o1-*`, `o3-*`, and `o4-*`
* `aihubmix-anthropic`: Claude models, such as `claude-*`
* `aihubmix-google`: Gemini models, such as `gemini-*`
* `aihubmix-other`: other models called through an OpenAI-compatible endpoint, such as `glm-5.2`
For example, set `gpt-5.4` as the default OpenClaw model:
```powershell theme={null}
openclaw models set aihubmix-openai/gpt-5.4
```
If Windows cannot find `openclaw`, use the local path form:
```powershell theme={null}
& "your-install-path\OpenClaw\openclaw.cmd" models set aihubmix-openai/gpt-5.4
```
Check the current default model and authentication status:
```powershell theme={null}
openclaw models status
```
Run a real call for verification:
```powershell theme={null}
openclaw infer model run --local --json --model aihubmix-openai/gpt-5.4 --prompt "Reply only OK"
```
To call a model outside the OpenAI / Claude / Gemini groups, use `aihubmix-other`, for example:
```powershell theme={null}
openclaw infer model run --local --json --model aihubmix-other/glm-5.2 --prompt "Reply only OK"
```
List the model catalog currently loaded by OpenClaw:
```powershell theme={null}
openclaw infer model list --json
```
## Start
```shellscript theme={null}
openclaw gateway
```
## Test
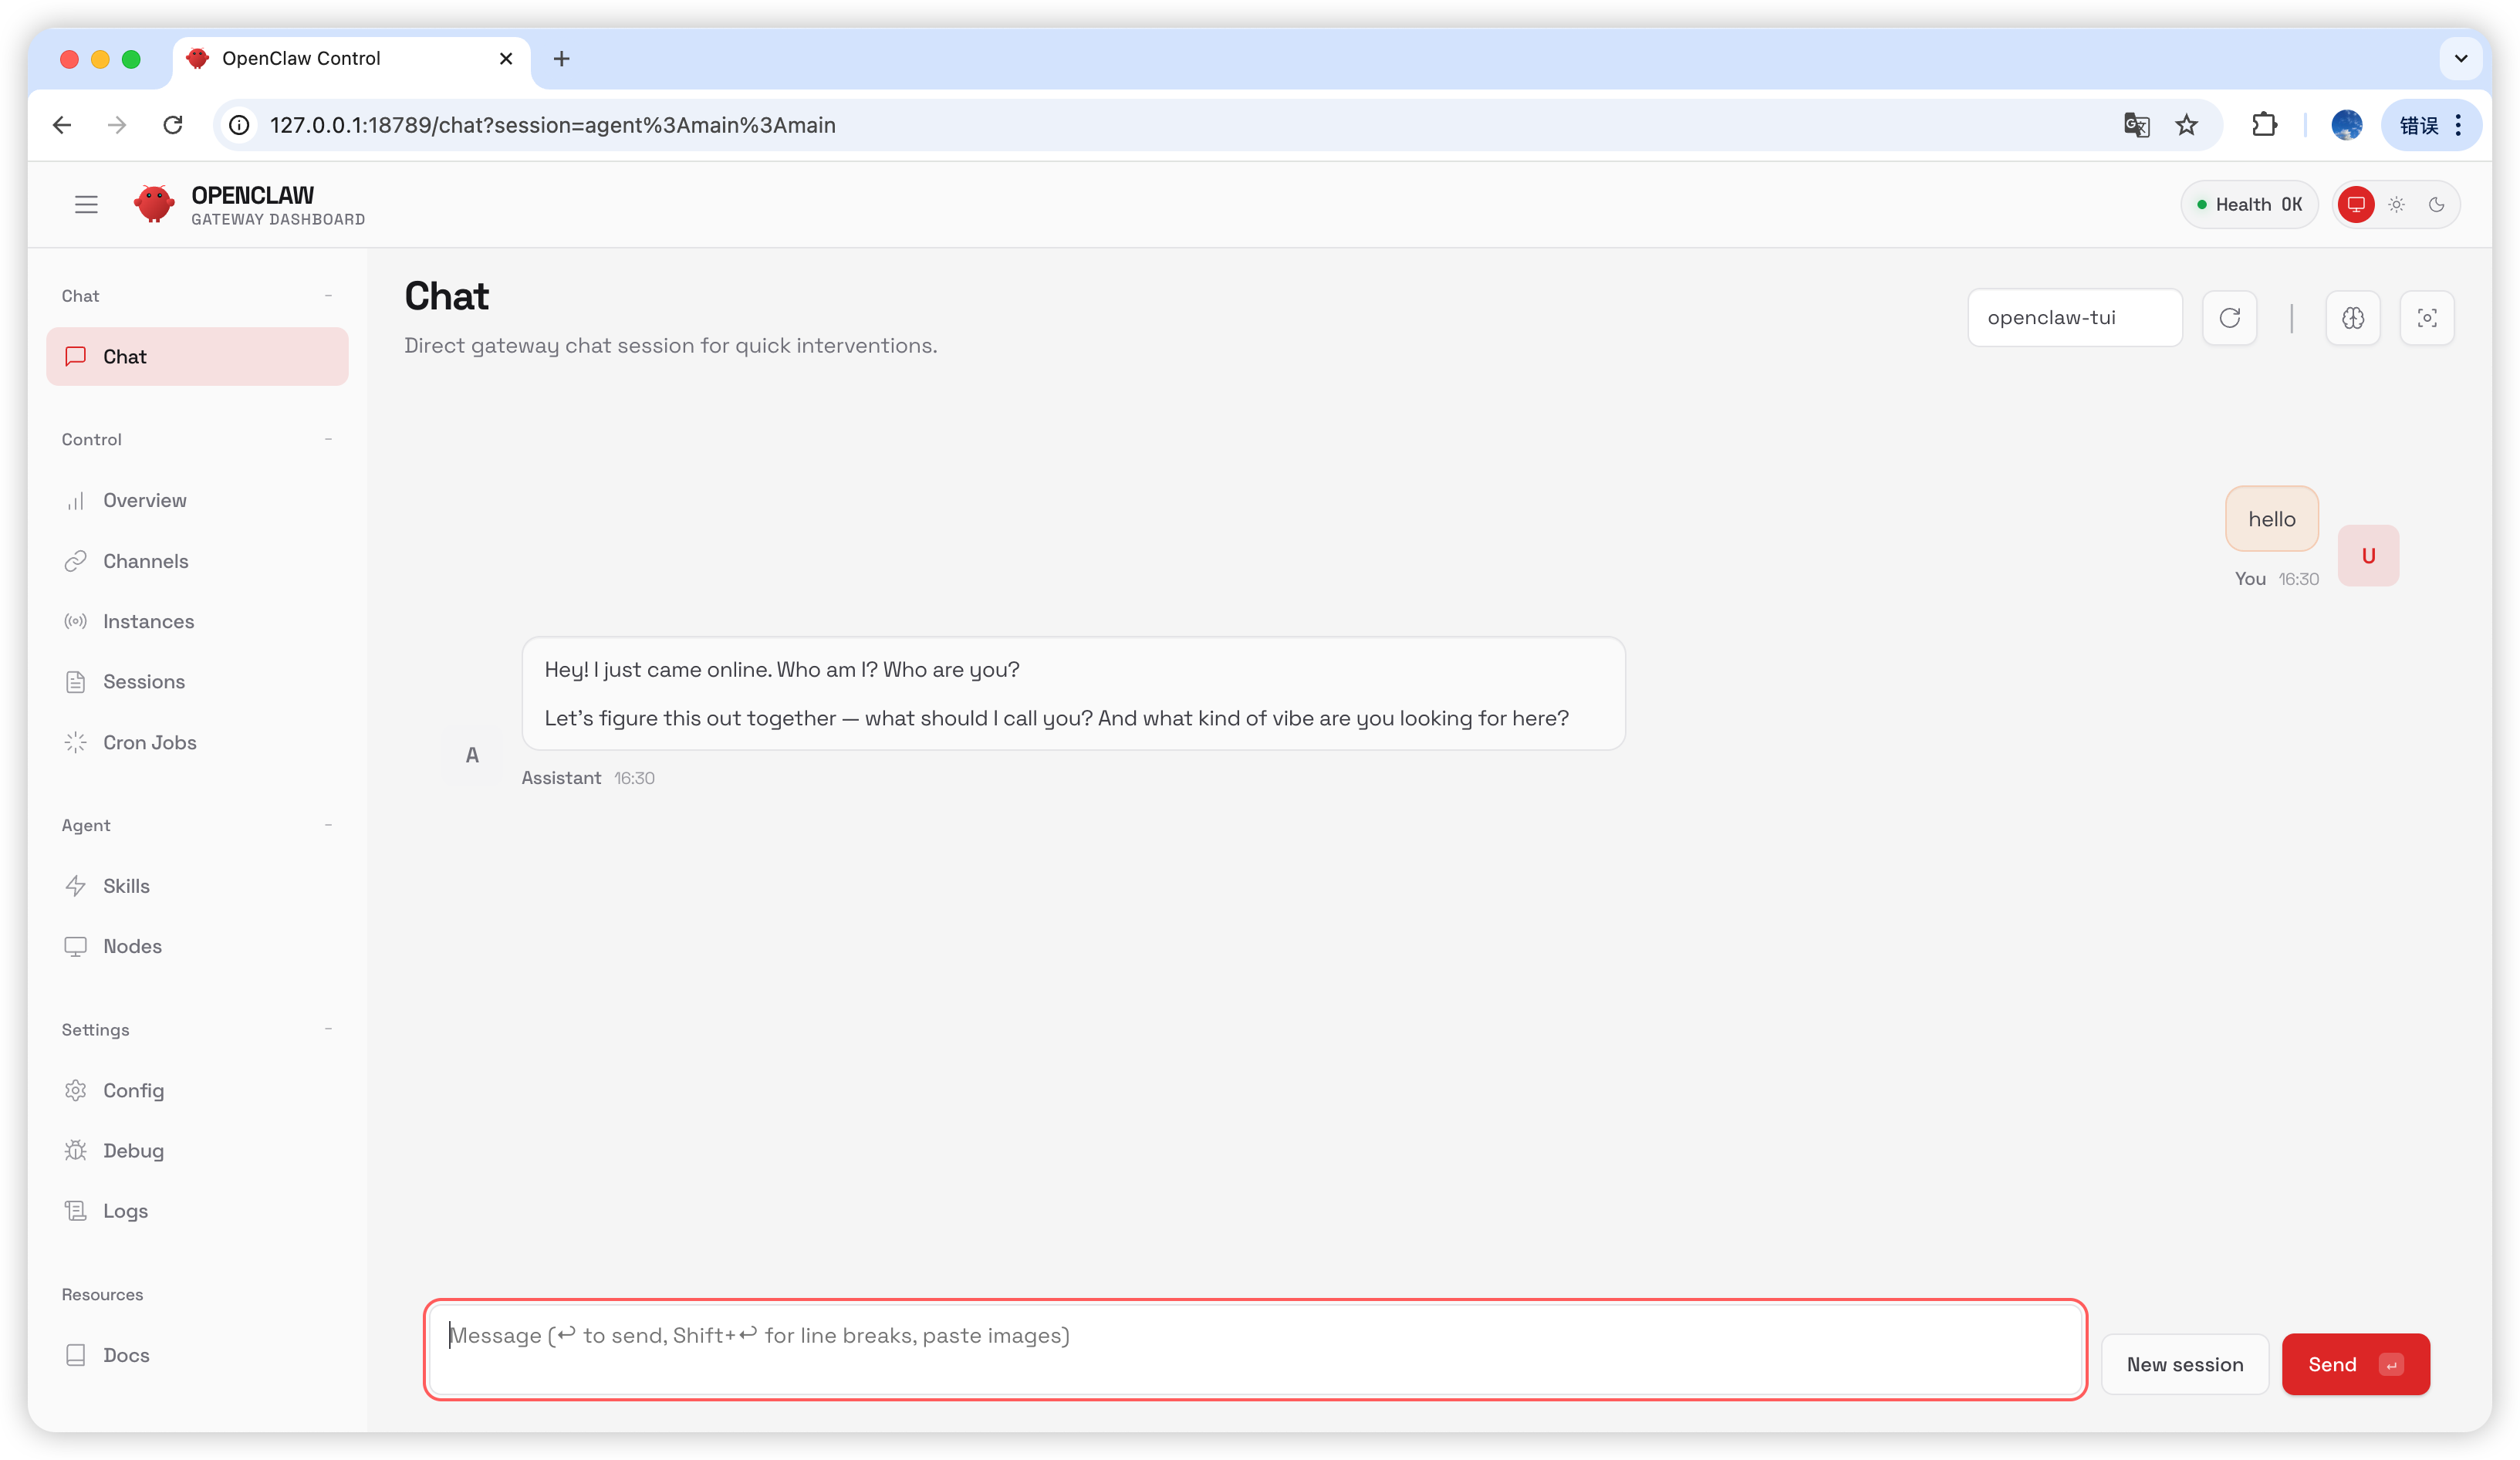
Type `hello` in the chat page; if you receive a reply, the configuration is successful.
Select `Hatch in UI`.
## Configure AIHubMix
### Method 1: Quick Setup via Plugin (Recommended)
Plugin source code: [aihubmix-auth](https://github.com/akakenle/aihubmix-auth)
Install the AIHubMix auth plugin and restart the Gateway:
```shellscript theme={null}
openclaw plugins install @akakenle/aihubmix-auth
openclaw gateway restart
```
Run the auth command. Enter your AIHubMix API Key when prompted. You only need to run the command below once for any one of the four providers — the plugin uses `providerAuthAliases` to make the same key valid for all transports:
```shellscript theme={null}
openclaw models auth login --provider aihubmix-openai --method api-key --set-default
```
The plugin organizes models into the following groups:
* **aihubmix-openai** — `gpt-*` / `o1-*` / `o3-*` / `o4-*`, `https://aihubmix.com/v1` (`openai-completions`)
* **aihubmix-anthropic** — `claude-*`, `https://aihubmix.com` (`anthropic-messages`)
* **aihubmix-google** — `gemini-*`, `https://aihubmix.com/gemini/v1beta` (`google-generative-ai`)
* **aihubmix-other** — other models, `https://aihubmix.com/v1` (`openai-completions`)
Shorthand model ids (e.g. `claude-sonnet-4-5`) are automatically routed to the correct transport by the plugin's `resolveDynamicModel` hook — no need to write the full `provider/model`.
> Prefer to skip interactive login? Set `export AIHUBMIX_API_KEY=sk-...` before installing — the plugin will write the key as an inline `apiKey` in the provider config (interactive login stores it in the auth-profile instead).
Once configured, jump to the [Start](#start) section to begin using it.
### Method 2: Manual Configuration
Open the `~/.openclaw/openclaw.json` file and add the following configuration:
```json theme={null}
{
"models": {
"mode": "merge",
"providers": {
"aihubmix-openai": {
"baseUrl": "https://aihubmix.com/v1",
"api": "openai-completions",
"models": [
{
"id": "gpt-4o",
"name": "gpt-4o",
"reasoning": false,
"input": ["text"],
"cost": {
"input": 0,
"output": 0,
"cacheRead": 0,
"cacheWrite": 0
},
"contextWindow": 128000,
"maxTokens": 16384
}
]
},
"aihubmix-anthropic": {
"baseUrl": "https://aihubmix.com",
"api": "anthropic-messages",
"models": [
{
"id": "claude-sonnet-4-5",
"name": "claude-sonnet-4-5",
"reasoning": false,
"input": ["text"],
"cost": {
"input": 0,
"output": 0,
"cacheRead": 0,
"cacheWrite": 0
},
"contextWindow": 200000,
"maxTokens": 64000
}
]
},
"aihubmix-google": {
"baseUrl": "https://aihubmix.com/gemini/v1beta",
"api": "google-generative-ai",
"models": []
},
"aihubmix-other": {
"baseUrl": "https://aihubmix.com/v1",
"api": "openai-completions",
"models": []
}
}
},
"agents": {
"defaults": {
"model": {
"primary": "aihubmix-anthropic/claude-sonnet-4-5"
},
"workspace": "your_workspace_path",
"compaction": {
"mode": "safeguard"
},
"maxConcurrent": 4,
"subagents": {
"maxConcurrent": 8
}
}
}
}
```
### Method 3: Switch the Default Model with Dynamic Model Commands
The AIHubMix OpenClaw plugin supports dynamic model routing. As long as a model is available in your AIHubMix account, you can call it in the `provider/model-id` format. The actual model availability depends on the AIHubMix console and API response.
Common provider rules:
* `aihubmix-openai`: OpenAI-compatible models, such as `gpt-*`, `o1-*`, `o3-*`, and `o4-*`
* `aihubmix-anthropic`: Claude models, such as `claude-*`
* `aihubmix-google`: Gemini models, such as `gemini-*`
* `aihubmix-other`: other models called through an OpenAI-compatible endpoint, such as `glm-5.2`
For example, set `gpt-5.4` as the default OpenClaw model:
```powershell theme={null}
openclaw models set aihubmix-openai/gpt-5.4
```
If Windows cannot find `openclaw`, use the local path form:
```powershell theme={null}
& "your-install-path\OpenClaw\openclaw.cmd" models set aihubmix-openai/gpt-5.4
```
Check the current default model and authentication status:
```powershell theme={null}
openclaw models status
```
Run a real call for verification:
```powershell theme={null}
openclaw infer model run --local --json --model aihubmix-openai/gpt-5.4 --prompt "Reply only OK"
```
To call a model outside the OpenAI / Claude / Gemini groups, use `aihubmix-other`, for example:
```powershell theme={null}
openclaw infer model run --local --json --model aihubmix-other/glm-5.2 --prompt "Reply only OK"
```
List the model catalog currently loaded by OpenClaw:
```powershell theme={null}
openclaw infer model list --json
```
## Start
```shellscript theme={null}
openclaw gateway
```
## Test
Type `hello` in the chat page; if you receive a reply, the configuration is successful.
 ## Frequently Asked Questions
### Version Upgrade
```shellscript theme={null}
openclaw plugins update @akakenle/aihubmix-auth
openclaw gateway restart
```
### Gateway Process Occupied
```shellscript theme={null}
openclaw gateway stop
openclaw gateway
```
***
Last updated: 2026-07-03
## Frequently Asked Questions
### Version Upgrade
```shellscript theme={null}
openclaw plugins update @akakenle/aihubmix-auth
openclaw gateway restart
```
### Gateway Process Occupied
```shellscript theme={null}
openclaw gateway stop
openclaw gateway
```
***
Last updated: 2026-07-03