> ## Documentation Index
> Fetch the complete documentation index at: https://docs.aihubmix.com/llms.txt
> Use this file to discover all available pages before exploring further.
# Codex CLI + AIHubMix Integration Tutorial
> Connect AIHubMix in Codex CLI: use a single API key to freely switch GLM, Claude, Gemini, DeepSeek and other models from the /model list. Covers config.toml setup, a model_catalog_json catalog generation script, and troubleshooting FAQs.
[Codex CLI](https://openai.com/codex/) is OpenAI's official terminal coding tool. After connecting AIHubMix, a single API key lets you call and freely switch between GLM, Claude, Gemini, DeepSeek and other vendors' models right in the terminal — without locking into one vendor. This guide covers two approaches: the **basic approach** (profile + a single fixed model, fastest to start) and the **custom-model approach** (a `model_catalog_json` catalog file so you can switch anytime from the `/model` list).
## Installation
### Official Download (macOS Version)
[https://openai.com/en/codex/](https://openai.com/en/codex/)
### Install via Command Line
```bash theme={null}
npm install -g @openai/codex
```
## Environment Variable Configuration
### Configure Using Configuration Files
1. Modify the `~/.codex/config.toml` configuration file to add the following settings:
```toml theme={null}
profile = "aihubmix"
[model_providers.aihubmix]
name = "aihubmix"
base_url = "https://aihubmix.com/v1"
personality = "pragmatic"
wire_api = "responses"
[profiles.aihubmix]
model = "gpt-5.2"
model_provider = "aihubmix"
model_reasoning_effort = "high"
```
2. Modify the `~/.codex/auth.json` configuration file to change the following settings:
```json theme={null}
{
"OPENAI_API_KEY": "AIHUBMIX_API_KEY"
}
```
### Configure via cc-switch
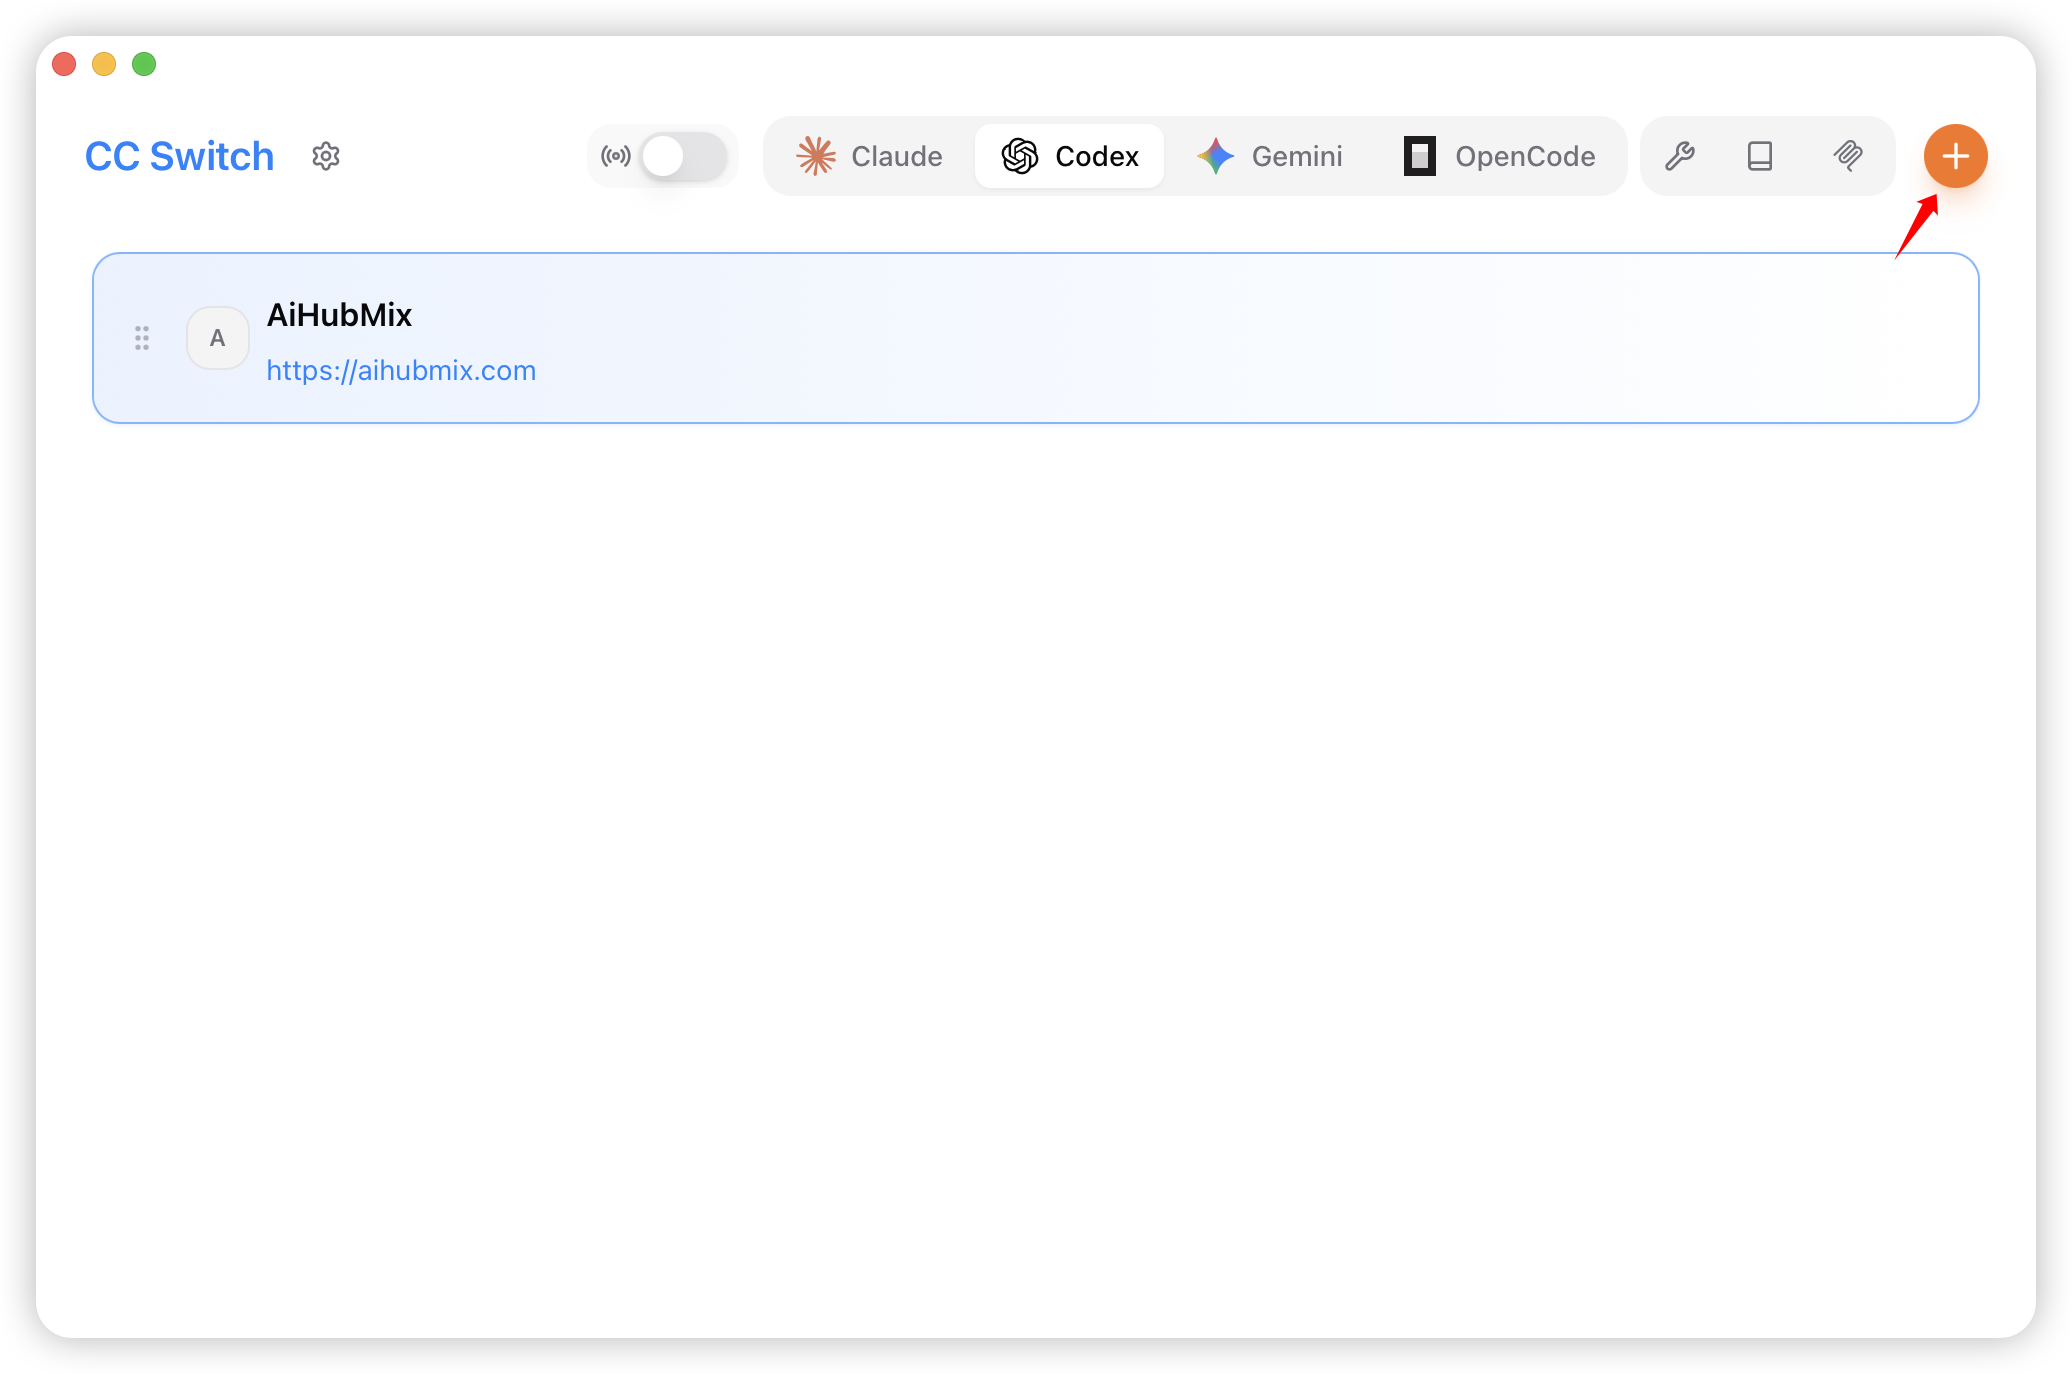
1. Run CC-Switch and add the provider.
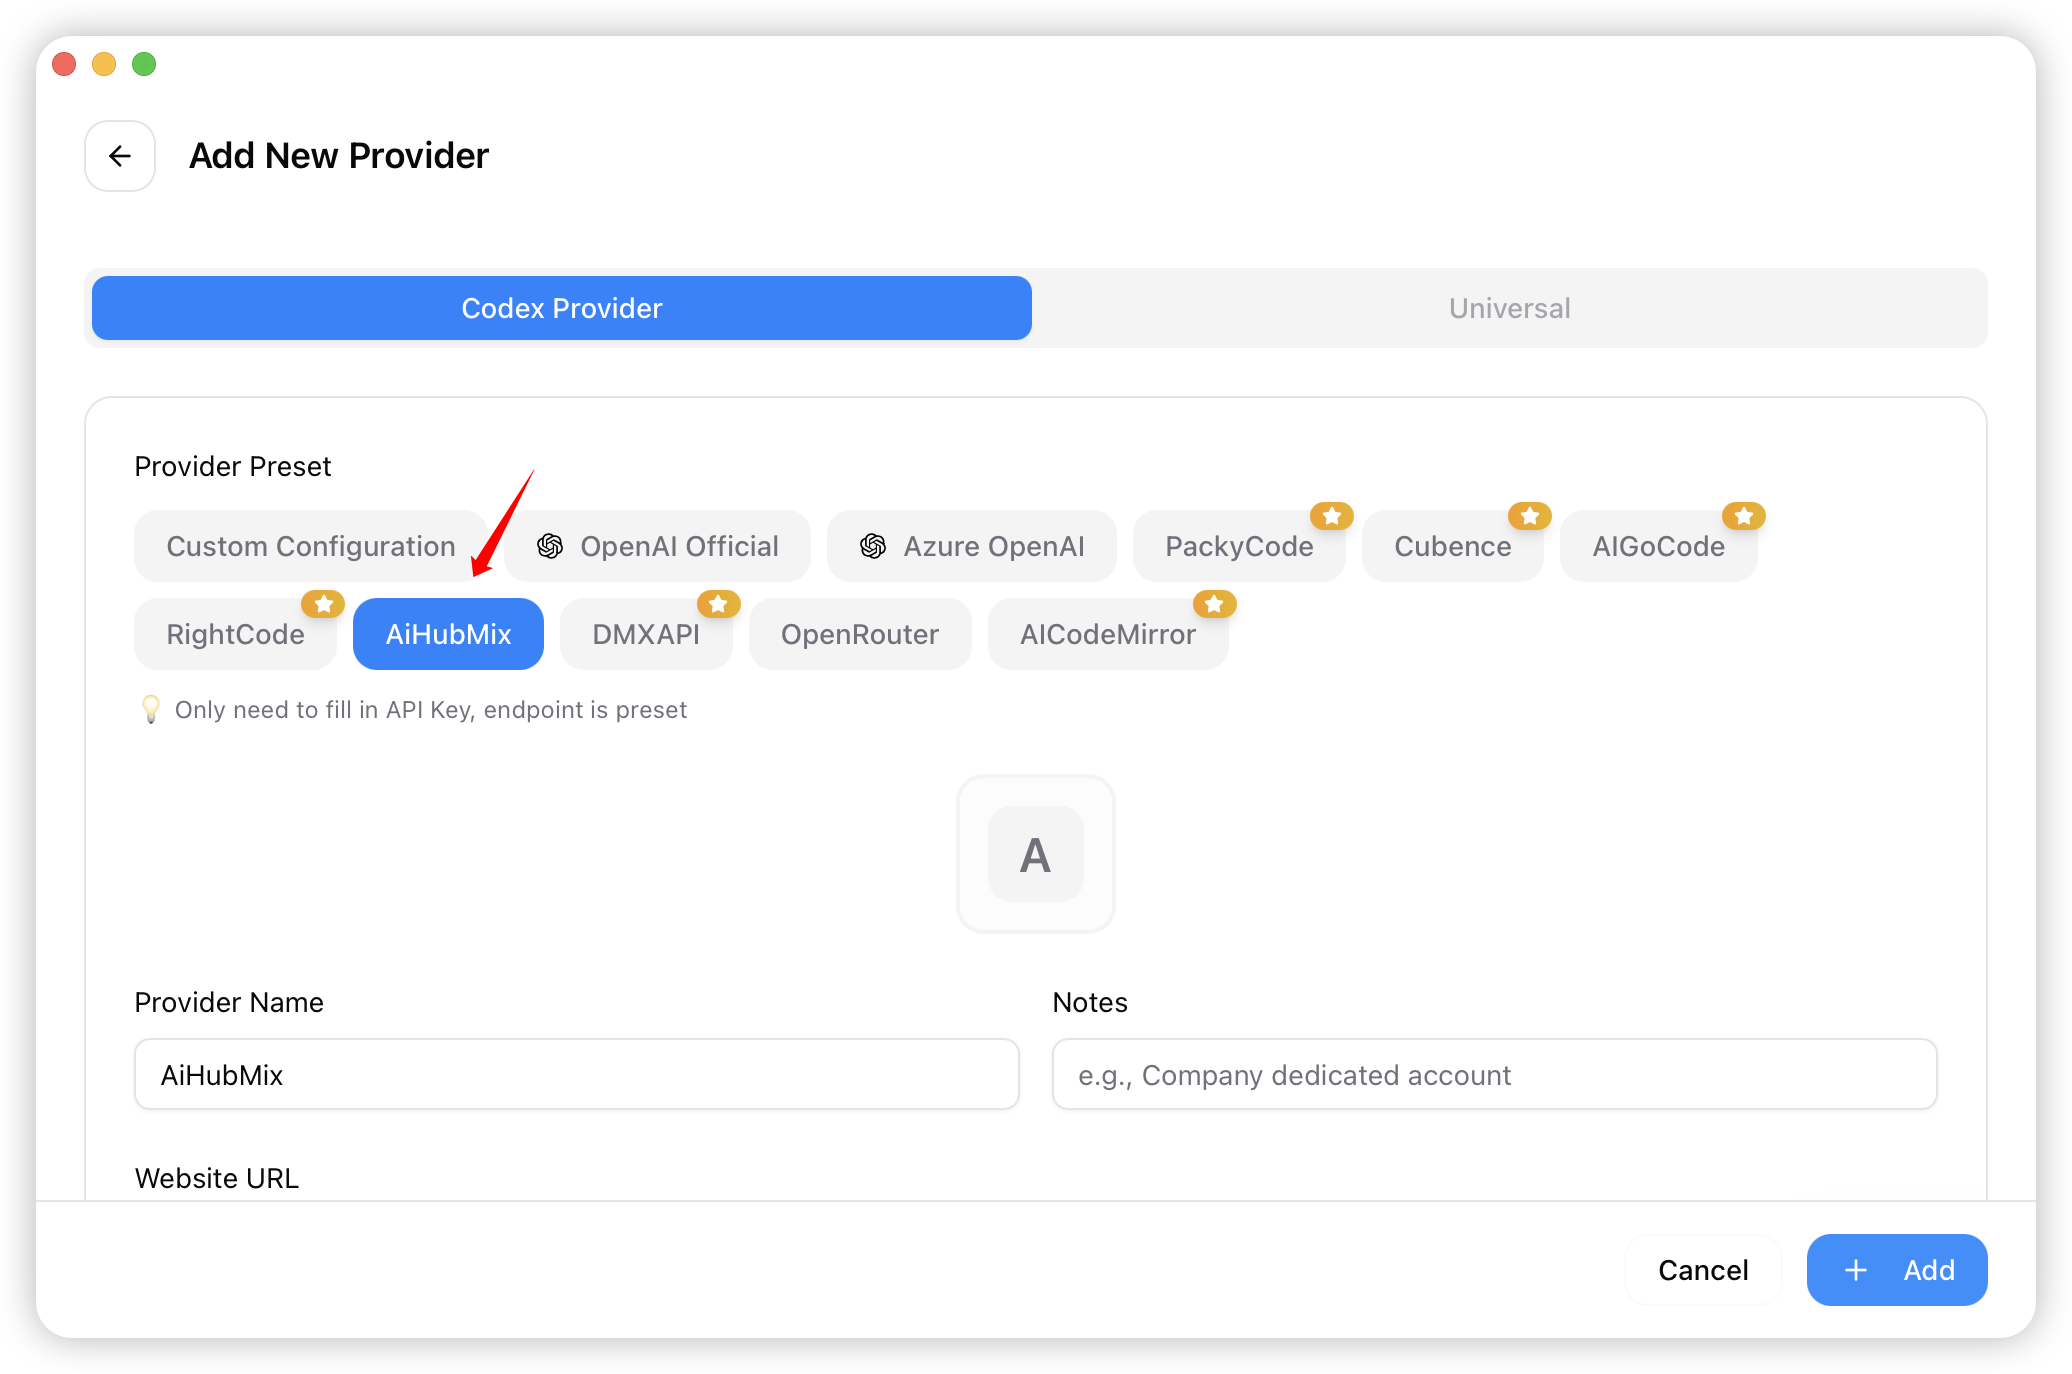
 2. Select "AiHubMix" from the preset list.
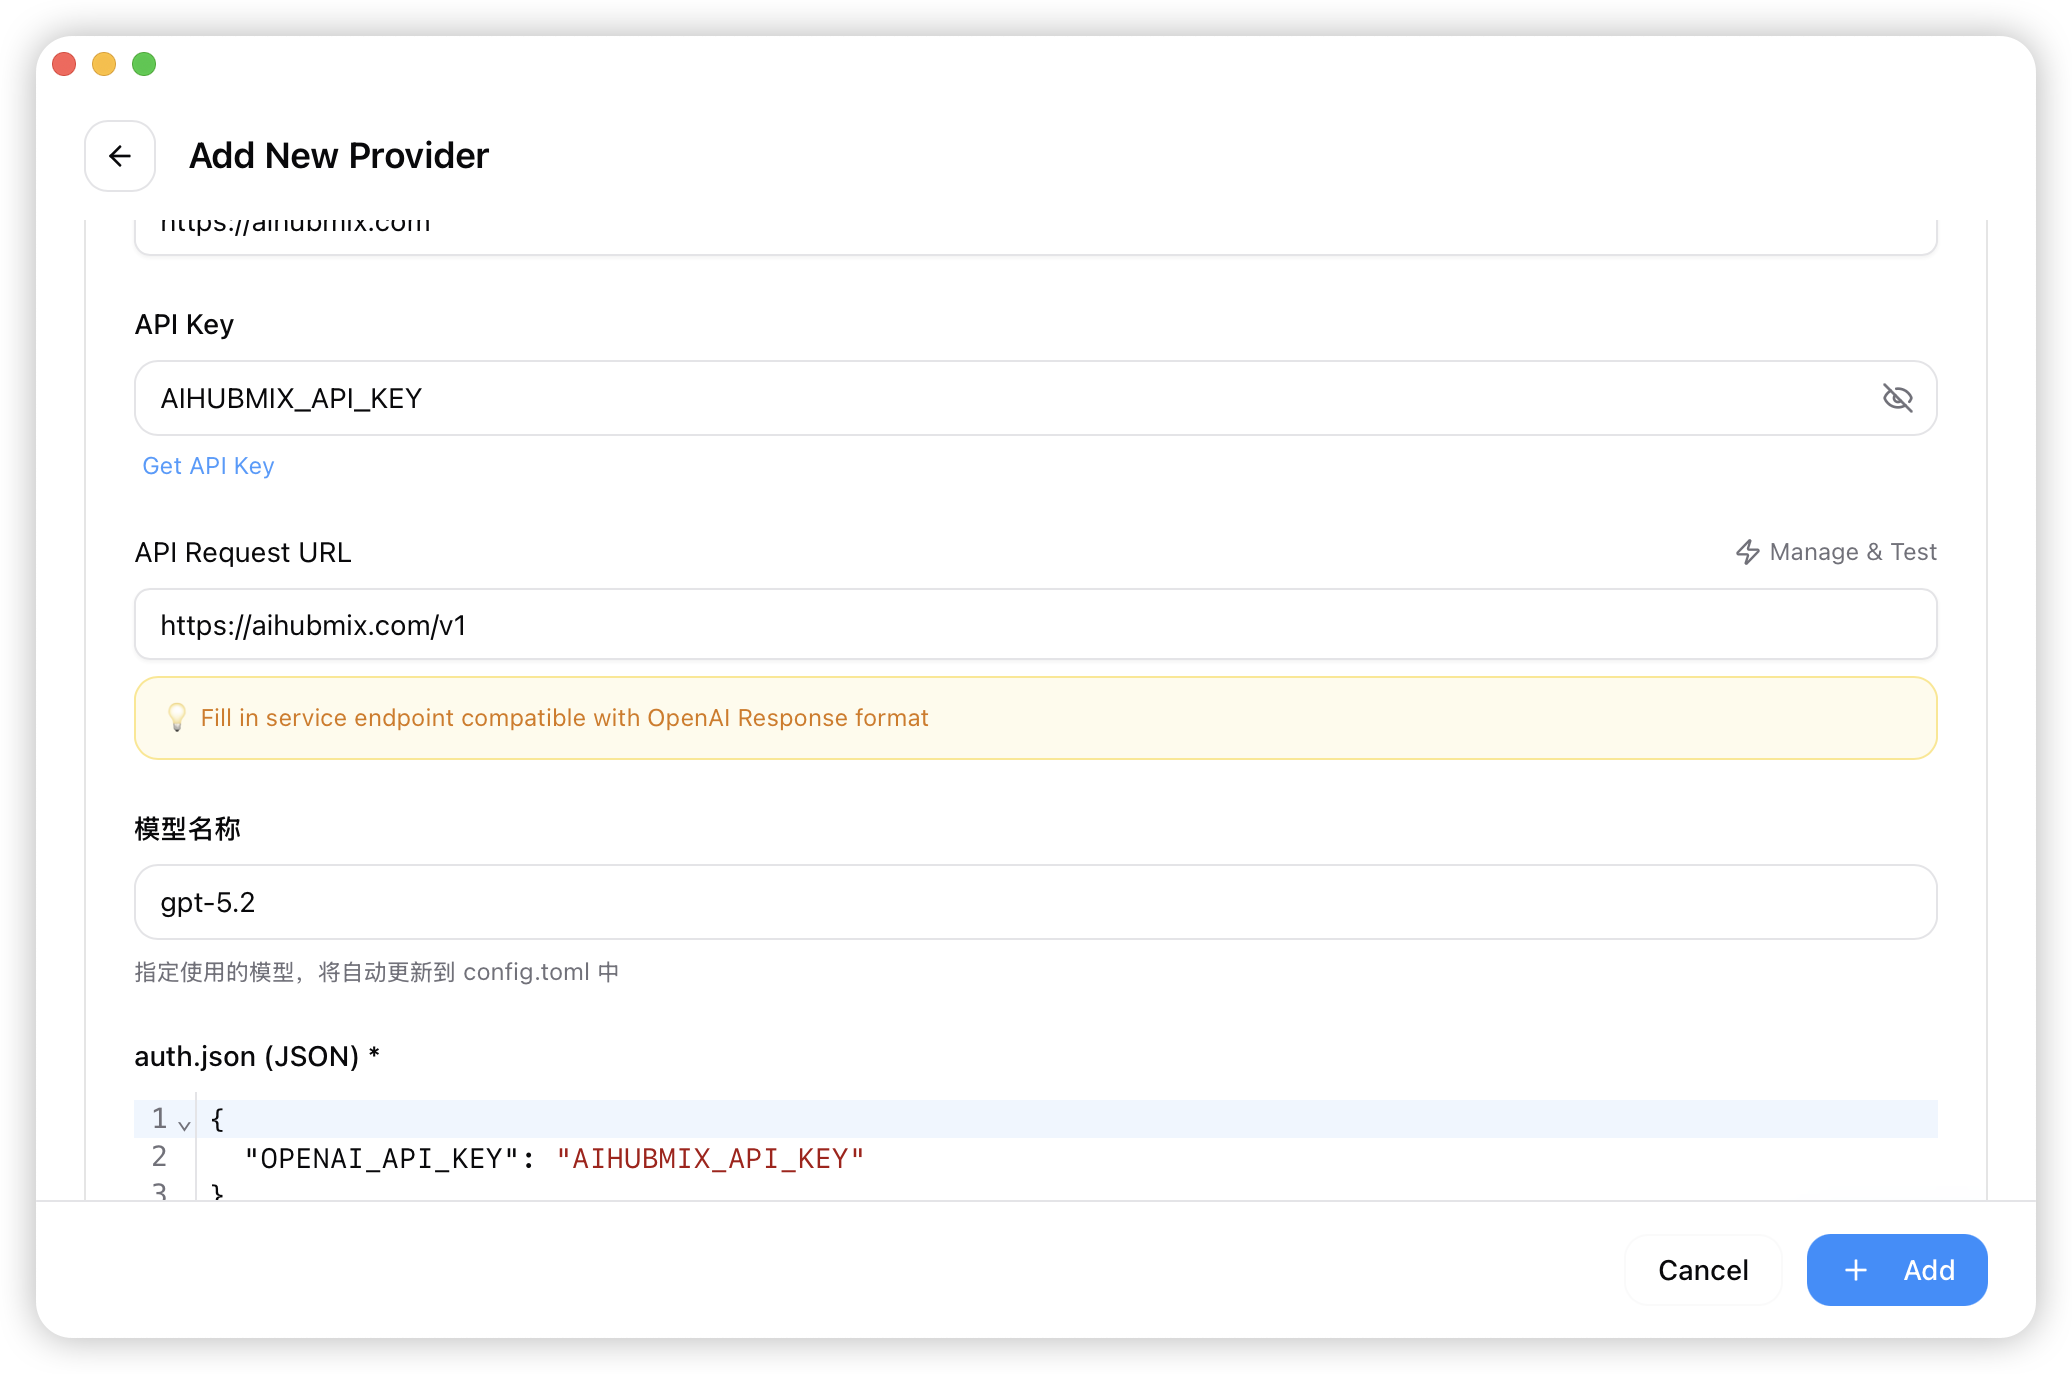
 3. Enter your key in the "API Key" field and click "Add" to save the settings.
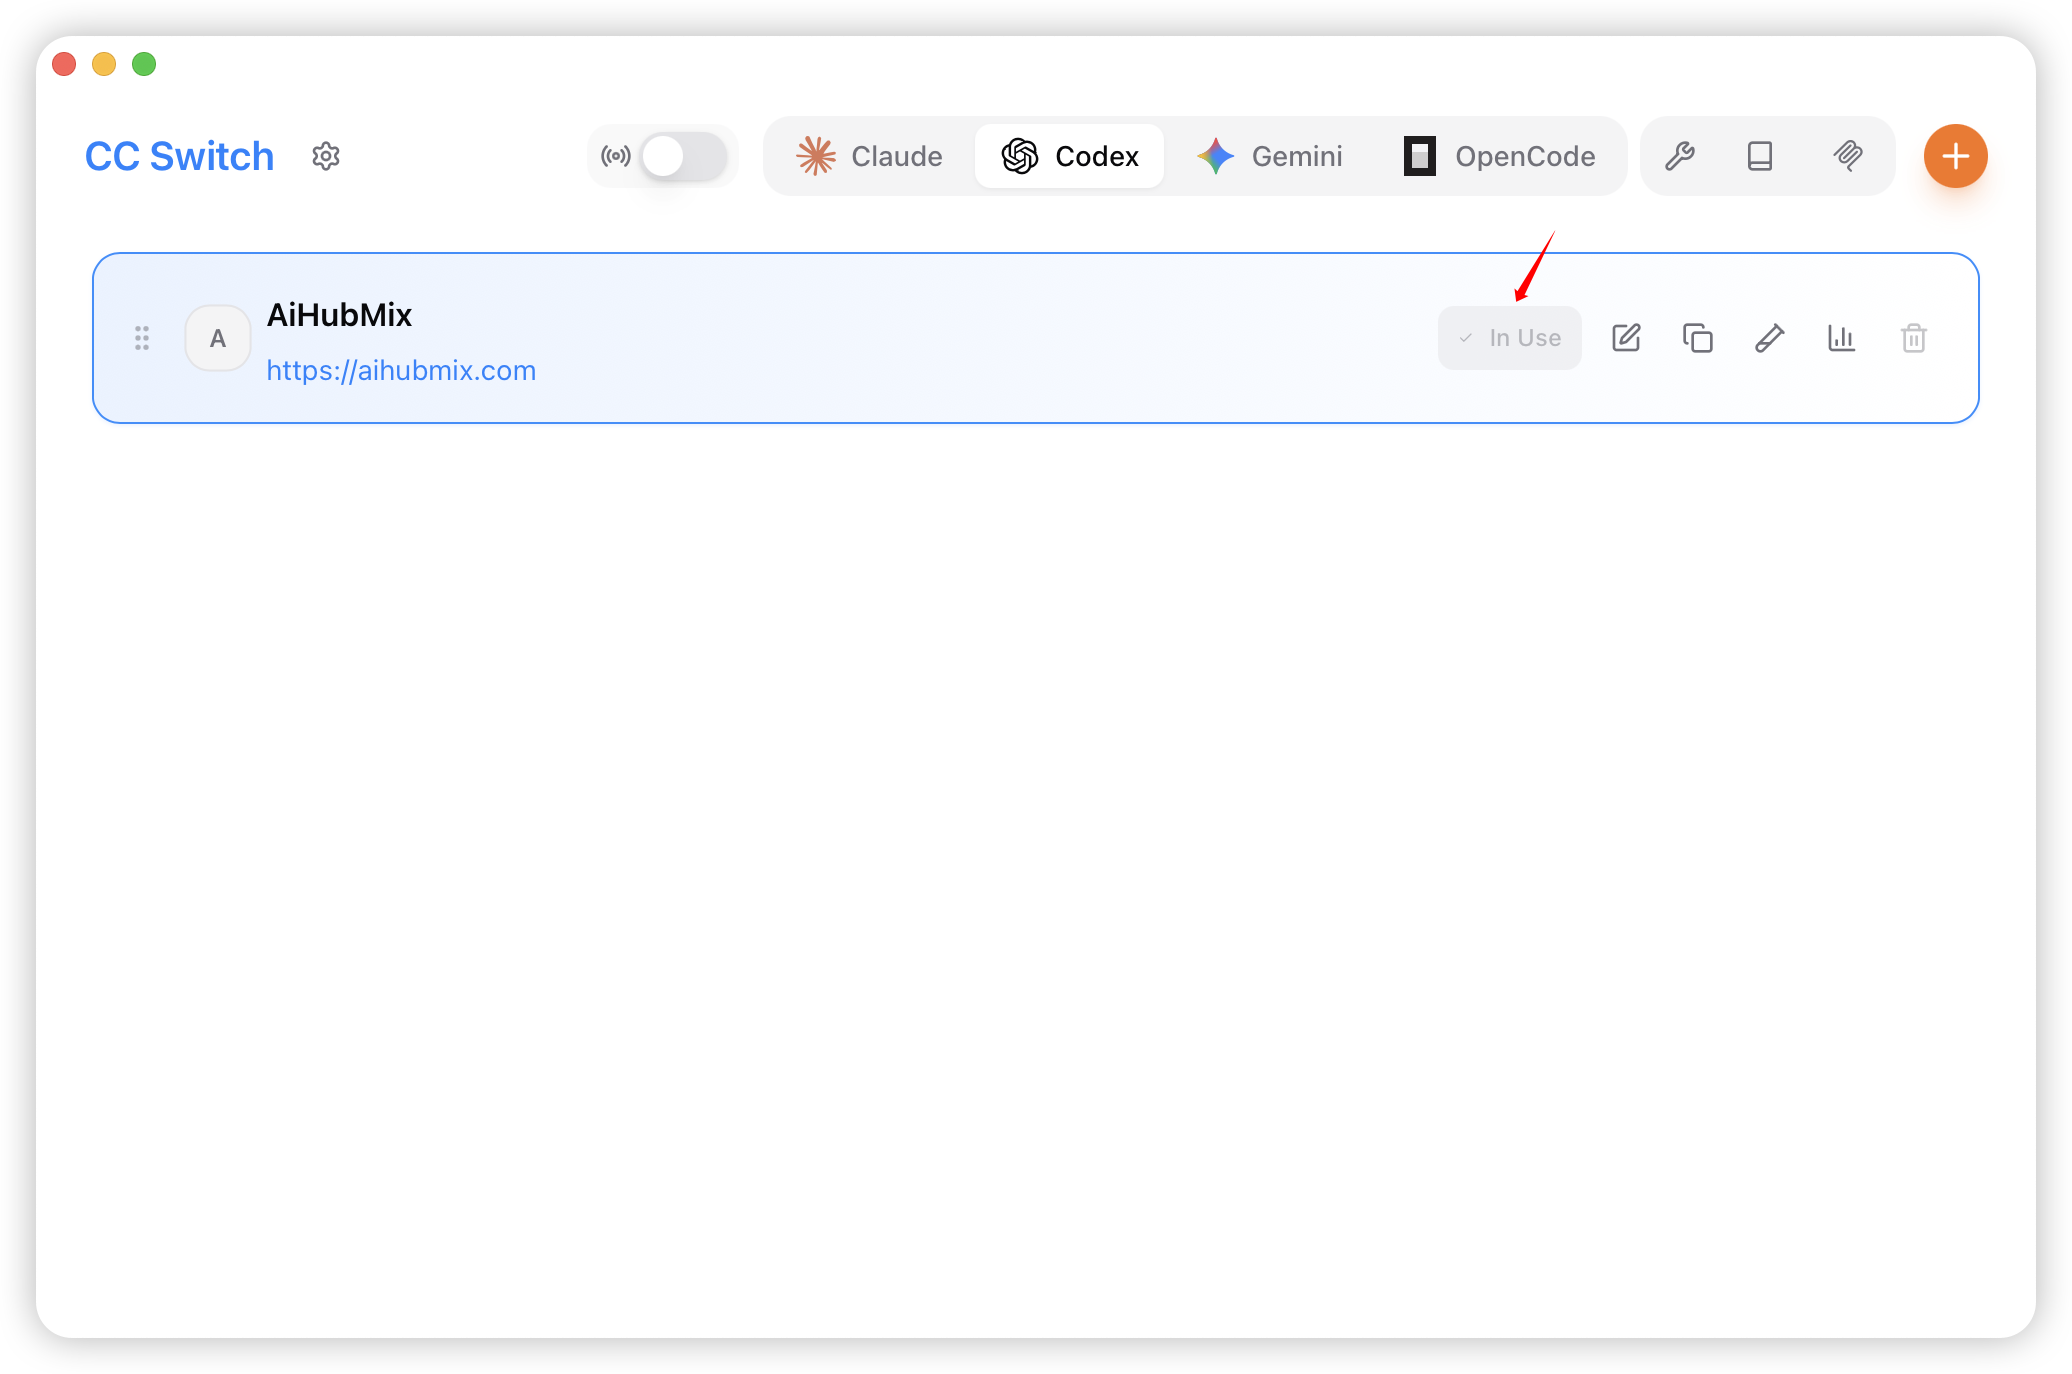
 4. Return to the home page, select "AiHubMix" from the provider list, and click "Enable" to start using it.
 ## Using Codex
### Using in the Terminal
1. Open the terminal, navigate to your project directory, and run the `codex` command.
```bash theme={null}
cd /your/project/path
codex
```
2. Set permissions as needed.
## Using Codex
### Using in the Terminal
1. Open the terminal, navigate to your project directory, and run the `codex` command.
```bash theme={null}
cd /your/project/path
codex
```
2. Set permissions as needed.
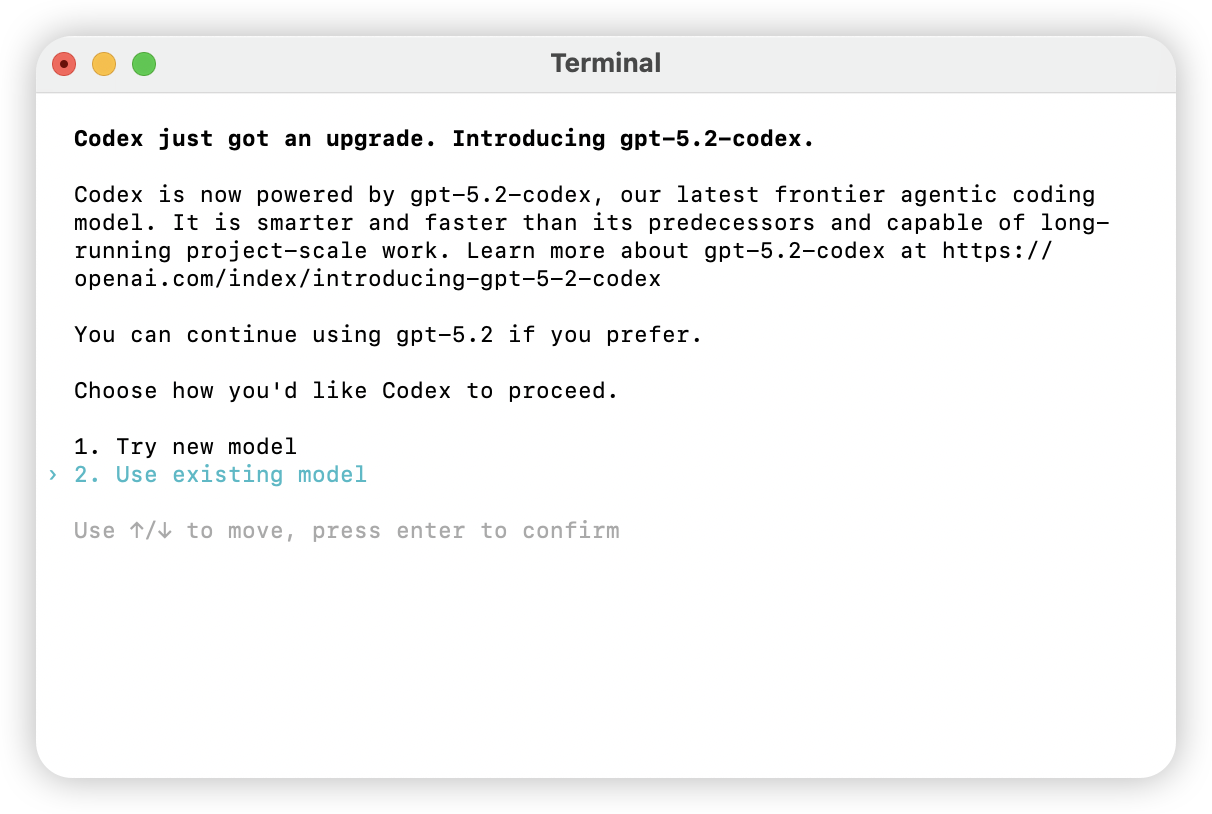
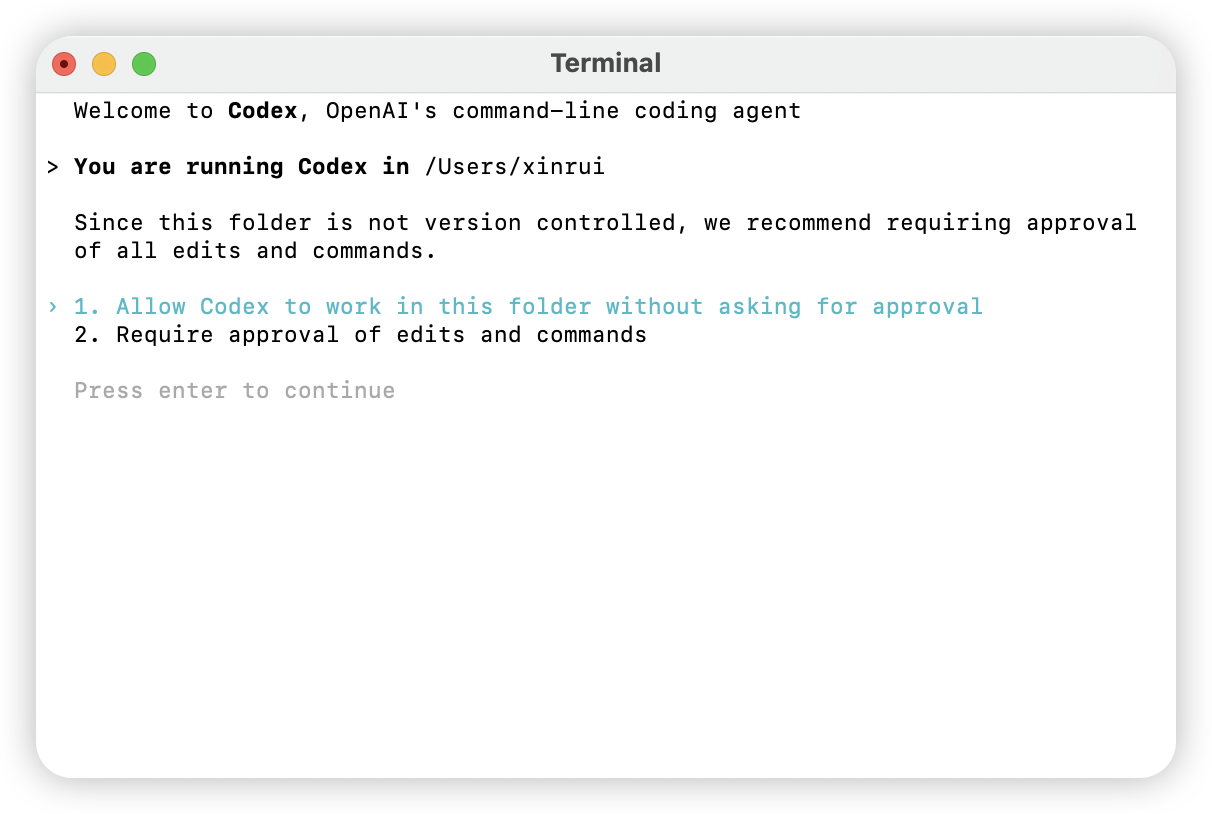 3. Select the model you need based on your requirements.
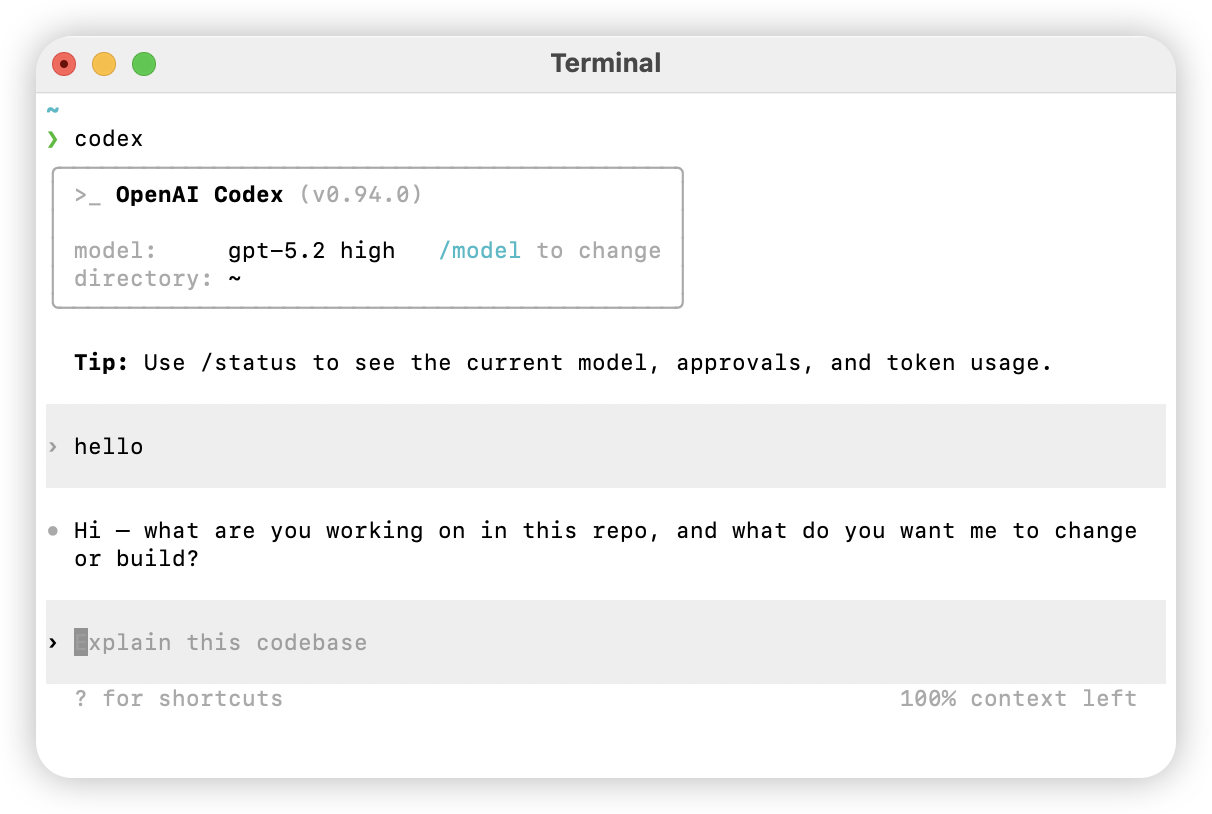
 4. Input natural language; if you receive a normal response, the configuration is successful.
 ### Using in the Codex Desktop Application
1. Open the Codex desktop application and select the working directory.
2. Enter the task in the input box; if you receive a normal response, the configuration is successful.
### Using in the Codex Desktop Application
1. Open the Codex desktop application and select the working directory.
2. Enter the task in the input box; if you receive a normal response, the configuration is successful.
 ## Useful Command References
### Help Command
```bash theme={null}
codex -h
```
### Complete Command Options
```bash theme={null}
Usage
$ codex [options]
Options
-h, --help Show help information and exit
-m, --model Specify the model to use (default: codex-mini-latest)
-i, --image Path to the file containing image input
-v, --view View previously saved session records
-q, --quiet Non-interactive mode, only prints the final output of the assistant
-a, --approval-mode Override approval policy: 'suggest', 'auto-edit', or 'full-auto'
--auto-edit Automatically approve file edits; will still prompt for command confirmation
--full-auto Automatically approve edits and commands in sandbox environment
--no-project-doc Do not automatically include 'codex.md' file from the repository
--project-doc Include specified Markdown file as context
--full-stdout Do not truncate stdout/stderr of command output
Dangerous Options
--dangerously-auto-approve-everything
Skip all confirmation prompts and execute commands directly (no sandbox protection)
For use only in temporary local testing environments
Experimental Options
-f, --full-context Start in "full context" mode, loading the entire repository into context
and applying bulk edits in a single operation
Only compatible with --model parameter
Examples
$ codex "Write and run a Python program that prints ASCII art"
$ codex -q "Fix build issues"
```
## Useful Command References
### Help Command
```bash theme={null}
codex -h
```
### Complete Command Options
```bash theme={null}
Usage
$ codex [options]
Options
-h, --help Show help information and exit
-m, --model Specify the model to use (default: codex-mini-latest)
-i, --image Path to the file containing image input
-v, --view View previously saved session records
-q, --quiet Non-interactive mode, only prints the final output of the assistant
-a, --approval-mode Override approval policy: 'suggest', 'auto-edit', or 'full-auto'
--auto-edit Automatically approve file edits; will still prompt for command confirmation
--full-auto Automatically approve edits and commands in sandbox environment
--no-project-doc Do not automatically include 'codex.md' file from the repository
--project-doc Include specified Markdown file as context
--full-stdout Do not truncate stdout/stderr of command output
Dangerous Options
--dangerously-auto-approve-everything
Skip all confirmation prompts and execute commands directly (no sandbox protection)
For use only in temporary local testing environments
Experimental Options
-f, --full-context Start in "full context" mode, loading the entire repository into context
and applying bulk edits in a single operation
Only compatible with --model parameter
Examples
$ codex "Write and run a Python program that prints ASCII art"
$ codex -q "Fix build issues"
```
Using Custom Models in Codex
By default, Codex only shows OpenAI's official models in the `/model` list. If you want to pick any model available on AIHubMix (GLM, Claude, Gemini, DeepSeek, Kimi, Qwen, etc.) directly from the list, you can use the officially supported "custom models" mechanism: declare the selectable models via a local JSON file (`model_catalog_json`), then point requests at AIHubMix with `[model_providers.aihubmix]`.
> Official documentation: [Advanced Configuration · OSS mode / local providers](https://developers.openai.com/codex/config-advanced)
### Two integration approaches
The "Environment Variable Configuration" section earlier on this page covers the **basic approach**, while this section covers the **custom models approach**. The differences are as follows — choose based on your needs:
| | Basic approach (profile + single model) | Custom models approach (this section) |
| ------------------ | --------------------------------------------------- | --------------------------------------------------------- |
| What you configure | Hard-code a single `model = "xxx"` in `config.toml` | Additionally maintain a `model_catalog_json` catalog file |
| Switching models | Edit the config file and restart | Pick directly from the `/model` list, switch anytime |
| Best for | Sticking with one fixed model long-term | Frequently comparing / switching between multiple models |
| Complexity | Low | Medium |
The whole process is just 4 steps: **generate the catalog file → edit `config.toml` → set the environment variable → restart and select a model**.
### Step 1: Generate the model catalog file
The catalog file is a `{ "models": [ ... ] }` structure, where each element in the array describes a model that can be selected in `/model`. Below we first explain the fields using **a single fixed model**, then provide a script to **batch-generate the top 30**.
#### 1.1 First understand the format: a single fixed model
Below is a minimal complete catalog that has been **verified to parse correctly in Codex** (containing only one model, `glm-5.2`). Save it as `~/.codex/model-catalogs/custom-models.json` and it's ready to use; to add more models, keep appending entries with the same structure to the `models` array.
```json theme={null}
{
"models": [
{
"slug": "glm-5.2",
"display_name": "GLM 5.2",
"description": "GLM 5.2 (via AIHubMix)",
"context_window": 1000000,
"max_context_window": 1000000,
"supported_reasoning_levels": [
{ "effort": "low", "description": "Fast responses" },
{ "effort": "medium", "description": "Balanced" },
{ "effort": "high", "description": "Deeper reasoning" }
],
"shell_type": "shell_command",
"visibility": "list",
"supported_in_api": true,
"priority": 0,
"availability_nux": null,
"upgrade": null,
"base_instructions": "You are Codex, a coding agent.",
"supports_reasoning_summaries": true,
"support_verbosity": false,
"default_verbosity": null,
"apply_patch_tool_type": null,
"truncation_policy": { "mode": "tokens", "limit": 10000 },
"supports_parallel_tool_calls": true,
"experimental_supported_tools": []
}
]
}
```
Field descriptions (the few you'll typically change):
| Field | Purpose | From API |
| --------------------------------------- | ------------------------------------------------------------------------------------------------------------------------------------- | ---------------- |
| `slug` | The model ID that Codex uses to make requests; must match the `model_id` returned by the API | `model_id` |
| `display_name` | The name shown in the `/model` list | `model_name` |
| `context_window` / `max_context_window` | Context window. **If omitted, it falls back to a very small conservative default** — recommend filling in the real value from the API | `context_length` |
| `supported_reasoning_levels` | Reasoning levels; after switching models you can still pick the effort via `/model` | — |
| `visibility` | Must be set to `list` to appear in the selector | — |
| `priority` | List ordering; smaller numbers come first | — |
**The remaining fields are required and have fixed values**: `base_instructions`, `availability_nux`, `upgrade`, `supports_reasoning_summaries`, `support_verbosity`, `default_verbosity`, `apply_patch_tool_type`, `truncation_policy`, `supports_parallel_tool_calls`, `experimental_supported_tools`. Newer versions of Codex (verified on `codex-cli 0.130.0`) parse strictly, and **if any one is missing, the entire catalog is discarded** and falls back to the built-in catalog, with an error like `missing field base_instructions` — manifesting as "not a single custom model shows up in `/model`." So you cannot remove any more fields from the example above.
About `base_instructions`: it is the **system prompt** for that model. The example uses a single sentence as a placeholder, and the model runs fine; to get coding performance closest to native Codex, replace it with the full `base_instructions` of any built-in model from `codex debug models --bundled` (that's exactly what the batch script in the next section does).
The official catalog uses **snake\_case** fields (`display_name`, `supported_in_api`, `visibility`). Two kinds of errors both cause the entire catalog to be discarded so no model shows up in `/model`: missing required fields report `missing field ...`; using camelCase legacy formats like `displayName`, `hidden` or unrecognized values report `unknown variant ...`. Just stick to the field set in this article to avoid them.
#### 1.2 Batch-generate the top 30
Writing multiple entries by hand makes it easy to miss fields. To write the first 30 LLMs from the [AIHubMix model list API](https://aihubmix.com/api/v1/models?type=llm) into the catalog all at once, use the script below — it **clones a built-in model as a template**, so the required fields (including the correct `base_instructions`) are inherently complete and never missing across Codex versions. Requires `curl`, `python3`, and the installed `codex` CLI:
```bash theme={null}
mkdir -p ~/.codex/model-catalogs
# 1) Take a built-in model as the template: it comes with all required fields like base_instructions
codex debug models --bundled > /tmp/_tpl.json
# 2) Fetch the AIHubMix model list
curl -s "https://aihubmix.com/api/v1/models?type=llm" > /tmp/_aihubmix.json
# 3) Clone the template to generate each entry, overriding only the fields unique to each model
python3 - <<'PY' > ~/.codex/model-catalogs/custom-models.json
import json, sys
tpl = json.load(open("/tmp/_tpl.json"))["models"][0] # any built-in model as template
api = json.load(open("/tmp/_aihubmix.json"))["data"]
# skip image-generation models (types contains image_generation), then take the top 30
api = [m for m in api if "image_generation" not in (m.get("types") or "")][:30]
out = []
for i, m in enumerate(api):
e = dict(tpl) # clone all fields from the template
ctx = m.get("context_length") or 200000
e["slug"] = m["model_id"] # must match the API's model_id
e["display_name"] = m.get("model_name") or m["model_id"]
e["description"] = (m.get("model_name") or m["model_id"]) + " (via AIHubMix)"
e["context_window"] = ctx
e["max_context_window"] = ctx
e["visibility"] = "list"
e["supported_in_api"] = True
e["priority"] = i
e["availability_nux"] = None
e["upgrade"] = None
out.append(e)
json.dump({"models": out}, sys.stdout, ensure_ascii=False, indent=2)
PY
```
The script overrides only the fields unique to each model (`slug`, `display_name`, `description`, `context_window`, etc.); all other required fields are cloned from the built-in template — which is exactly the field set from 1.1, except `base_instructions` uses the full official prompt.
> The generated file is fairly large (each entry contains the full `base_instructions`, roughly 1–2 MB), which is normal. After running it, verify it parses correctly with `codex debug models` (see Step 5).
> The `image_generation` filter line in the script is intentional: among the `type=llm` results, a very small number of models also carry the `image_generation` tag (e.g. `gpt-image-2`) and aren't suitable for conversation; the script automatically skips them before taking the first 30.
### Step 2: Modify `config.toml`
Edit `~/.codex/config.toml`, add `model_catalog_json` at the **root level**, and define the `aihubmix` provider:
```toml theme={null}
# ⚠️ model_catalog_json must be at the root level, not inside [model_providers.*]
model_provider = "aihubmix"
model_catalog_json = "~/.codex/model-catalogs/custom-models.json"
[model_providers.aihubmix]
name = "Aihubmix"
base_url = "https://aihubmix.com/v1"
wire_api = "responses"
env_key = "AIHUBMIX_API_KEY"
```
`wire_api = "responses"` is critical — **omitting it or setting it to `chat` will fail to connect**. Newer versions of Codex only use OpenAI's Responses API (`/v1/responses`), and AIHubMix is natively compatible with the Responses API, so you can point directly at `https://aihubmix.com/v1` without building your own conversion proxy.
If you'd also like to specify a **default model** and **default reasoning level** (used directly at startup, without picking manually each time), you can use this more complete config:
```toml theme={null}
model = "glm-5.2" # default model on startup; must exist in the catalog file
model_provider = "aihubmix"
model_catalog_json = "~/.codex/model-catalogs/custom-models.json"
model_reasoning_effort = "high" # default reasoning effort: minimal / low / medium / high
[model_providers.aihubmix]
name = "Aihubmix"
base_url = "https://aihubmix.com/v1"
wire_api = "responses"
env_key = "AIHUBMIX_API_KEY"
```
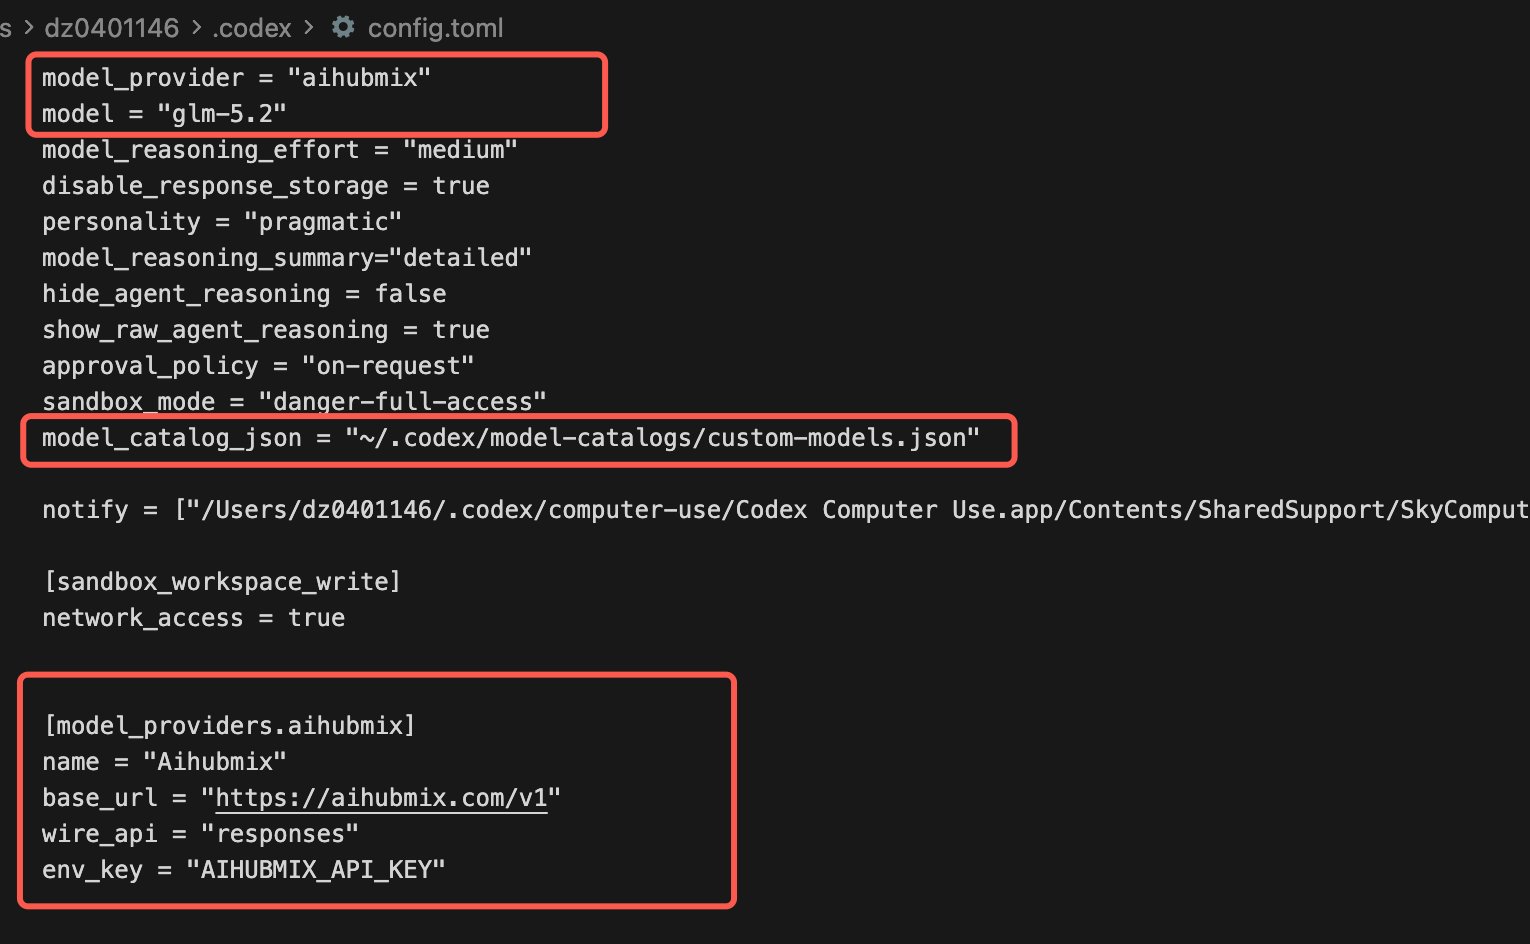
Once configured, `config.toml` looks roughly like this (the red boxes are the key items for this step: the root-level `model` / `model_provider` / `model_catalog_json`, and the `[model_providers.aihubmix]` section):
 ### Step 3: Set the environment variable
Set up the environment variable specified by `env_key` above (note: no spaces around `=`):
```bash theme={null}
export AIHUBMIX_API_KEY=sk-xxx
```
We recommend writing it into `~/.zshrc` / `~/.bashrc` to persist it. Get your Key from the [AIHubMix console](https://aihubmix.com/token).
### Step 4: Restart and select a model
Restart the Codex App / TUI for the catalog file to take effect, then:
```bash theme={null}
codex
# type /model in the TUI to see and switch among the 30 models declared above
```
After typing `/model`, all models declared in the catalog are listed; use the arrow keys to select and Enter to confirm:
### Step 3: Set the environment variable
Set up the environment variable specified by `env_key` above (note: no spaces around `=`):
```bash theme={null}
export AIHUBMIX_API_KEY=sk-xxx
```
We recommend writing it into `~/.zshrc` / `~/.bashrc` to persist it. Get your Key from the [AIHubMix console](https://aihubmix.com/token).
### Step 4: Restart and select a model
Restart the Codex App / TUI for the catalog file to take effect, then:
```bash theme={null}
codex
# type /model in the TUI to see and switch among the 30 models declared above
```
After typing `/model`, all models declared in the catalog are listed; use the arrow keys to select and Enter to confirm:
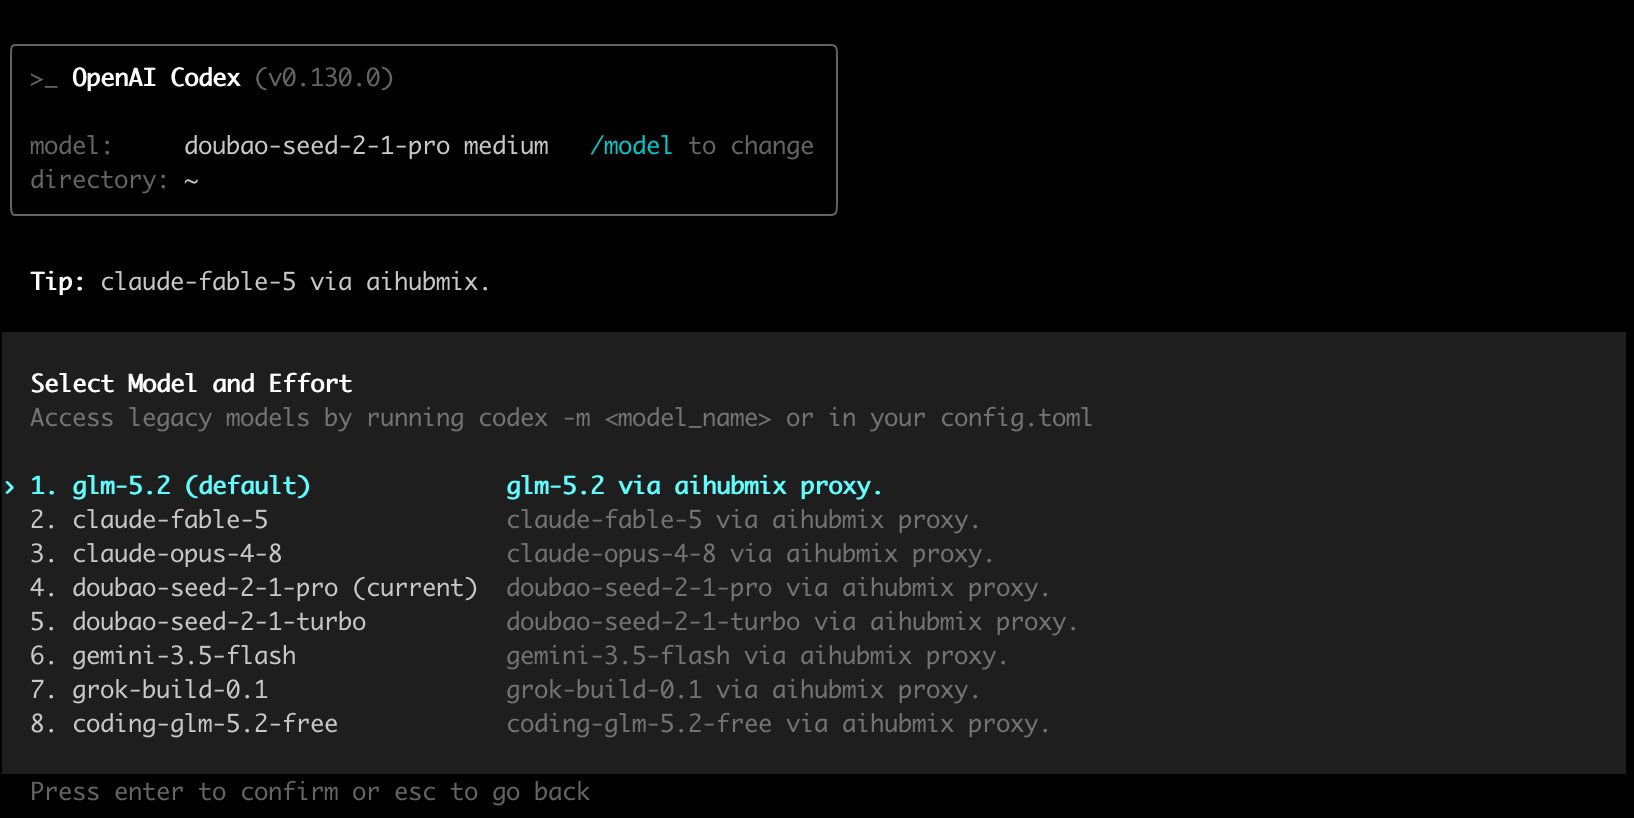 Once a model is selected, `/model` will also let you choose a reasoning level (effort); pick `low` / `medium` / `high` as needed.
### Step 5: Verify it works
1. Enter Codex and type `/model`, confirm you can see the models declared in the catalog, and switch to one of them (e.g. `glm-5.2`).
2. Ask any question to verify the link is working. Note: **don't judge by asking "which model are you"** — `base_instructions` says "You are Codex... based on GPT-5", so all models will claim to be GPT-5 accordingly, and asking won't reveal the real model. To confirm which model was actually called, log in to the [AIHubMix console](https://aihubmix.com/token) and check the `model_id` of that request record on the "Logs" page — that's the truth.
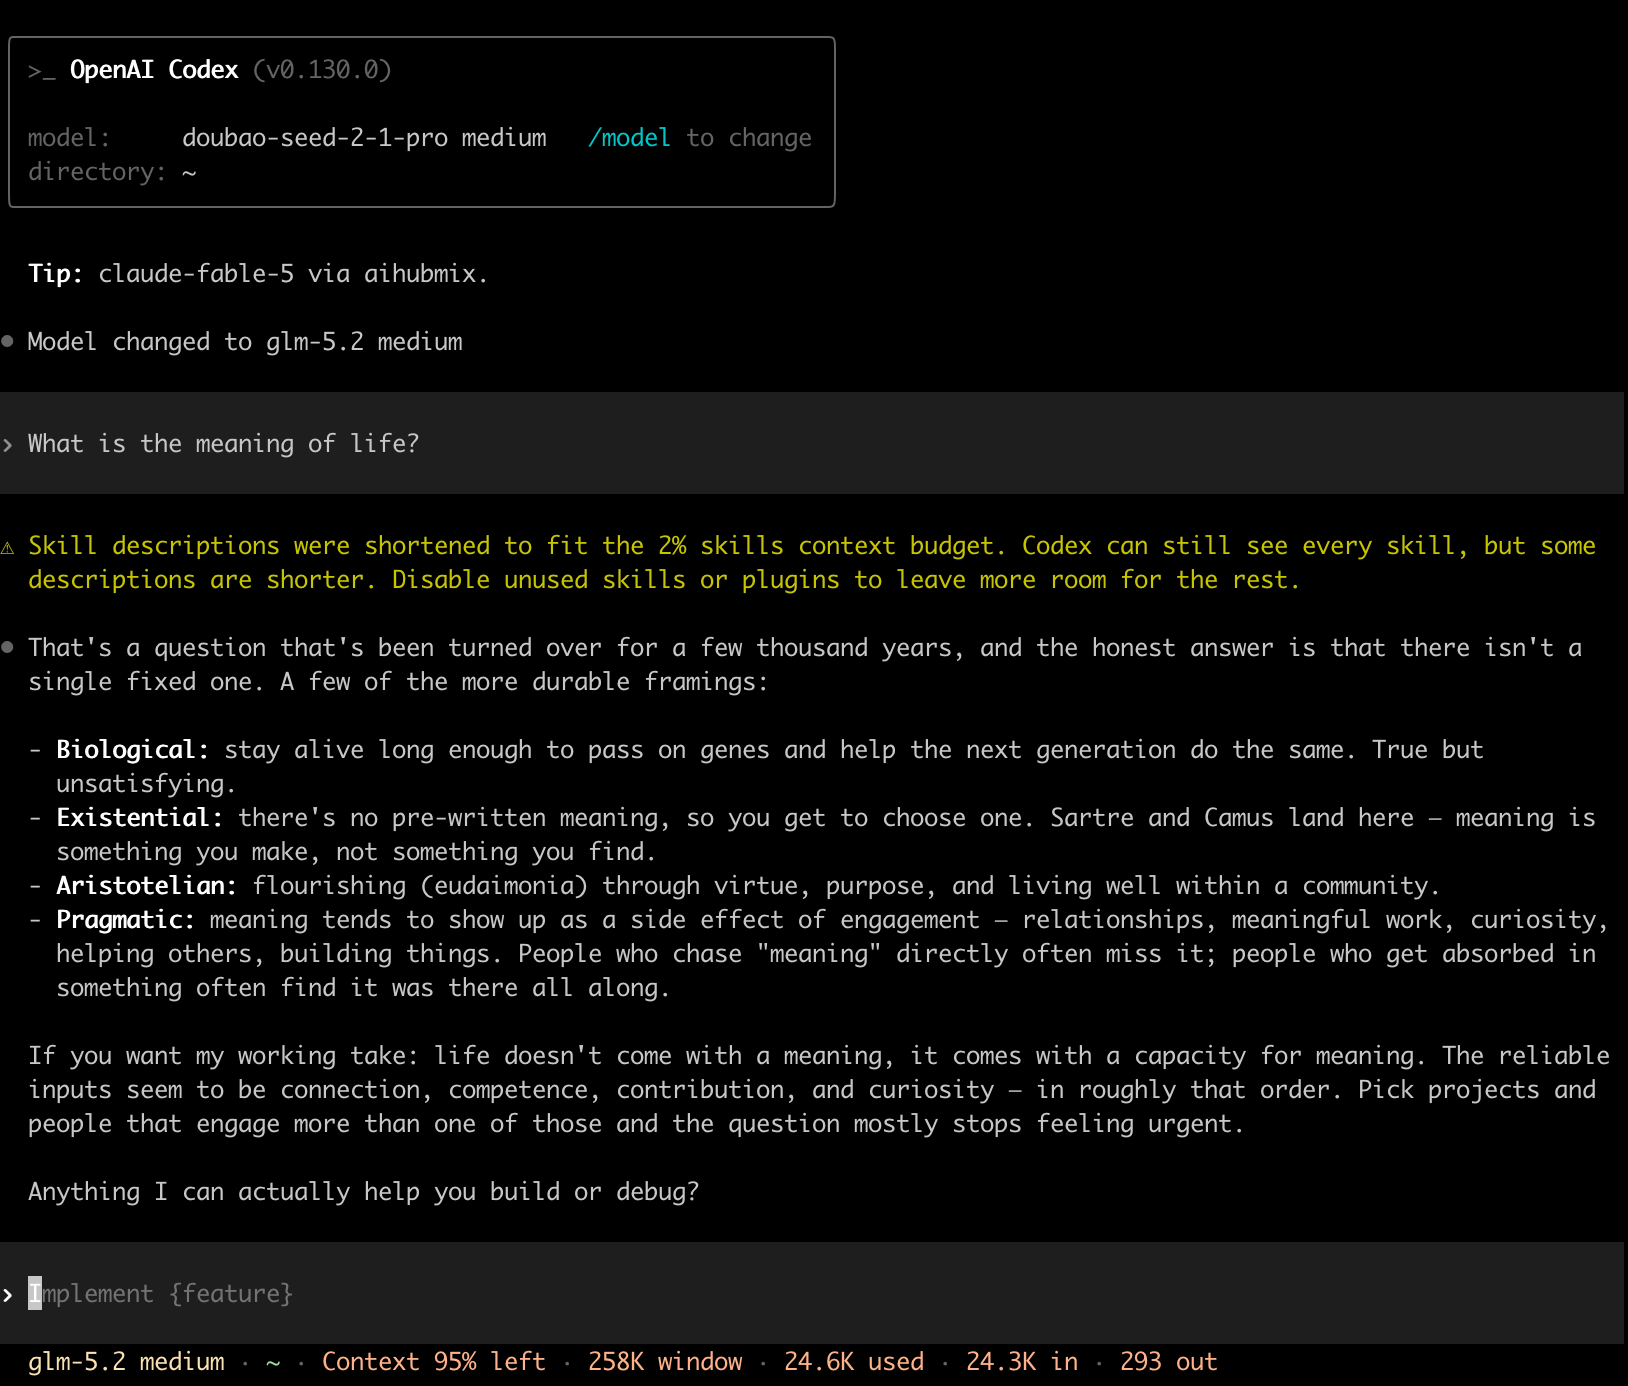
After a successful switch, the top shows `Model changed to ...`, and the bottom status bar also displays the current model and context window (the image below switched to `glm-5.2`, window 258K):
Once a model is selected, `/model` will also let you choose a reasoning level (effort); pick `low` / `medium` / `high` as needed.
### Step 5: Verify it works
1. Enter Codex and type `/model`, confirm you can see the models declared in the catalog, and switch to one of them (e.g. `glm-5.2`).
2. Ask any question to verify the link is working. Note: **don't judge by asking "which model are you"** — `base_instructions` says "You are Codex... based on GPT-5", so all models will claim to be GPT-5 accordingly, and asking won't reveal the real model. To confirm which model was actually called, log in to the [AIHubMix console](https://aihubmix.com/token) and check the `model_id` of that request record on the "Logs" page — that's the truth.
After a successful switch, the top shows `Model changed to ...`, and the bottom status bar also displays the current model and context window (the image below switched to `glm-5.2`, window 258K):
 ## Custom Models FAQ
* **Custom models don't show up in `/model`?** Troubleshoot in order:
1. **First run `codex debug models`.** If it reports `missing field ...` (most common — a required field is missing) or `unknown variant ...` (wrong field name/value), the entire catalog failed to parse and was discarded — just regenerate it using the "clone a built-in template" script from Step 1.
2. Confirm `model_catalog_json` is written at the **root level** of `config.toml`, not inside a `[model_providers.*]` section;
3. Confirm the JSON uses snake\_case official fields and `visibility` is `list`;
4. If `codex debug models` can already see all the models but the **Desktop App** only shows one or two with the current model displayed as "custom" — this is a known Desktop App bug: it layers an additional official-slug allowlist filter on top of the local catalog, removing non-official models from the selector (see GitHub Issues [#19694](https://github.com/openai/codex/issues/19694), [#15138](https://github.com/openai/codex/issues/15138)). The model is in fact still called normally per the `model = "..."` in `config.toml` (you can confirm in the AIHubMix logs); only the name fails to display. **For correct display, use the terminal `codex` CLI / TUI**; on the Desktop App you can only hard-code `model = "the model you want"` in `config.toml` and wait for the official fix.
* **The catalog is a "replace", not a "merge".** `model_catalog_json` **replaces** the entire model list rather than appending (tested: with only 2 models in the catalog, `codex debug models` shows only those 2, and all built-in `gpt-5.x` models disappear). If you want both kinds, write them all into the custom catalog together.
* **Request reports a protocol error / can't connect.** Most likely the provider's `base_url` or `wire_api` isn't configured correctly. AIHubMix requires `wire_api = "responses"` + `base_url = "https://aihubmix.com/v1"`. If you're connecting to a third party that only supports Chat Completions, you'll need a local conversion proxy — AIHubMix users don't need this step.
* **Frequent "Reconnecting" reconnects.** In some network/proxy environments WebSocket (WSS) doesn't work; add `supports_websockets = false` to the provider section to force HTTP.
* **Parsing reports `missing field ...` (e.g. `missing field base_instructions`).** The entry is missing a required field. Newer versions of Codex parse strictly, and `base_instructions`, `availability_nux`, `upgrade`, `supports_reasoning_summaries`, `support_verbosity`, `default_verbosity`, `apply_patch_tool_type`, `truncation_policy`, `supports_parallel_tool_calls`, `experimental_supported_tools` must all be present. The "clone a built-in template" script from Step 1 can fill them all in at once.
* **Parsing reports `unknown variant`.** The catalog JSON has a field name or value that Codex doesn't recognize (commonly camelCase legacy formats like `displayName`/`hidden`). Switch to the snake\_case field set in this article.
## Reference Articles
* Official docs: [Advanced Configuration](https://developers.openai.com/codex/config-advanced) | [Configuration Reference](https://developers.openai.com/codex/config-reference)
* Official built-in catalog format reference: [codex-rs/models-manager/models.json](https://github.com/openai/codex/blob/main/codex-rs/models-manager/models.json)
* Community guide: [Codex config.toml: integrate any custom provider in 6 lines](https://www.morphllm.com/codex-provider-configuration)
***
Last updated: 2026-06-25
## Custom Models FAQ
* **Custom models don't show up in `/model`?** Troubleshoot in order:
1. **First run `codex debug models`.** If it reports `missing field ...` (most common — a required field is missing) or `unknown variant ...` (wrong field name/value), the entire catalog failed to parse and was discarded — just regenerate it using the "clone a built-in template" script from Step 1.
2. Confirm `model_catalog_json` is written at the **root level** of `config.toml`, not inside a `[model_providers.*]` section;
3. Confirm the JSON uses snake\_case official fields and `visibility` is `list`;
4. If `codex debug models` can already see all the models but the **Desktop App** only shows one or two with the current model displayed as "custom" — this is a known Desktop App bug: it layers an additional official-slug allowlist filter on top of the local catalog, removing non-official models from the selector (see GitHub Issues [#19694](https://github.com/openai/codex/issues/19694), [#15138](https://github.com/openai/codex/issues/15138)). The model is in fact still called normally per the `model = "..."` in `config.toml` (you can confirm in the AIHubMix logs); only the name fails to display. **For correct display, use the terminal `codex` CLI / TUI**; on the Desktop App you can only hard-code `model = "the model you want"` in `config.toml` and wait for the official fix.
* **The catalog is a "replace", not a "merge".** `model_catalog_json` **replaces** the entire model list rather than appending (tested: with only 2 models in the catalog, `codex debug models` shows only those 2, and all built-in `gpt-5.x` models disappear). If you want both kinds, write them all into the custom catalog together.
* **Request reports a protocol error / can't connect.** Most likely the provider's `base_url` or `wire_api` isn't configured correctly. AIHubMix requires `wire_api = "responses"` + `base_url = "https://aihubmix.com/v1"`. If you're connecting to a third party that only supports Chat Completions, you'll need a local conversion proxy — AIHubMix users don't need this step.
* **Frequent "Reconnecting" reconnects.** In some network/proxy environments WebSocket (WSS) doesn't work; add `supports_websockets = false` to the provider section to force HTTP.
* **Parsing reports `missing field ...` (e.g. `missing field base_instructions`).** The entry is missing a required field. Newer versions of Codex parse strictly, and `base_instructions`, `availability_nux`, `upgrade`, `supports_reasoning_summaries`, `support_verbosity`, `default_verbosity`, `apply_patch_tool_type`, `truncation_policy`, `supports_parallel_tool_calls`, `experimental_supported_tools` must all be present. The "clone a built-in template" script from Step 1 can fill them all in at once.
* **Parsing reports `unknown variant`.** The catalog JSON has a field name or value that Codex doesn't recognize (commonly camelCase legacy formats like `displayName`/`hidden`). Switch to the snake\_case field set in this article.
## Reference Articles
* Official docs: [Advanced Configuration](https://developers.openai.com/codex/config-advanced) | [Configuration Reference](https://developers.openai.com/codex/config-reference)
* Official built-in catalog format reference: [codex-rs/models-manager/models.json](https://github.com/openai/codex/blob/main/codex-rs/models-manager/models.json)
* Community guide: [Codex config.toml: integrate any custom provider in 6 lines](https://www.morphllm.com/codex-provider-configuration)
***
Last updated: 2026-06-25