> ## Documentation Index
> Fetch the complete documentation index at: https://docs.aihubmix.com/llms.txt
> Use this file to discover all available pages before exploring further.
# WorkBuddy
> AIHubMix in WorkBuddy konfigurieren und beliebige von AIHubMix unterstuetzte Modelle verwenden.
WorkBuddy unterstuetzt benutzerdefinierte OpenAI-kompatible Modelle. Nach der Einrichtung von AIHubMix lassen sich GPT-, Claude-, Gemini-, DeepSeek-, GLM- und weitere AIHubMix-Modelle auswaehlen.
## Vorbereitung
* [WorkBuddy](https://www.codebuddy.cn/work/) installieren und oeffnen.
* Im [AIHubMix Console](https://aihubmix.com/token) einen API Key erstellen; das Format ist normalerweise `sk-***`.
* Die gewuenschte Modell-ID aus der AIHubMix-Modellliste kopieren, zum Beispiel `gpt-5.5`, `gemini-3.5-flash` oder `deepseek-chat`.
## AIHubMix ueber die Benutzeroberflaeche konfigurieren
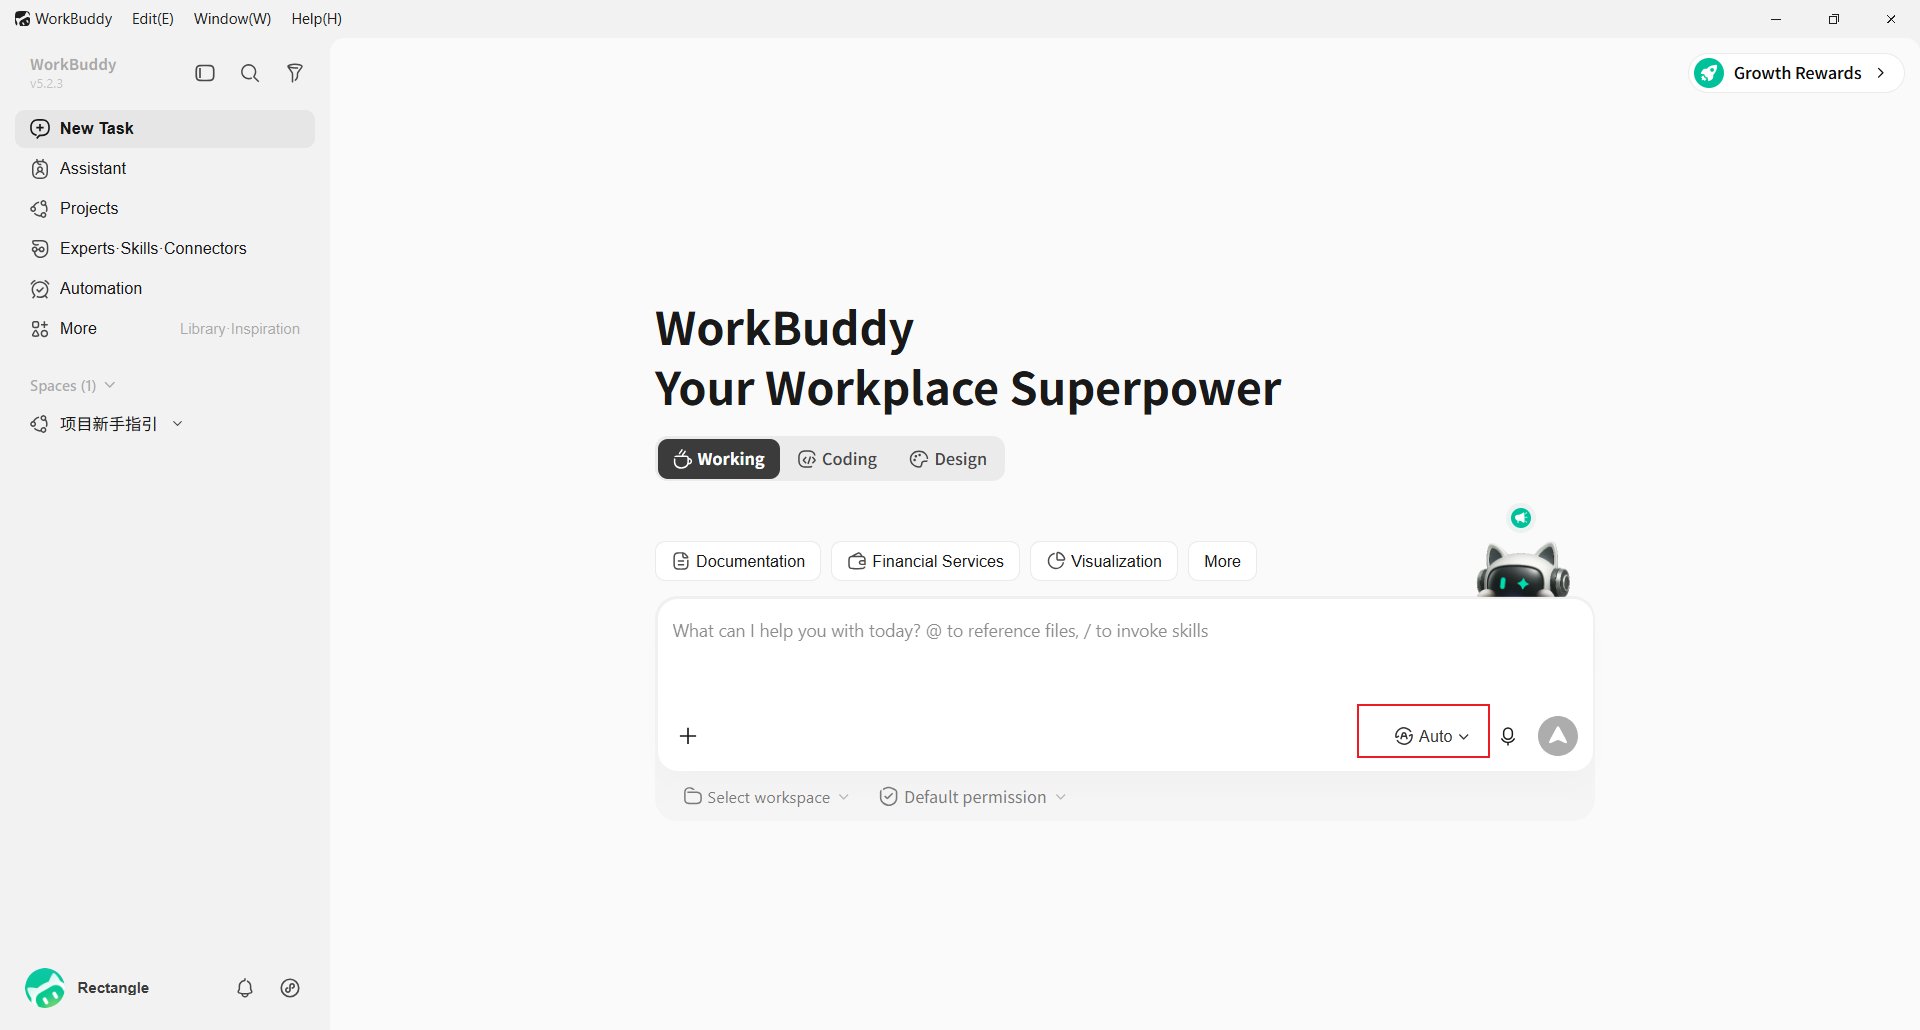
In WorkBuddy rechts unten im Eingabefeld auf die aktuelle Modellauswahl, zum Beispiel **Auto**, klicken.
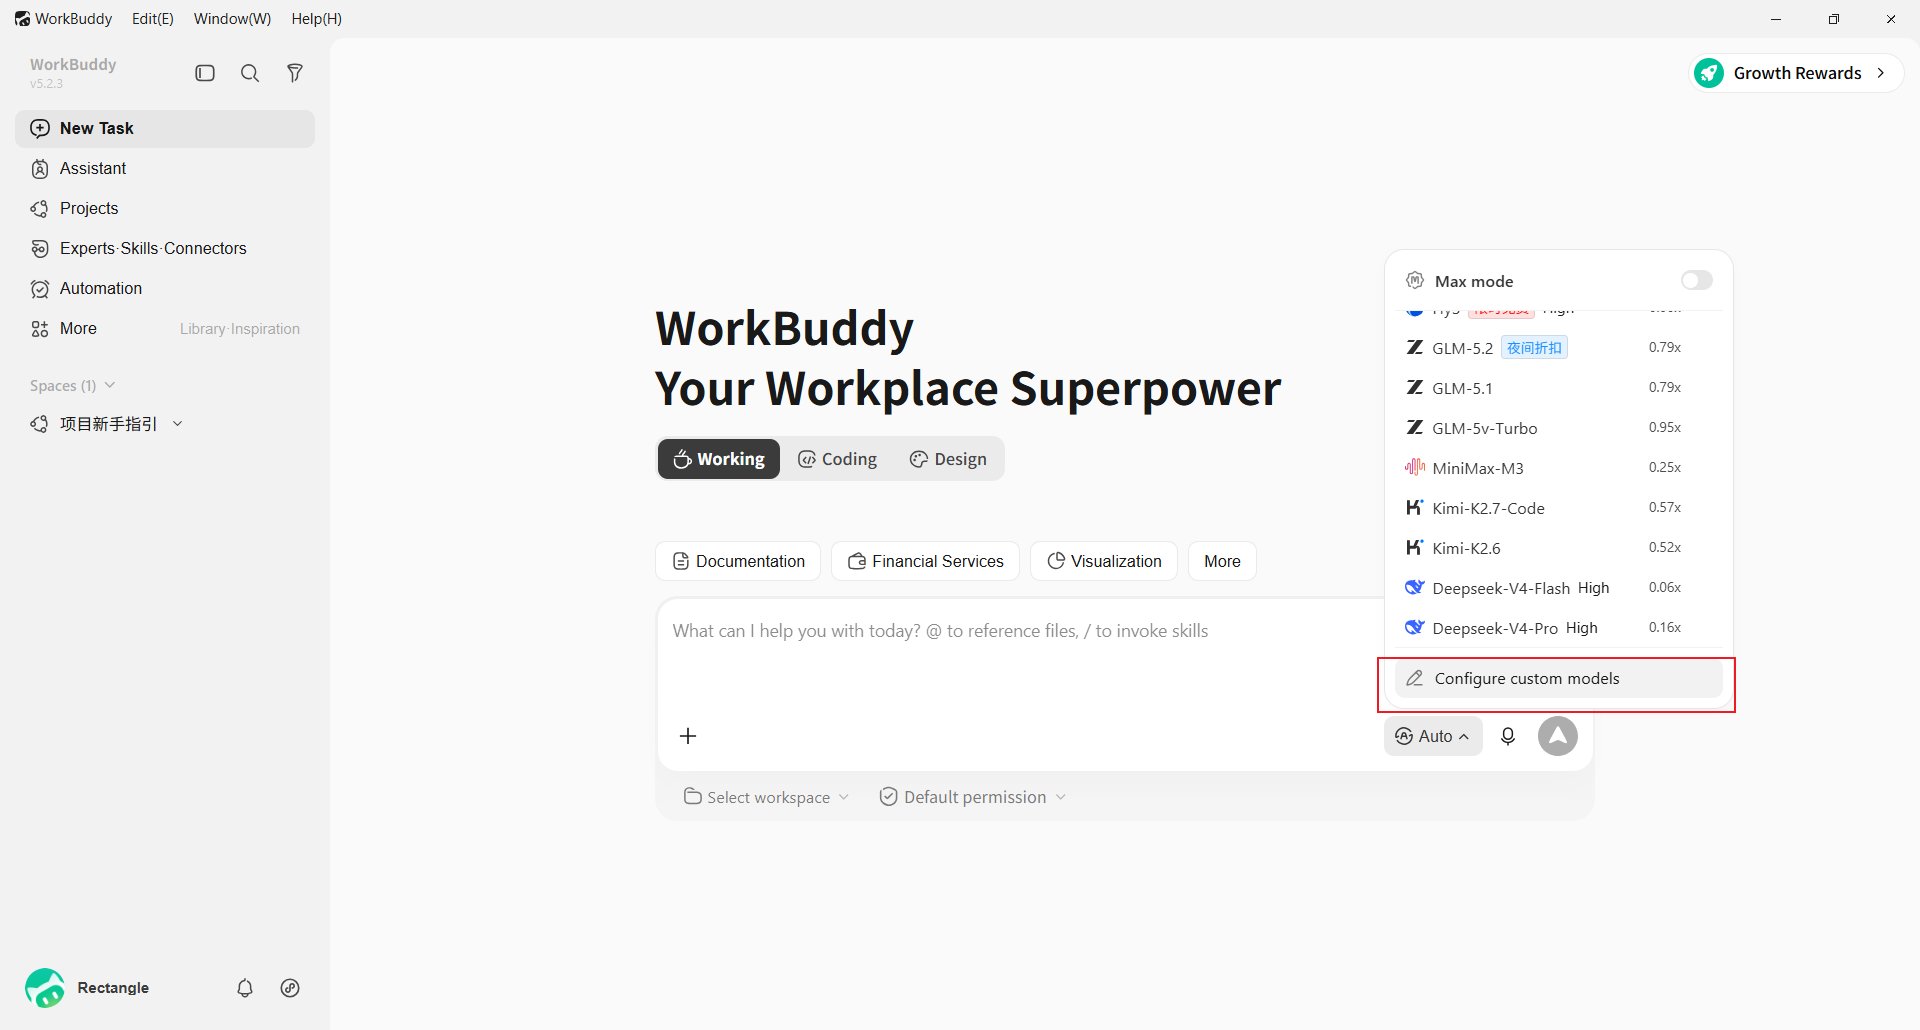
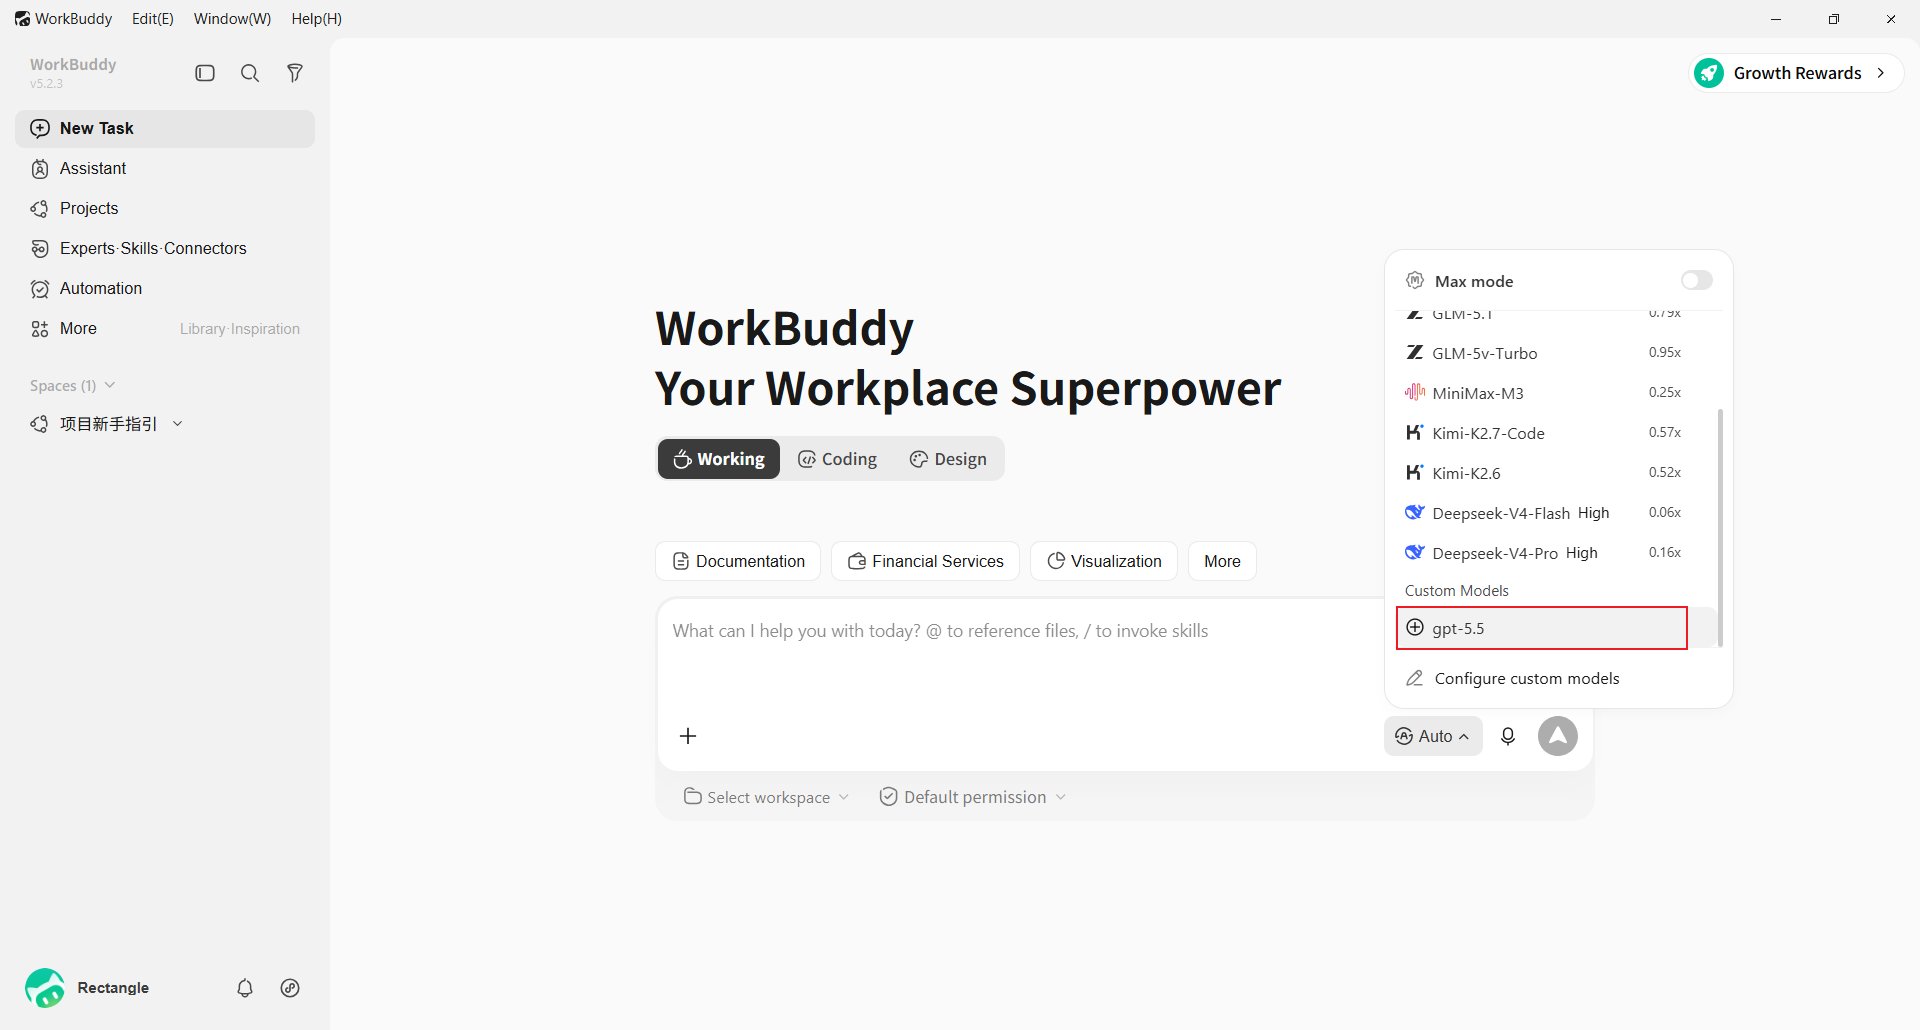
 Ans Ende der Modellliste scrollen und **Configure custom models** waehlen.
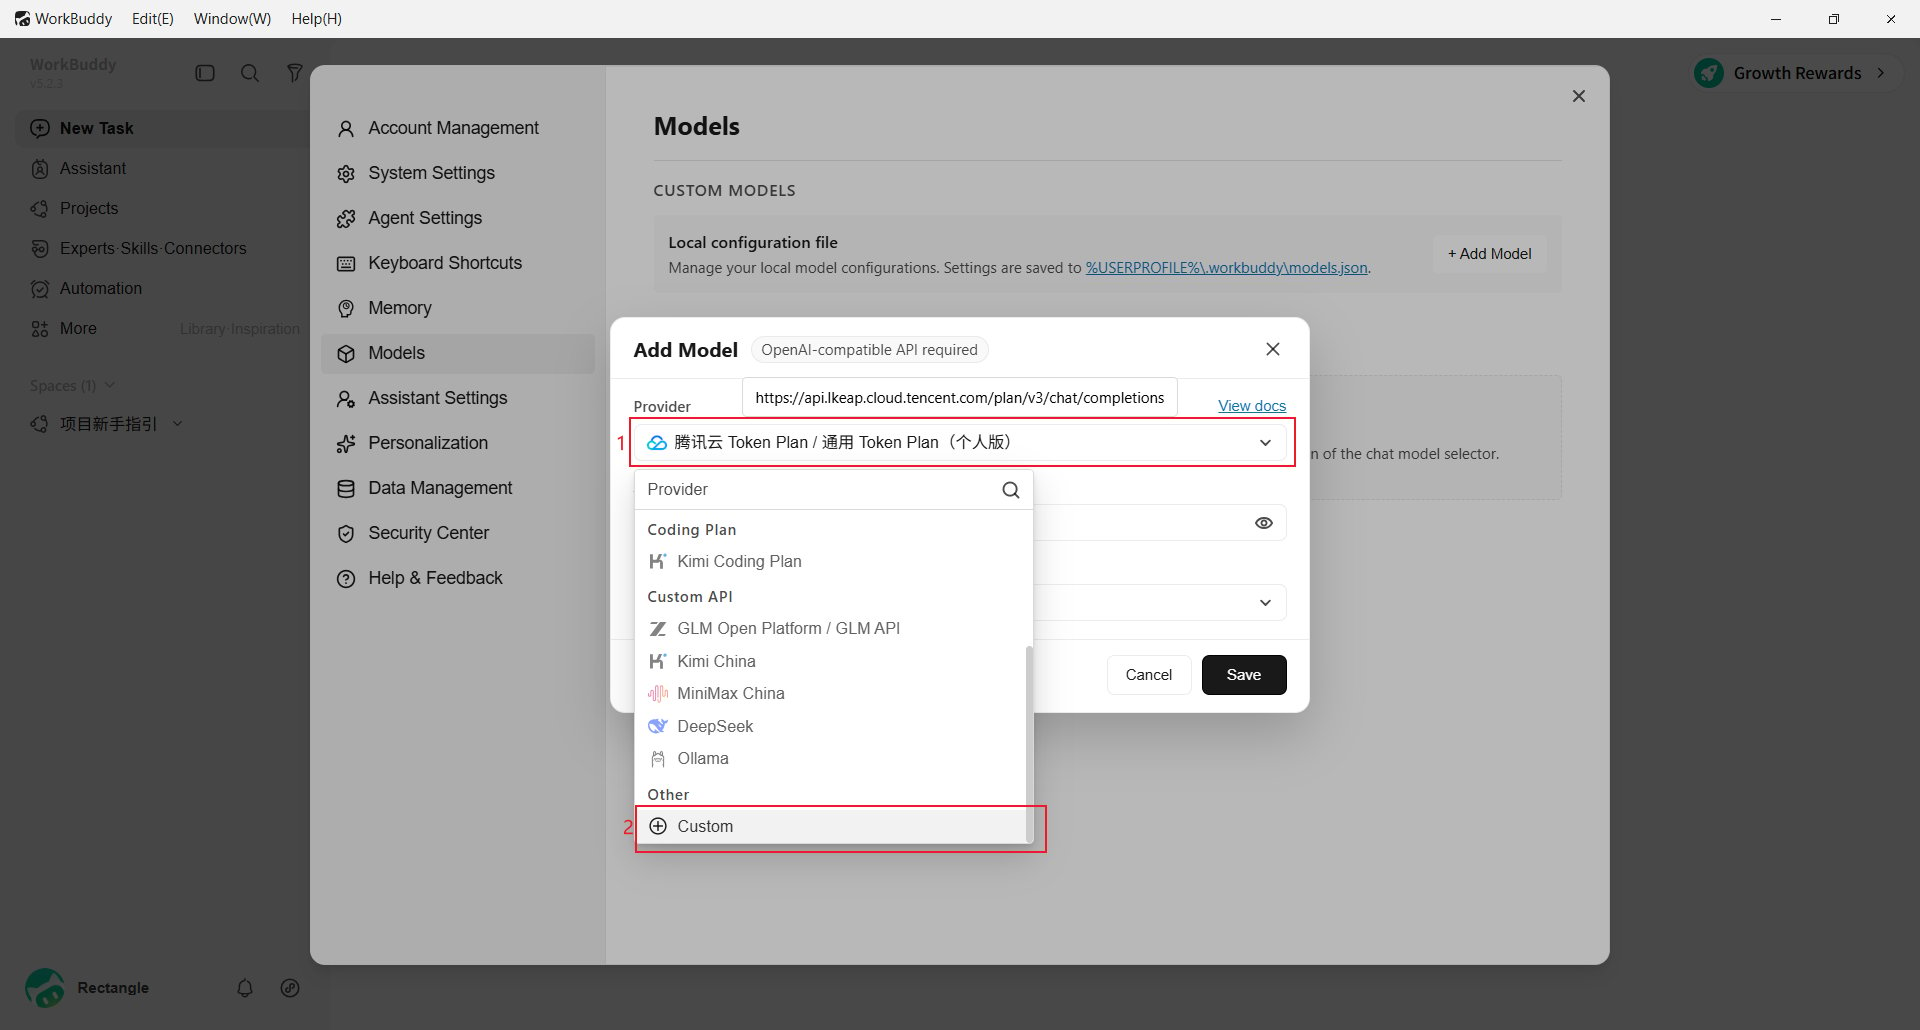
 Auf **Add Model** klicken und unter **Provider** die Option **Custom** waehlen.
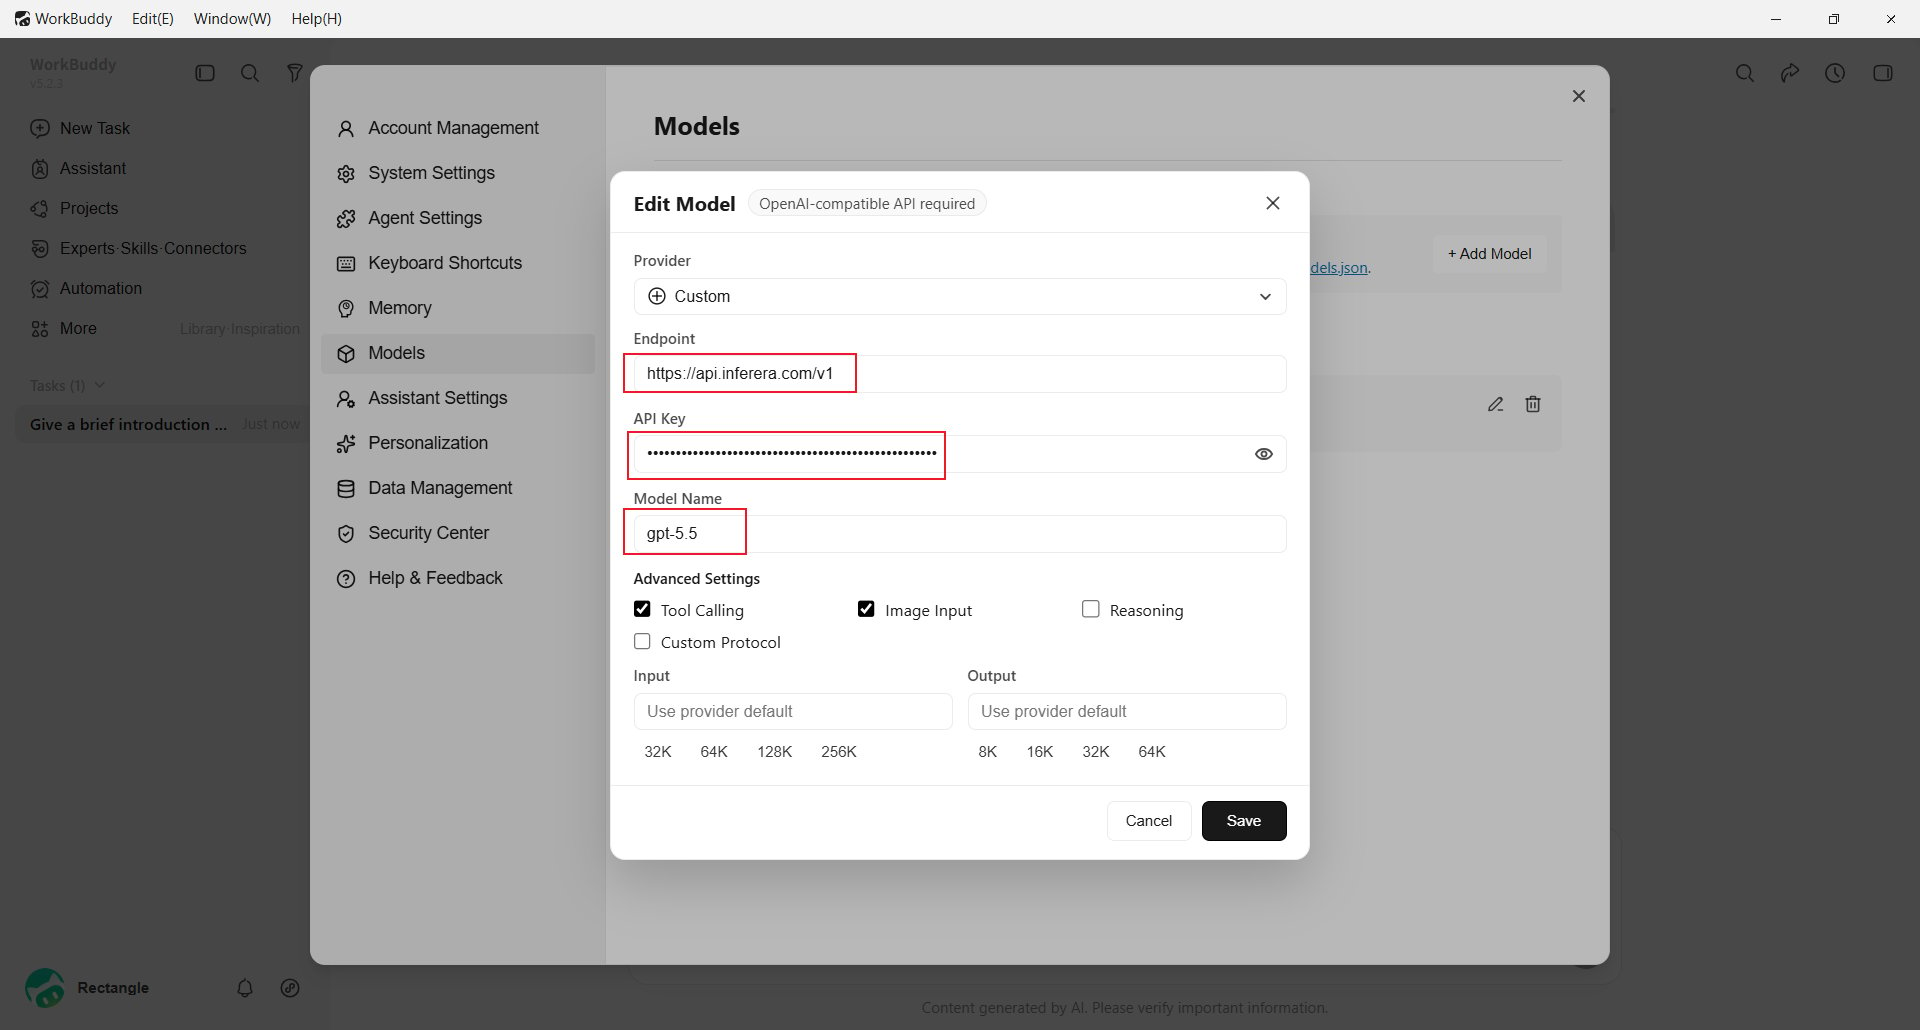
 Folgende Felder ausfuellen:
* **Endpoint**: `https://aihubmix.com/v1`; bei Nichterreichbarkeit `https://api.inferera.com/v1` verwenden.
* **API Key**: Den im [AIHubMix Console](https://aihubmix.com/token) erstellten Key eintragen.
* **Model Name**: Die Modell-ID eintragen, zum Beispiel `gpt-5.5`.
* **Advanced Settings**: **Tool Calling**, **Image Input** oder **Reasoning** nur fuer unterstuetzte Funktionen aktivieren.
Mit **Save** speichern.
Folgende Felder ausfuellen:
* **Endpoint**: `https://aihubmix.com/v1`; bei Nichterreichbarkeit `https://api.inferera.com/v1` verwenden.
* **API Key**: Den im [AIHubMix Console](https://aihubmix.com/token) erstellten Key eintragen.
* **Model Name**: Die Modell-ID eintragen, zum Beispiel `gpt-5.5`.
* **Advanced Settings**: **Tool Calling**, **Image Input** oder **Reasoning** nur fuer unterstuetzte Funktionen aktivieren.
Mit **Save** speichern.
 Zurueck in der Modellauswahl das Modell unter **Custom Models** waehlen.
 ## Modell per Konfigurationsdatei hinzufuegen
WorkBuddy speichert die Modelle in einer lokalen `models.json`. Statt die Felder in der Benutzeroberflaeche einzeln auszufuellen, diese Datei bearbeiten:
```text theme={null}
%USERPROFILE%\.workbuddy\models.json
```
Die Datei enthaelt ein Modell-Array:
```json theme={null}
[{"id":"gpt-5.5","name":"gpt-5.5","vendor":"Custom","url":"https://aihubmix.com/v1","apiKey":"sk-***","supportsToolCall":true,"supportsImages":true,"supportsReasoning":false,"useCustomProtocol":false}]
```
Falls die Hauptadresse nicht erreichbar ist:
```json theme={null}
"url": "https://api.inferera.com/v1"
```
`id` und `name` sind die Modell-ID, `vendor` ist `Custom` und `apiKey` ist der AIHubMix Key. `supportsImages` und `supportsToolCall` entsprechen **Image Input** und **Tool Calling**. Anschliessend WorkBuddy neu starten oder die Modellauswahl erneut oeffnen.
## Funktion pruefen
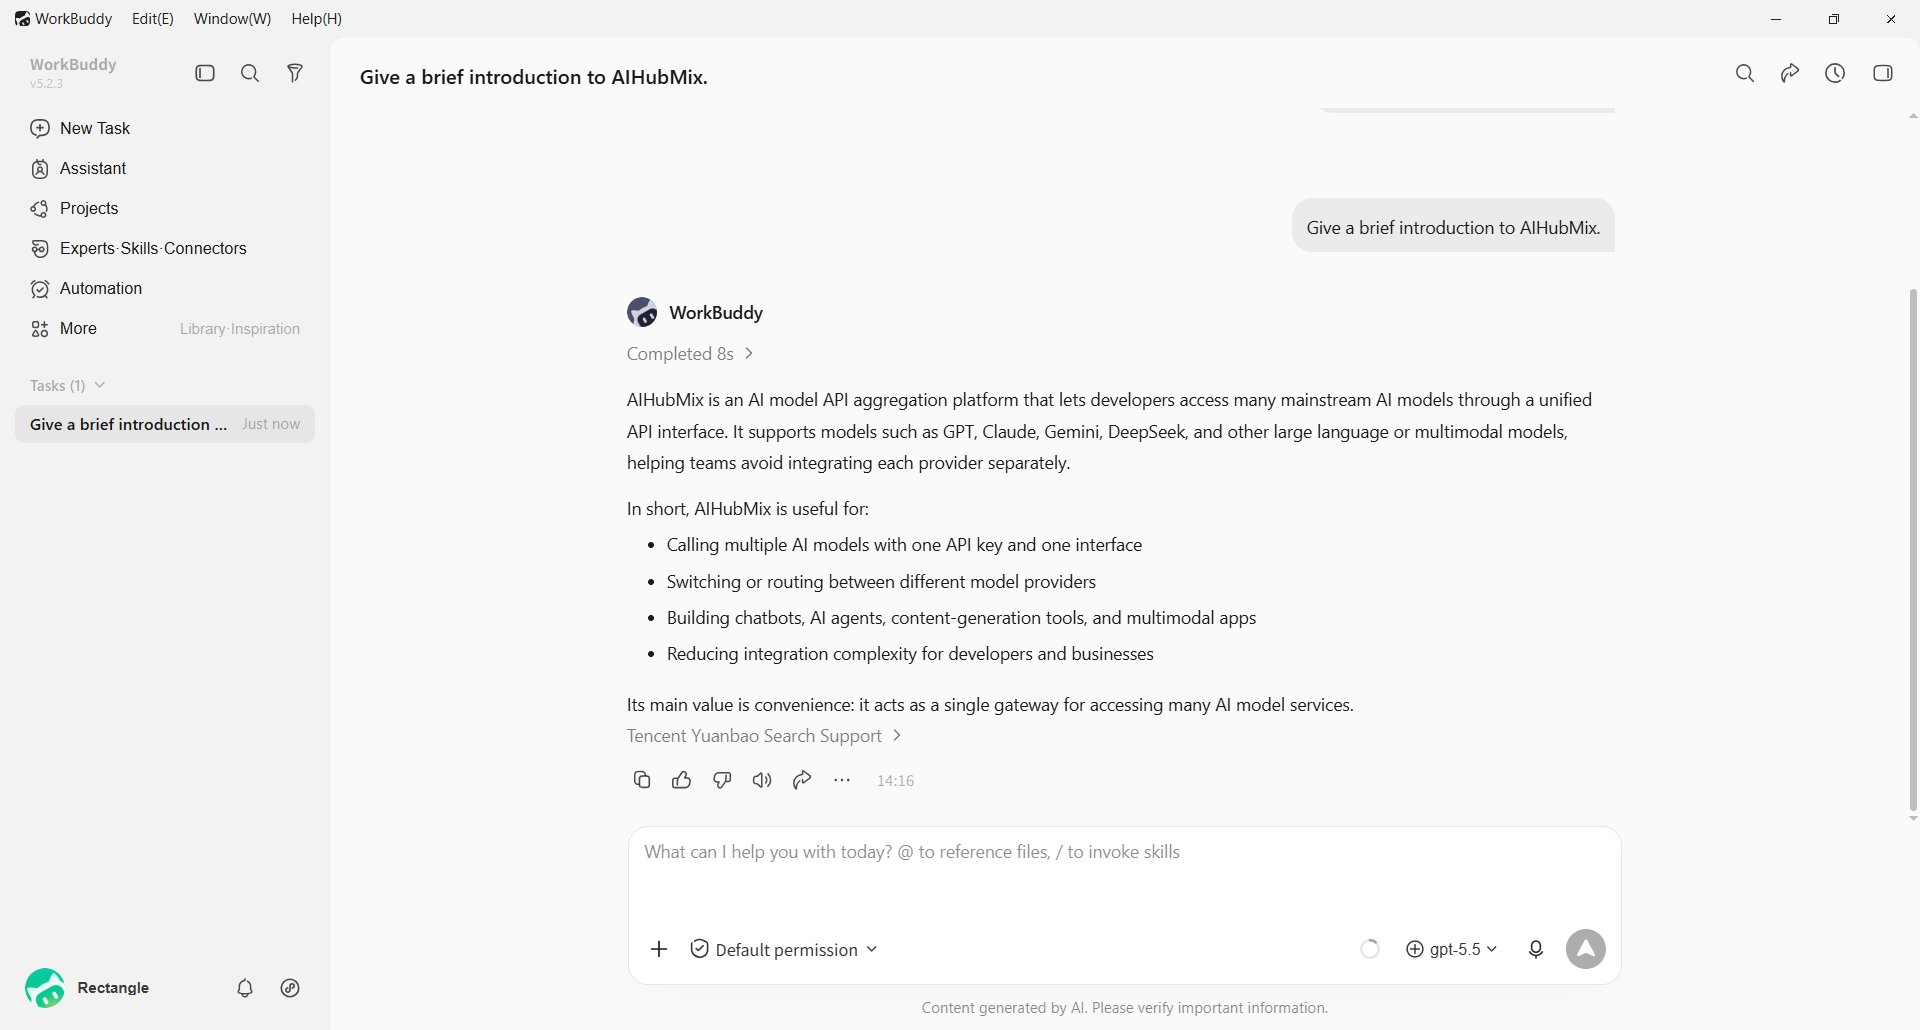
Das Modell waehlen und eine kurze Nachricht senden. Eine Antwort bestaetigt die Einrichtung.
## Modell per Konfigurationsdatei hinzufuegen
WorkBuddy speichert die Modelle in einer lokalen `models.json`. Statt die Felder in der Benutzeroberflaeche einzeln auszufuellen, diese Datei bearbeiten:
```text theme={null}
%USERPROFILE%\.workbuddy\models.json
```
Die Datei enthaelt ein Modell-Array:
```json theme={null}
[{"id":"gpt-5.5","name":"gpt-5.5","vendor":"Custom","url":"https://aihubmix.com/v1","apiKey":"sk-***","supportsToolCall":true,"supportsImages":true,"supportsReasoning":false,"useCustomProtocol":false}]
```
Falls die Hauptadresse nicht erreichbar ist:
```json theme={null}
"url": "https://api.inferera.com/v1"
```
`id` und `name` sind die Modell-ID, `vendor` ist `Custom` und `apiKey` ist der AIHubMix Key. `supportsImages` und `supportsToolCall` entsprechen **Image Input** und **Tool Calling**. Anschliessend WorkBuddy neu starten oder die Modellauswahl erneut oeffnen.
## Funktion pruefen
Das Modell waehlen und eine kurze Nachricht senden. Eine Antwort bestaetigt die Einrichtung.
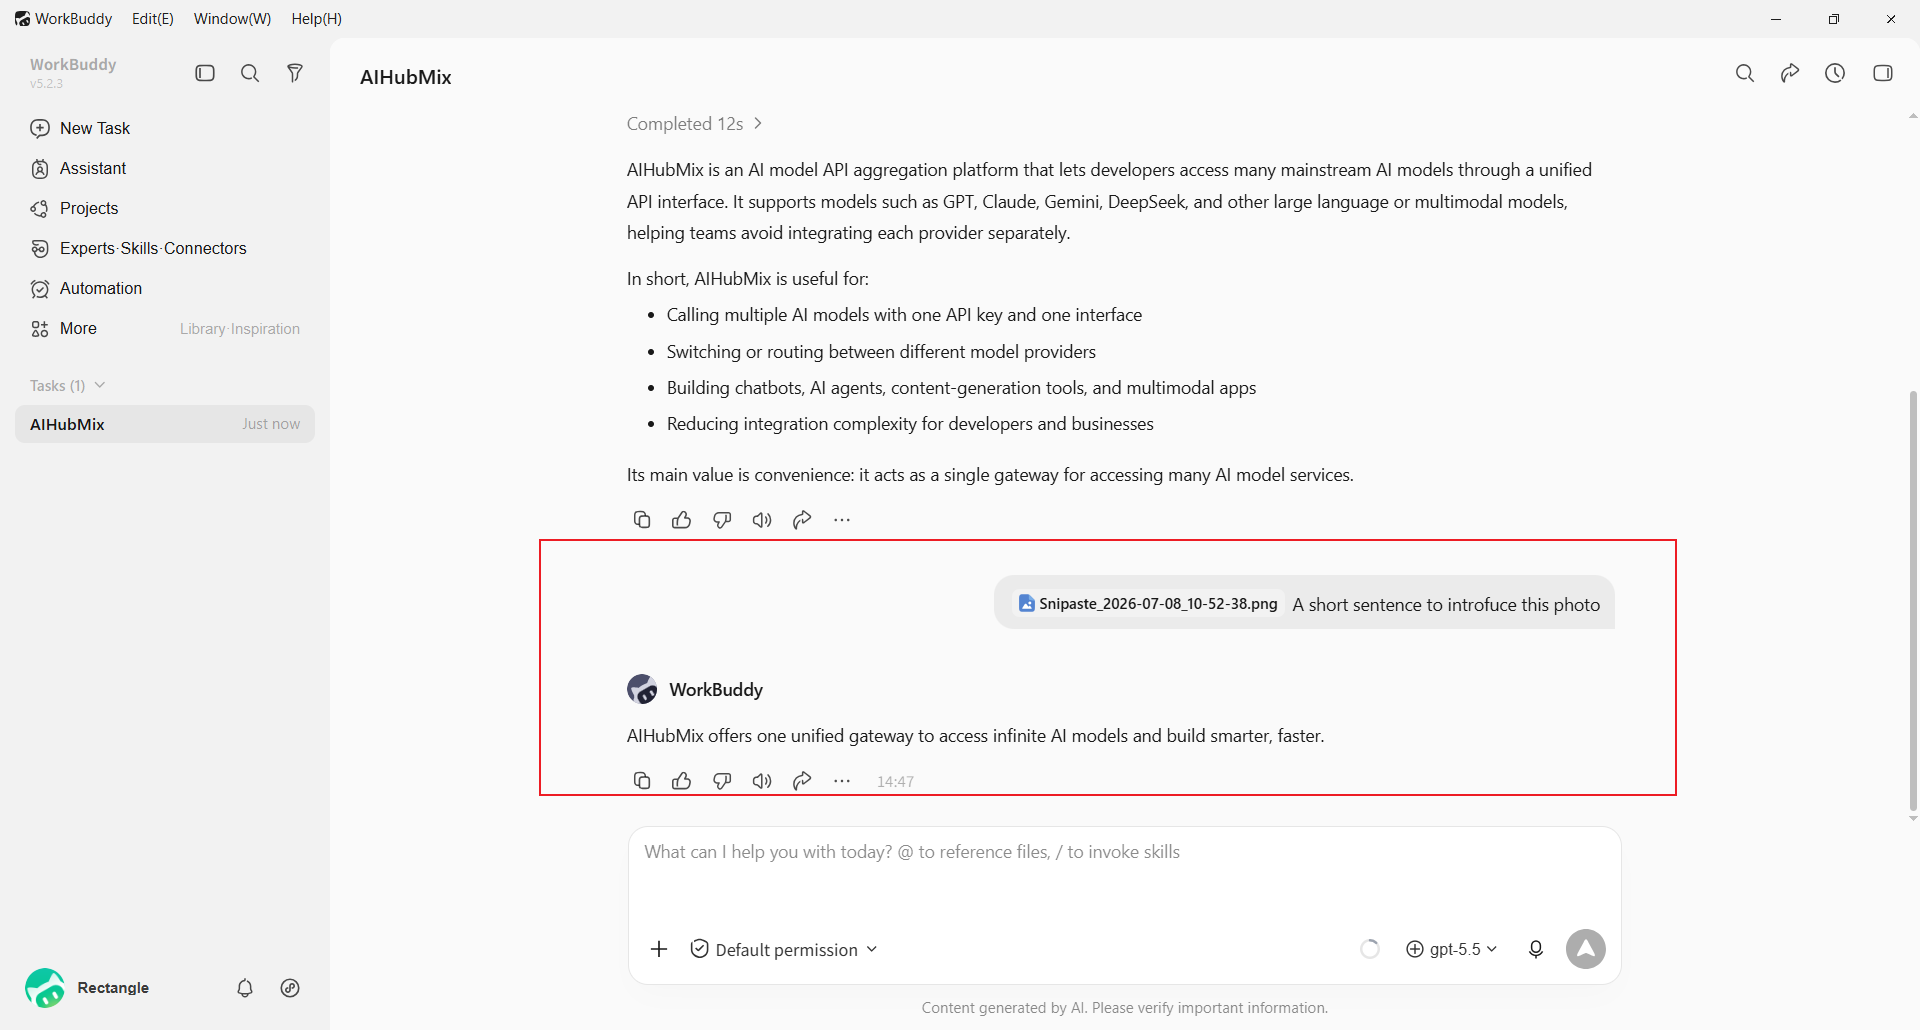
 Wenn **Image Input** fuer ein unterstuetztes Modell aktiviert ist, ein Bild hochladen und die Bildeingabe testen.
 ## FAQ
**Warum Custom waehlen?**
AIHubMix verwendet eine OpenAI-kompatible Schnittstelle. Endpoint, API Key und Modellname muessen daher manuell eingetragen werden; integrierte Anbieter verwenden eventuell ihre eigene API-Adresse.
**Das Modell erscheint nach dem Speichern nicht?**
Die Modellauswahl erneut oeffnen und bis **Custom Models** scrollen. Pruefen, ob **Save** geklickt wurde und ein Modellname eingetragen ist. Bei Dateikonfiguration muss `%USERPROFILE%\.workbuddy\models.json` gueltiges JSON sein.
**Was pruefen, wenn eine Anfrage fehlschlaegt?**
Pruefen, ob der Endpoint `/v1` enthaelt, der API Key vollstaendig ist und der Modellname der AIHubMix-Modell-ID entspricht. Bei Ausfall der Hauptadresse `https://api.inferera.com/v1` verwenden.
Letzte Aktualisierung: 2026-07-10
## FAQ
**Warum Custom waehlen?**
AIHubMix verwendet eine OpenAI-kompatible Schnittstelle. Endpoint, API Key und Modellname muessen daher manuell eingetragen werden; integrierte Anbieter verwenden eventuell ihre eigene API-Adresse.
**Das Modell erscheint nach dem Speichern nicht?**
Die Modellauswahl erneut oeffnen und bis **Custom Models** scrollen. Pruefen, ob **Save** geklickt wurde und ein Modellname eingetragen ist. Bei Dateikonfiguration muss `%USERPROFILE%\.workbuddy\models.json` gueltiges JSON sein.
**Was pruefen, wenn eine Anfrage fehlschlaegt?**
Pruefen, ob der Endpoint `/v1` enthaelt, der API Key vollstaendig ist und der Modellname der AIHubMix-Modell-ID entspricht. Bei Ausfall der Hauptadresse `https://api.inferera.com/v1` verwenden.
Letzte Aktualisierung: 2026-07-10