> ## Documentation Index
> Fetch the complete documentation index at: https://docs.aihubmix.com/llms.txt
> Use this file to discover all available pages before exploring further.
# CodeBuddy
> AIHubMix in CodeBuddy konfigurieren und beliebige von AIHubMix unterstuetzte Modelle verwenden.
CodeBuddy unterstuetzt benutzerdefinierte OpenAI-kompatible Modelle. Nach der Einrichtung von AIHubMix lassen sich GPT-, Claude-, Gemini-, DeepSeek-, GLM- und weitere AIHubMix-Modelle in CodeBuddy verwenden.
## Vorbereitung
* [CodeBuddy](https://www.codebuddy.cn/) installieren und oeffnen.
* Im [AIHubMix Console](https://aihubmix.com/token) einen API Key erstellen; das Format ist normalerweise `sk-***`.
* Die gewuenschte Modell-ID, zum Beispiel `gpt-5.5`, `gemini-3.5-flash` oder `deepseek-chat`, aus der AIHubMix-Modellliste kopieren.
## AIHubMix ueber die Benutzeroberflaeche konfigurieren
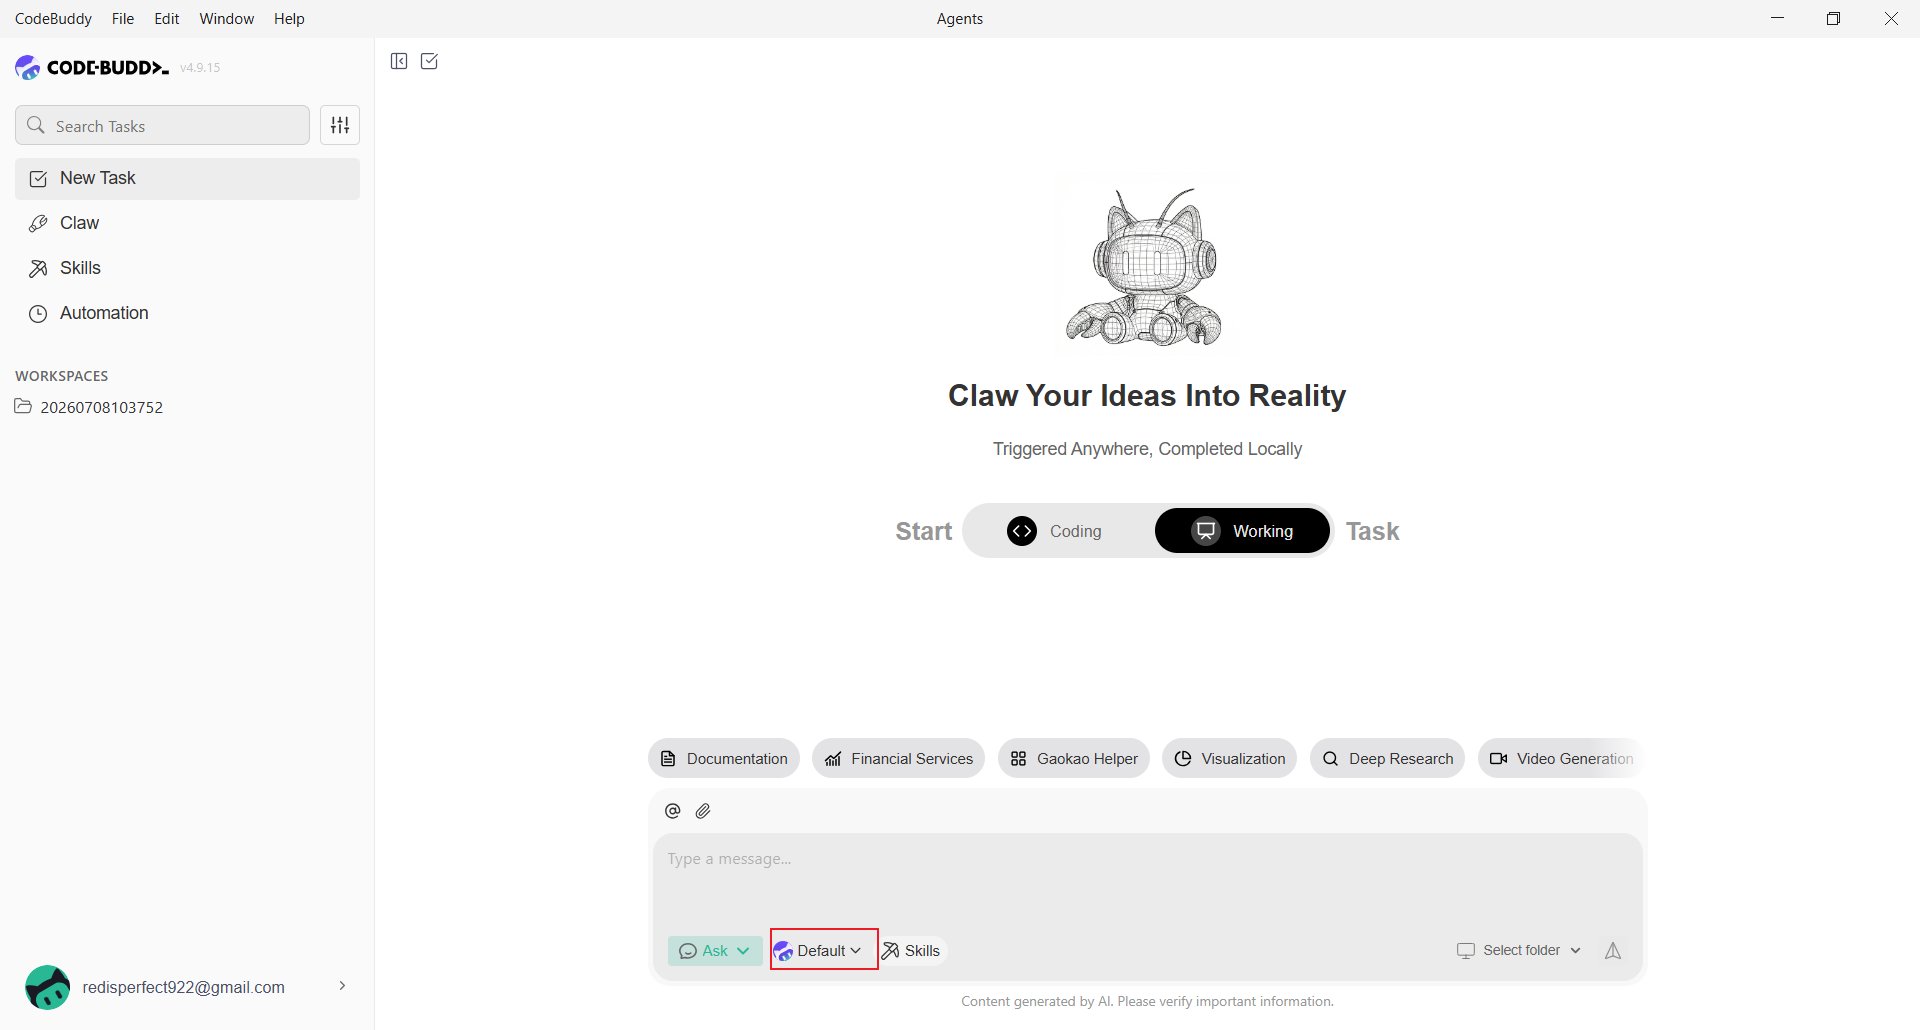
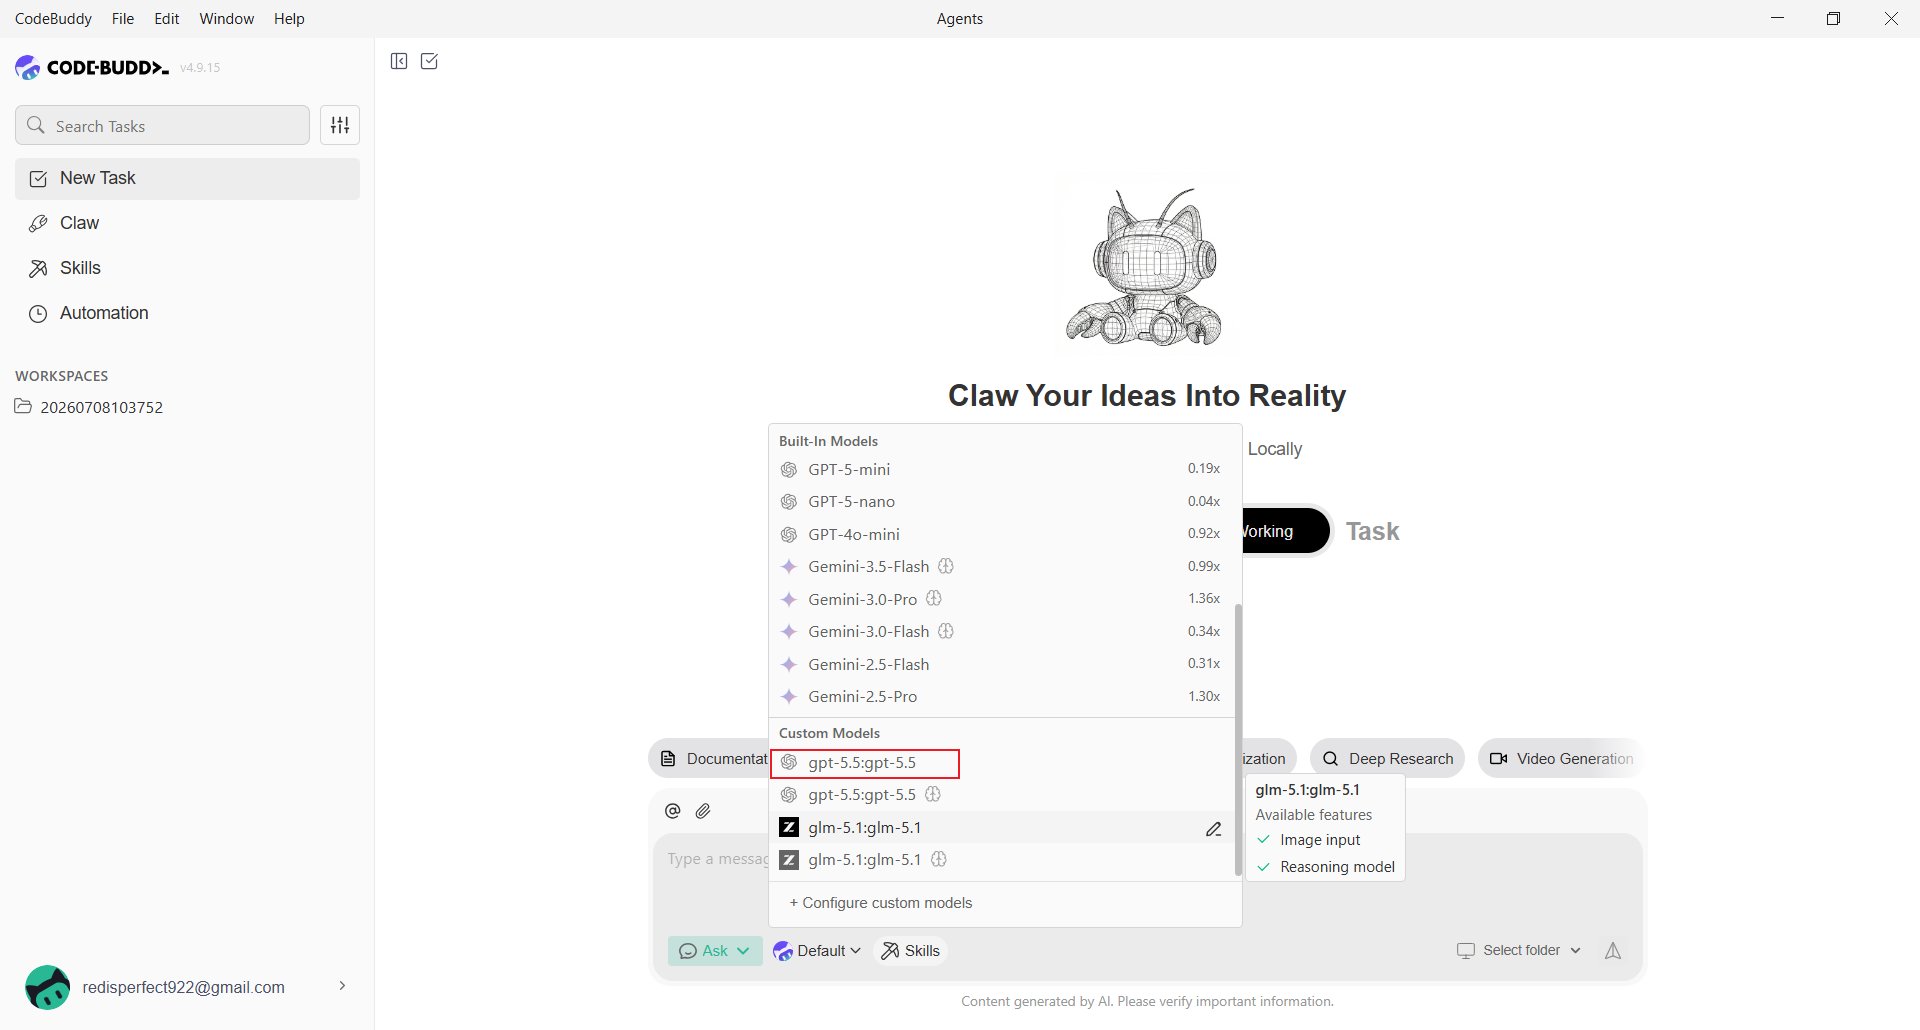
In CodeBuddy unter dem Eingabefeld auf den aktuellen Modellnamen, zum Beispiel **Default**, klicken.
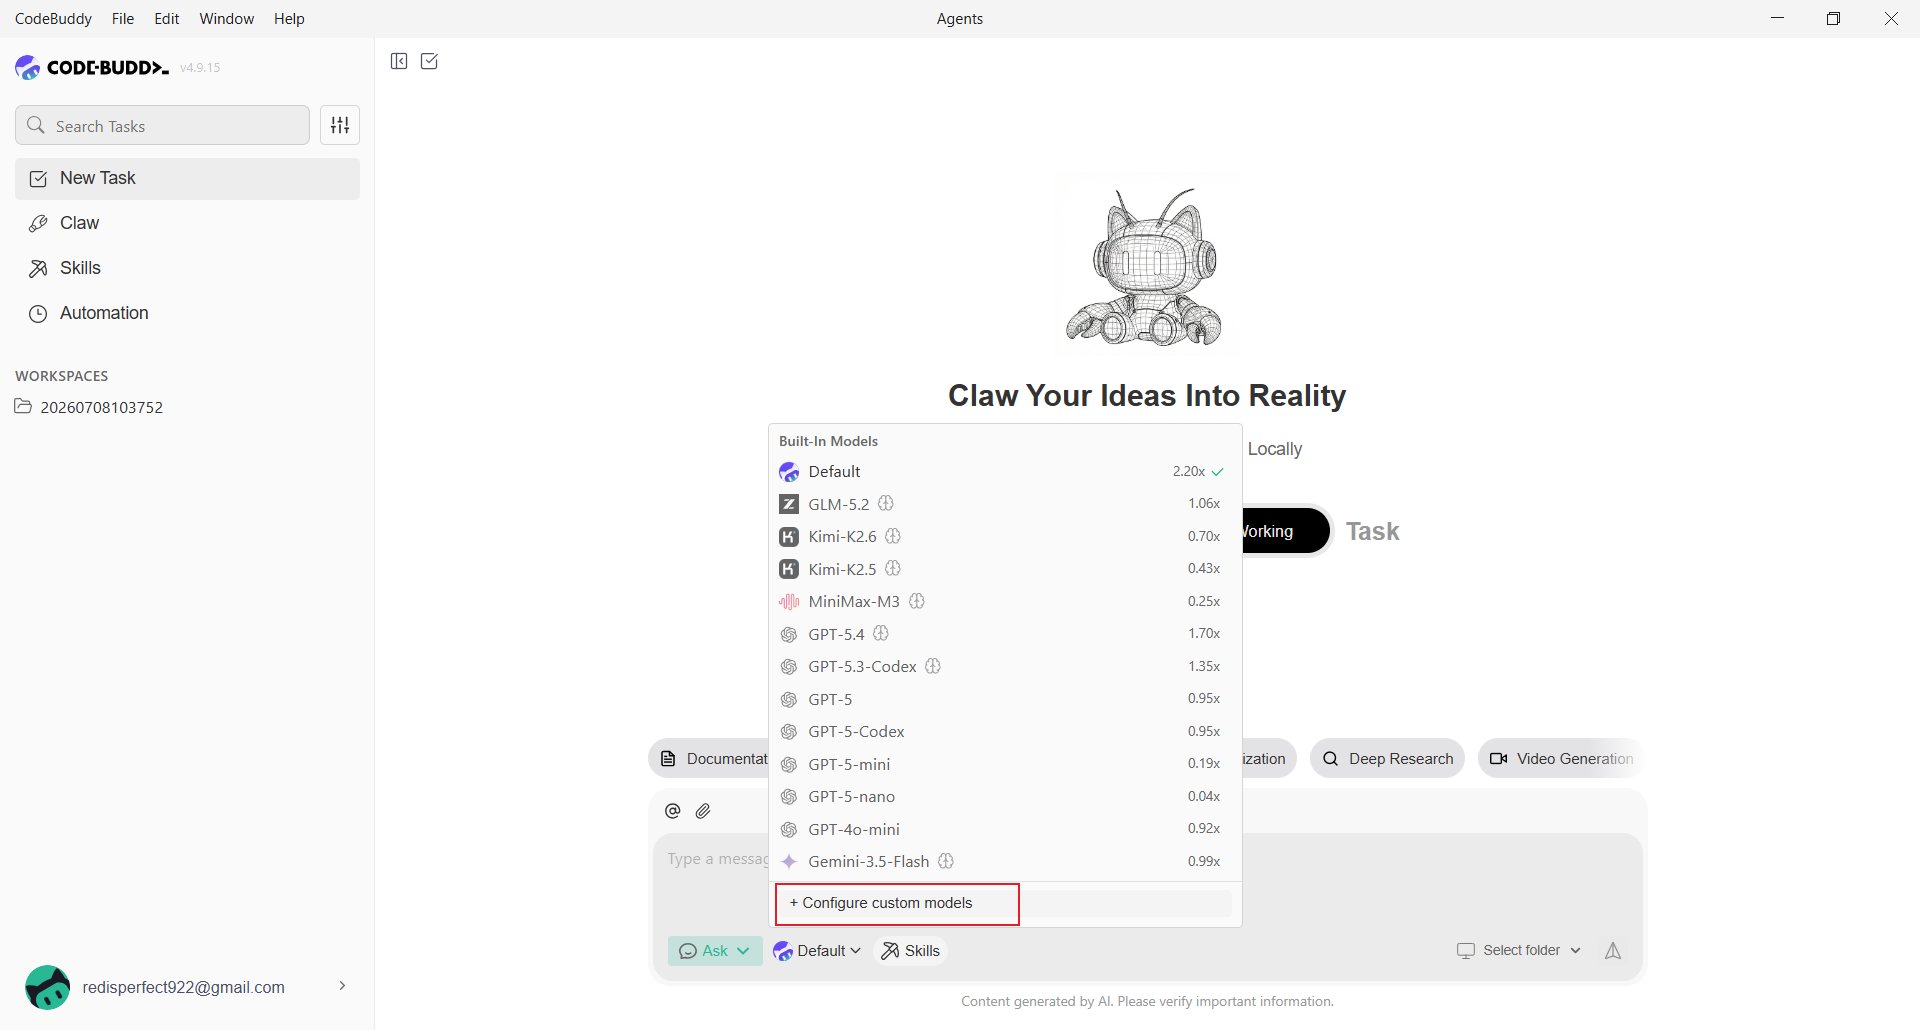
 Ans Ende der Modellliste scrollen und **Configure custom models** waehlen.
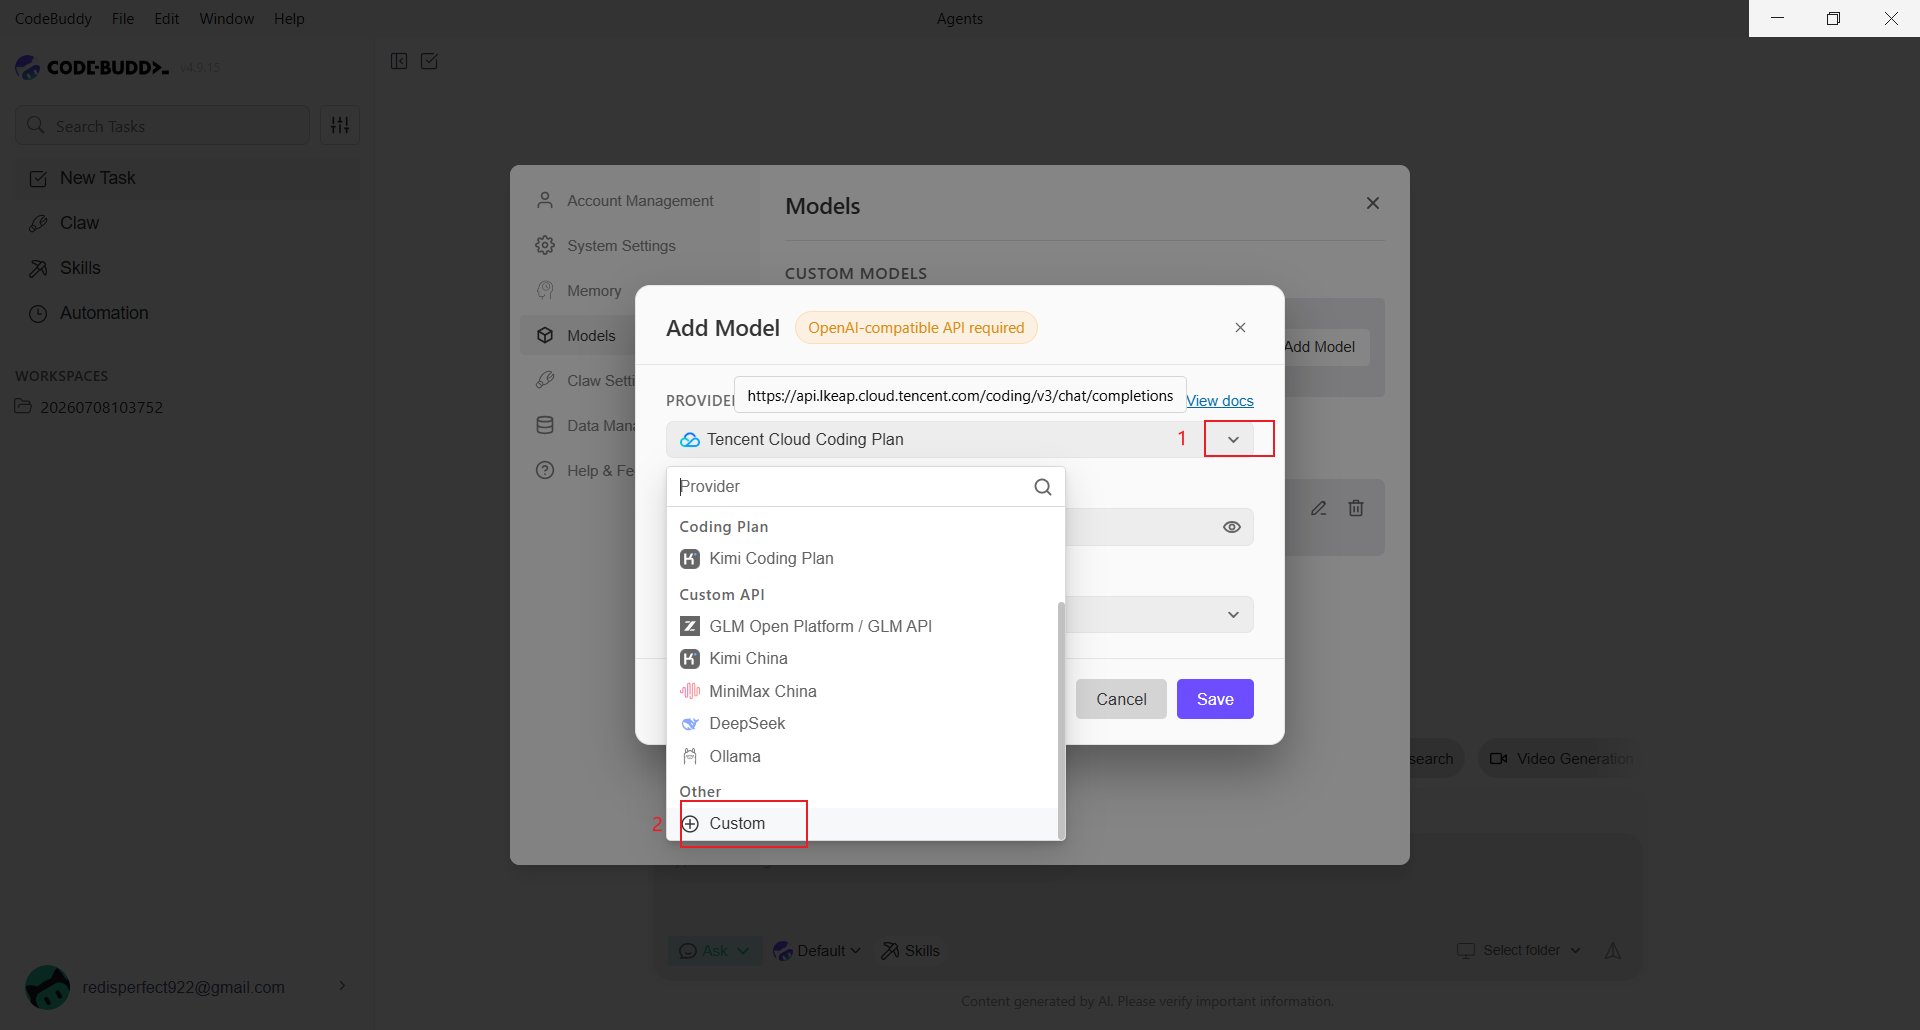
 Auf **Add Model** klicken und im Menue **Provider** die Option **Custom** waehlen.
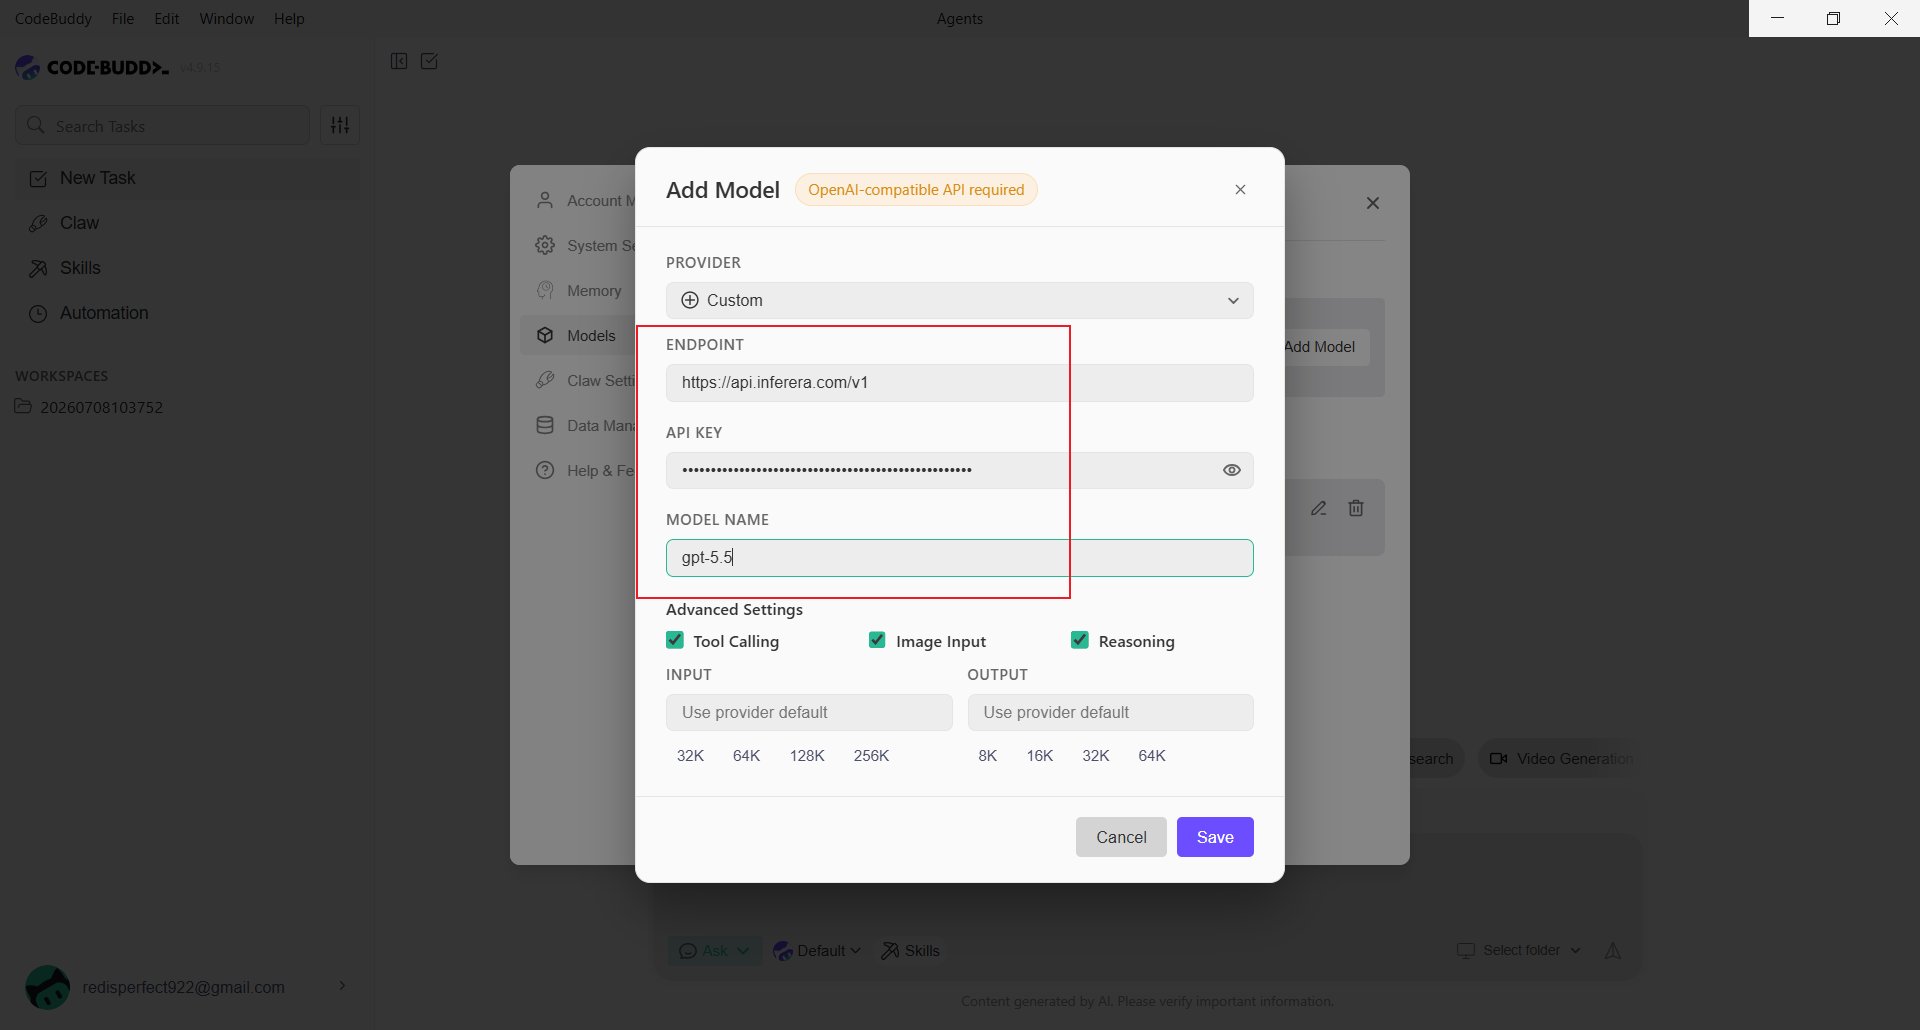
 Folgende Felder ausfuellen:
* **Endpoint**: `https://aihubmix.com/v1` verwenden. Wenn die Hauptadresse voruebergehend nicht erreichbar ist, `https://api.inferera.com/v1` als Ersatzadresse eintragen.
* **API Key**: Den im [AIHubMix Console](https://aihubmix.com/token) erstellten Key eintragen.
* **Model Name**: Die Modell-ID eintragen, zum Beispiel `gpt-5.5`.
* **Advanced Settings**: **Tool Calling**, **Image Input** oder **Reasoning** nur aktivieren, wenn das Modell die jeweilige Funktion unterstuetzt.
Mit **Save** speichern.
Folgende Felder ausfuellen:
* **Endpoint**: `https://aihubmix.com/v1` verwenden. Wenn die Hauptadresse voruebergehend nicht erreichbar ist, `https://api.inferera.com/v1` als Ersatzadresse eintragen.
* **API Key**: Den im [AIHubMix Console](https://aihubmix.com/token) erstellten Key eintragen.
* **Model Name**: Die Modell-ID eintragen, zum Beispiel `gpt-5.5`.
* **Advanced Settings**: **Tool Calling**, **Image Input** oder **Reasoning** nur aktivieren, wenn das Modell die jeweilige Funktion unterstuetzt.
Mit **Save** speichern.
 Zur Modellauswahl zurueckkehren und das Modell unter **Custom Models** auswaehlen.
 ## Modell per Konfigurationsdatei hinzufuegen
CodeBuddy speichert benutzerdefinierte Modelle lokal. Diese Datei kann direkt bearbeitet werden:
```text theme={null}
%USERPROFILE%\.codebuddy\models.json
```
Eine projektbezogene Konfiguration liegt unter:
```text theme={null}
Ihr-Projektverzeichnis\.codebuddy\models.json
```
Die Projektkonfiguration hat Vorrang. In `models.json` muss die vollstaendige Chat-Completions-URL stehen:
```json theme={null}
{
"models": [{
"id": "gpt-5.5",
"name": "gpt-5.5",
"vendor": "AIHubMix",
"url": "https://aihubmix.com/v1/chat/completions",
"apiKey": "sk-***",
"maxInputTokens": 128000,
"maxOutputTokens": 8192,
"supportsToolCall": true,
"supportsImages": true,
"supportsReasoning": true
}],
"availableModels": ["gpt-5.5"]
}
```
Falls die Hauptadresse nicht erreichbar ist:
```json theme={null}
"url": "https://api.inferera.com/v1/chat/completions"
```
In der Benutzeroberflaeche genuegt der Endpoint mit `/v1`; in `models.json` ist `/chat/completions` erforderlich. Danach CodeBuddy neu starten oder die Modellauswahl erneut oeffnen. Fuer einen Key ohne Klartext kann verwendet werden:
```json theme={null}
"apiKey": "${AIHUBMIX_API_KEY}"
```
## CodeBuddy CLI
Die Kommandozeilenversion heisst **CodeBuddy Code**. Mit npm installieren und mit `codebuddy` starten:
```shell theme={null}
npm install -g @tencent-ai/codebuddy-code
```
API Key, Endpoint und Standardmodell werden ueber Umgebungsvariablen gesetzt. Fuer die Anthropic-kompatible AIHubMix-Schnittstelle ist bei `CODEBUDDY_BASE_URL` die Basis-URL einzutragen:
```powershell theme={null}
$env:CODEBUDDY_API_KEY="sk-***"
$env:CODEBUDDY_BASE_URL="https://aihubmix.com"
$env:CODEBUDDY_MODEL="glm-4.7"
codebuddy
```
Fuer eine dauerhafte Einstellung `%USERPROFILE%\.codebuddy\settings.json` bearbeiten:
```json theme={null}
{"env":{"CODEBUDDY_API_KEY":"sk-***","CODEBUDDY_BASE_URL":"https://aihubmix.com","CODEBUDDY_MODEL":"glm-4.7"}}
```
Die CLI nutzt das Anthropic-kompatible Protokoll; Desktop-Modelle nutzen den OpenAI-kompatiblen Endpoint. Bei 404 pruefen, dass `CODEBUDDY_BASE_URL` nicht auf einen OpenAI-Pfad wie `/v1/chat/completions` gesetzt wurde.
## Funktion pruefen
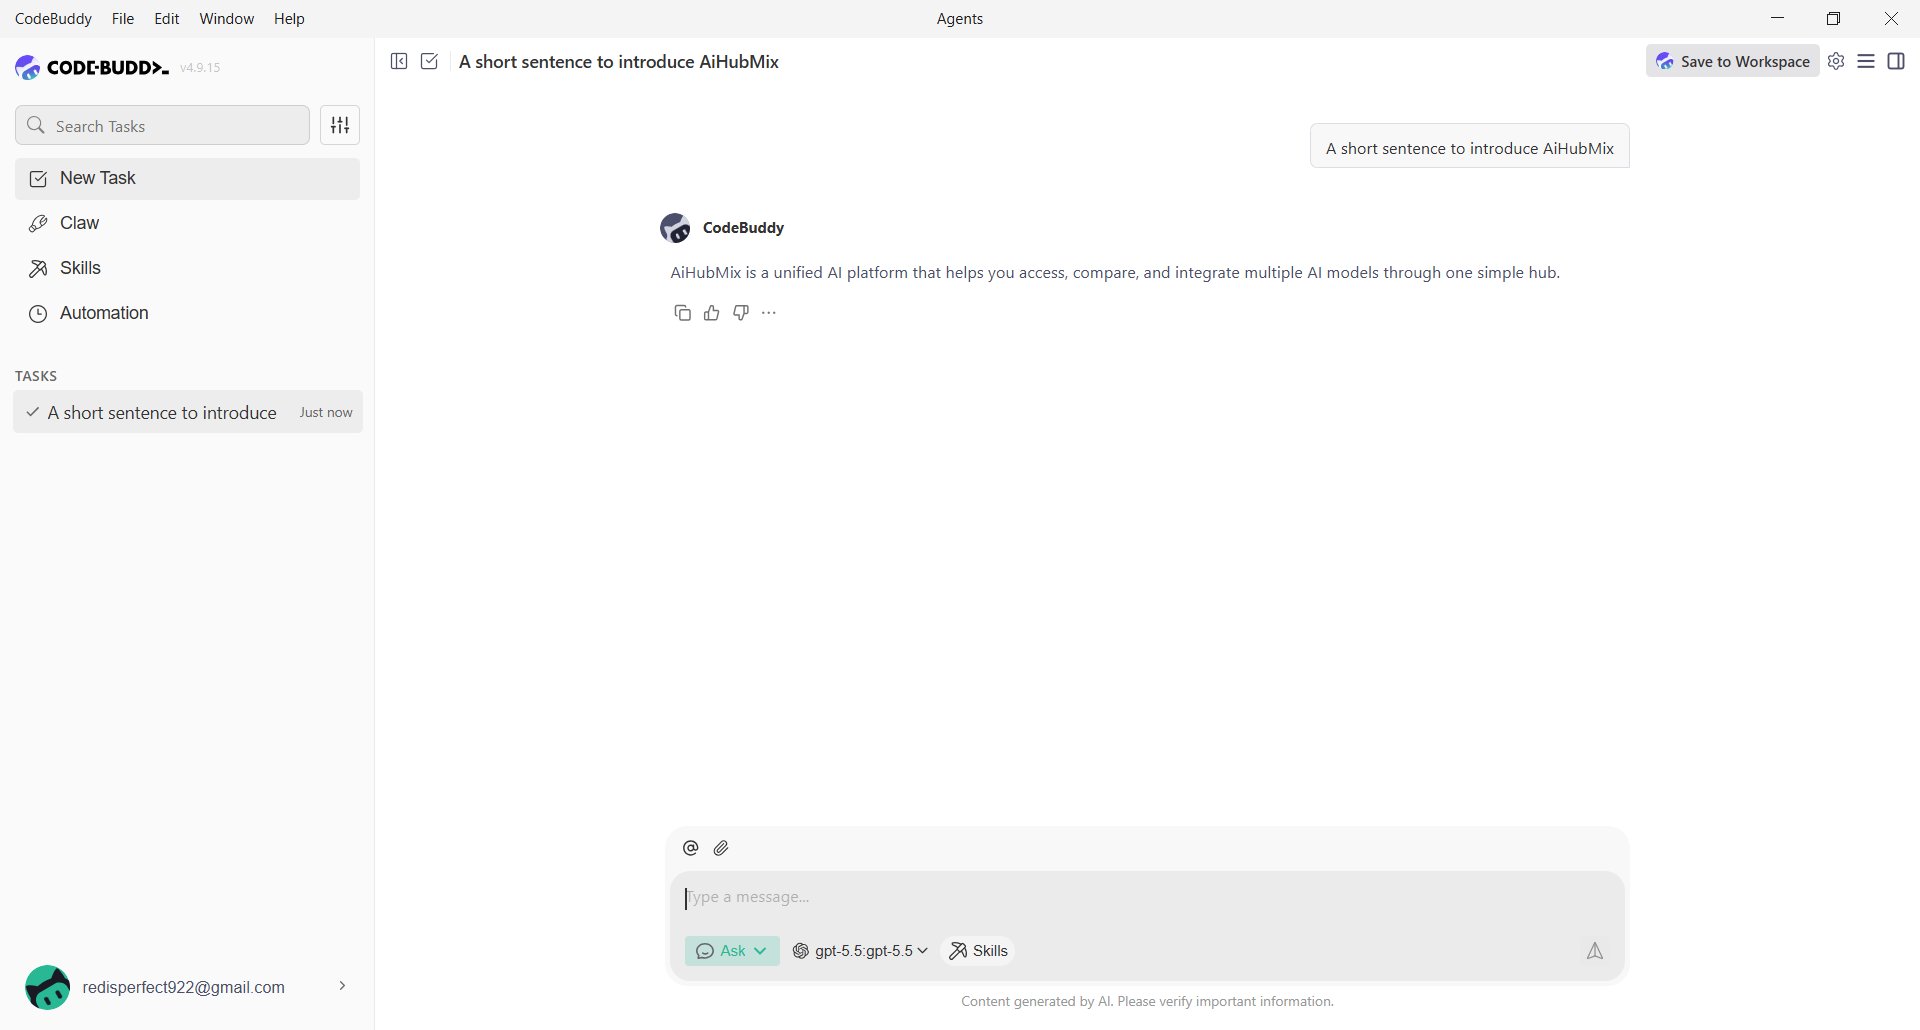
Das benutzerdefinierte Modell waehlen und eine kurze Nachricht senden. Eine Antwort bestaetigt die Einrichtung.
## Modell per Konfigurationsdatei hinzufuegen
CodeBuddy speichert benutzerdefinierte Modelle lokal. Diese Datei kann direkt bearbeitet werden:
```text theme={null}
%USERPROFILE%\.codebuddy\models.json
```
Eine projektbezogene Konfiguration liegt unter:
```text theme={null}
Ihr-Projektverzeichnis\.codebuddy\models.json
```
Die Projektkonfiguration hat Vorrang. In `models.json` muss die vollstaendige Chat-Completions-URL stehen:
```json theme={null}
{
"models": [{
"id": "gpt-5.5",
"name": "gpt-5.5",
"vendor": "AIHubMix",
"url": "https://aihubmix.com/v1/chat/completions",
"apiKey": "sk-***",
"maxInputTokens": 128000,
"maxOutputTokens": 8192,
"supportsToolCall": true,
"supportsImages": true,
"supportsReasoning": true
}],
"availableModels": ["gpt-5.5"]
}
```
Falls die Hauptadresse nicht erreichbar ist:
```json theme={null}
"url": "https://api.inferera.com/v1/chat/completions"
```
In der Benutzeroberflaeche genuegt der Endpoint mit `/v1`; in `models.json` ist `/chat/completions` erforderlich. Danach CodeBuddy neu starten oder die Modellauswahl erneut oeffnen. Fuer einen Key ohne Klartext kann verwendet werden:
```json theme={null}
"apiKey": "${AIHUBMIX_API_KEY}"
```
## CodeBuddy CLI
Die Kommandozeilenversion heisst **CodeBuddy Code**. Mit npm installieren und mit `codebuddy` starten:
```shell theme={null}
npm install -g @tencent-ai/codebuddy-code
```
API Key, Endpoint und Standardmodell werden ueber Umgebungsvariablen gesetzt. Fuer die Anthropic-kompatible AIHubMix-Schnittstelle ist bei `CODEBUDDY_BASE_URL` die Basis-URL einzutragen:
```powershell theme={null}
$env:CODEBUDDY_API_KEY="sk-***"
$env:CODEBUDDY_BASE_URL="https://aihubmix.com"
$env:CODEBUDDY_MODEL="glm-4.7"
codebuddy
```
Fuer eine dauerhafte Einstellung `%USERPROFILE%\.codebuddy\settings.json` bearbeiten:
```json theme={null}
{"env":{"CODEBUDDY_API_KEY":"sk-***","CODEBUDDY_BASE_URL":"https://aihubmix.com","CODEBUDDY_MODEL":"glm-4.7"}}
```
Die CLI nutzt das Anthropic-kompatible Protokoll; Desktop-Modelle nutzen den OpenAI-kompatiblen Endpoint. Bei 404 pruefen, dass `CODEBUDDY_BASE_URL` nicht auf einen OpenAI-Pfad wie `/v1/chat/completions` gesetzt wurde.
## Funktion pruefen
Das benutzerdefinierte Modell waehlen und eine kurze Nachricht senden. Eine Antwort bestaetigt die Einrichtung.
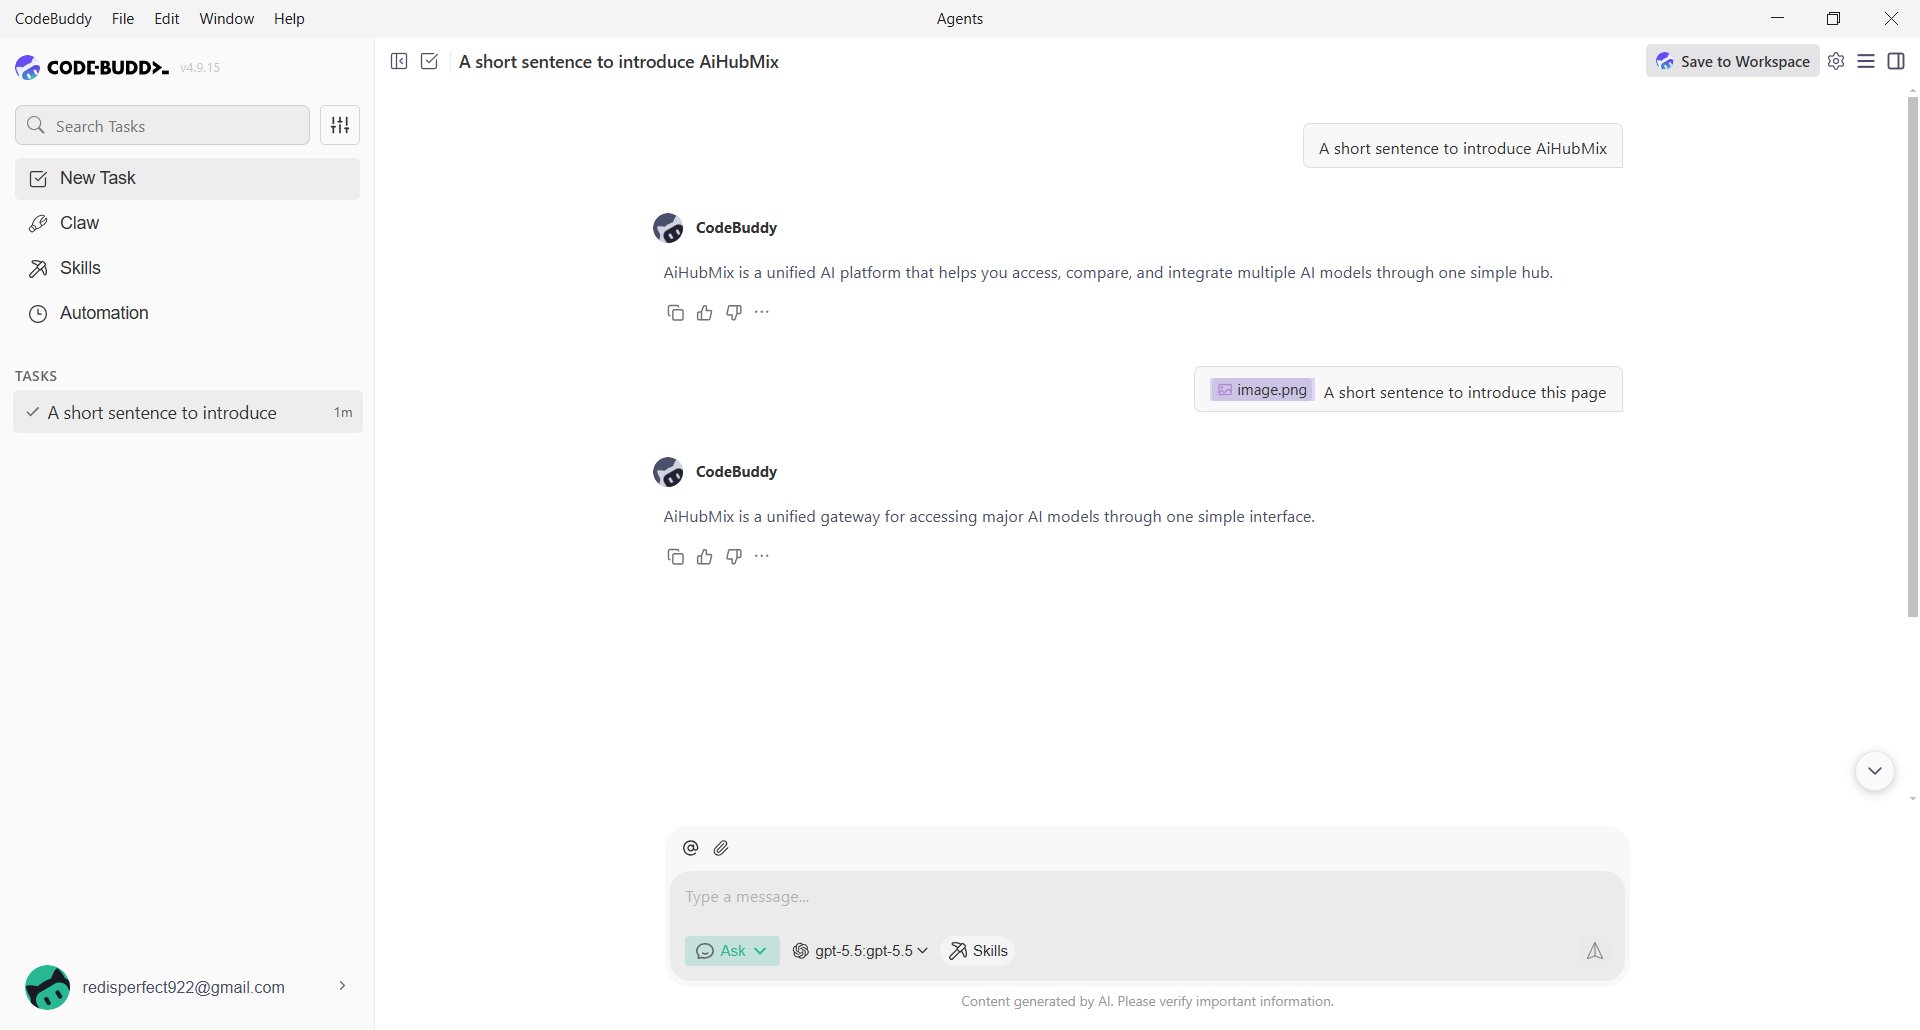
 Bei einem Modell mit Bildeingabe ein Bild hochladen und diese Funktion testen.
 ## FAQ
**Modell nach dem Speichern nicht verfuegbar?**
Pruefen, ob der Endpoint `/v1` enthaelt, der API Key vollstaendig ist und der Modellname der AIHubMix-Modell-ID entspricht. In `models.json` muss die URL auch `/chat/completions` enthalten.
**Warum erscheinen zwei aehnliche Modellnamen?**
CodeBuddy kann ein eigenes Modell als `modellname:modellname` anzeigen. Das ist normal, wenn es korrekt antwortet.
**Verwenden CLI und Desktop-App dieselben Einstellungen?**
Nein. Die Desktop-App verwendet `models.json`; die CLI liest Umgebungsvariablen oder `env` in `settings.json`.
Letzte Aktualisierung: 2026-07-10
## FAQ
**Modell nach dem Speichern nicht verfuegbar?**
Pruefen, ob der Endpoint `/v1` enthaelt, der API Key vollstaendig ist und der Modellname der AIHubMix-Modell-ID entspricht. In `models.json` muss die URL auch `/chat/completions` enthalten.
**Warum erscheinen zwei aehnliche Modellnamen?**
CodeBuddy kann ein eigenes Modell als `modellname:modellname` anzeigen. Das ist normal, wenn es korrekt antwortet.
**Verwenden CLI und Desktop-App dieselben Einstellungen?**
Nein. Die Desktop-App verwendet `models.json`; die CLI liest Umgebungsvariablen oder `env` in `settings.json`.
Letzte Aktualisierung: 2026-07-10