> ## Documentation Index
> Fetch the complete documentation index at: https://docs.aihubmix.com/llms.txt
> Use this file to discover all available pages before exploring further.
# OpenClaw
## Installation
Stellen Sie vor der Installation sicher, dass Node >= 22 ist.
Führen Sie den Installationsbefehl aus:
```shellscript theme={null}
npm install -g openclaw@latest
```
Nach der Installation können die folgenden Befehle aus jedem Verzeichnis ausgeführt werden. Sie müssen nicht zuerst in das OpenClaw-Installationsverzeichnis wechseln. Wenn Ihr Terminal `openclaw` erkennt, können Sie die Befehle in dieser Anleitung direkt kopieren.
```powershell theme={null}
openclaw models status
```
Wenn Windows meldet, dass `openclaw` nicht gefunden wurde, ersetzen Sie den Befehl am Anfang durch den Pfad zur lokalen ausführbaren Datei:
```powershell theme={null}
& "Ihr-Installationspfad\OpenClaw\openclaw.cmd" models status
```
`Ihr-Installationspfad` ist ein Platzhalter. Ersetzen Sie ihn durch das übergeordnete Verzeichnis Ihrer OpenClaw-Installation. Wenn OpenClaw zum Beispiel unter `D:\Apps\OpenClaw` liegt, verwenden Sie `& "D:\Apps\OpenClaw\openclaw.cmd" models status`.
### Terminal-Konfiguration
Öffnen Sie das Terminal und führen Sie den folgenden Befehl aus, um die Konfiguration zu starten:
```shellscript theme={null}
openclaw onboard
```
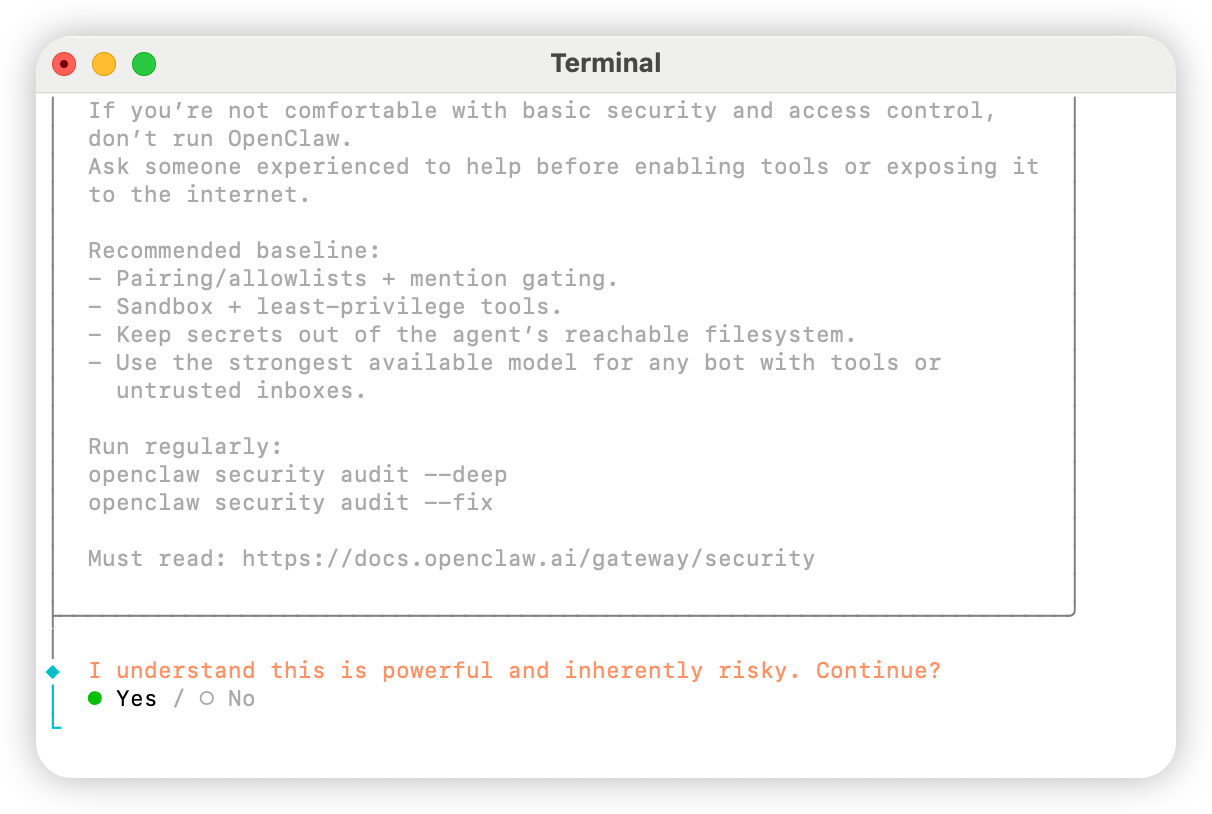
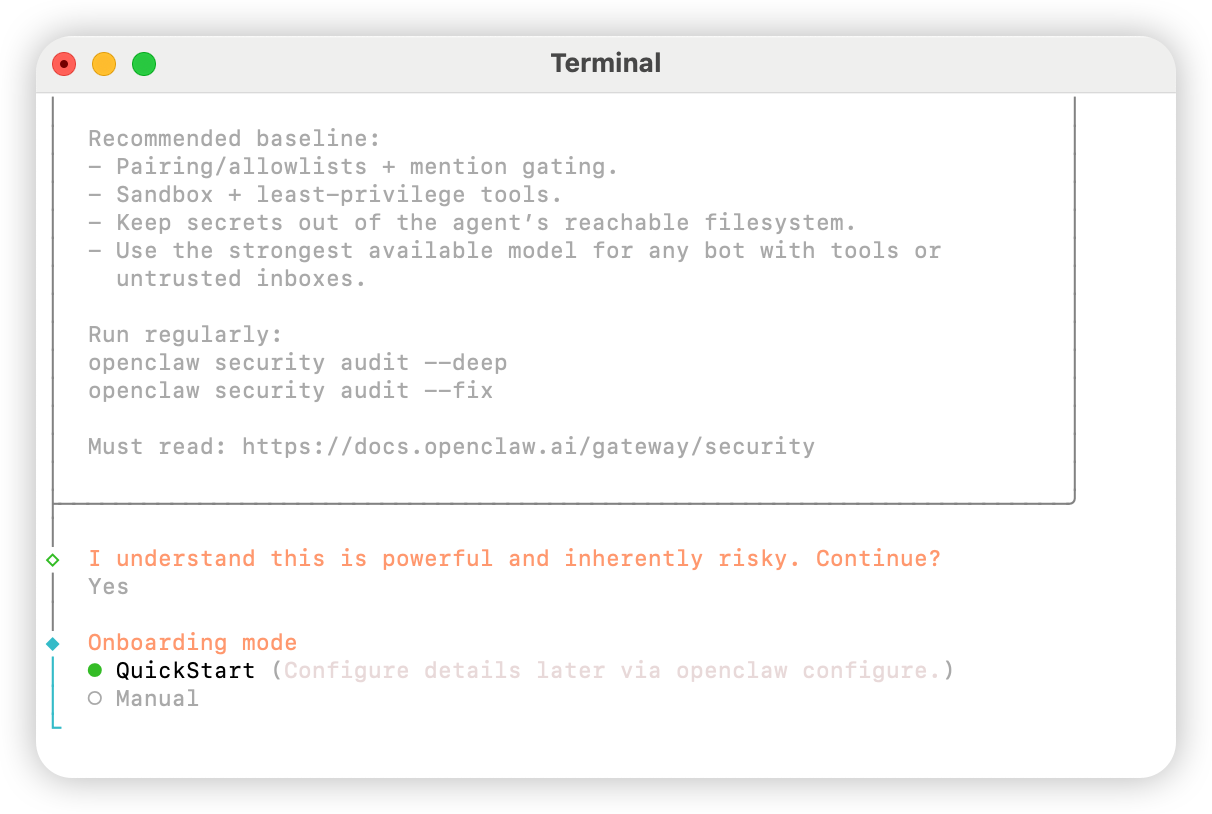
Wählen Sie `Yes`
 Wählen Sie `QuickStart`
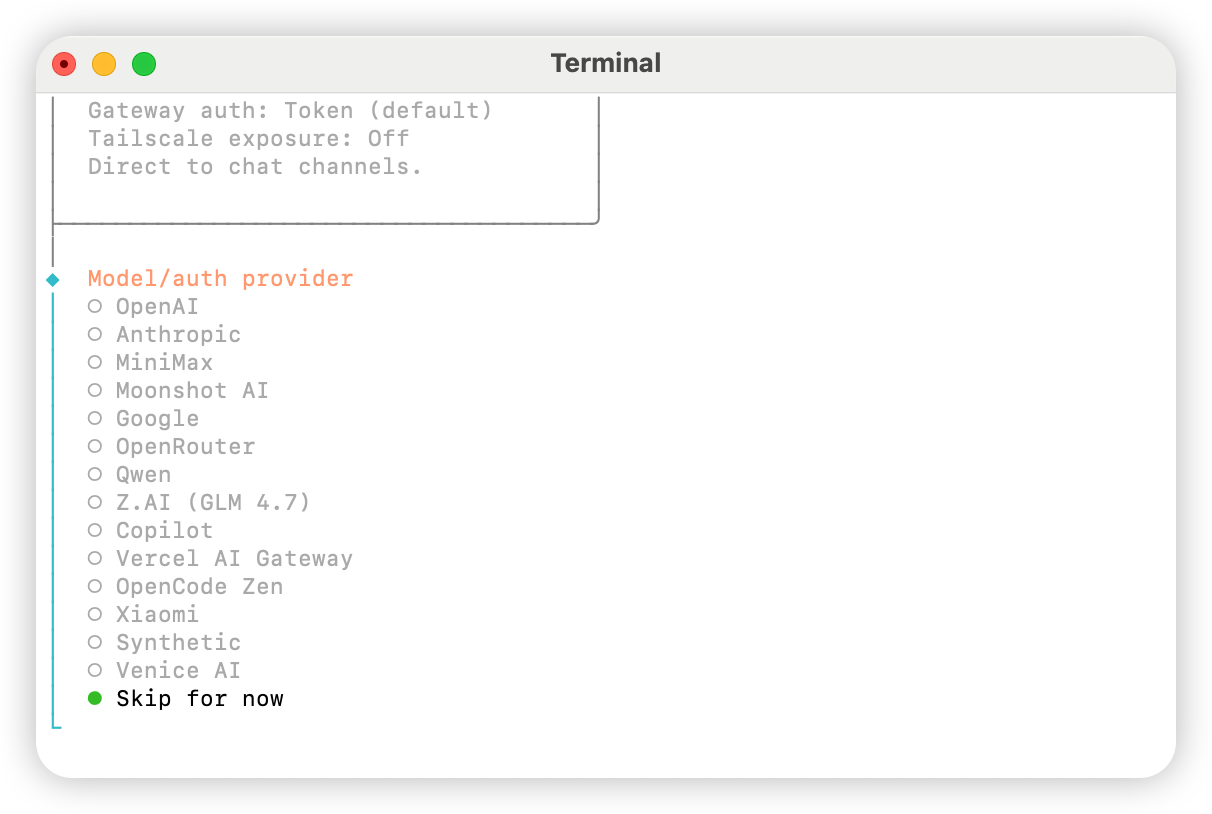
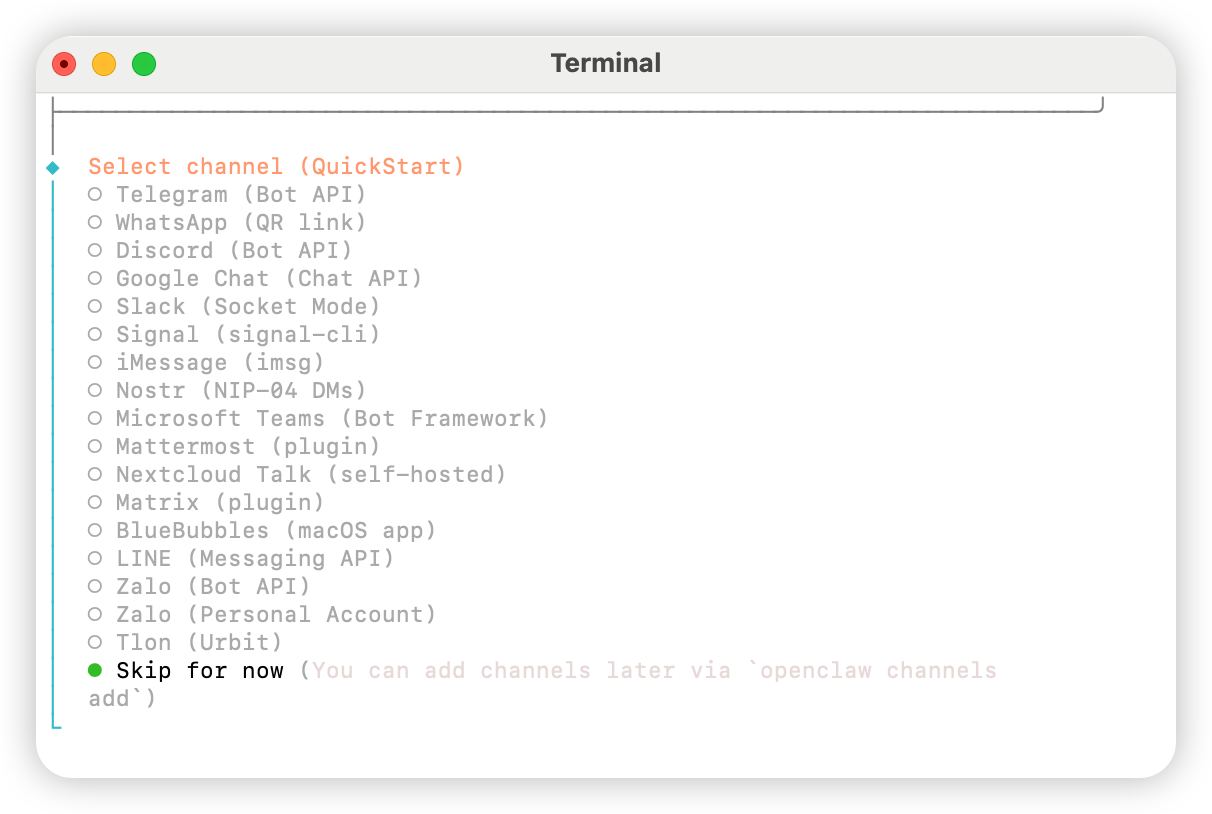
 Wählen Sie `Skip for now`
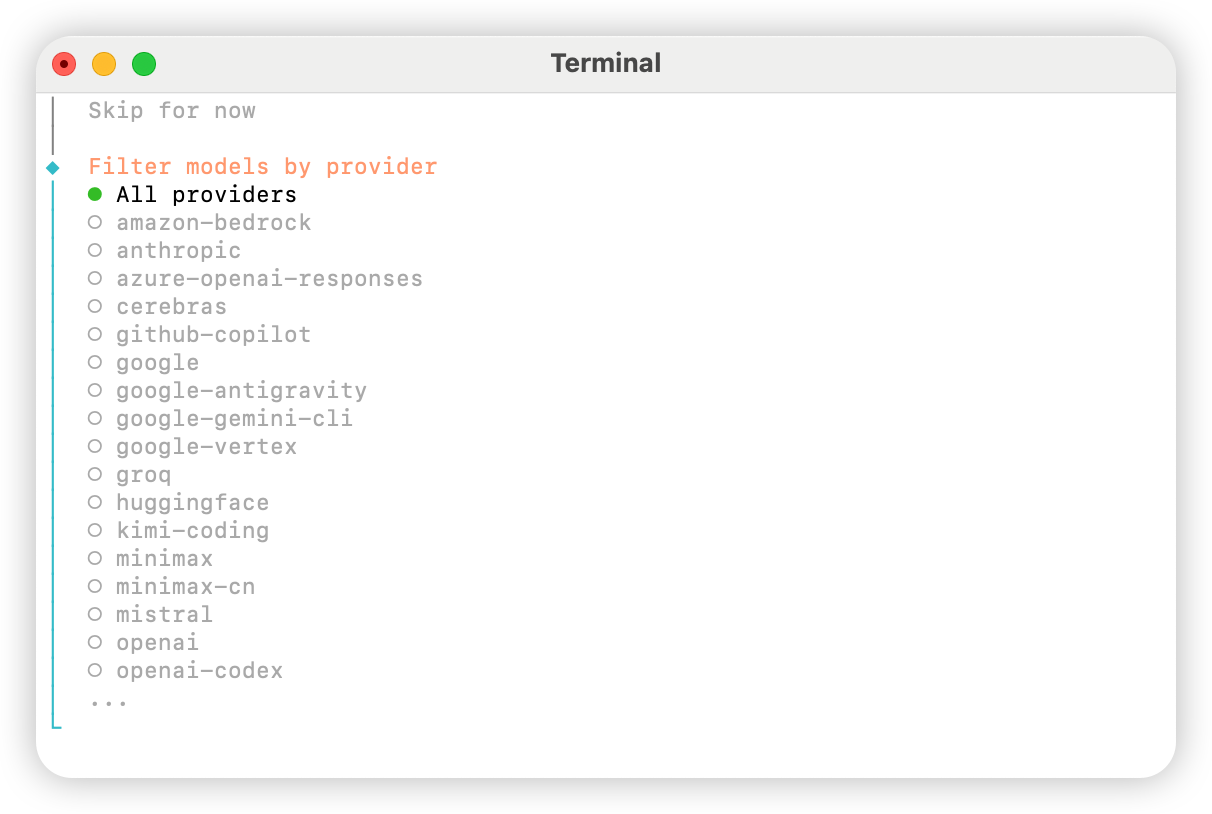
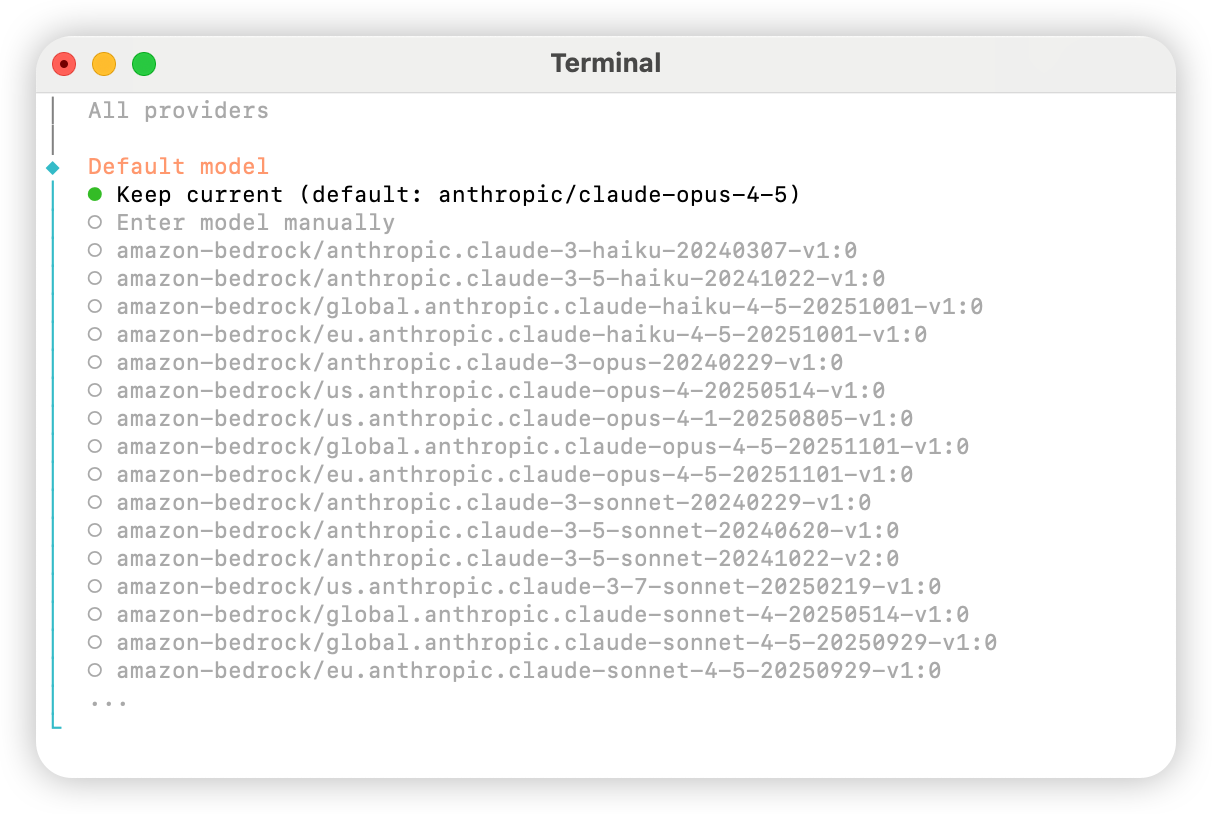
 Wählen Sie `All providers`
 Wählen Sie das Standardmodell nach Bedarf; Sie können zunächst `Keep current` wählen (bei Verwendung von "Methode 2: Manuelle Konfiguration" kann es im nächsten Schritt in der Konfigurationsdatei angepasst werden).
 Verknüpfen Sie Ihr persönliches Konto nach Bedarf; falls nicht erforderlich, wählen Sie bitte `Skip for now`.
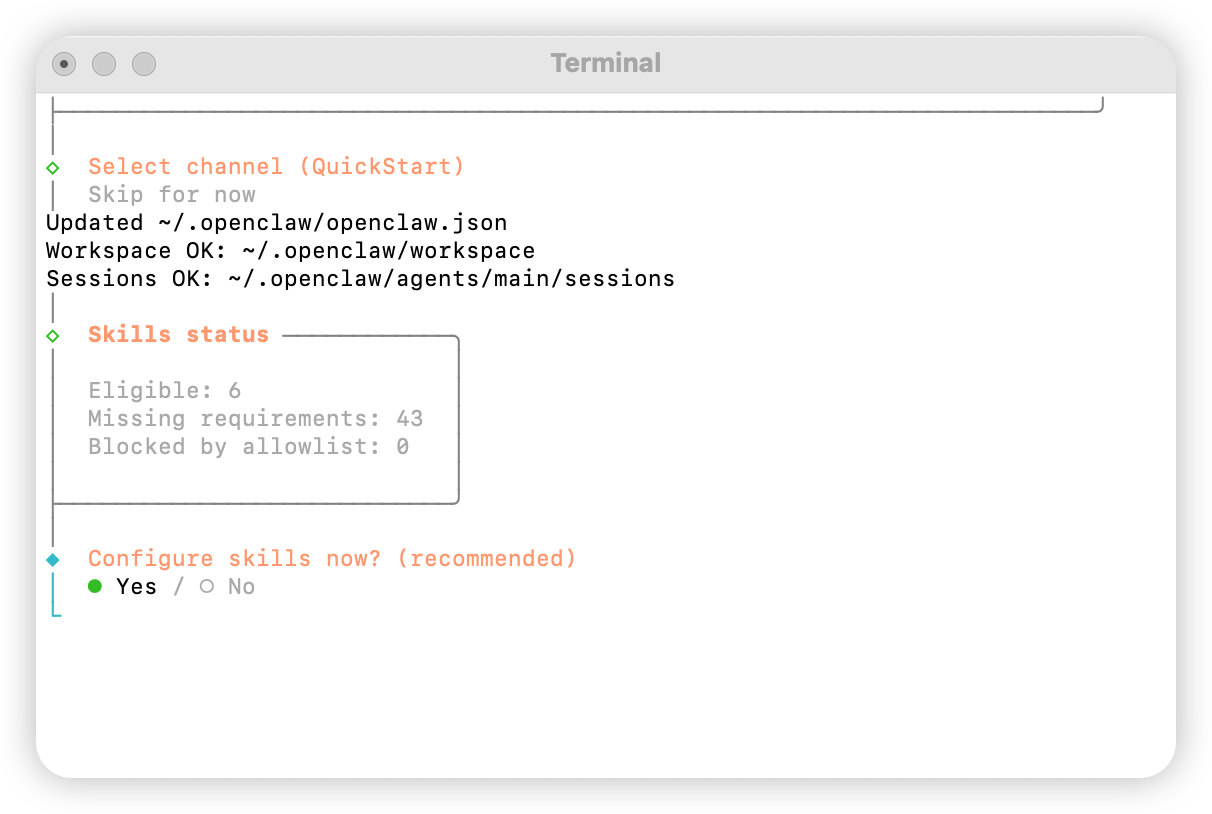
 Konfigurieren Sie Skills, indem Sie `Yes` wählen.
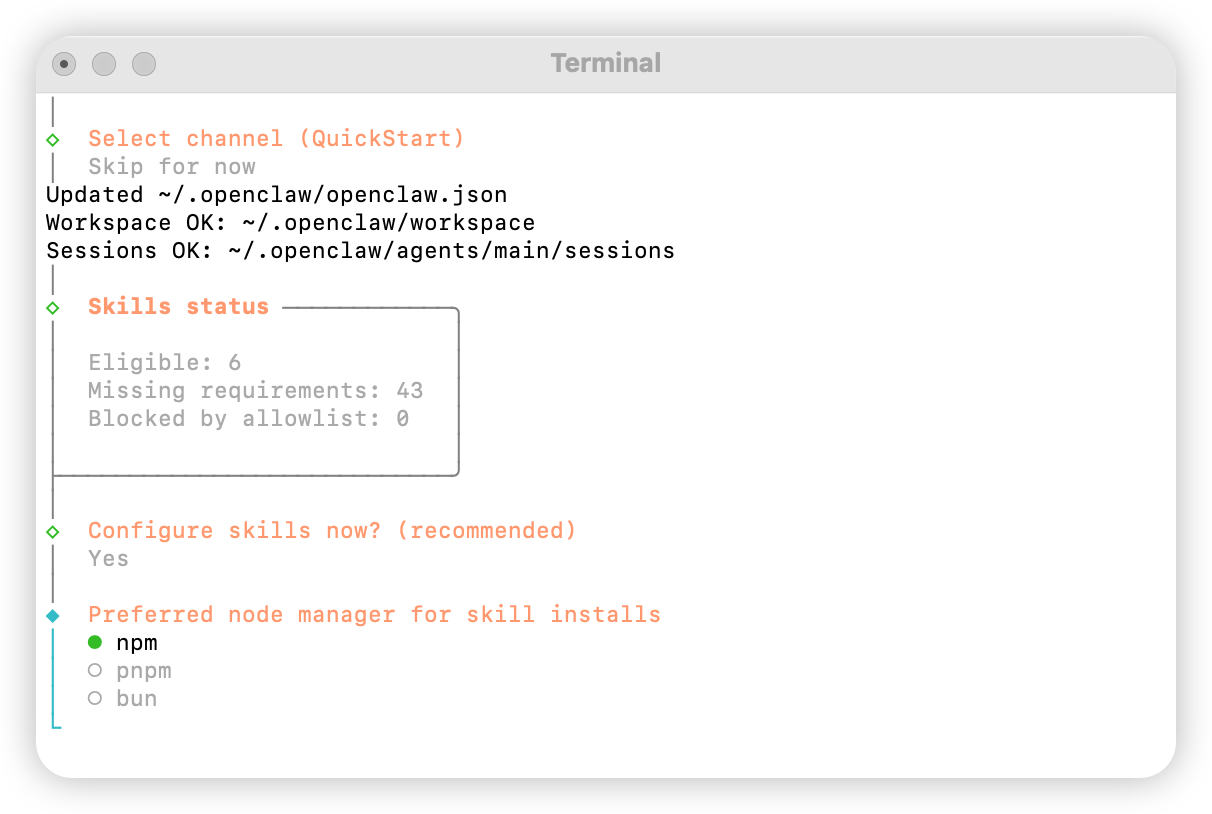
 Wählen Sie `npm`
 Konfigurieren Sie die Skill-Auswahl nach Bedarf.
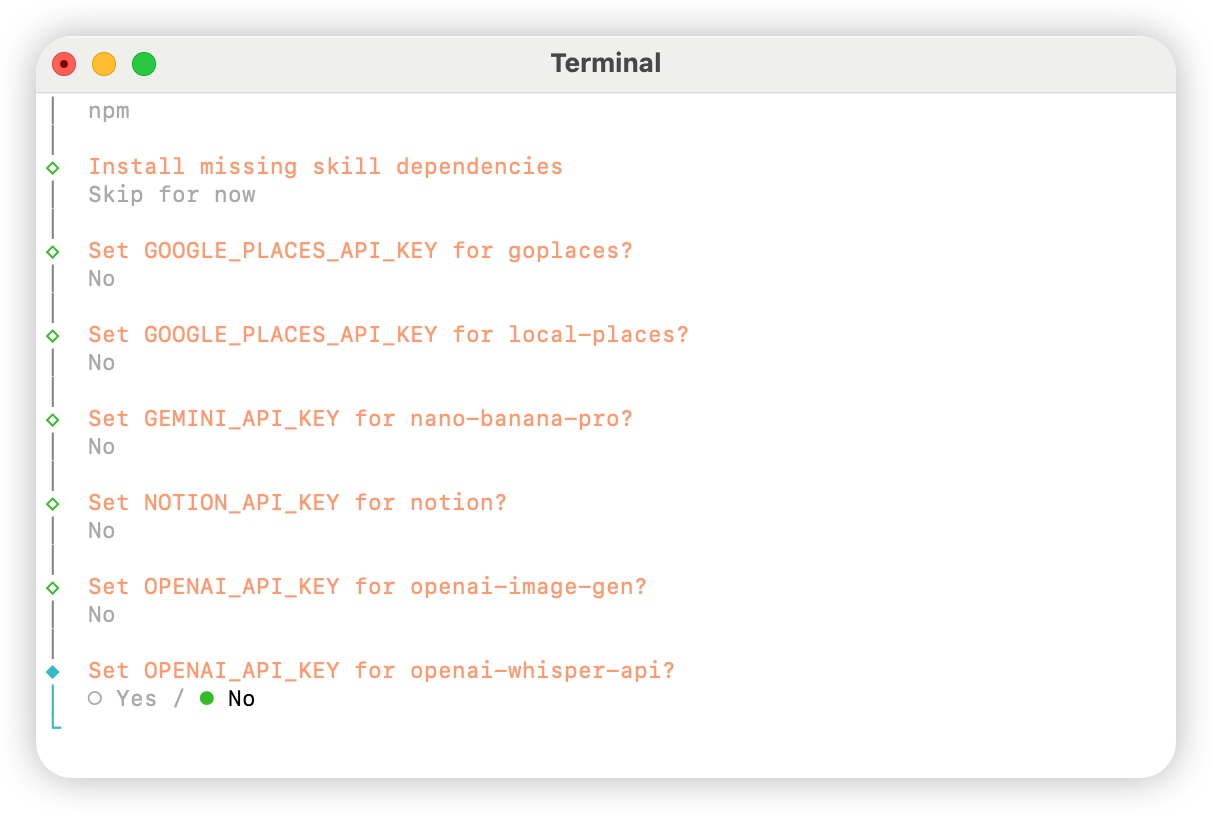
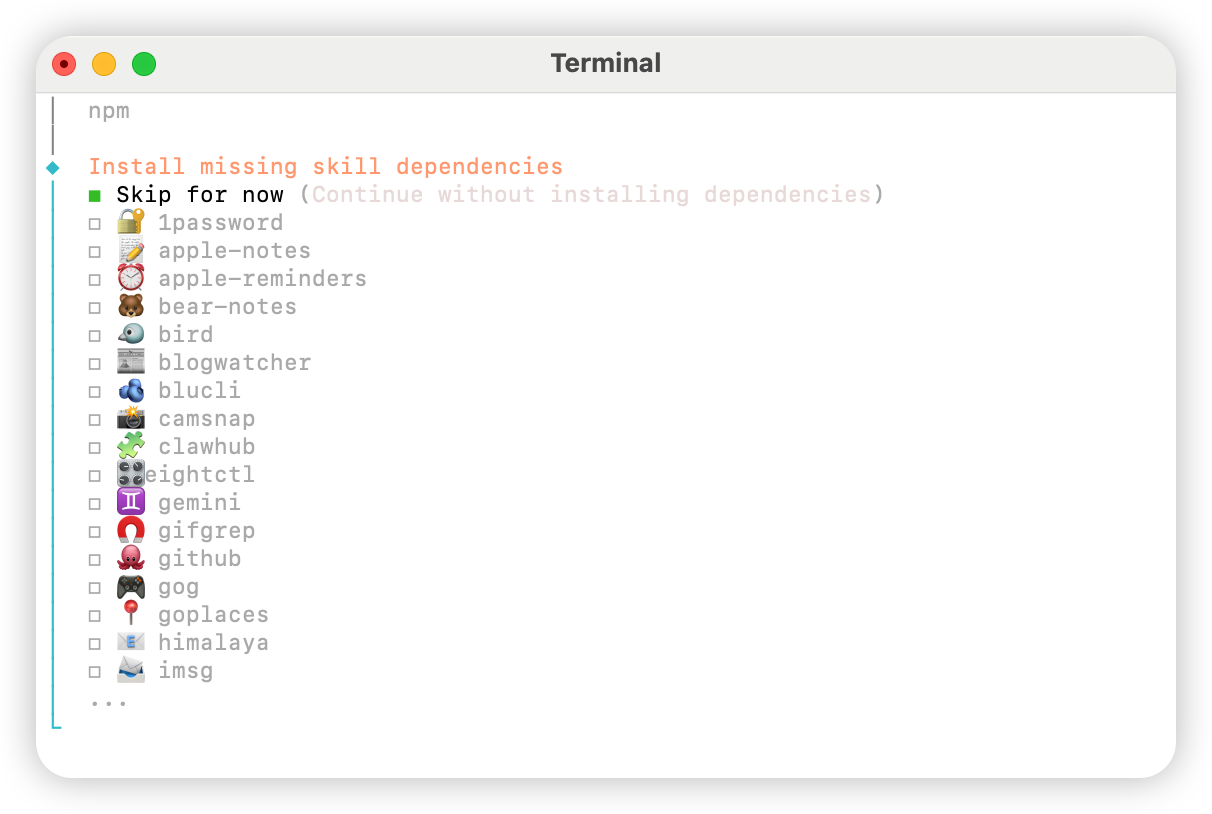 Wählen Sie für alle Optionen `No`.
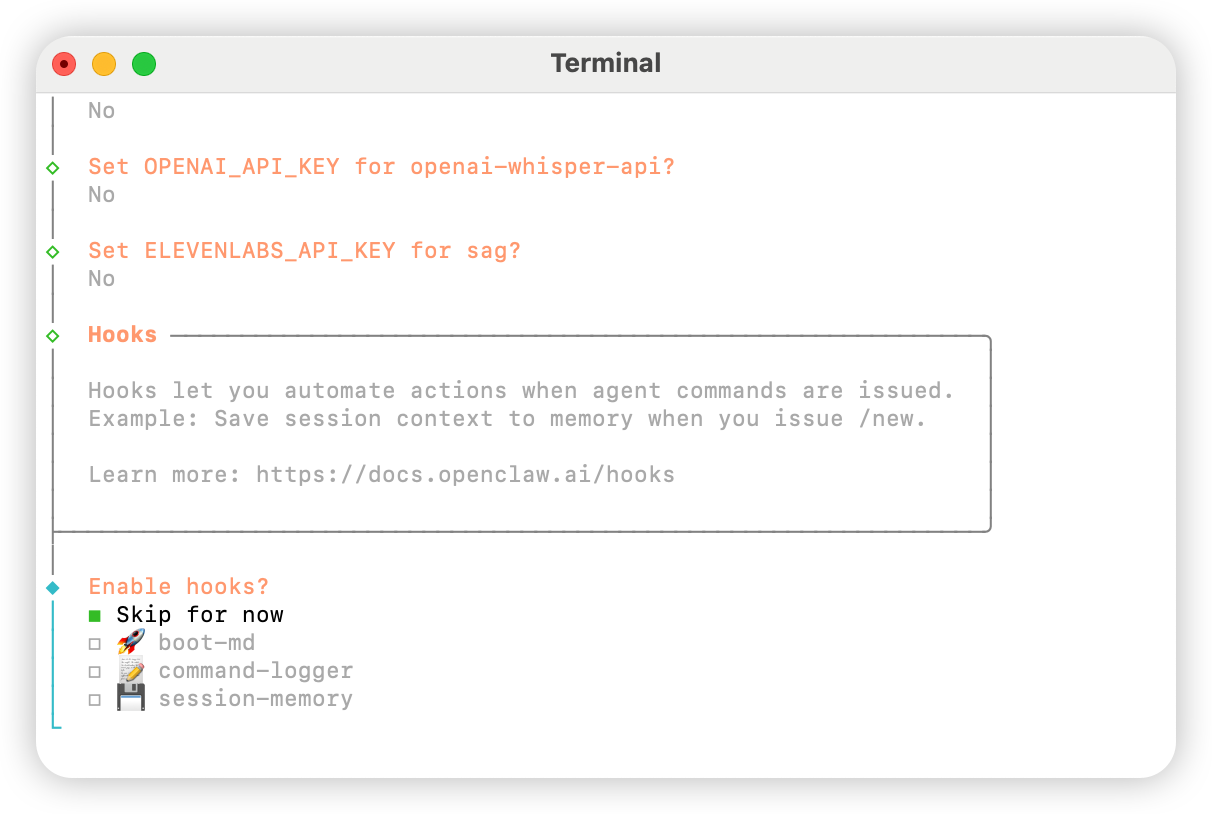
 Wählen Sie `Skip for now`.
 Wählen Sie `Hatch in UI`.
## AIHubMix konfigurieren
### Methode 1: Schnellkonfiguration per Plugin (empfohlen)
Plugin-Quellcode: [aihubmix-auth](https://github.com/akakenle/aihubmix-auth)
Installieren Sie das AIHubMix-Auth-Plugin und starten Sie das Gateway neu:
```shellscript theme={null}
openclaw plugins install @akakenle/aihubmix-auth
openclaw gateway restart
```
Führen Sie den Auth-Befehl aus. Geben Sie Ihren AIHubMix-API-Schlüssel ein, wenn Sie dazu aufgefordert werden. Sie müssen den untenstehenden Befehl nur einmal für einen der vier Provider ausführen — das Plugin verwendet `providerAuthAliases`, um denselben Schlüssel für alle Transports gültig zu machen:
```shellscript theme={null}
openclaw models auth login --provider aihubmix-openai --method api-key --set-default
```
Das Plugin ordnet die Modelle in folgenden Gruppen:
* **aihubmix-openai** — `gpt-*` / `o1-*` / `o3-*` / `o4-*`, `https://aihubmix.com/v1` (`openai-completions`)
* **aihubmix-anthropic** — `claude-*`, `https://aihubmix.com` (`anthropic-messages`)
* **aihubmix-google** — `gemini-*`, `https://aihubmix.com/gemini/v1beta` (`google-generative-ai`)
* **aihubmix-other** — Sonstige Modelle, `https://aihubmix.com/v1` (`openai-completions`)
Kurzschreibweisen für Modell-IDs (z. B. `claude-sonnet-4-5`) werden automatisch vom `resolveDynamicModel`-Hook des Plugins zum richtigen Transport geroutet — keine vollständige `provider/model`-Angabe erforderlich.
> Möchten Sie die interaktive Anmeldung überspringen? Setzen Sie `export AIHUBMIX_API_KEY=sk-...` vor der Installation — das Plugin schreibt den Schlüssel als inline `apiKey` in die Provider-Konfiguration (interaktive Anmeldung speichert ihn stattdessen im Auth-Profil).
Sobald die Konfiguration abgeschlossen ist, springen Sie zum Abschnitt [Start](#start), um es zu verwenden.
### Methode 2: Manuelle Konfiguration
Öffnen Sie die Datei `~/.openclaw/openclaw.json` und fügen Sie folgende Konfiguration hinzu:
```json theme={null}
{
"models": {
"mode": "merge",
"providers": {
"aihubmix-openai": {
"baseUrl": "https://aihubmix.com/v1",
"api": "openai-completions",
"models": [
{
"id": "gpt-4o",
"name": "gpt-4o",
"reasoning": false,
"input": ["text"],
"cost": {
"input": 0,
"output": 0,
"cacheRead": 0,
"cacheWrite": 0
},
"contextWindow": 128000,
"maxTokens": 16384
}
]
},
"aihubmix-anthropic": {
"baseUrl": "https://aihubmix.com",
"api": "anthropic-messages",
"models": [
{
"id": "claude-sonnet-4-5",
"name": "claude-sonnet-4-5",
"reasoning": false,
"input": ["text"],
"cost": {
"input": 0,
"output": 0,
"cacheRead": 0,
"cacheWrite": 0
},
"contextWindow": 200000,
"maxTokens": 64000
}
]
},
"aihubmix-google": {
"baseUrl": "https://aihubmix.com/gemini/v1beta",
"api": "google-generative-ai",
"models": []
},
"aihubmix-other": {
"baseUrl": "https://aihubmix.com/v1",
"api": "openai-completions",
"models": []
}
}
},
"agents": {
"defaults": {
"model": {
"primary": "aihubmix-anthropic/claude-sonnet-4-5"
},
"workspace": "your_workspace_path",
"compaction": {
"mode": "safeguard"
},
"maxConcurrent": 4,
"subagents": {
"maxConcurrent": 8
}
}
}
}
```
### Methode 3: Standardmodell mit dynamischen Modellbefehlen wechseln
Das AIHubMix-Plugin für OpenClaw unterstützt dynamisches Modell-Routing. Solange ein Modell in Ihrem AIHubMix-Konto verfügbar ist, können Sie es im Format `provider/model-id` aufrufen. Maßgeblich für die tatsächliche Verfügbarkeit sind die AIHubMix-Konsole und die API-Antwort.
Übliche Provider-Regeln:
* `aihubmix-openai`: OpenAI-kompatible Modelle, zum Beispiel `gpt-*`, `o1-*`, `o3-*` und `o4-*`
* `aihubmix-anthropic`: Claude-Modelle, zum Beispiel `claude-*`
* `aihubmix-google`: Gemini-Modelle, zum Beispiel `gemini-*`
* `aihubmix-other`: andere Modelle, die über einen OpenAI-kompatiblen Endpunkt aufgerufen werden, zum Beispiel `glm-5.2`
Beispiel: `gpt-5.4` als Standardmodell von OpenClaw festlegen:
```powershell theme={null}
openclaw models set aihubmix-openai/gpt-5.4
```
Wenn Windows `openclaw` nicht findet, verwenden Sie die Schreibweise mit lokalem Pfad:
```powershell theme={null}
& "Ihr-Installationspfad\OpenClaw\openclaw.cmd" models set aihubmix-openai/gpt-5.4
```
Aktuelles Standardmodell und Authentifizierungsstatus prüfen:
```powershell theme={null}
openclaw models status
```
Einen echten Testaufruf ausführen:
```powershell theme={null}
openclaw infer model run --local --json --model aihubmix-openai/gpt-5.4 --prompt "Reply only OK"
```
Für Modelle außerhalb der OpenAI-/Claude-/Gemini-Gruppen verwenden Sie `aihubmix-other`, zum Beispiel:
```powershell theme={null}
openclaw infer model run --local --json --model aihubmix-other/glm-5.2 --prompt "Reply only OK"
```
Den aktuell von OpenClaw geladenen Modellkatalog anzeigen:
```powershell theme={null}
openclaw infer model list --json
```
## Start
```shellscript theme={null}
openclaw gateway
```
## Test
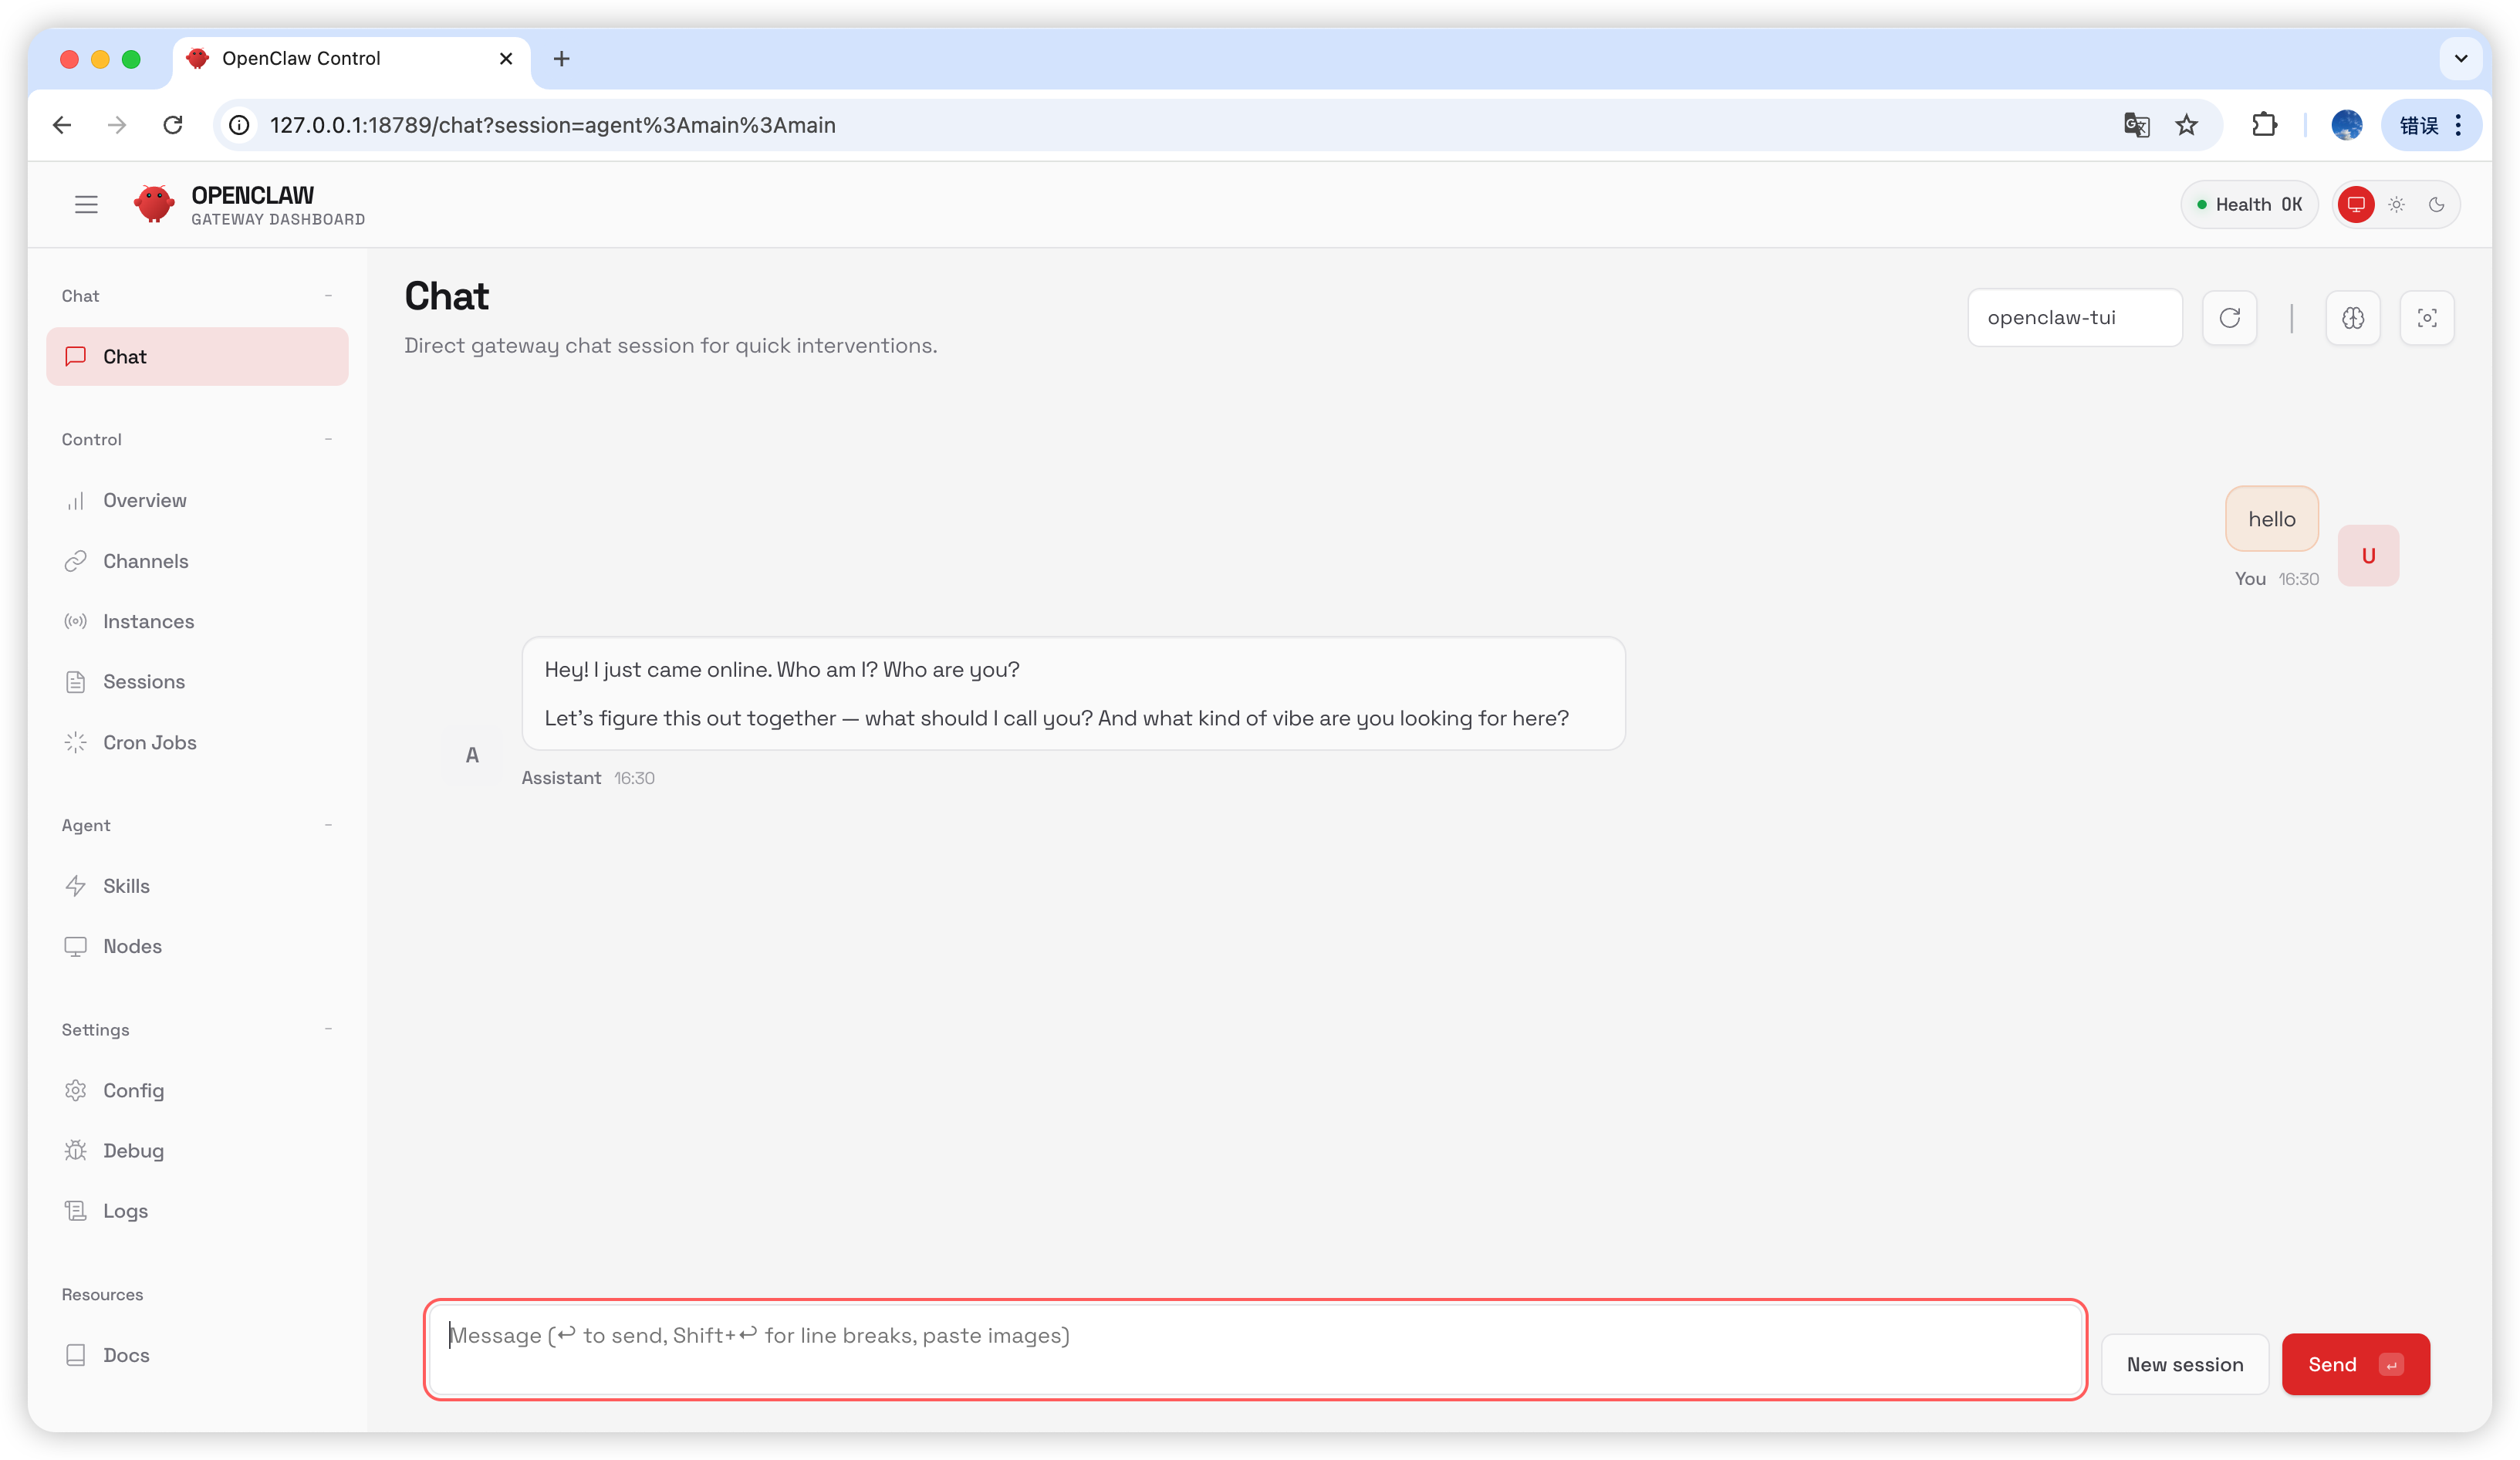
Geben Sie auf der Chat-Seite `hello` ein; wenn Sie eine Antwort erhalten, war die Konfiguration erfolgreich.
Wählen Sie `Hatch in UI`.
## AIHubMix konfigurieren
### Methode 1: Schnellkonfiguration per Plugin (empfohlen)
Plugin-Quellcode: [aihubmix-auth](https://github.com/akakenle/aihubmix-auth)
Installieren Sie das AIHubMix-Auth-Plugin und starten Sie das Gateway neu:
```shellscript theme={null}
openclaw plugins install @akakenle/aihubmix-auth
openclaw gateway restart
```
Führen Sie den Auth-Befehl aus. Geben Sie Ihren AIHubMix-API-Schlüssel ein, wenn Sie dazu aufgefordert werden. Sie müssen den untenstehenden Befehl nur einmal für einen der vier Provider ausführen — das Plugin verwendet `providerAuthAliases`, um denselben Schlüssel für alle Transports gültig zu machen:
```shellscript theme={null}
openclaw models auth login --provider aihubmix-openai --method api-key --set-default
```
Das Plugin ordnet die Modelle in folgenden Gruppen:
* **aihubmix-openai** — `gpt-*` / `o1-*` / `o3-*` / `o4-*`, `https://aihubmix.com/v1` (`openai-completions`)
* **aihubmix-anthropic** — `claude-*`, `https://aihubmix.com` (`anthropic-messages`)
* **aihubmix-google** — `gemini-*`, `https://aihubmix.com/gemini/v1beta` (`google-generative-ai`)
* **aihubmix-other** — Sonstige Modelle, `https://aihubmix.com/v1` (`openai-completions`)
Kurzschreibweisen für Modell-IDs (z. B. `claude-sonnet-4-5`) werden automatisch vom `resolveDynamicModel`-Hook des Plugins zum richtigen Transport geroutet — keine vollständige `provider/model`-Angabe erforderlich.
> Möchten Sie die interaktive Anmeldung überspringen? Setzen Sie `export AIHUBMIX_API_KEY=sk-...` vor der Installation — das Plugin schreibt den Schlüssel als inline `apiKey` in die Provider-Konfiguration (interaktive Anmeldung speichert ihn stattdessen im Auth-Profil).
Sobald die Konfiguration abgeschlossen ist, springen Sie zum Abschnitt [Start](#start), um es zu verwenden.
### Methode 2: Manuelle Konfiguration
Öffnen Sie die Datei `~/.openclaw/openclaw.json` und fügen Sie folgende Konfiguration hinzu:
```json theme={null}
{
"models": {
"mode": "merge",
"providers": {
"aihubmix-openai": {
"baseUrl": "https://aihubmix.com/v1",
"api": "openai-completions",
"models": [
{
"id": "gpt-4o",
"name": "gpt-4o",
"reasoning": false,
"input": ["text"],
"cost": {
"input": 0,
"output": 0,
"cacheRead": 0,
"cacheWrite": 0
},
"contextWindow": 128000,
"maxTokens": 16384
}
]
},
"aihubmix-anthropic": {
"baseUrl": "https://aihubmix.com",
"api": "anthropic-messages",
"models": [
{
"id": "claude-sonnet-4-5",
"name": "claude-sonnet-4-5",
"reasoning": false,
"input": ["text"],
"cost": {
"input": 0,
"output": 0,
"cacheRead": 0,
"cacheWrite": 0
},
"contextWindow": 200000,
"maxTokens": 64000
}
]
},
"aihubmix-google": {
"baseUrl": "https://aihubmix.com/gemini/v1beta",
"api": "google-generative-ai",
"models": []
},
"aihubmix-other": {
"baseUrl": "https://aihubmix.com/v1",
"api": "openai-completions",
"models": []
}
}
},
"agents": {
"defaults": {
"model": {
"primary": "aihubmix-anthropic/claude-sonnet-4-5"
},
"workspace": "your_workspace_path",
"compaction": {
"mode": "safeguard"
},
"maxConcurrent": 4,
"subagents": {
"maxConcurrent": 8
}
}
}
}
```
### Methode 3: Standardmodell mit dynamischen Modellbefehlen wechseln
Das AIHubMix-Plugin für OpenClaw unterstützt dynamisches Modell-Routing. Solange ein Modell in Ihrem AIHubMix-Konto verfügbar ist, können Sie es im Format `provider/model-id` aufrufen. Maßgeblich für die tatsächliche Verfügbarkeit sind die AIHubMix-Konsole und die API-Antwort.
Übliche Provider-Regeln:
* `aihubmix-openai`: OpenAI-kompatible Modelle, zum Beispiel `gpt-*`, `o1-*`, `o3-*` und `o4-*`
* `aihubmix-anthropic`: Claude-Modelle, zum Beispiel `claude-*`
* `aihubmix-google`: Gemini-Modelle, zum Beispiel `gemini-*`
* `aihubmix-other`: andere Modelle, die über einen OpenAI-kompatiblen Endpunkt aufgerufen werden, zum Beispiel `glm-5.2`
Beispiel: `gpt-5.4` als Standardmodell von OpenClaw festlegen:
```powershell theme={null}
openclaw models set aihubmix-openai/gpt-5.4
```
Wenn Windows `openclaw` nicht findet, verwenden Sie die Schreibweise mit lokalem Pfad:
```powershell theme={null}
& "Ihr-Installationspfad\OpenClaw\openclaw.cmd" models set aihubmix-openai/gpt-5.4
```
Aktuelles Standardmodell und Authentifizierungsstatus prüfen:
```powershell theme={null}
openclaw models status
```
Einen echten Testaufruf ausführen:
```powershell theme={null}
openclaw infer model run --local --json --model aihubmix-openai/gpt-5.4 --prompt "Reply only OK"
```
Für Modelle außerhalb der OpenAI-/Claude-/Gemini-Gruppen verwenden Sie `aihubmix-other`, zum Beispiel:
```powershell theme={null}
openclaw infer model run --local --json --model aihubmix-other/glm-5.2 --prompt "Reply only OK"
```
Den aktuell von OpenClaw geladenen Modellkatalog anzeigen:
```powershell theme={null}
openclaw infer model list --json
```
## Start
```shellscript theme={null}
openclaw gateway
```
## Test
Geben Sie auf der Chat-Seite `hello` ein; wenn Sie eine Antwort erhalten, war die Konfiguration erfolgreich.
 ## Häufig gestellte Fragen
### Version aktualisieren
```shellscript theme={null}
openclaw plugins update @akakenle/aihubmix-auth
openclaw gateway restart
```
### Gateway-Prozess belegt
```shellscript theme={null}
openclaw gateway stop
openclaw gateway
```
***
Zuletzt aktualisiert: 2026-07-03
## Häufig gestellte Fragen
### Version aktualisieren
```shellscript theme={null}
openclaw plugins update @akakenle/aihubmix-auth
openclaw gateway restart
```
### Gateway-Prozess belegt
```shellscript theme={null}
openclaw gateway stop
openclaw gateway
```
***
Zuletzt aktualisiert: 2026-07-03