> ## Documentation Index
> Fetch the complete documentation index at: https://docs.aihubmix.com/llms.txt
> Use this file to discover all available pages before exploring further.
# WorkBuddy
> 在 WorkBuddy 中配置 AIHubMix:添加 Custom 模型后使用 AIHubMix 支持的任意模型。
WorkBuddy 可以添加自定义 OpenAI 兼容模型。把 AIHubMix 配进去后,就能在 WorkBuddy 的模型选择器里调用 AIHubMix 支持的 GPT、Claude、Gemini、DeepSeek、GLM 等模型。
## 准备工作
* [WorkBuddy](https://www.codebuddy.cn/work/) 已安装,并且可以正常打开。
* 在 [AIHubMix 控制台](https://aihubmix.com/token) 创建好的 API Key,格式通常是 `sk-***`。
* 要使用的模型 ID,例如 `gpt-5.5`、`gemini-3.5-flash`、`deepseek-chat`。模型 ID 建议直接从 AIHubMix 模型列表复制。
## 前端界面配置 AIHubMix 模型
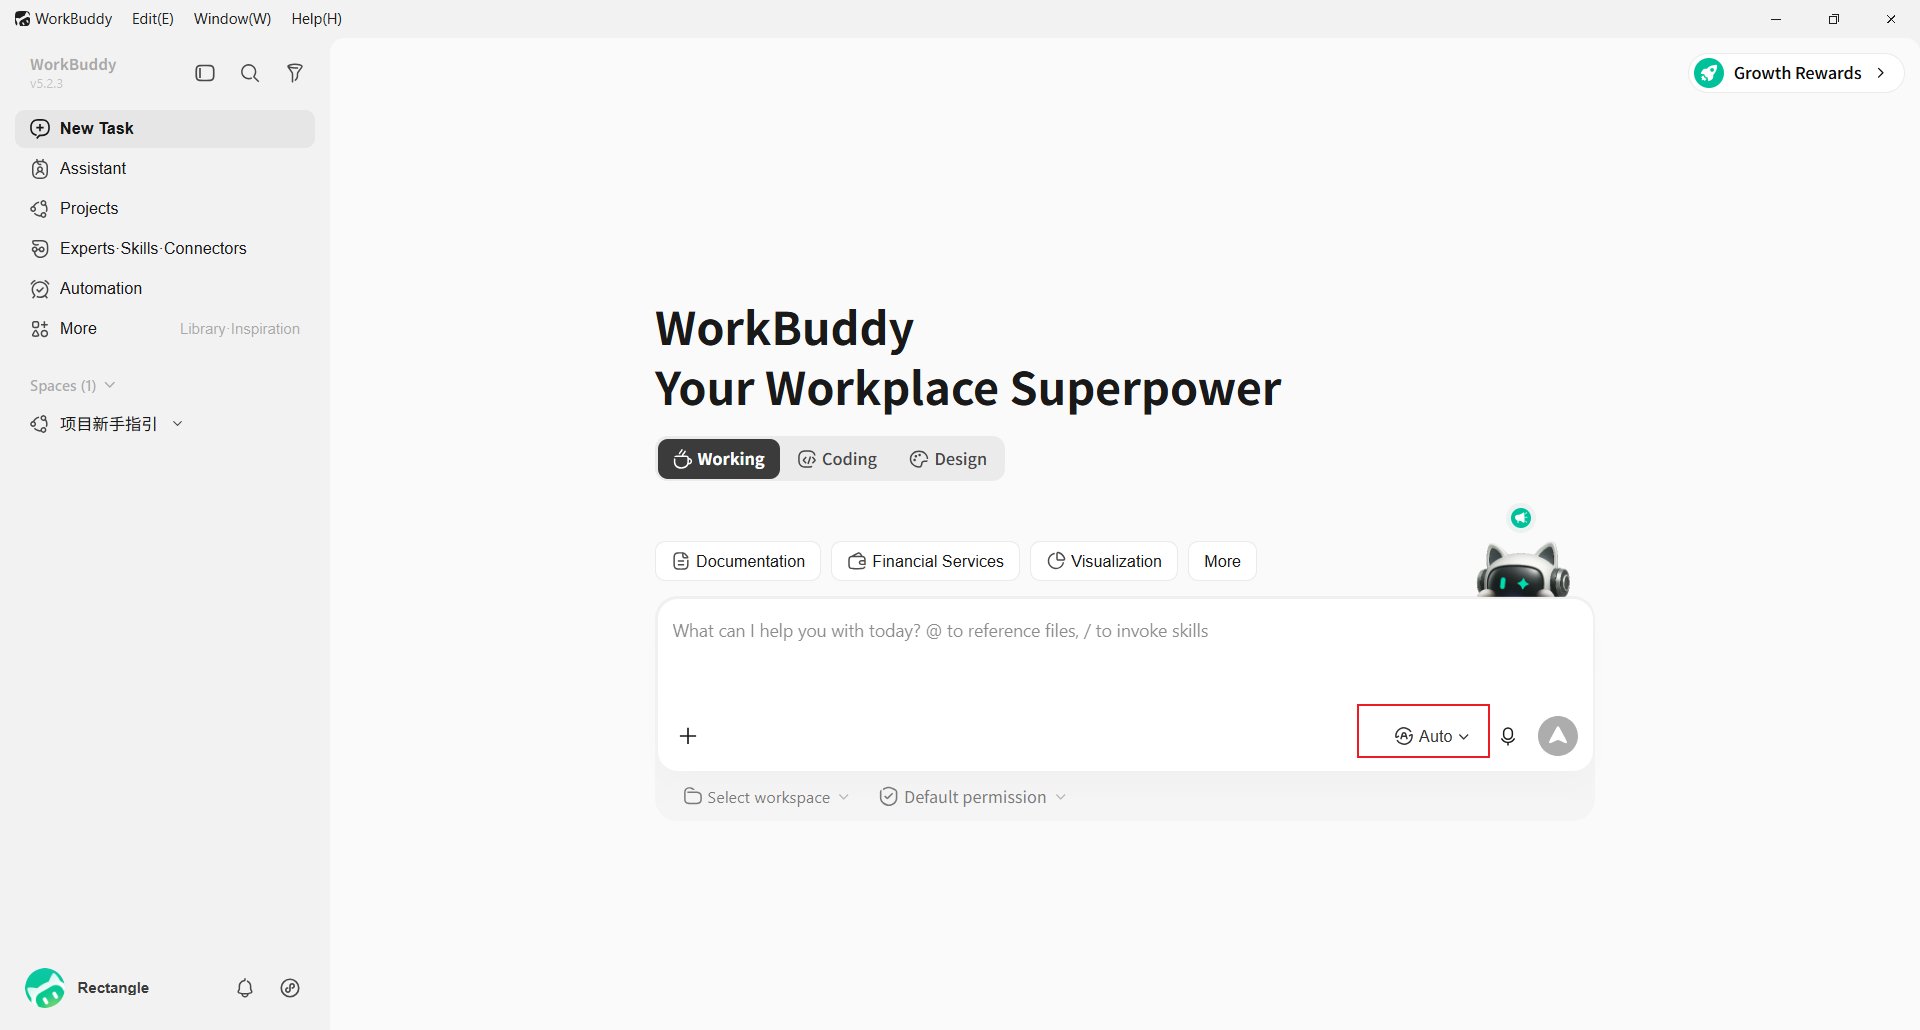
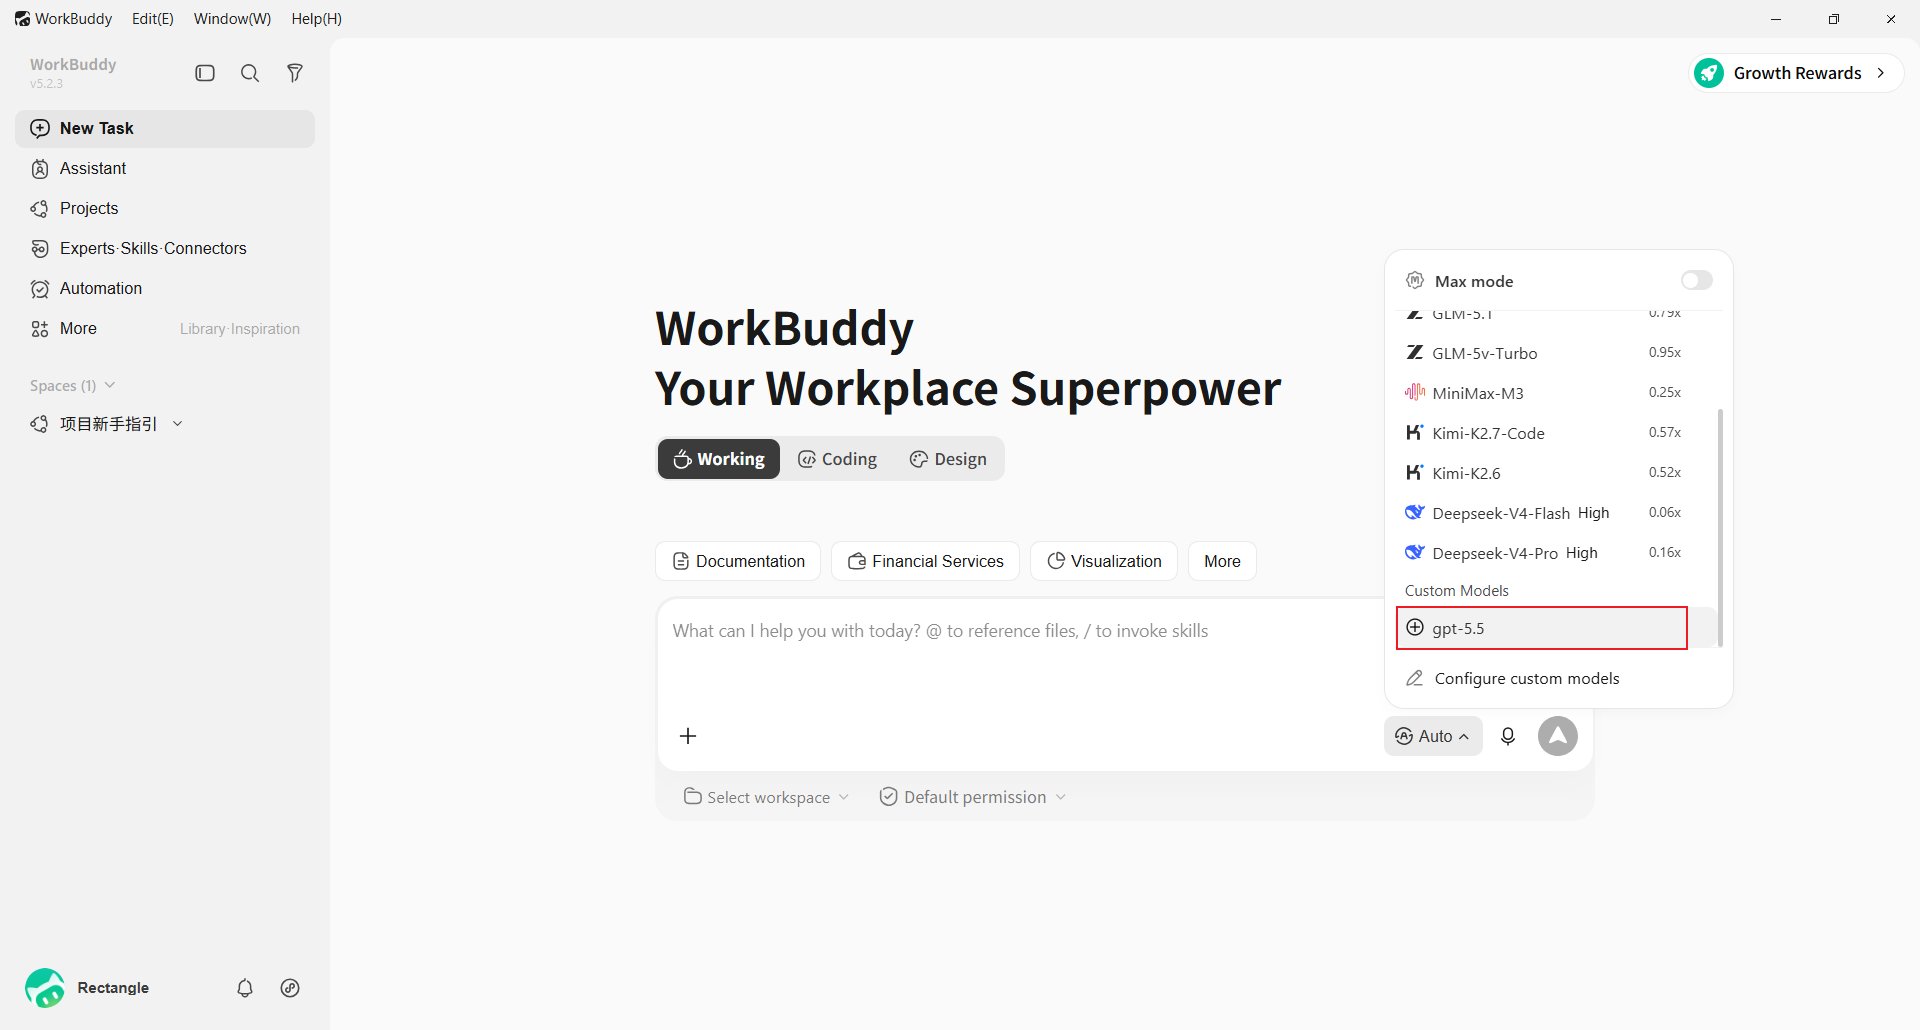
打开 WorkBuddy,在输入框右下角点击当前模型选择器,例如 **Auto**。
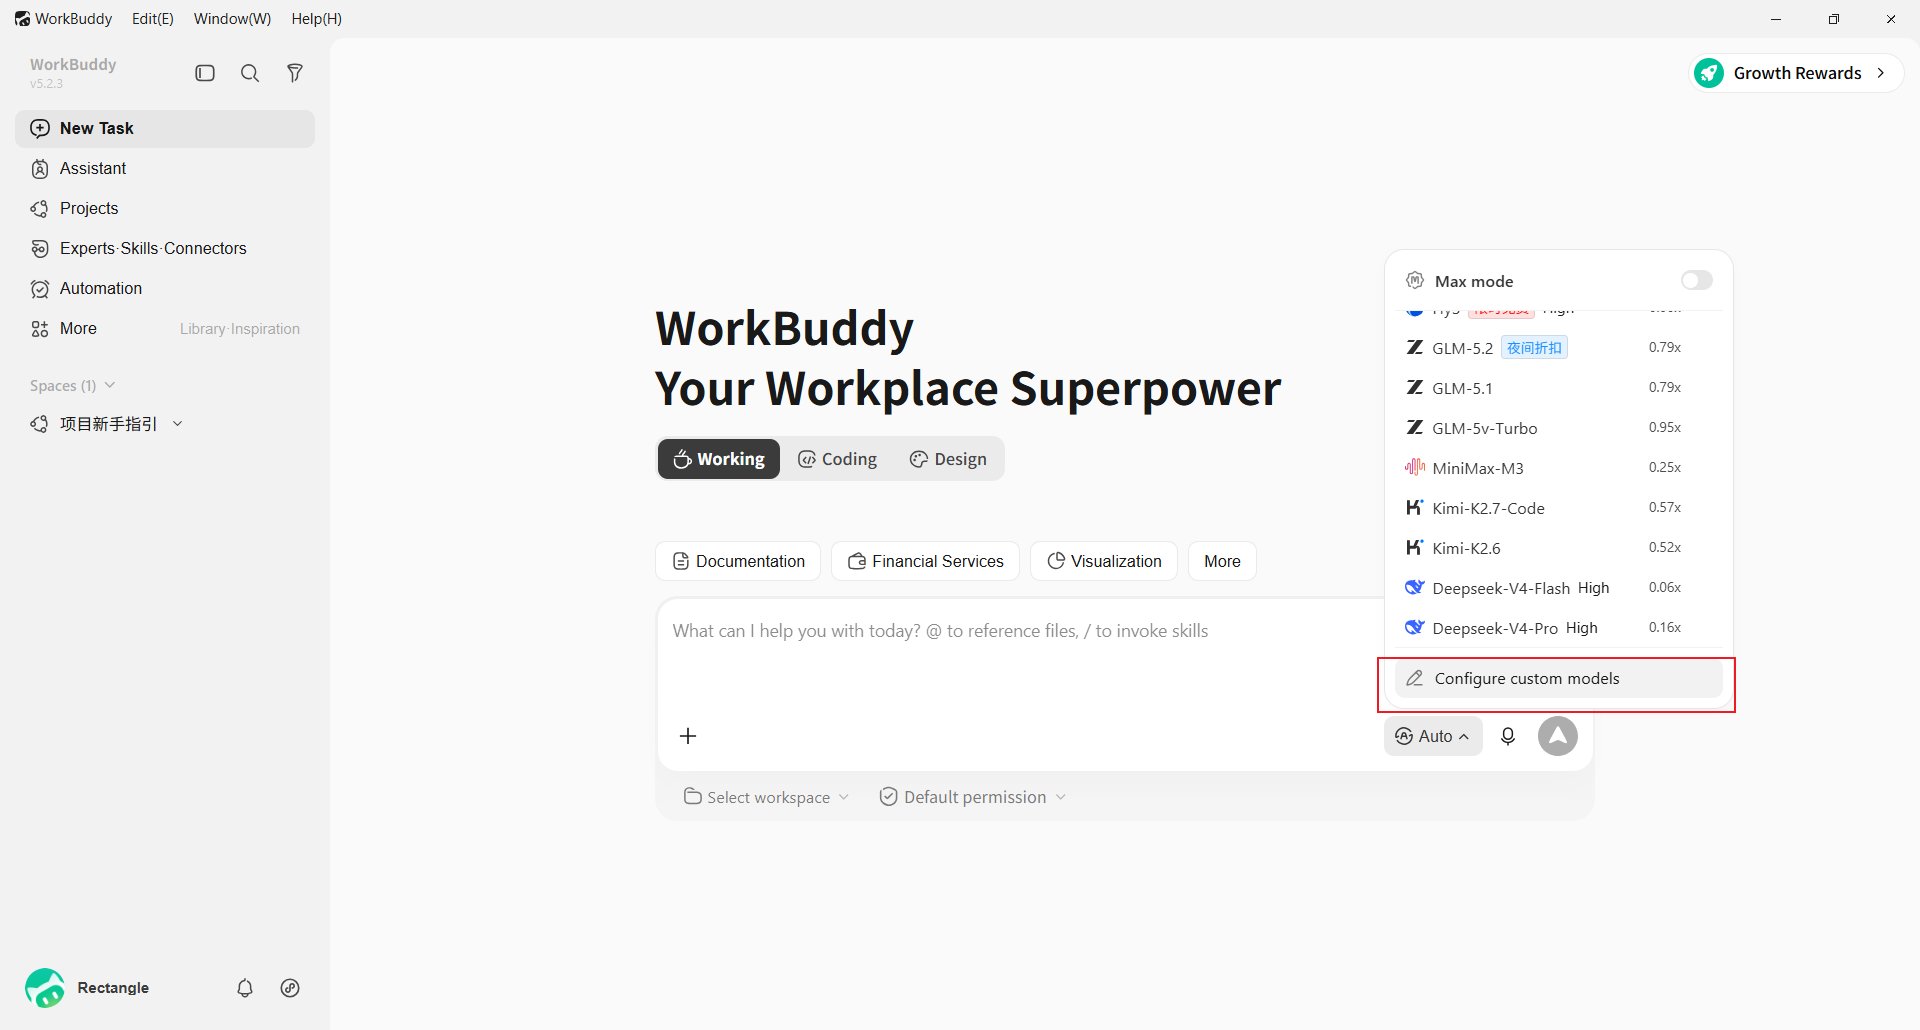
 把模型列表拉到底部,点击 **Configure custom models**。
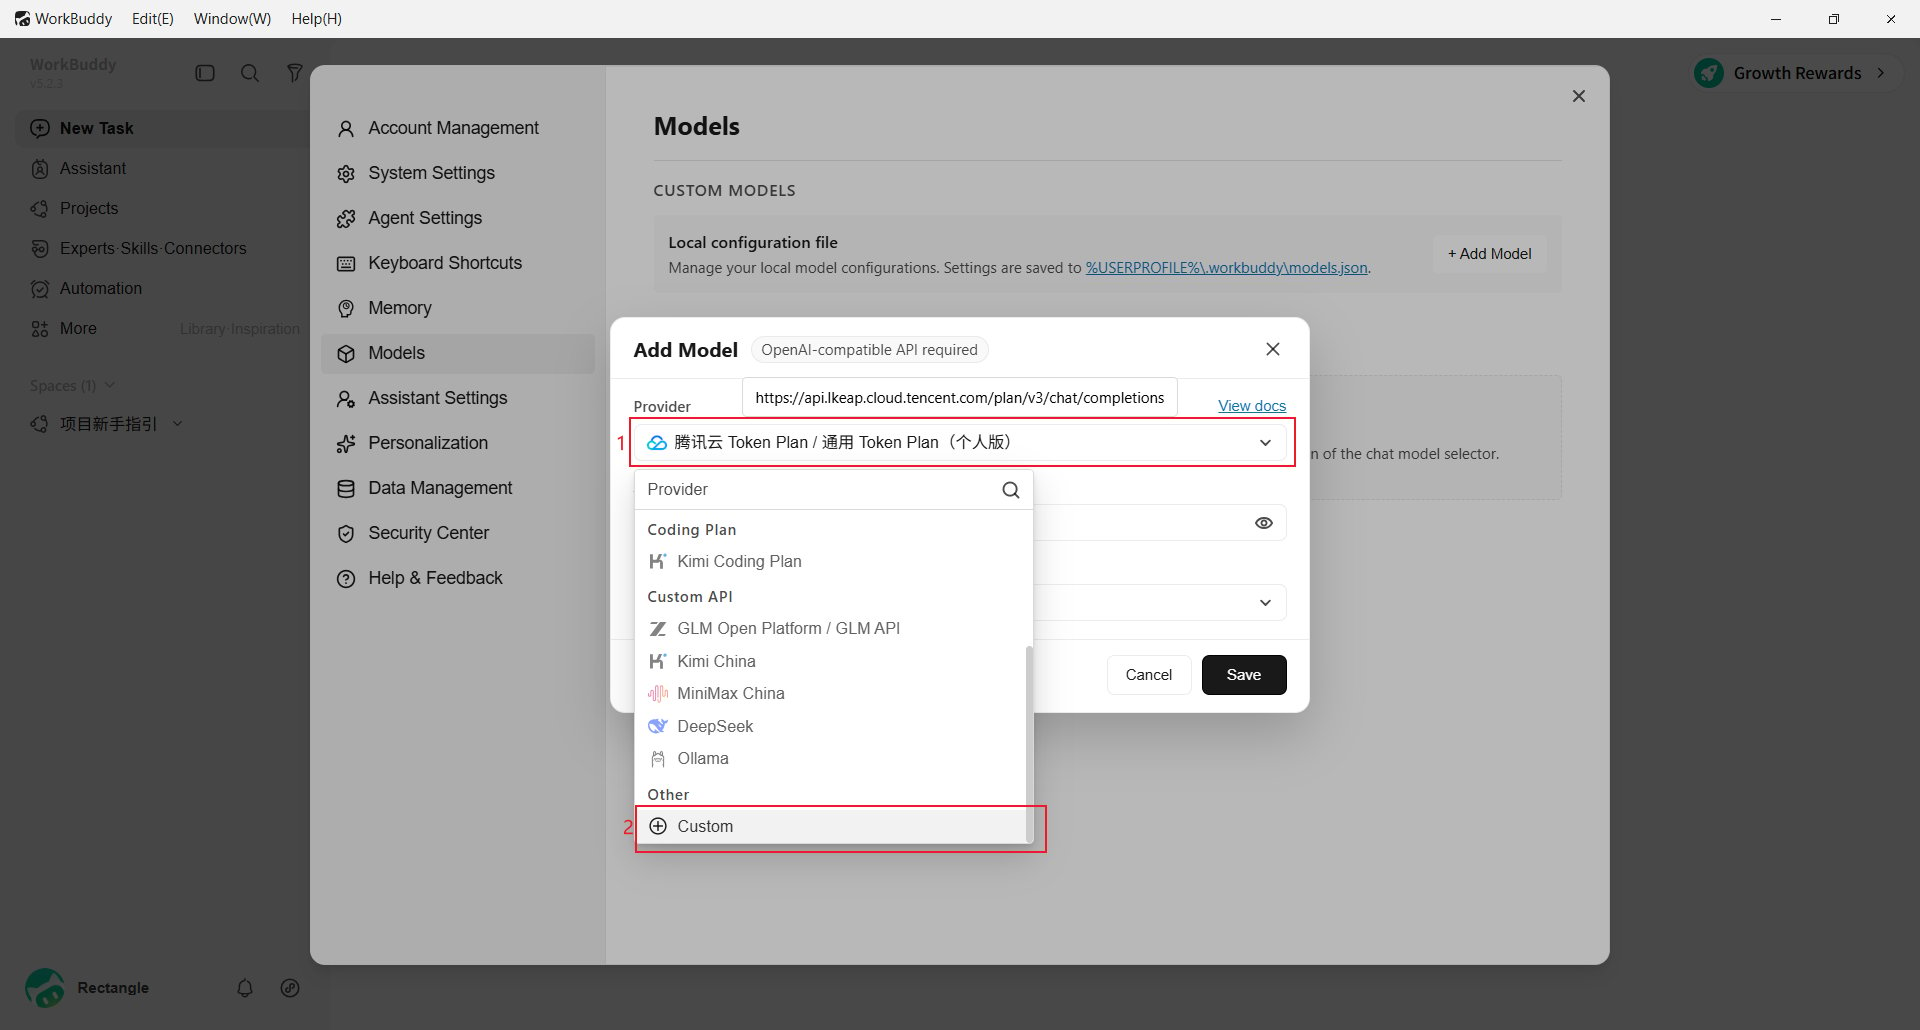
 点击 **Add Model**,然后在 **Provider** 下拉框里选择 **Custom**。
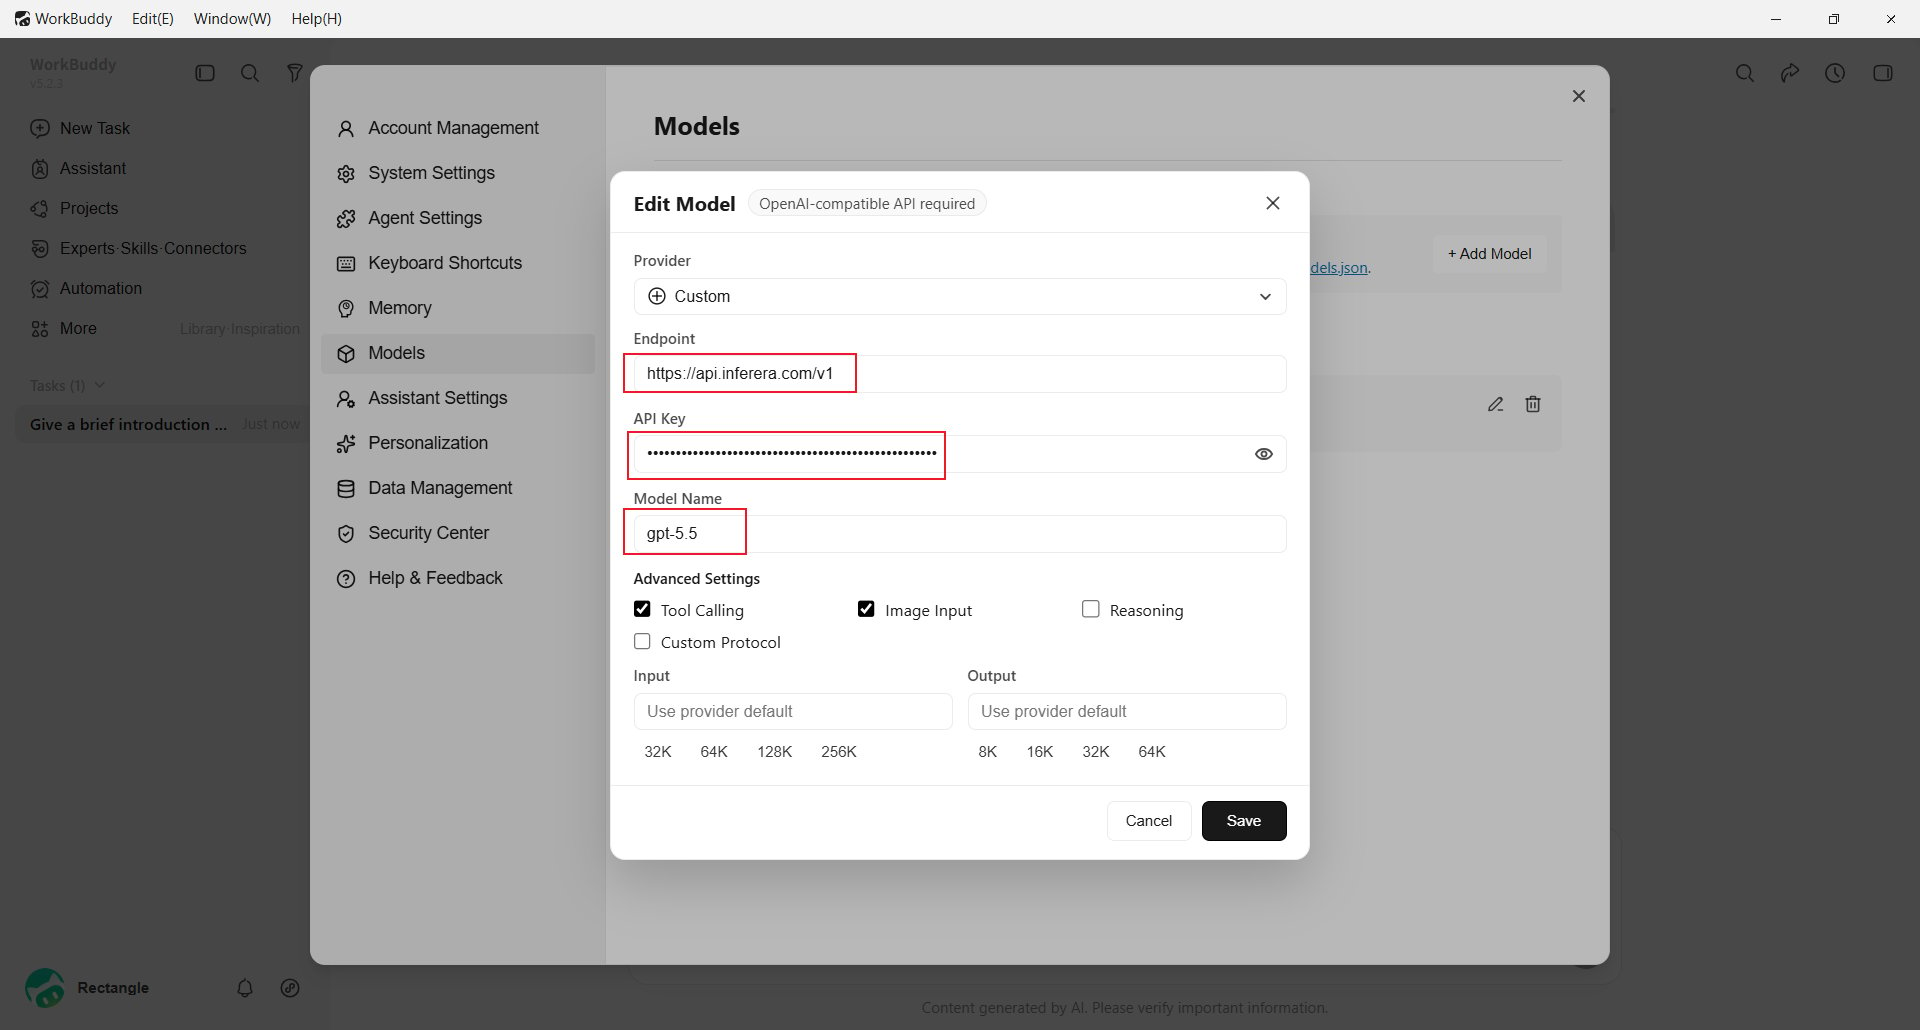
 接着填写这几项:
* **Endpoint**:通常填 `https://aihubmix.com/v1`。如果主地址暂时不可用,改成备用地址 `https://api.inferera.com/v1`。
* **API Key**:填你在 [AIHubMix 控制台](https://aihubmix.com/token) 创建的 Key。
* **Model Name**:填要用的模型 ID,例如 `gpt-5.5`。
* **Advanced Settings**:按模型能力勾选。需要工具调用就开 **Tool Calling**;模型支持看图就开 **Image Input**;推理模型可以开 **Reasoning**。
填好后点击 **Save**。
接着填写这几项:
* **Endpoint**:通常填 `https://aihubmix.com/v1`。如果主地址暂时不可用,改成备用地址 `https://api.inferera.com/v1`。
* **API Key**:填你在 [AIHubMix 控制台](https://aihubmix.com/token) 创建的 Key。
* **Model Name**:填要用的模型 ID,例如 `gpt-5.5`。
* **Advanced Settings**:按模型能力勾选。需要工具调用就开 **Tool Calling**;模型支持看图就开 **Image Input**;推理模型可以开 **Reasoning**。
填好后点击 **Save**。
 保存后回到模型列表,在 **Custom Models** 区域选择刚添加的模型。
 ## 通过配置文件添加模型
WorkBuddy 的自定义模型会保存到本地 `models.json`。如果不想从前端界面里逐项填写,可以编辑这个文件:
```text theme={null}
%USERPROFILE%\.workbuddy\models.json
```
文件内容是一个模型数组。下面是 AIHubMix 的示例配置:
```json theme={null}
[
{
"id": "gpt-5.5",
"name": "gpt-5.5",
"vendor": "Custom",
"url": "https://aihubmix.com/v1",
"apiKey": "sk-***",
"supportsToolCall": true,
"supportsImages": true,
"supportsReasoning": false,
"useCustomProtocol": false
}
]
```
如果当前 API 主地址不可用,把 `url` 改成备用地址即可:
```json theme={null}
"url": "https://api.inferera.com/v1"
```
字段含义和前端界面里的选项基本一致:`id` / `name` 填模型 ID,`vendor` 使用 `Custom`,`apiKey` 填 AIHubMix Key,`supportsImages` 对应 **Image Input**,`supportsToolCall` 对应 **Tool Calling**。改完后重启 WorkBuddy,或重新打开模型选择器查看。
## 验证效果
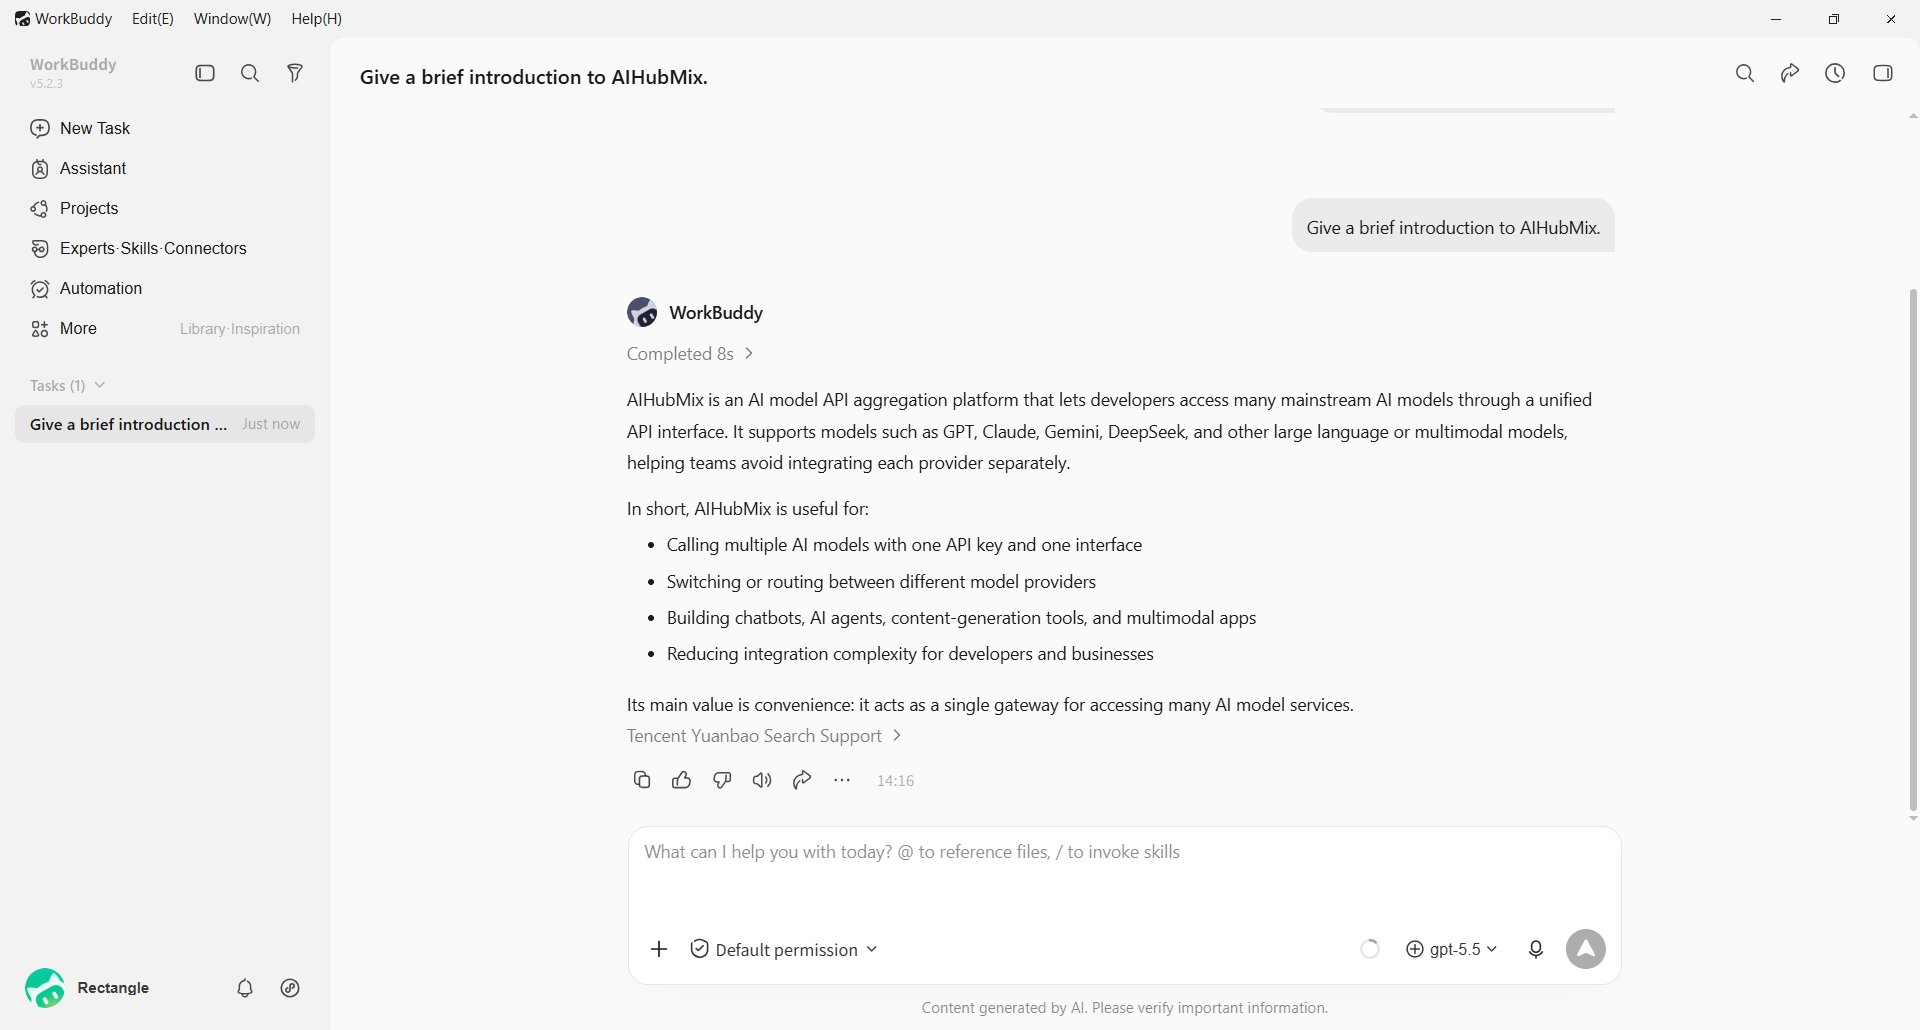
选中自定义模型后,发一条简单消息测试一下,比如让 WorkBuddy 简短介绍 AIHubMix。能正常回复,就说明配置已经生效。
## 通过配置文件添加模型
WorkBuddy 的自定义模型会保存到本地 `models.json`。如果不想从前端界面里逐项填写,可以编辑这个文件:
```text theme={null}
%USERPROFILE%\.workbuddy\models.json
```
文件内容是一个模型数组。下面是 AIHubMix 的示例配置:
```json theme={null}
[
{
"id": "gpt-5.5",
"name": "gpt-5.5",
"vendor": "Custom",
"url": "https://aihubmix.com/v1",
"apiKey": "sk-***",
"supportsToolCall": true,
"supportsImages": true,
"supportsReasoning": false,
"useCustomProtocol": false
}
]
```
如果当前 API 主地址不可用,把 `url` 改成备用地址即可:
```json theme={null}
"url": "https://api.inferera.com/v1"
```
字段含义和前端界面里的选项基本一致:`id` / `name` 填模型 ID,`vendor` 使用 `Custom`,`apiKey` 填 AIHubMix Key,`supportsImages` 对应 **Image Input**,`supportsToolCall` 对应 **Tool Calling**。改完后重启 WorkBuddy,或重新打开模型选择器查看。
## 验证效果
选中自定义模型后,发一条简单消息测试一下,比如让 WorkBuddy 简短介绍 AIHubMix。能正常回复,就说明配置已经生效。
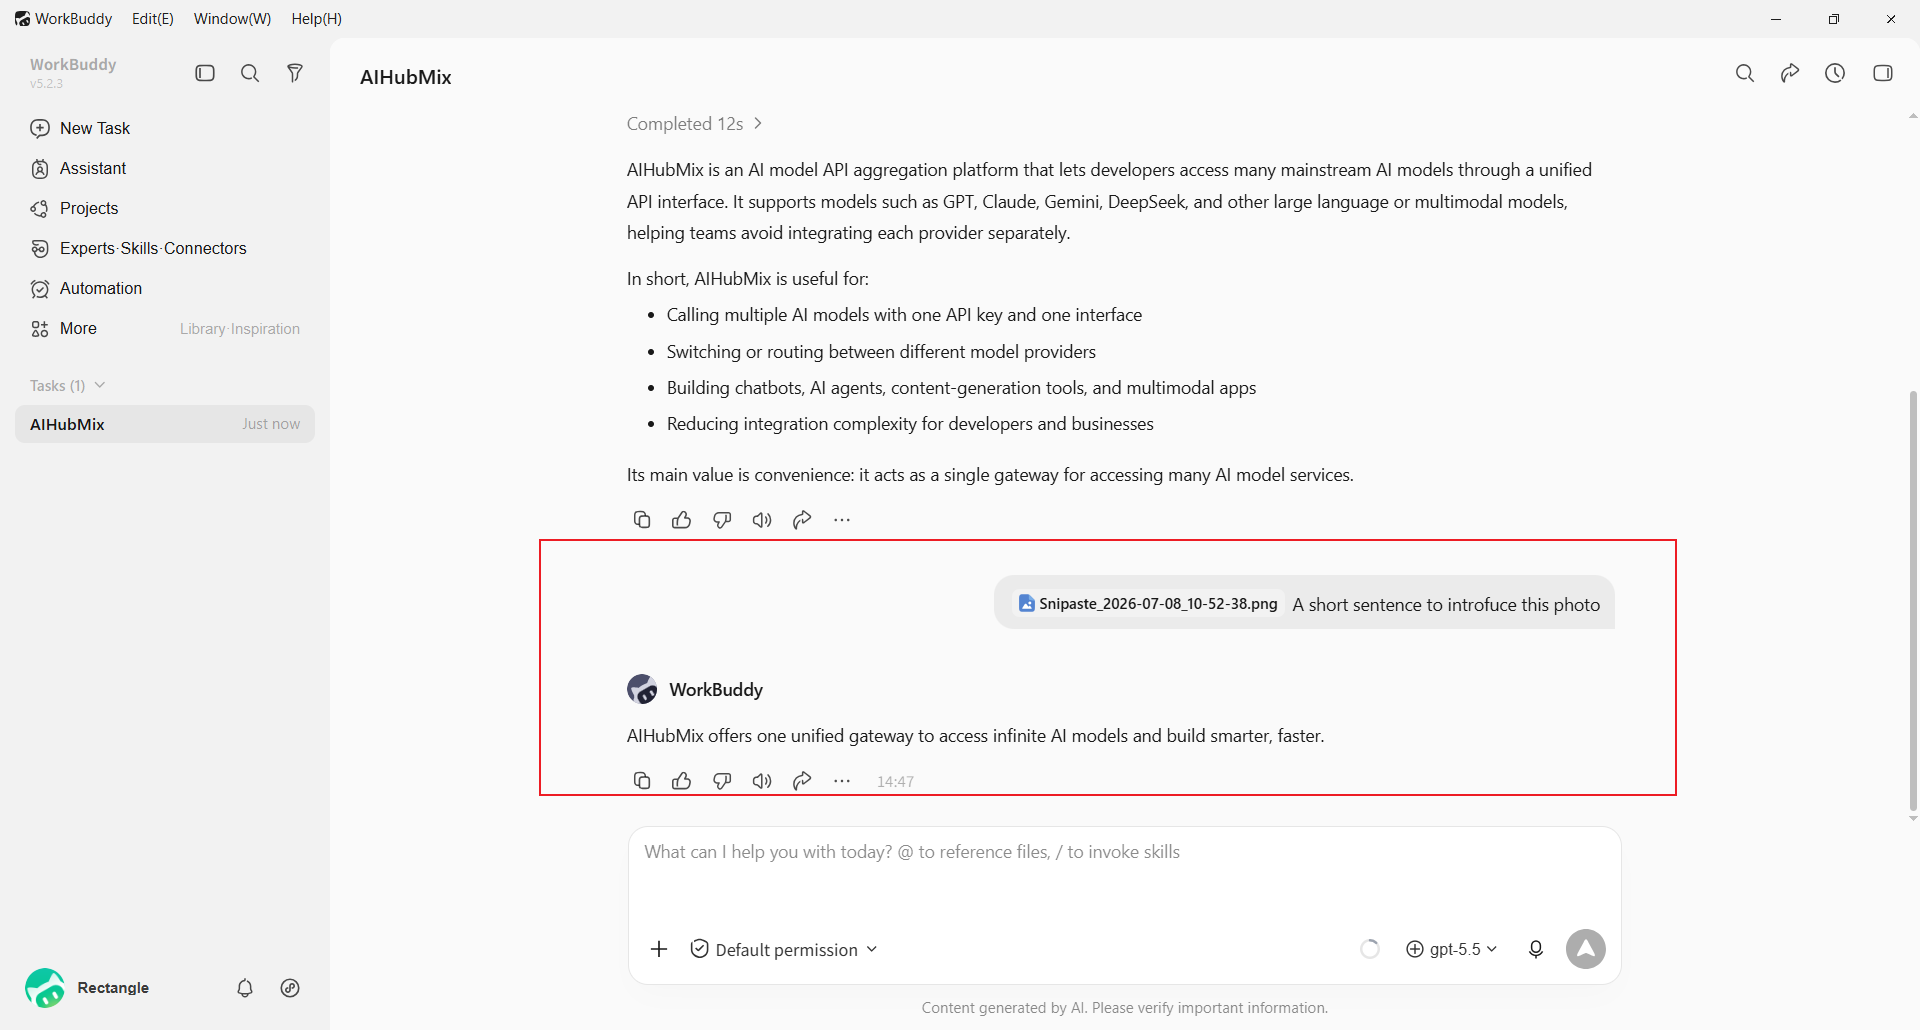
 如果配置时开启了 **Image Input**,可以再上传一张图片,让 WorkBuddy 根据图片内容回答。这样能顺手确认图片输入能力已经生效。
 ## 常见问题
**为什么要选择 Custom?**
AIHubMix 提供的是 OpenAI 兼容接口,需要手动填写 Endpoint、API Key 和 Model Name。选择内置供应商时,WorkBuddy 可能会自动使用对方平台自己的接口地址。
**保存后看不到模型怎么办?**
重新打开模型选择器,滑到 **Custom Models** 区域。如果还是没有出现,检查是否点了 **Save**,以及 Model Name 是否为空。手动改配置文件时,检查 `%USERPROFILE%\.workbuddy\models.json` 是否是合法 JSON。
**请求失败怎么办?**
检查 Endpoint 是否带 `/v1`,API Key 是否完整,Model Name 是否和 AIHubMix 模型 ID 一致。若主地址不可用,可将 Endpoint 改为 `https://api.inferera.com/v1`。
更新时间:2026-07-10
## 常见问题
**为什么要选择 Custom?**
AIHubMix 提供的是 OpenAI 兼容接口,需要手动填写 Endpoint、API Key 和 Model Name。选择内置供应商时,WorkBuddy 可能会自动使用对方平台自己的接口地址。
**保存后看不到模型怎么办?**
重新打开模型选择器,滑到 **Custom Models** 区域。如果还是没有出现,检查是否点了 **Save**,以及 Model Name 是否为空。手动改配置文件时,检查 `%USERPROFILE%\.workbuddy\models.json` 是否是合法 JSON。
**请求失败怎么办?**
检查 Endpoint 是否带 `/v1`,API Key 是否完整,Model Name 是否和 AIHubMix 模型 ID 一致。若主地址不可用,可将 Endpoint 改为 `https://api.inferera.com/v1`。
更新时间:2026-07-10