> ## Documentation Index
> Fetch the complete documentation index at: https://docs.aihubmix.com/llms.txt
> Use this file to discover all available pages before exploring further.
# Codex CLI 接入 AIHubMix 教程
> 在 Codex CLI 中接入 AIHubMix:用单个 API key 在 /model 列表自由切换 GLM、Claude、Gemini、DeepSeek 等模型。含 config.toml 配置、model_catalog_json 模型目录生成脚本与常见问题排查。
[Codex CLI](https://openai.com/codex/) 是 OpenAI 官方的终端编程工具。接入 AIHubMix 后,你只需一个 API key 就能在终端里调用并自由切换 GLM、Claude、Gemini、DeepSeek 等各家模型,无需绑定单一厂商。本文覆盖两种接入方式:**基础方式**(profile + 固定单模型,最快上手)与**自定义模型方式**(用 `model_catalog_json` 目录文件,在 `/model` 列表里随时切换)。
## 安装
### 官网下载(macOS 版本)
[https://openai.com/zh-Hans-CN/codex/](https://openai.com/zh-Hans-CN/codex/)
### 使用命令行安装
```bash theme={null}
npm install -g @openai/codex
```
## 环境变量配置
### 使用配置文件配置
1. 修改 ` ~/.codex/config.toml` 配置文件,增加如下配置:
```toml theme={null}
profile = "aihubmix"
[model_providers.aihubmix]
name = "aihubmix"
base_url = "https://aihubmix.com/v1"
personality = "pragmatic"
wire_api = "responses"
[profiles.aihubmix]
model = "gpt-5.2"
model_provider = "aihubmix"
model_reasoning_effort = "high"
```
2. 修改 ` ~/.codex/auth.json` 配置文件,修改如下配置:
```json theme={null}
{
"OPENAI_API_KEY": "AIHUBMIX_API_KEY"
}
```
### 通过 cc-switch 配置
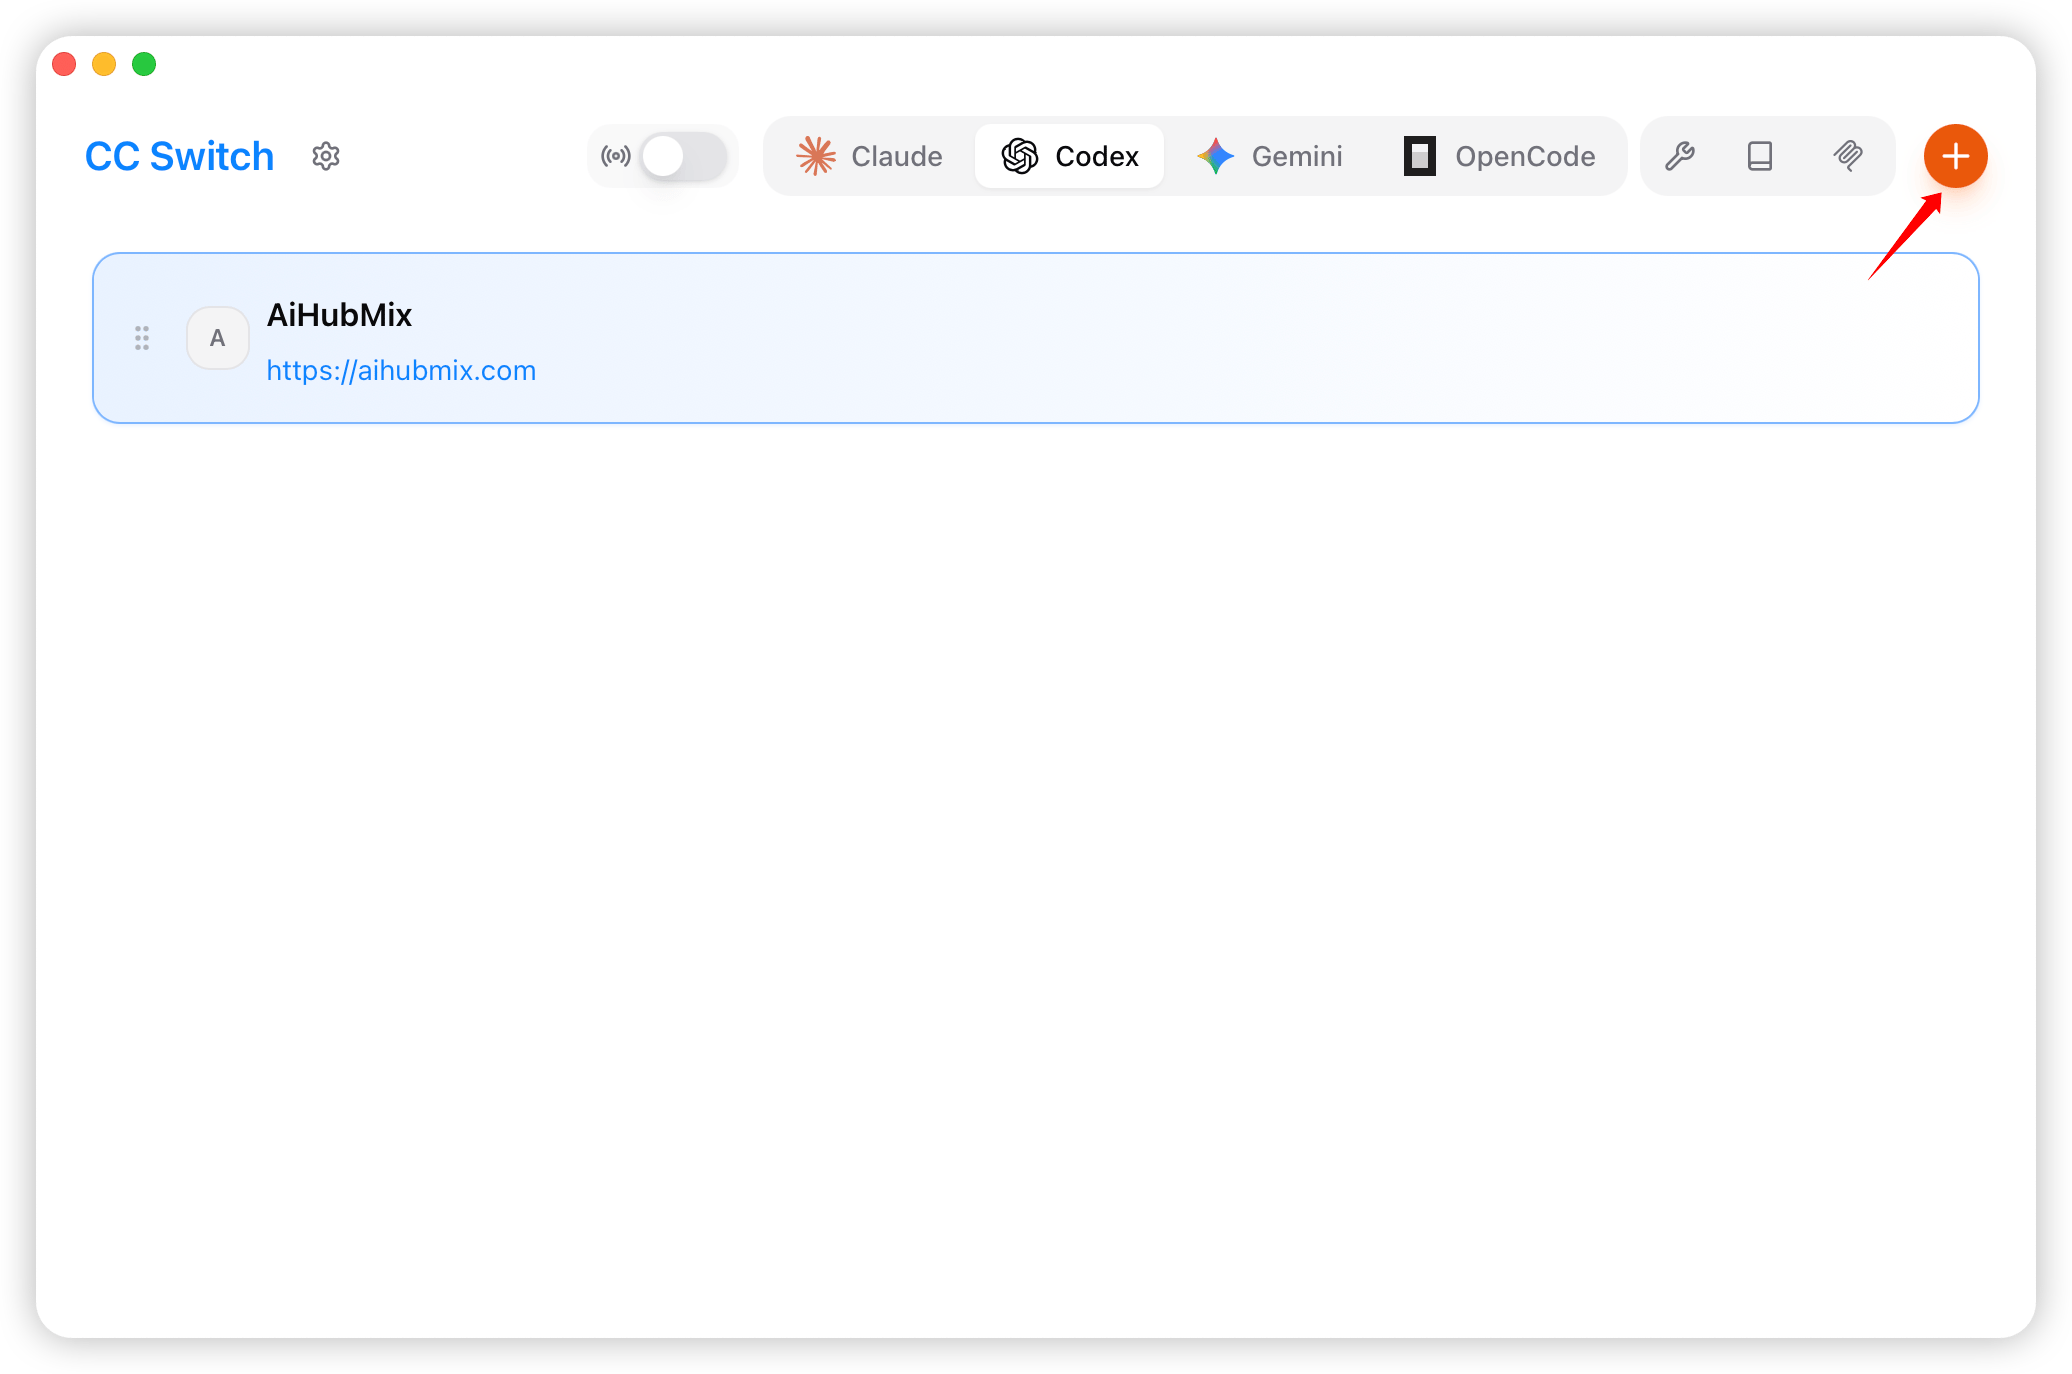
1. 运行 CC-Switch,添加供应商。
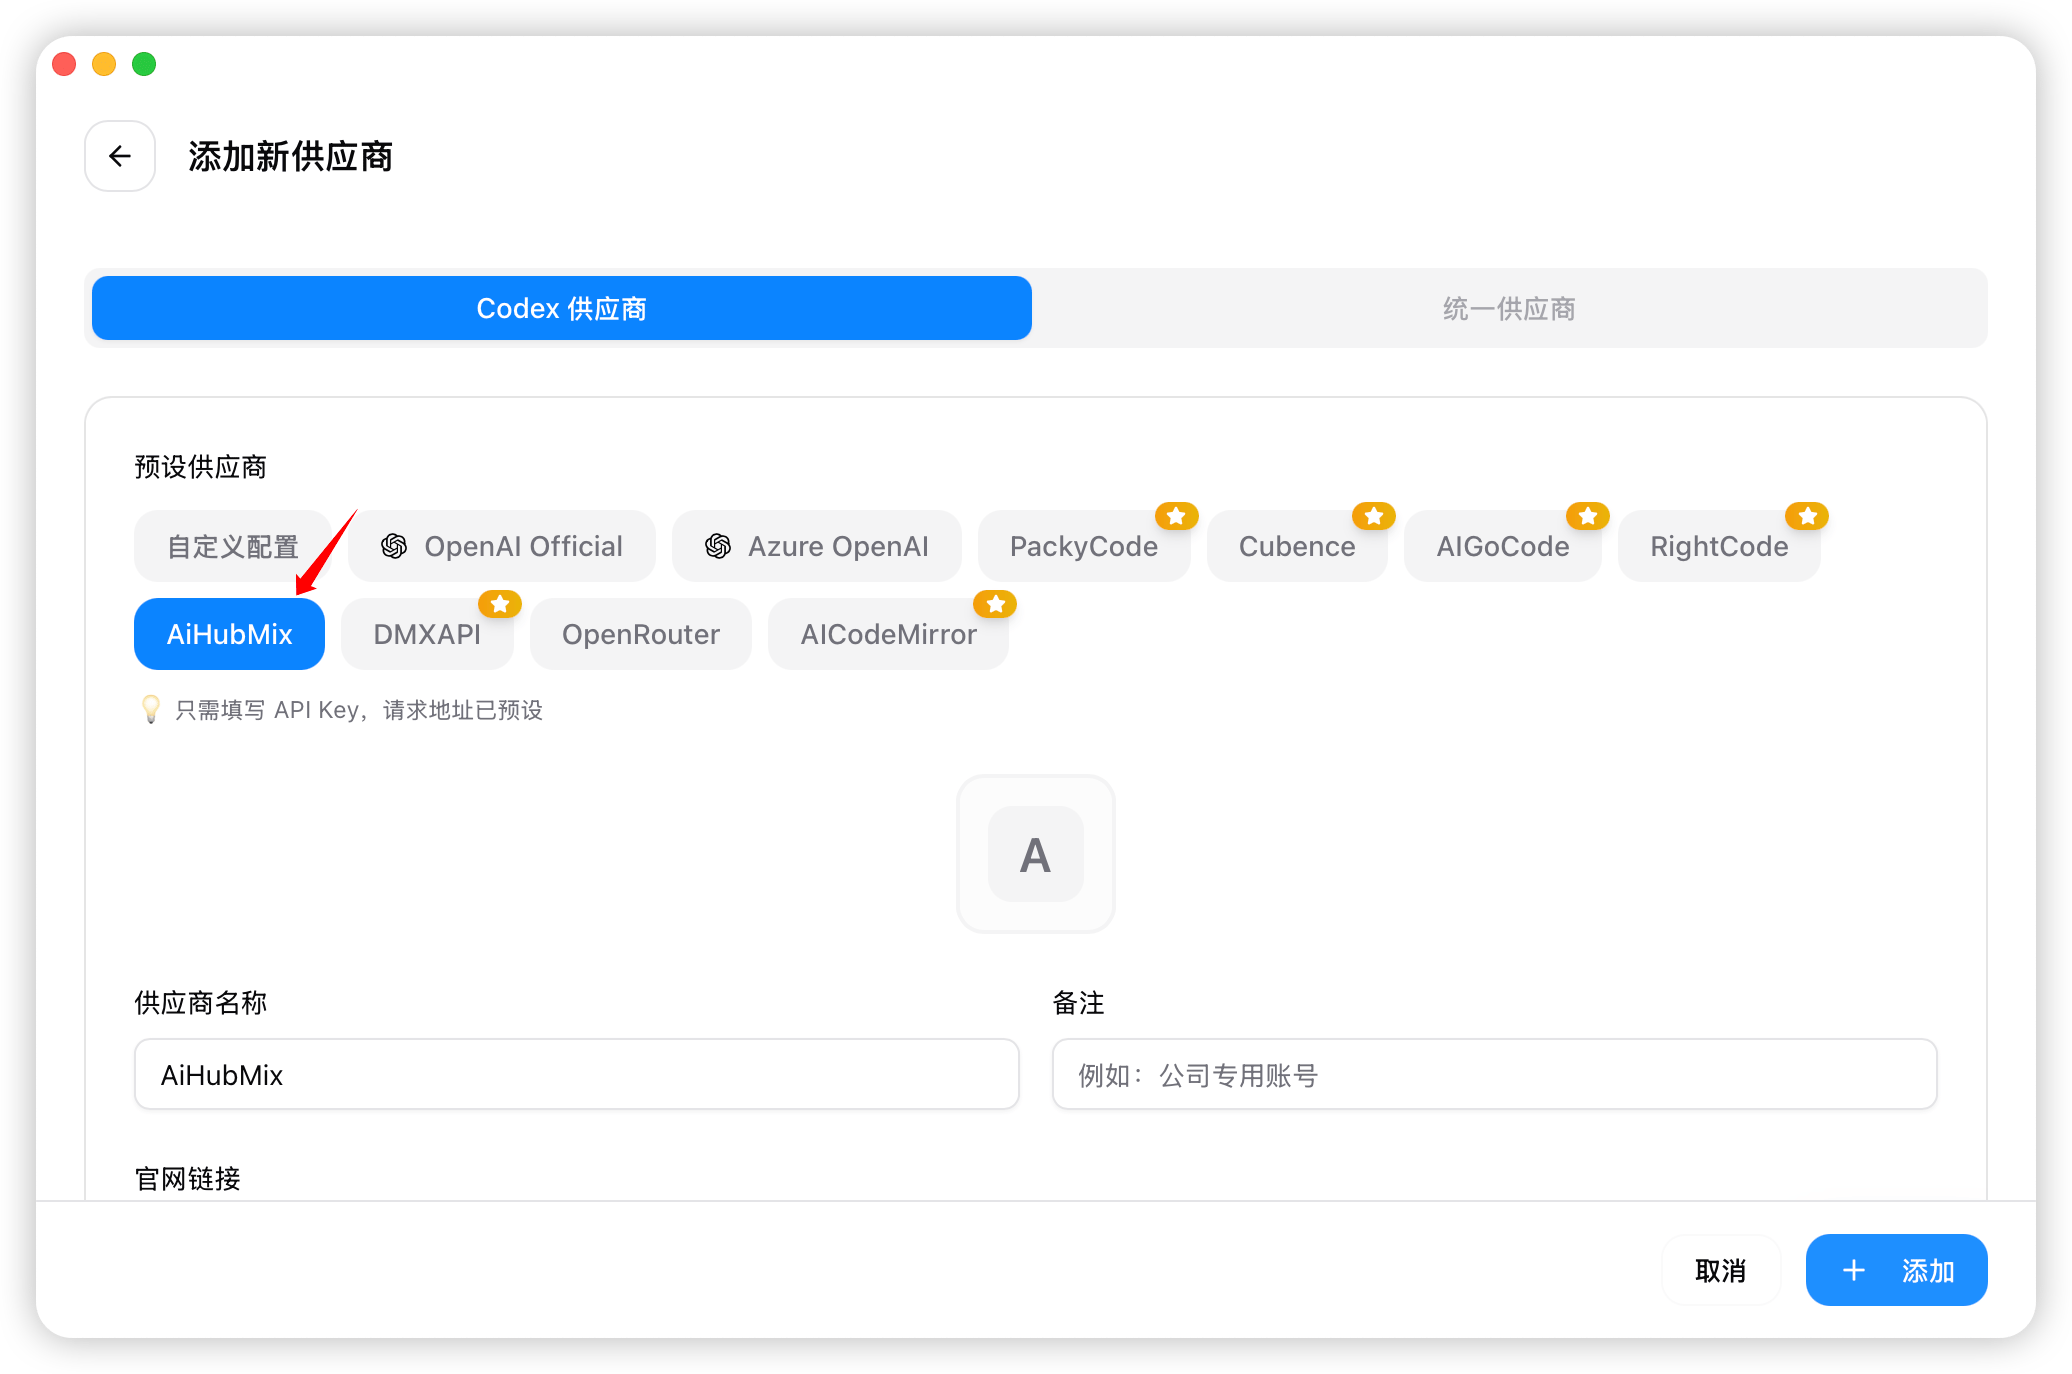
 2. 在预设列表中选择「AiHubMix」。
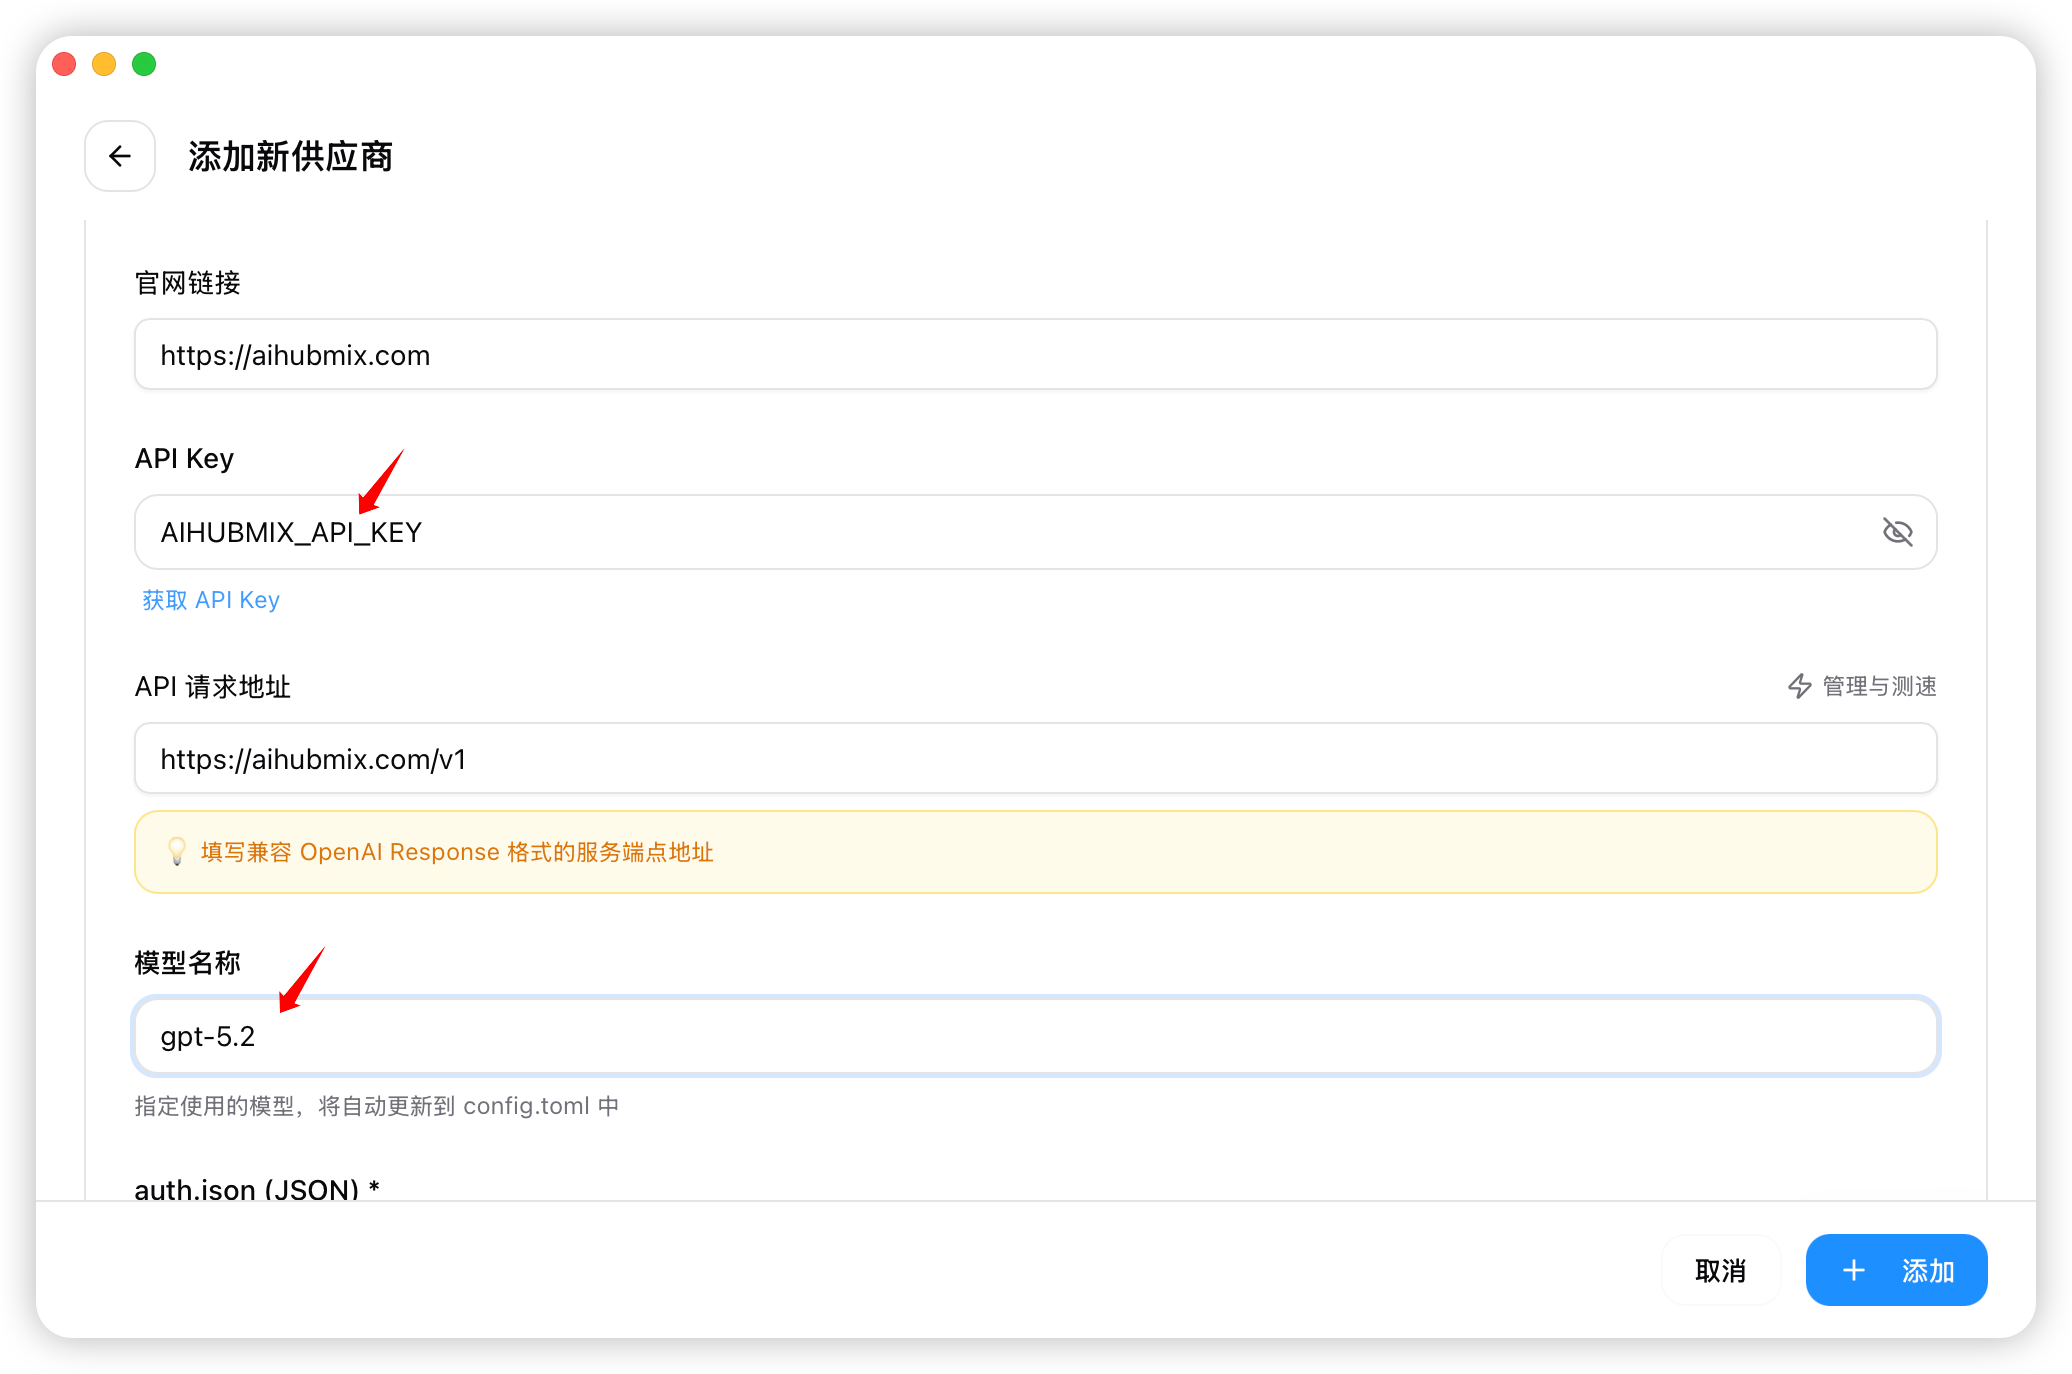
 3. 在「API Key」栏中填写你的密钥并点击「添加」保存设置。
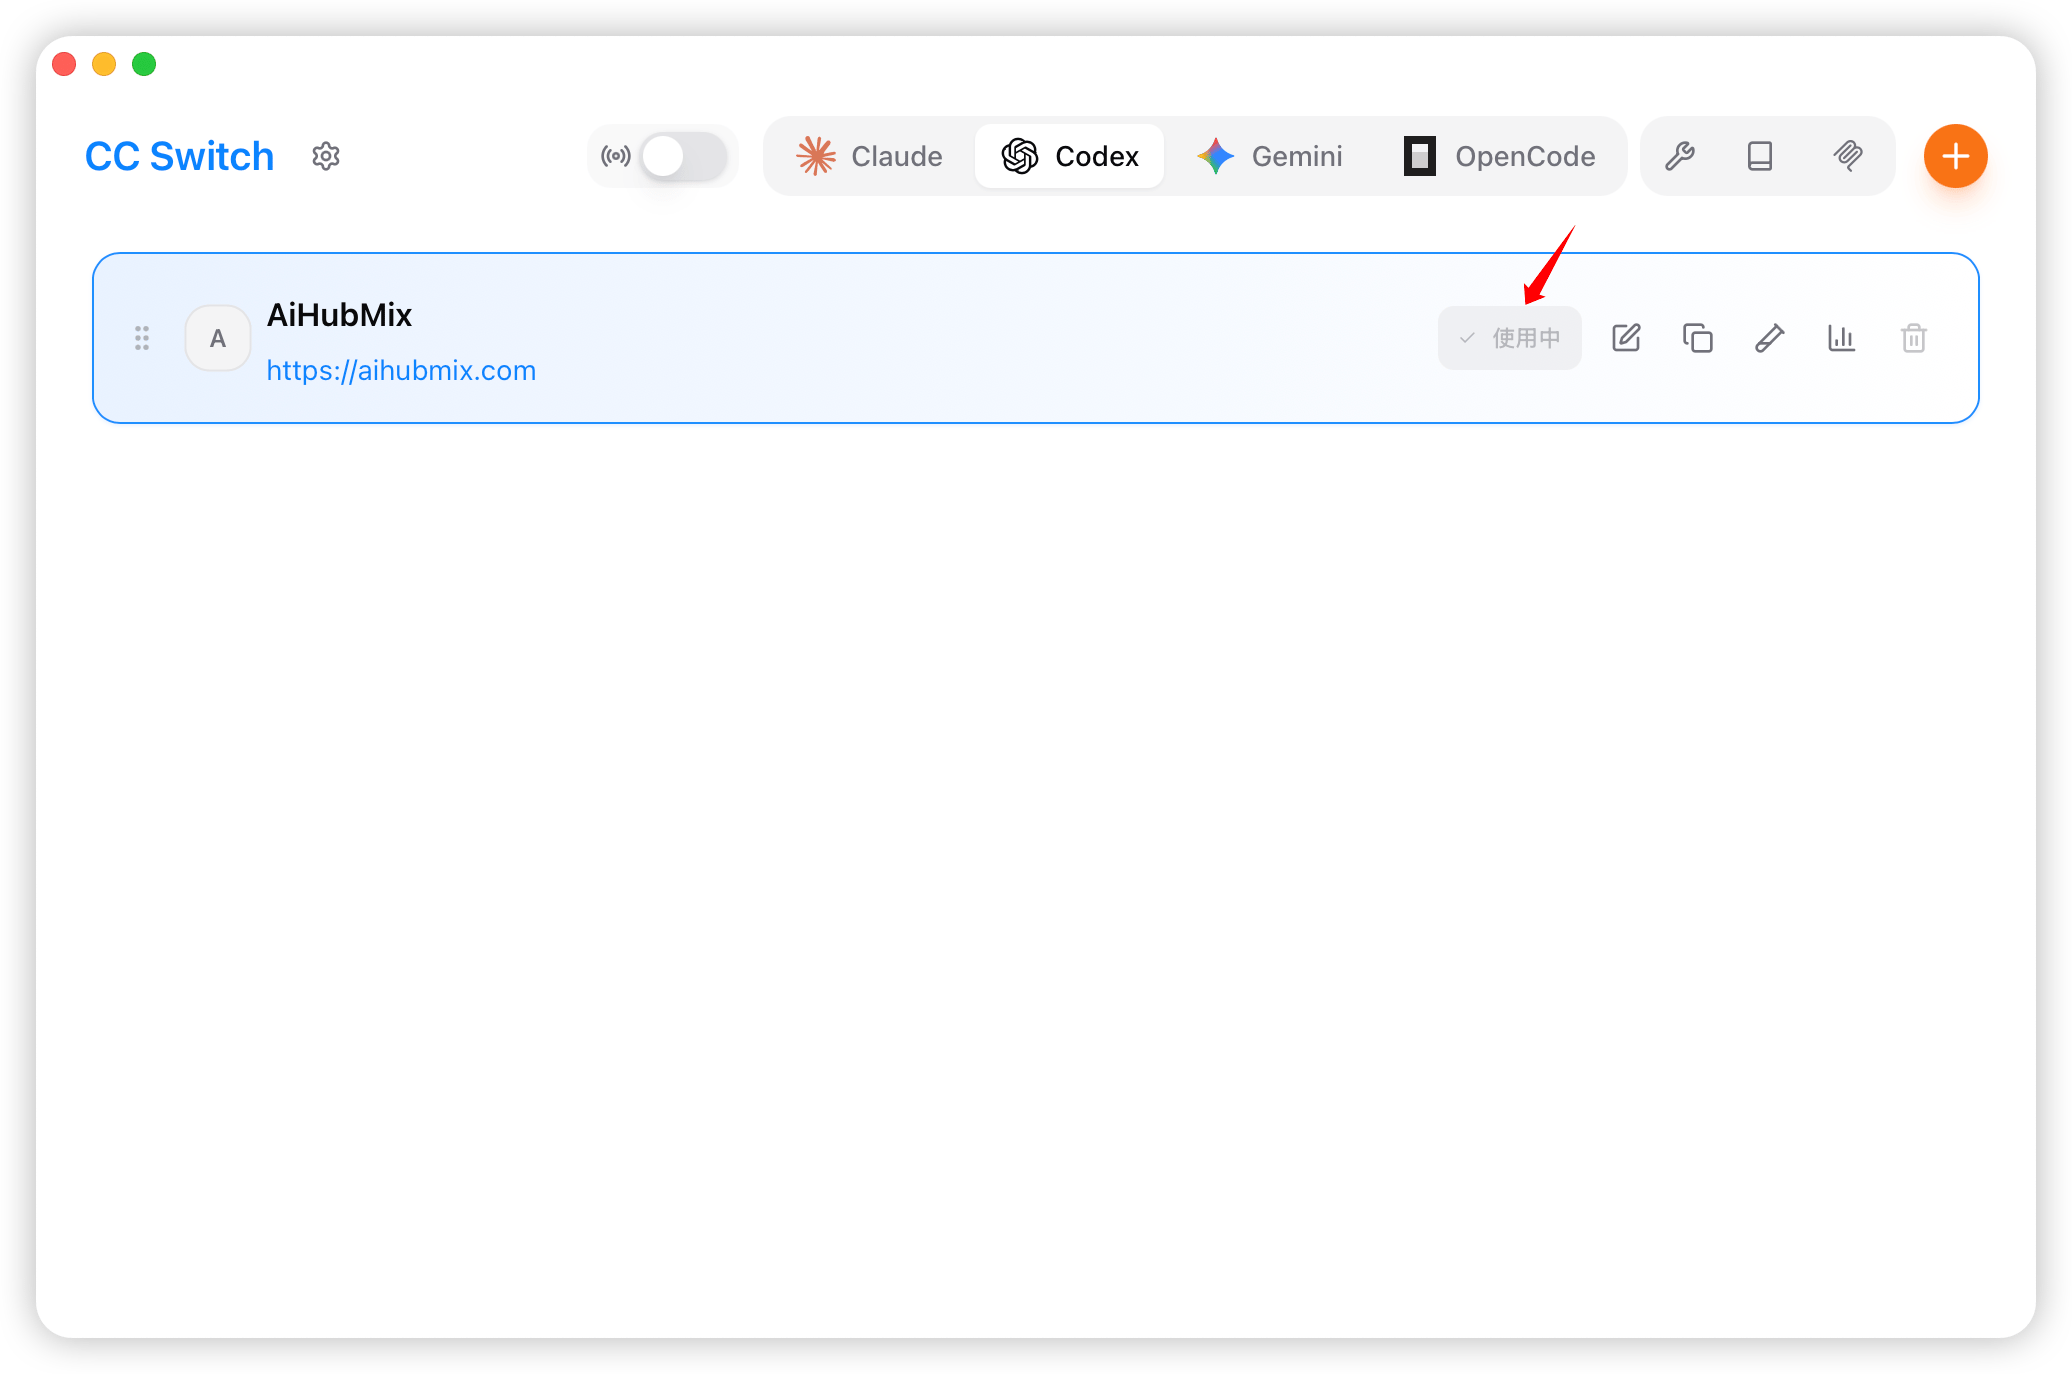
 4. 返回首页,在供应商列表中选择「AiHubMix」,点击「启用」即可使用。
 ## 使用 Codex
### 在终端中使用
1. 打开终端,定位到你的项目目录,然后运行 `codex` 命令。
```bash theme={null}
cd /你的项目路径
codex
```
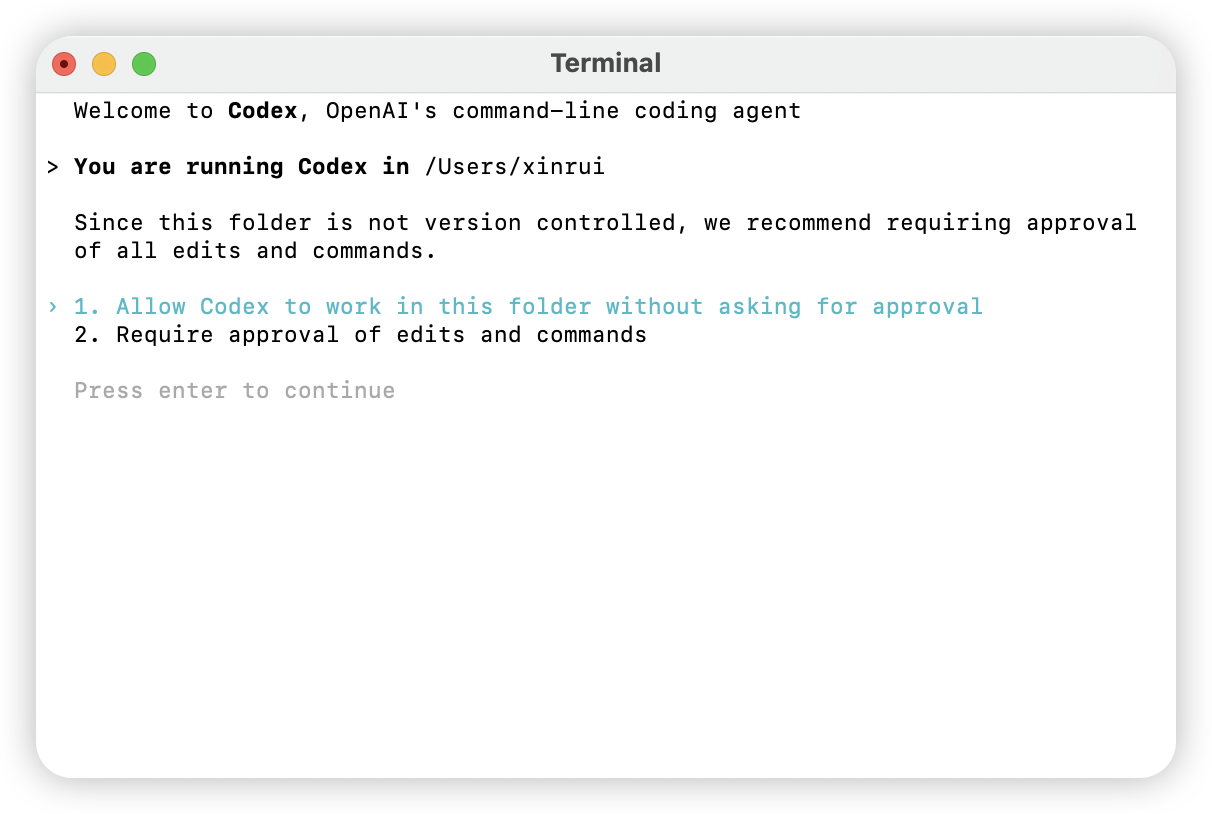
2. 根据需求,设置权限。
## 使用 Codex
### 在终端中使用
1. 打开终端,定位到你的项目目录,然后运行 `codex` 命令。
```bash theme={null}
cd /你的项目路径
codex
```
2. 根据需求,设置权限。
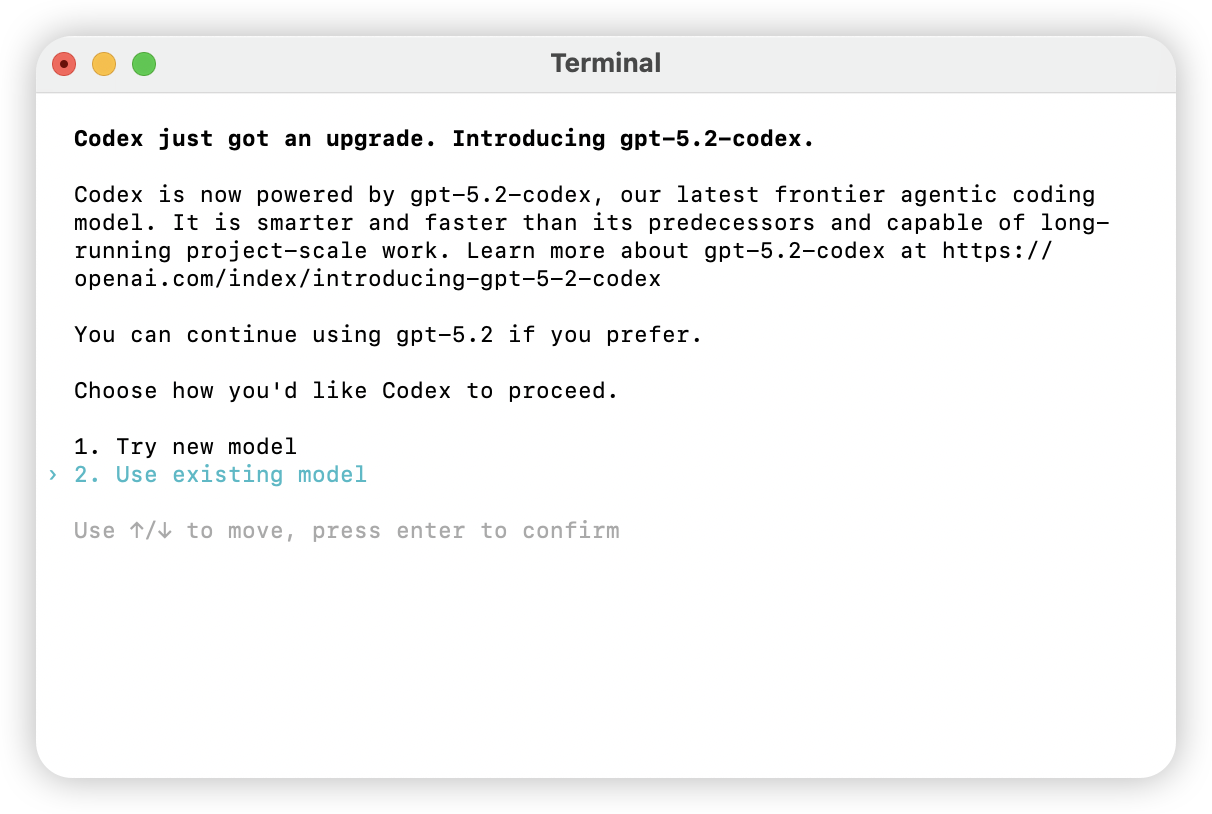
 3. 根据需求,选择需要使用的模型。
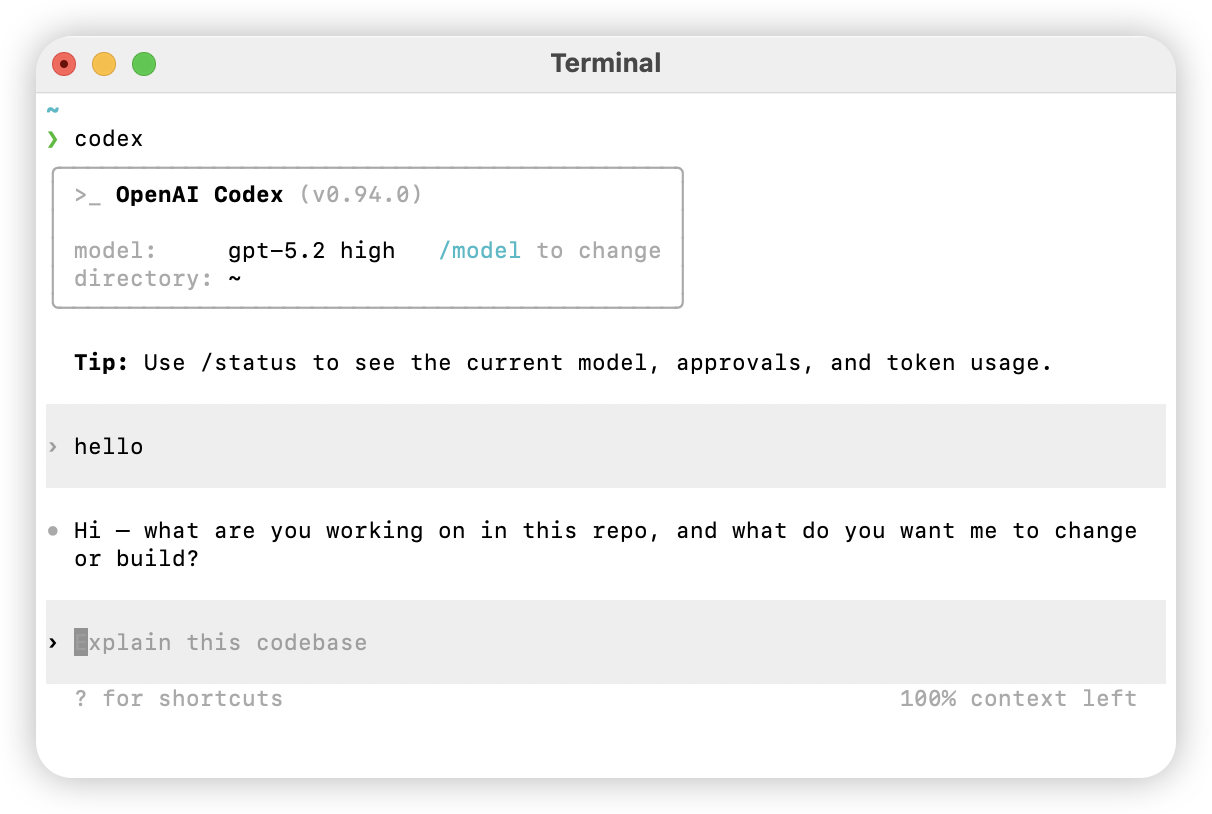
 4. 输入自然语言,若正常响应,则配置成功。
 ### 在 Codex 桌面端使用
1. 打开 Codex 桌面端,选择工作目录。
2. 在输入框输入任务,若正常响应,则配置成功。
### 在 Codex 桌面端使用
1. 打开 Codex 桌面端,选择工作目录。
2. 在输入框输入任务,若正常响应,则配置成功。
 ## 实用命令参考
### 帮助命令
```bash theme={null}
codex -h
```
### 完整命令选项
```bash theme={null}
Usage
$ codex [options]
Options
-h, --help 显示帮助信息并退出
-m, --model 指定使用的模型 (默认: codex-mini-latest)
-i, --image 包含图像输入的文件路径
-v, --view 查看之前保存的会话记录
-q, --quiet 非交互模式,仅打印助手的最终输出
-a, --approval-mode 覆盖审批策略: 'suggest', 'auto-edit', 或 'full-auto'
--auto-edit 自动批准文件编辑;仍会提示确认命令
--full-auto 自动批准沙箱环境中的编辑和命令
--no-project-doc 不自动包含仓库中的 'codex.md' 文件
--project-doc 包含指定的 Markdown 文件作为上下文
--full-stdout 不截断命令输出的 stdout/stderr
危险选项
--dangerously-auto-approve-everything
跳过所有确认提示并直接执行命令(无沙箱保护)
仅用于临时本地测试环境
实验性选项
-f, --full-context 以"完整上下文"模式启动,将整个仓库加载到上下文中
并在一次操作中应用批量编辑
仅兼容 --model 参数
示例
$ codex "编写并运行一个打印 ASCII 艺术的 Python 程序"
$ codex -q "修复构建问题"
```
## 实用命令参考
### 帮助命令
```bash theme={null}
codex -h
```
### 完整命令选项
```bash theme={null}
Usage
$ codex [options]
Options
-h, --help 显示帮助信息并退出
-m, --model 指定使用的模型 (默认: codex-mini-latest)
-i, --image 包含图像输入的文件路径
-v, --view 查看之前保存的会话记录
-q, --quiet 非交互模式,仅打印助手的最终输出
-a, --approval-mode 覆盖审批策略: 'suggest', 'auto-edit', 或 'full-auto'
--auto-edit 自动批准文件编辑;仍会提示确认命令
--full-auto 自动批准沙箱环境中的编辑和命令
--no-project-doc 不自动包含仓库中的 'codex.md' 文件
--project-doc 包含指定的 Markdown 文件作为上下文
--full-stdout 不截断命令输出的 stdout/stderr
危险选项
--dangerously-auto-approve-everything
跳过所有确认提示并直接执行命令(无沙箱保护)
仅用于临时本地测试环境
实验性选项
-f, --full-context 以"完整上下文"模式启动,将整个仓库加载到上下文中
并在一次操作中应用批量编辑
仅兼容 --model 参数
示例
$ codex "编写并运行一个打印 ASCII 艺术的 Python 程序"
$ codex -q "修复构建问题"
```
在 Codex 中使用自定义模型
Codex 默认只在 `/model` 列表里展示 OpenAI 官方模型。如果你想直接从列表中选择 AIHubMix 上的任意模型(GLM、Claude、Gemini、DeepSeek、Kimi、Qwen……),可以用官方支持的「自定义模型」机制:通过一个本地 JSON 文件(`model_catalog_json`)声明可选模型,再用 `[model_providers.aihubmix]` 把请求指向 AIHubMix。
> 官方说明:[Advanced Configuration · OSS mode / local providers](https://developers.openai.com/codex/config-advanced)
### 两种接入方式
本页前面「环境变量配置」讲的是**基础方式**,本节讲的是**自定义模型方式**,区别如下,按需选择:
| | 基础方式(profile + 单模型) | 自定义模型方式(本节) |
| ---- | ------------------------------------- | -------------------------------- |
| 配置内容 | 在 `config.toml` 里写死一个 `model = "xxx"` | 额外维护一个 `model_catalog_json` 目录文件 |
| 切换模型 | 改配置文件后重启 | 直接在 `/model` 列表里点选,随时切 |
| 适合场景 | 长期固定用某一个模型 | 想在多个模型间频繁对比 / 切换 |
| 复杂度 | 低 | 中 |
整体流程只有 4 步:**生成目录文件 → 改 `config.toml` → 设环境变量 → 重启选模型**。
### 第 1 步:生成模型目录文件
目录文件是一个 `{ "models": [ ... ] }` 结构,数组里每个元素描述一个可在 `/model` 里选择的模型。下面先用**一个固定模型**讲清字段,再给**批量生成前 30 名**的脚本。
#### 1.1 先理解格式:固定一个模型
下面是一份**已验证可被 Codex 解析**的最小完整目录(只含 `glm-5.2` 一个模型)。直接存成 `~/.codex/model-catalogs/custom-models.json` 就能用;想要更多模型,就往 `models` 数组里继续追加同样结构的条目。
```json theme={null}
{
"models": [
{
"slug": "glm-5.2",
"display_name": "GLM 5.2",
"description": "GLM 5.2 (via AIHubMix)",
"context_window": 1000000,
"max_context_window": 1000000,
"supported_reasoning_levels": [
{ "effort": "low", "description": "Fast responses" },
{ "effort": "medium", "description": "Balanced" },
{ "effort": "high", "description": "Deeper reasoning" }
],
"shell_type": "shell_command",
"visibility": "list",
"supported_in_api": true,
"priority": 0,
"availability_nux": null,
"upgrade": null,
"base_instructions": "You are Codex, a coding agent.",
"supports_reasoning_summaries": true,
"support_verbosity": false,
"default_verbosity": null,
"apply_patch_tool_type": null,
"truncation_policy": { "mode": "tokens", "limit": 10000 },
"supports_parallel_tool_calls": true,
"experimental_supported_tools": []
}
]
}
```
字段说明(你通常会改的几个):
| 字段 | 作用 | 来自接口 |
| --------------------------------------- | ----------------------------------------- | ---------------- |
| `slug` | 模型 ID,Codex 用它发起请求,必须与接口返回的 `model_id` 一致 | `model_id` |
| `display_name` | `/model` 列表里显示的名字 | `model_name` |
| `context_window` / `max_context_window` | 上下文窗口。**不写会回退到很小的保守默认值**,建议按接口真实值填 | `context_length` |
| `supported_reasoning_levels` | 推理档位,切换模型后用 `/model` 还能选 effort | — |
| `visibility` | 设为 `list` 才会出现在选择器中 | — |
| `priority` | 列表排序,数字越小越靠前 | — |
**其余字段是必填且值固定的**:`base_instructions`、`availability_nux`、`upgrade`、`supports_reasoning_summaries`、`support_verbosity`、`default_verbosity`、`apply_patch_tool_type`、`truncation_policy`、`supports_parallel_tool_calls`、`experimental_supported_tools`。新版 Codex(已在 `codex-cli 0.130.0` 上验证)严格解析,**少任何一个,整份目录都会被丢弃**并回退到内置目录,报错形如 `missing field base_instructions`,表现就是「`/model` 里一个自定义模型都看不到」。所以上面这份示例不能再删字段。
关于 `base_instructions`:它是该模型的**系统提示词**。示例里用一句话占位,模型能正常跑;想要最接近原生 Codex 的编码表现,把它换成 `codex debug models --bundled` 里任一内置模型的完整 `base_instructions`(下一节的批量脚本就是这么做的)。
官方目录用 **snake\_case** 字段(`display_name`、`supported_in_api`、`visibility`)。两类错误都会让整份目录被丢弃、`/model` 里看不到模型:缺必填字段会报 `missing field ...`;用了 `displayName`、`hidden` 这类 camelCase 旧格式或不认识的取值会报 `unknown variant ...`。以本文这套字段为准即可避开。
#### 1.2 批量生成前 30 名
手写多个条目容易漏字段。要把 [AIHubMix 模型列表接口](https://aihubmix.com/api/v1/models?type=llm) 的前 30 个 LLM 一次性写进目录,用下面的脚本——它**以一个内置模型为模板克隆**,必填字段(含正确的 `base_instructions`)天生齐全,跨 Codex 版本都不缺。需要 `curl`、`python3` 和已安装的 `codex` CLI:
```bash theme={null}
mkdir -p ~/.codex/model-catalogs
# 1) 取一个内置模型当模板:它自带 base_instructions 等全部必填字段
codex debug models --bundled > /tmp/_tpl.json
# 2) 拉 AIHubMix 模型列表
curl -s "https://aihubmix.com/api/v1/models?type=llm" > /tmp/_aihubmix.json
# 3) 克隆模板逐个生成条目,只覆盖每个模型独有的字段
python3 - <<'PY' > ~/.codex/model-catalogs/custom-models.json
import json, sys
tpl = json.load(open("/tmp/_tpl.json"))["models"][0] # 任意内置模型当模板
api = json.load(open("/tmp/_aihubmix.json"))["data"]
# 跳过图像生成模型(types 含 image_generation),再取前 30
api = [m for m in api if "image_generation" not in (m.get("types") or "")][:30]
out = []
for i, m in enumerate(api):
e = dict(tpl) # 克隆模板的全部字段
ctx = m.get("context_length") or 200000
e["slug"] = m["model_id"] # 必须与接口 model_id 一致
e["display_name"] = m.get("model_name") or m["model_id"]
e["description"] = (m.get("model_name") or m["model_id"]) + " (via AIHubMix)"
e["context_window"] = ctx
e["max_context_window"] = ctx
e["visibility"] = "list"
e["supported_in_api"] = True
e["priority"] = i
e["availability_nux"] = None
e["upgrade"] = None
out.append(e)
json.dump({"models": out}, sys.stdout, ensure_ascii=False, indent=2)
PY
```
脚本只覆盖每个模型独有的字段(`slug`、`display_name`、`description`、`context_window` 等),其余必填字段全部从内置模板克隆而来——这正是 1.1 里那套字段,只是 `base_instructions` 用的是完整官方提示词。
> 生成的文件较大(每个条目都含完整 `base_instructions`,约 1~2 MB),属正常现象。运行后用 `codex debug models` 验证能否被正确解析(见第 5 步)。
> 脚本里那行 `image_generation` 过滤是有意保留的:`type=llm` 的返回中有极少数模型同时带 `image_generation` 标签(如 `gpt-image-2`),不适合对话,脚本会自动跳过后再取前 30。
### 第 2 步:修改 `config.toml`
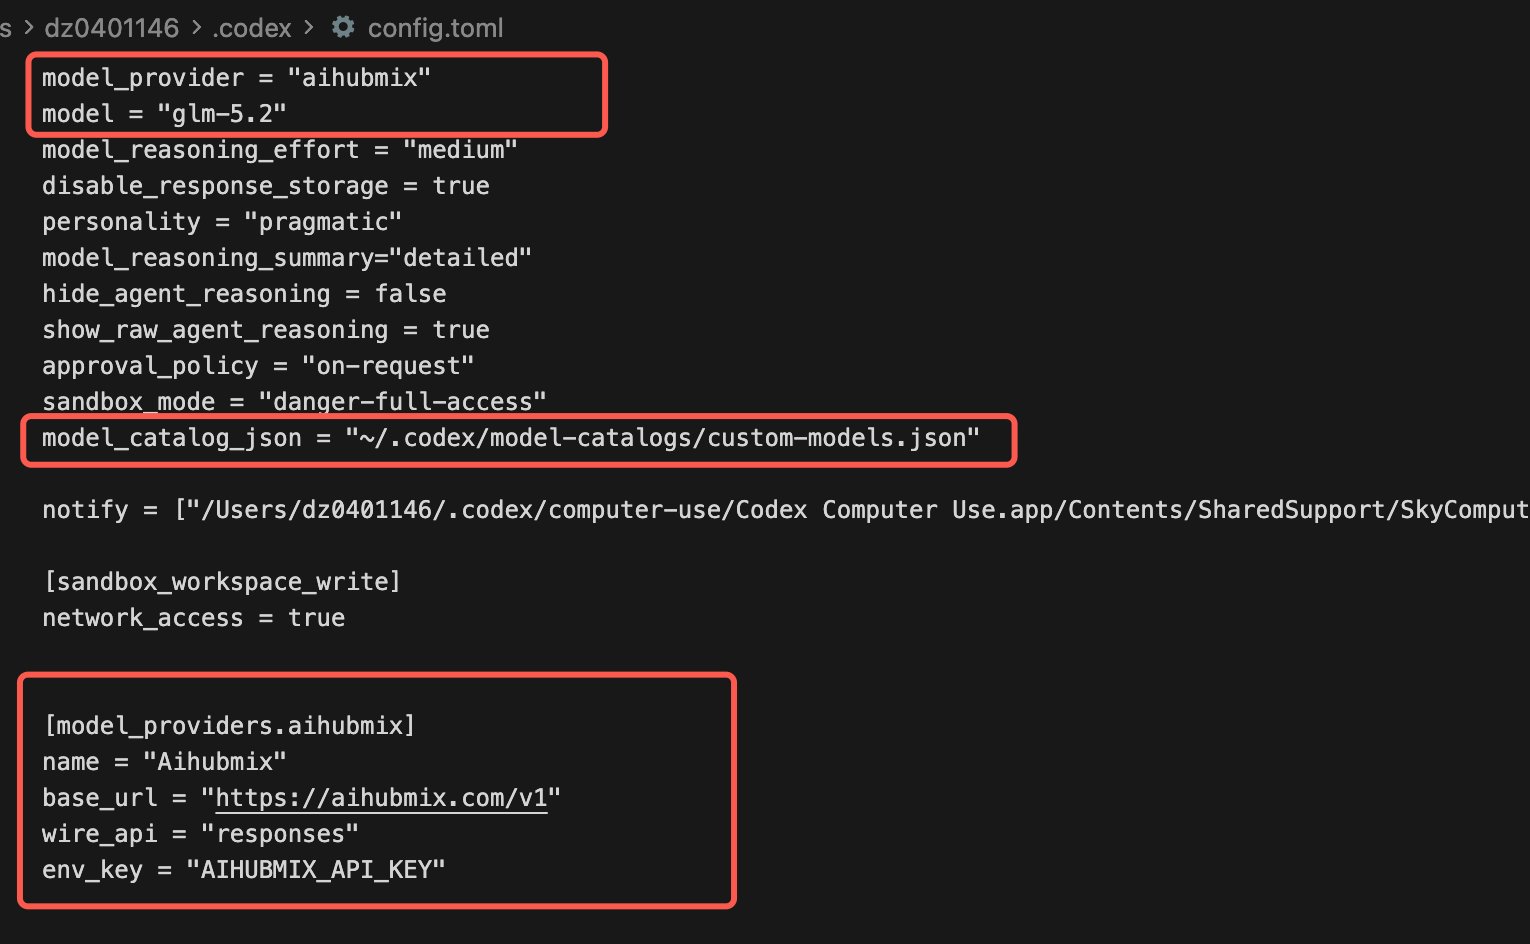
编辑 `~/.codex/config.toml`,在**根级别**加上 `model_catalog_json`,并定义 `aihubmix` provider:
```toml theme={null}
# ⚠️ model_catalog_json 必须写在根级别,不能放进 [model_providers.*] 段里
model_provider = "aihubmix"
model_catalog_json = "~/.codex/model-catalogs/custom-models.json"
[model_providers.aihubmix]
name = "Aihubmix"
base_url = "https://aihubmix.com/v1"
wire_api = "responses"
env_key = "AIHUBMIX_API_KEY"
```
`wire_api = "responses"` 是关键,**漏写或写成 `chat` 都连不上**。Codex 新版只走 OpenAI 的 Responses API(`/v1/responses`),AIHubMix 已原生兼容 Responses API,所以直接指向 `https://aihubmix.com/v1` 即可,无需自建转换代理。
如果想顺便指定**默认模型**和**默认推理档位**(启动时直接用,不用每次手点),可以用这份更完整的配置:
```toml theme={null}
model = "glm-5.2" # 启动默认模型,需在目录文件里存在
model_provider = "aihubmix"
model_catalog_json = "~/.codex/model-catalogs/custom-models.json"
model_reasoning_effort = "high" # 默认推理档位:minimal / low / medium / high
[model_providers.aihubmix]
name = "Aihubmix"
base_url = "https://aihubmix.com/v1"
wire_api = "responses"
env_key = "AIHUBMIX_API_KEY"
```
配好后 `config.toml` 大致如下(红框为本步的关键项:根级别的 `model` / `model_provider` / `model_catalog_json`,以及 `[model_providers.aihubmix]` 段):
 ### 第 3 步:设置环境变量
把上面 `env_key` 指定的环境变量配好(注意 `=` 两侧不要有空格):
```bash theme={null}
export AIHUBMIX_API_KEY=sk-xxx
```
建议写进 `~/.zshrc` / `~/.bashrc` 持久化。在 [AIHubMix 控制台](https://aihubmix.com/token) 获取 Key。
### 第 4 步:重启并选择模型
重启 Codex App / TUI 让目录文件生效,然后:
```bash theme={null}
codex
# 在交互界面里输入 /model,即可看到上一步声明的 30 个模型并切换
```
输入 `/model` 后会列出目录里声明的全部模型,方向键选中、回车确认:
### 第 3 步:设置环境变量
把上面 `env_key` 指定的环境变量配好(注意 `=` 两侧不要有空格):
```bash theme={null}
export AIHUBMIX_API_KEY=sk-xxx
```
建议写进 `~/.zshrc` / `~/.bashrc` 持久化。在 [AIHubMix 控制台](https://aihubmix.com/token) 获取 Key。
### 第 4 步:重启并选择模型
重启 Codex App / TUI 让目录文件生效,然后:
```bash theme={null}
codex
# 在交互界面里输入 /model,即可看到上一步声明的 30 个模型并切换
```
输入 `/model` 后会列出目录里声明的全部模型,方向键选中、回车确认:
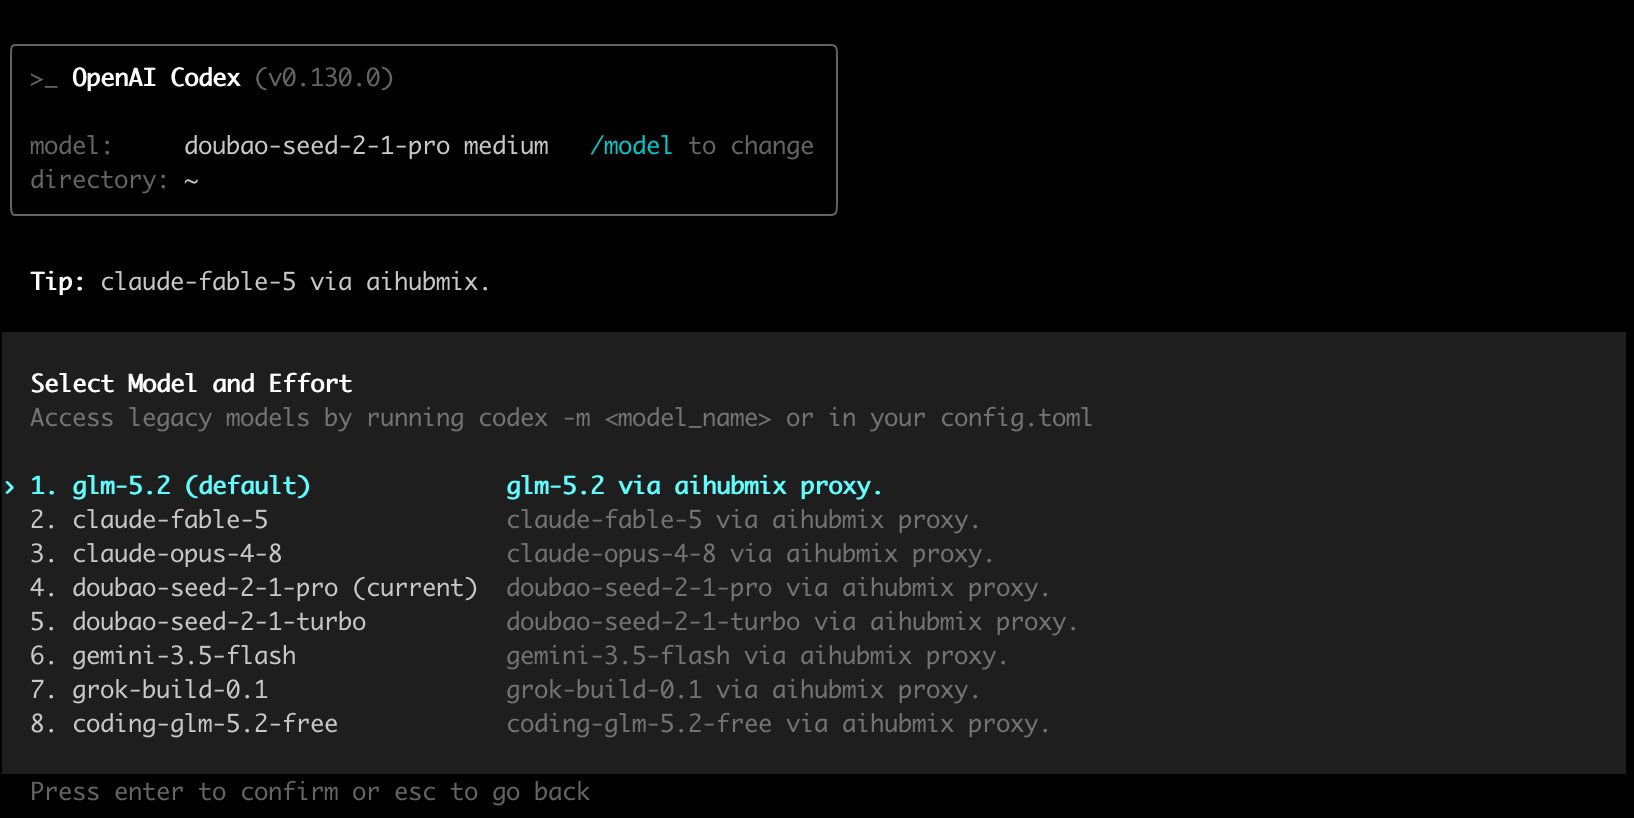 选中模型后,`/model` 还会让你选推理档位(effort),按需求选 `low` / `medium` / `high` 即可。
### 第 5 步:验证是否生效
1. 进入 Codex 后输入 `/model`,确认能看到目录里声明的模型,并切到其中一个(如 `glm-5.2`)。
2. 随便提一个问题验证链路打通。注意:**不要靠「你是哪个模型」来判断**——`base_instructions` 里写着「You are Codex... based on GPT-5」,所有模型都会照此自称 GPT-5,问了也分辨不出真实模型。要确认实际调用的模型,登录 [AIHubMix 控制台](https://aihubmix.com/token)「日志」页看那条请求记录的 `model_id`,这才是真相。
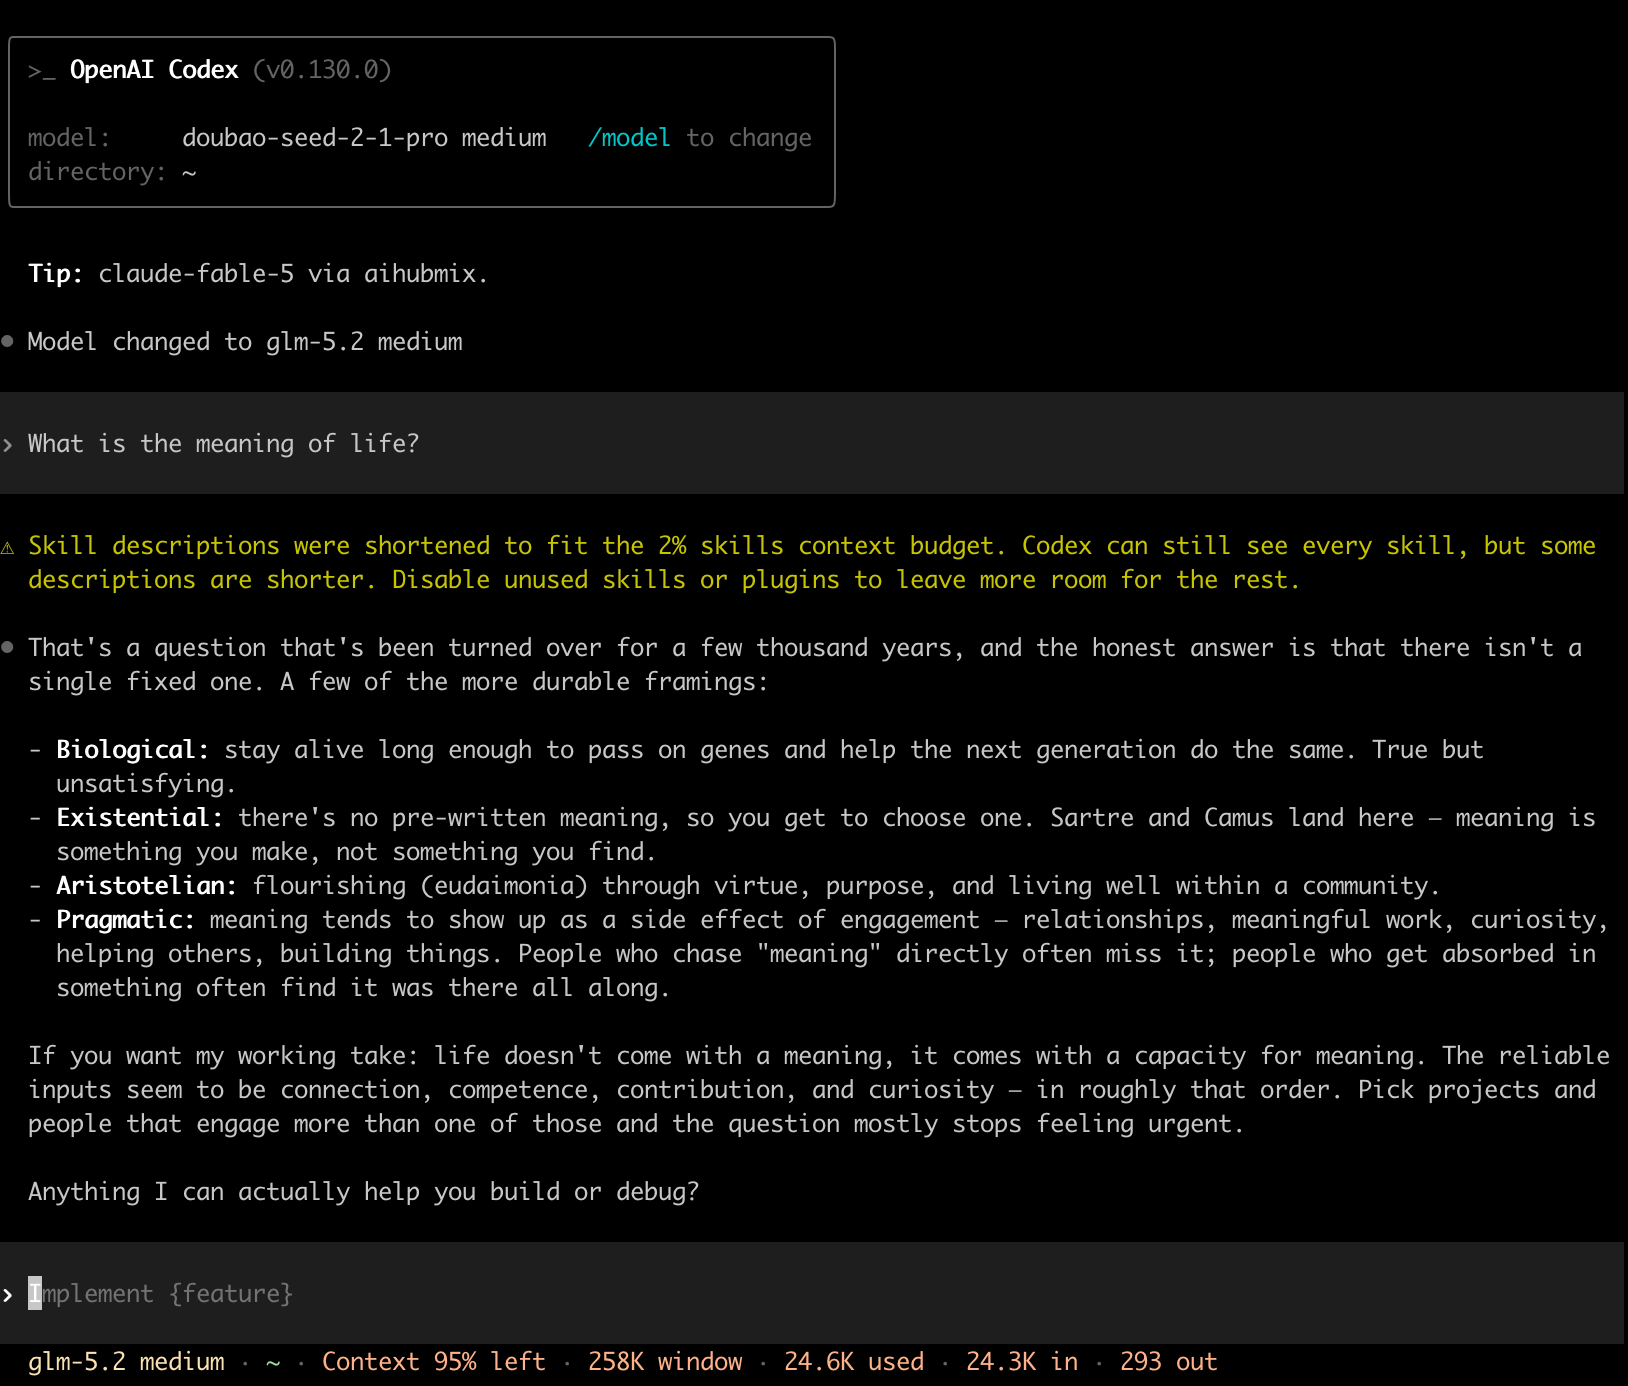
切换成功后顶部会提示 `Model changed to ...`,底部状态栏也会显示当前模型与上下文窗口(下图切到了 `glm-5.2`,窗口 258K):
选中模型后,`/model` 还会让你选推理档位(effort),按需求选 `low` / `medium` / `high` 即可。
### 第 5 步:验证是否生效
1. 进入 Codex 后输入 `/model`,确认能看到目录里声明的模型,并切到其中一个(如 `glm-5.2`)。
2. 随便提一个问题验证链路打通。注意:**不要靠「你是哪个模型」来判断**——`base_instructions` 里写着「You are Codex... based on GPT-5」,所有模型都会照此自称 GPT-5,问了也分辨不出真实模型。要确认实际调用的模型,登录 [AIHubMix 控制台](https://aihubmix.com/token)「日志」页看那条请求记录的 `model_id`,这才是真相。
切换成功后顶部会提示 `Model changed to ...`,底部状态栏也会显示当前模型与上下文窗口(下图切到了 `glm-5.2`,窗口 258K):
 ## 自定义模型常见问题
* **`/model` 里看不到自定义模型?** 按先后顺序排查:
1. **先跑 `codex debug models`**。若报 `missing field ...`(最常见,缺必填字段)或 `unknown variant ...`(字段名/取值不对),说明整份目录解析失败被丢弃——用第 1 步「克隆内置模板」脚本重新生成即可。
2. 确认 `model_catalog_json` 写在 `config.toml` **根级别**,不在 `[model_providers.*]` 段里;
3. 确认 JSON 用的是 snake\_case 官方字段、`visibility` 为 `list`;
4. 如果 `codex debug models` 已经能看到全部模型,但\*\*桌面端(Desktop App)\*\*里只剩一两个、当前模型显示为「自定义」——这是桌面端的已知 bug:它会在本地目录之上再套一层官方 slug 白名单过滤,把非官方模型从选择器里删掉(见 GitHub Issue [#19694](https://github.com/openai/codex/issues/19694)、[#15138](https://github.com/openai/codex/issues/15138))。此时模型其实仍按 `config.toml` 里的 `model = "..."` 正常调用(去 AIHubMix 日志可证实),只是名字显示不出来。**要正确显示就用终端 `codex` CLI / TUI**;桌面端只能直接在 `config.toml` 里写死 `model = "你要的模型"`,等官方修复。
* **目录是「替换」不是「合并」。** `model_catalog_json` 会**替换**整个模型列表,而不是追加(实测:目录里只放 2 个模型,`codex debug models` 就只剩这 2 个,内置的 `gpt-5.x` 全部消失)。如果你两类都想要,就把它们一并写进自定义目录。
* **请求报协议错误 / 连不上。** 多半是 provider 的 `base_url` 或 `wire_api` 没配对。AIHubMix 必须 `wire_api = "responses"` + `base_url = "https://aihubmix.com/v1"`。若你接的是只支持 Chat Completions 的第三方,则需要本地转换代理,AIHubMix 用户无需此步。
* **频繁 “Reconnecting” 重连。** 部分网络/代理环境下 WebSocket(WSS)不通,可在 provider 段加 `supports_websockets = false` 强制走 HTTP。
* **解析报 `missing field ...`(如 `missing field base_instructions`)。** 条目缺了必填字段。新版 Codex 严格解析,`base_instructions`、`availability_nux`、`upgrade`、`supports_reasoning_summaries`、`support_verbosity`、`default_verbosity`、`apply_patch_tool_type`、`truncation_policy`、`supports_parallel_tool_calls`、`experimental_supported_tools` 等都必须存在。用第 1 步「克隆内置模板」脚本可一次性补齐。
* **解析报 `unknown variant`。** 目录 JSON 里有 Codex 不认识的字段名或取值(常见于 `displayName`/`hidden` 等 camelCase 旧格式)。改用本文的 snake\_case 字段集即可。
## 相关文档
* [模型智能路由](/cn/api/llm-router):把模型名填 `auto`,由网关按请求自动选最优模型。
* [模型列表 API](/cn/api/Models-API):查询 AIHubMix 上全部可用模型与其 `model_id`。
* [应用标识码 App-Code](/cn/api/App-code):接入后多数模型享 10% 优惠。
* [AIHubMix CLI](/cn/api/aihubmix-cli):在终端查询余额、管理 API Key、查看可用模型。
## 参考文章
* 官方文档:[Advanced Configuration](https://developers.openai.com/codex/config-advanced) | [Configuration Reference](https://developers.openai.com/codex/config-reference)
* 官方内置目录格式参考:[codex-rs/models-manager/models.json](https://github.com/openai/codex/blob/main/codex-rs/models-manager/models.json)
* 社区指南:[Codex config.toml:6 行接入任意自定义 provider](https://www.morphllm.com/codex-provider-configuration)
***
更新时间:2026-06-25
## 自定义模型常见问题
* **`/model` 里看不到自定义模型?** 按先后顺序排查:
1. **先跑 `codex debug models`**。若报 `missing field ...`(最常见,缺必填字段)或 `unknown variant ...`(字段名/取值不对),说明整份目录解析失败被丢弃——用第 1 步「克隆内置模板」脚本重新生成即可。
2. 确认 `model_catalog_json` 写在 `config.toml` **根级别**,不在 `[model_providers.*]` 段里;
3. 确认 JSON 用的是 snake\_case 官方字段、`visibility` 为 `list`;
4. 如果 `codex debug models` 已经能看到全部模型,但\*\*桌面端(Desktop App)\*\*里只剩一两个、当前模型显示为「自定义」——这是桌面端的已知 bug:它会在本地目录之上再套一层官方 slug 白名单过滤,把非官方模型从选择器里删掉(见 GitHub Issue [#19694](https://github.com/openai/codex/issues/19694)、[#15138](https://github.com/openai/codex/issues/15138))。此时模型其实仍按 `config.toml` 里的 `model = "..."` 正常调用(去 AIHubMix 日志可证实),只是名字显示不出来。**要正确显示就用终端 `codex` CLI / TUI**;桌面端只能直接在 `config.toml` 里写死 `model = "你要的模型"`,等官方修复。
* **目录是「替换」不是「合并」。** `model_catalog_json` 会**替换**整个模型列表,而不是追加(实测:目录里只放 2 个模型,`codex debug models` 就只剩这 2 个,内置的 `gpt-5.x` 全部消失)。如果你两类都想要,就把它们一并写进自定义目录。
* **请求报协议错误 / 连不上。** 多半是 provider 的 `base_url` 或 `wire_api` 没配对。AIHubMix 必须 `wire_api = "responses"` + `base_url = "https://aihubmix.com/v1"`。若你接的是只支持 Chat Completions 的第三方,则需要本地转换代理,AIHubMix 用户无需此步。
* **频繁 “Reconnecting” 重连。** 部分网络/代理环境下 WebSocket(WSS)不通,可在 provider 段加 `supports_websockets = false` 强制走 HTTP。
* **解析报 `missing field ...`(如 `missing field base_instructions`)。** 条目缺了必填字段。新版 Codex 严格解析,`base_instructions`、`availability_nux`、`upgrade`、`supports_reasoning_summaries`、`support_verbosity`、`default_verbosity`、`apply_patch_tool_type`、`truncation_policy`、`supports_parallel_tool_calls`、`experimental_supported_tools` 等都必须存在。用第 1 步「克隆内置模板」脚本可一次性补齐。
* **解析报 `unknown variant`。** 目录 JSON 里有 Codex 不认识的字段名或取值(常见于 `displayName`/`hidden` 等 camelCase 旧格式)。改用本文的 snake\_case 字段集即可。
## 相关文档
* [模型智能路由](/cn/api/llm-router):把模型名填 `auto`,由网关按请求自动选最优模型。
* [模型列表 API](/cn/api/Models-API):查询 AIHubMix 上全部可用模型与其 `model_id`。
* [应用标识码 App-Code](/cn/api/App-code):接入后多数模型享 10% 优惠。
* [AIHubMix CLI](/cn/api/aihubmix-cli):在终端查询余额、管理 API Key、查看可用模型。
## 参考文章
* 官方文档:[Advanced Configuration](https://developers.openai.com/codex/config-advanced) | [Configuration Reference](https://developers.openai.com/codex/config-reference)
* 官方内置目录格式参考:[codex-rs/models-manager/models.json](https://github.com/openai/codex/blob/main/codex-rs/models-manager/models.json)
* 社区指南:[Codex config.toml:6 行接入任意自定义 provider](https://www.morphllm.com/codex-provider-configuration)
***
更新时间:2026-06-25